Please Consider Donating us
We are helping millions of Beginners and Professionals to learn new programming technologies.
Please consider donating us:


ASP.NET MVC Data Annotation – Server Side Validation of Controls like Textbox, Dropdownlist, Checkbox, Radiobutton & more

Whenever a form is submitted then you should ensure to do the Server Side Validation of every control so that the received data is correct and valid.
Some developers provide only client side validation and leave the server side validation. This is a wrong practice as users can disable JavaScript on their browser and bypass the Client Side Validation. Therefore always make sure to do Server Side Validation in your project.
Server Side Validation Method in ASP.NET MVC
In ASP.NET MVC application we can do the Server Side Validation on the Model using Data Annotations.
Data Annotations is a namespace that provides attribute classes, and these classes define metadata for controls. In MVC we decorate Model Properties with these attribute classes to provide metadata.
This metadata describes a set of rules that are used to validate model properties. MVC Provides large number of Data Annotations class. Some important ones are:
| Name | Definition |
|---|---|
| [Required] | Data field is required. |
| [RegularExpression(string pattern)] | Data field value must match the specified regular expression pattern. |
| [Range(int minimum, int maximum)] | Data field value must lie within the minimum and maximum range. |
| [DataType(DataType dataType)] | Data field value must match with the specified data type. |
| [EmailAddress] | The value must be an email address. |
| [Phone] | The value must be phone number. |
In case, if you want to do the Custom Validation of a control, then you can create you our Custom Validation Attribute Class. In this class you write the validation code.
I will explain how to create Custom Attribute Class later in this tutorial.
Server Side Validation of a Form using Data Annotations
To help you understand Data Annotations I will create a Job Application form that will have a number of fields. In these fields server side validation will be performed.
The form will look like:
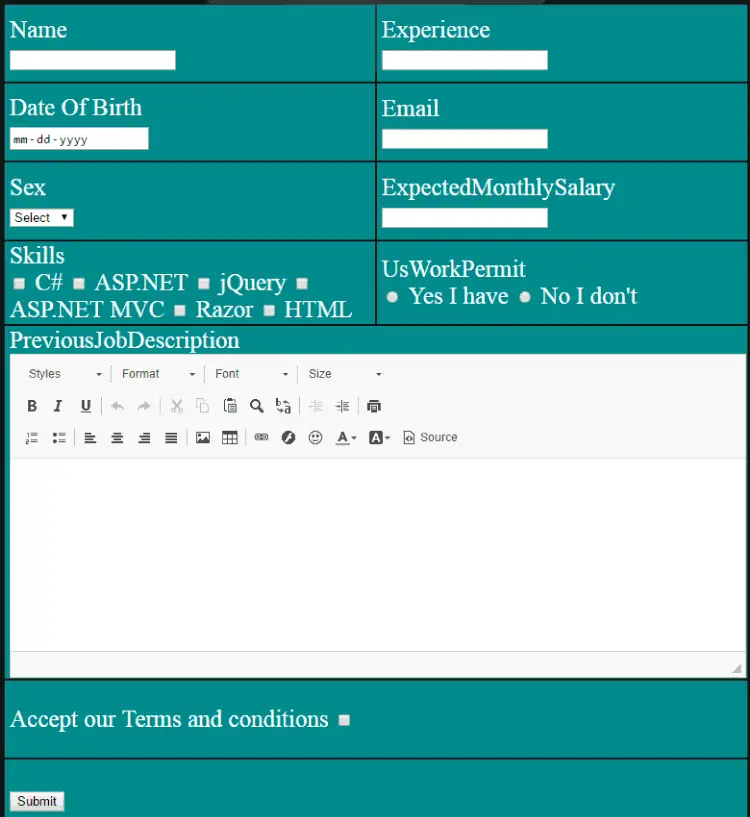
On this form there will be a button, which on clicking will submit the Job Application form. I will ensure the server side validations takes place for every field of the form.
First thing is to create a Model for this form. In this Model I will create the form fields and set the Data Annotations attributes to them.
Right click on the Model folder and create a new class, name this class as JobApplication.cs.
Add the following fields to it:
A required field with just a [Required] attribute on it.
[Required]
public string name { get; set; }
Only numbers and decimals, and should be between 3 and 15. Valid ones are – 3 , 5.7, 13, etc. For this you provide [Range] attribute to it:
[Range(3, 15, ErrorMessage = "Experience must be from 3 to 15 years")]
public int experience { get; set; }
Must be a data and between 01-25-1970 & 01-25-2000. For this field I provide 2 attributes –
a. DataType for specifying it to be of date time.
[DataType(DataType.Date)]
b. ValidBirthDate which is a custom attribute through which I do the manual server side validation.
[ValidBirthDate(ErrorMessage = "DOB Should be between 01-25-1970 & 01-25-2000")]
It will look like:
[Display(Name = "Date of Birth")]
[DataType(DataType.Date)]
[ValidBirthDate(ErrorMessage = "DOB Should be between 01-25-1970 & 01-25-2000")]
public DateTime birthDate { get; set; }
Next, I have to create this [ValidBirthDate] attribute class. I choose to create this class in a Class folder. So first create the Class folder in your project.
Then right click on this folder and add a new class to it. Name this class as CustomValidation.cs.
In this class create a new sealed class called ValidBirthDate and derive it from ValidationAttribute class.
I have to override the IsValid() method. Inside this IsValid()01-25-1970 and 01-25-2000.
In this way custom validation of BirthDate field is done.
The code of ValidBirthDate class is given below:
using System;
using System.Collections.Generic;
using System.Linq;
using System.ComponentModel.DataAnnotations;
using System.Web.Mvc;

namespace demo.MVC.Class
{
    public class CustomValidation
    {
    }
    public sealed class ValidBirthDate : ValidationAttribute
    {
        protected override ValidationResult IsValid(object value, ValidationContext validationContext)
        {
            DateTime _birthJoin = Convert.ToDateTime(value);
            DateTime minDate = Convert.ToDateTime("01-25-1970");
            DateTime maxDate = Convert.ToDateTime("01-25-2000");

            if (_birthJoin > minDate && _birthJoin < maxDate)
                return ValidationResult.Success;
            else
                return new ValidationResult(ErrorMessage);
        }
    }
}
This field should be a required one and must match with the email regular expression (so that invalid email addresses are not submitted). It’s code is:
[Required]
[RegularExpression(@"^[A-Za-z0-9._%+-]+@[A-Za-z0-9.-]+\.[A-Za-z]{2,4}$", ErrorMessage = "Invalid email")]
public string email { get; set; }
I will use a dropdownlist for taking value of user’s sex. The dropdownlist control will have 3 options – Select, Male & Female. A person should select either male or female.
Note: The values of Male and Female options are M and F.
The code for this is:
[SexValidation(ErrorMessage = "Select your sex")]
public string sex { get; set; }
SexValidation is a custom validation attribute and I will have to create a custom validation class for it.
So just as I did for the custom validation of date of birth, create a SexValidation class inside the CustomValidation.cs class.
The code for SexValidation class is:
public class SexValidation : ValidationAttribute
{
    protected override ValidationResult IsValid(object value, ValidationContext validationContext)
    {
        if (Convert.ToString(value) == "M" || Convert.ToString(value) == "F")
            return ValidationResult.Success;
        else
            return new ValidationResult(ErrorMessage);
    }
}
In the above code you will note that I am checking the dropdownlist’s selected option value (“M” of “F”). If the selected value is either from one of them, then I returned ValidationResult.Success else Select your sex text is returned (return new ValidationResult(ErrorMessage)).
It should be up to 2 places of decimal examples are like 3500.00, 4290.79, etc.
I provide it a RegularExpression attribute with a regular expression to match the valid salary format:
[RegularExpression(@"^(0(?!\.00)|[1-9]\d{0,6})\.\d{2}$", ErrorMessage = "Invalid salary 3500.50")]
public decimal expectedMonthlySalary { get; set; }
User will have to select his skills from (C#, ASP, jQuery, etc), and he should select at least 3 skills from it. I will have to create a custom validation class to do this check. Moreover these skills will be shown through checkboxes.
First create a property called skills with custom validation attribute SkillValidation on it.
[SkillValidation(ErrorMessage = "Select at least 3 skills")]
public List<CheckBox> skills { get; set; }
As you can see the ‘skills’ property is of type List. The ‘Checkbox’ will be another model class that will contain the IsChecked property. In the View I will create the checkboxes from the IsChecked property.
So create a new Checkbox.cs class in the model folder and add the below code:
public class CheckBox
{
    public bool IsChecked { get; set; }
}
Next, create the SkillValidation class in the CustomValidation.cs class.
public class SkillValidation : ValidationAttribute
{
    protected override ValidationResult IsValid(object value, ValidationContext validationContext)
    {
        List<CheckBox> instance = value as List<CheckBox>;
        int count = instance == null ? 0 : (from p in instance
                                                where p.IsChecked == true
                                                select p).Count();
        if (count >= 3)
            return ValidationResult.Success;
        else
            return new ValidationResult(ErrorMessage);
    }
}
User must select whether he/she has the USA work permit. I will show this through 2 Radio buttons.
In the JobApplication Model, create a string property for it and provide the [Required] attribute.
[Required]
public string usWorkPermit { get; set; }
In this field the user will have to provide details about his previous job.
Make this property string type and provide it the [Required] attribute.
[Required]
public string previousJobDescription { get; set; }
This is the last field where user has to select the terms checkbox. I make this property as Boolean and provide it with a custom validation attribute called [RequiredTerms].
[RequiredTerms(ErrorMessage ="Must accept our terms")]
public Boolean terms { get; set; }
Add the RequiredTerms class in the CustomValidation.cs.
public sealed class RequiredTerms : ValidationAttribute
{
    protected override ValidationResult IsValid(object value, ValidationContext validationContext)
    {
        if (Convert.ToBoolean(value) == false)
            return new ValidationResult(ErrorMessage);
        else
            return ValidationResult.Success;
    }
}
Creating “Job Application” Controller
Add a new controller and name it JobApplicationController.
The controller already has the Index Action of type GET. Create another Index Action of type POST.
[HttpPost]
[ValidateInput(false)]
public ActionResult Index(Models.JobApplication jobApplication)
{
    if (ModelState.IsValid)
        ViewBag.Result = "Form Submitted Successfully.";
    else
        ViewBag.Result = "Invalid Entries, Kindly Recheck.";
    return View();
}
When the submit button is clicked then the control moves to this HttpPost type Index Action. Here I check if all submitted values are in correct format.
If ModelState.IsValid is true then submitted values are in correct format. The ViewBag.Result stores a value that I will show in the view.
Creating the “Index” View
In the view I will also place a text editor for the Previous Job Description. I will use CKEditor which is a popular text editor for websites.
Add the CKEditor folder in your project and give it’s ckeditor.js file’s reference on top of the Index view like this:
<script src="~/Content/Component/ckeditor/ckeditor.js" type="text/javascript" language="javascript"></script>
Next add the reference to the Model:
@model demo.MVC.Models.JobApplication
Followed by CSS to design the form:
<style>
    #viewContent .jobApplicationDiv label {
        display: block;
        margin: 0;
        text-transform: capitalize;
    }

    #viewContent .jobApplicationDiv table tr > td > span {
        display: block;
        color: burlywood;
    }

    #viewContent table {
        width: 100%;
    }

        #viewContent table tr {
            height: 80px;
            background: darkcyan;
        }

            #viewContent table tr td {
                width: 50%;
                padding-left: 5px;
            }

    #viewContent .studentDiv {
        padding-top: 25px;
    }

        #viewContent .studentDiv table thead {
            background-color: #0f40e0;
        }

        #viewContent .studentDiv table tbody {
            background-color: #ff6a00;
        }
</style>
Next create the controls from the model properties by putting the below code in your View:
<h3>@ViewBag.Result</h3>
<div id="viewContent">
    <div class="jobApplicationDiv">
        @using (Html.BeginForm())
            {
            <table>
                <tr>
                    <td>
                        @Html.LabelFor(model => model.name)
                        @Html.EditorFor(model => model.name)
                        @Html.ValidationMessageFor(model => model.name)
                    </td>
                    <td>
                        @Html.LabelFor(model => model.experience)
                        @Html.EditorFor(model => model.experience)
                        @Html.ValidationMessageFor(model => model.experience)
                    </td>
                </tr>
                <tr>
                    <td>
                        @Html.LabelFor(model => model.birthDate)
                        @Html.EditorFor(model => model.birthDate)
                        @Html.ValidationMessageFor(model => model.birthDate)
                    </td>
                    <td>
                        @Html.LabelFor(model => model.email)
                        @Html.EditorFor(model => model.email)
                        @Html.ValidationMessageFor(model => model.email)
                    </td>
                </tr>
                <tr>
                    <td>
                        @Html.LabelFor(model => model.sex)
                        @Html.DropDownListFor(model => model.sex, new List<SelectListItem> { new SelectListItem { Text = "Select", Value = "Select" }, new SelectListItem { Text = "Male", Value = "M" }, new SelectListItem { Text = "Female", Value = "F" } })
                        @Html.ValidationMessageFor(model => model.sex)
                    </td>
                    <td>
                        @Html.LabelFor(model => model.expectedMonthlySalary)
                        @Html.EditorFor(model => model.expectedMonthlySalary)
                        @Html.ValidationMessageFor(model => model.expectedMonthlySalary)
                    </td>
                </tr>
                <tr>
                    <td>
                        @Html.LabelFor(model => model.skills)
                        @Html.CheckBoxFor(m => m.skills[0].IsChecked, new { id = "csharpSkill" }) C#
                        @Html.CheckBoxFor(m => m.skills[1].IsChecked, new { id = "aspSkill" }) ASP.NET
                        @Html.CheckBoxFor(m => m.skills[2].IsChecked, new { id = "jquerySkill" }) jQuery
                        @Html.CheckBoxFor(m => m.skills[3].IsChecked, new { id = "mvcSkill" }) ASP.NET MVC
                        @Html.CheckBoxFor(m => m.skills[4].IsChecked, new { id = "razorSkill" }) Razor
                        @Html.CheckBoxFor(m => m.skills[5].IsChecked, new { id = "htmlSkill" }) HTML
                        @Html.ValidationMessageFor(model => model.skills)
                    </td>
                    <td>
                        @Html.LabelFor(model => model.usWorkPermit)
                        @Html.RadioButtonFor(m => m.usWorkPermit, "True") Yes I have
                        @Html.RadioButtonFor(m => m.usWorkPermit, "False") No I don't
                        @Html.ValidationMessageFor(model => model.usWorkPermit)
                    </td>
                </tr>
                <tr>
                    <td colspan="2">
                        @Html.LabelFor(model => model.previousJobDescription)
                        @Html.TextAreaFor(model => model.previousJobDescription)
                        @Html.ValidationMessageFor(model => model.previousJobDescription)
                        <script type="text/javascript" language="javascript">
                            CKEDITOR.replace(@Html.IdFor(model => model.previousJobDescription));
                            CKEDITOR.config.toolbar = [
                               ['Styles', 'Format', 'Font', 'FontSize'],
                               '/',
                               ['Bold', 'Italic', 'Underline', 'StrikeThrough', '-', 'Undo', 'Redo', '-', 'Cut', 'Copy', 'Paste', 'Find', 'Replace', '-', 'Outdent', 'Indent', '-', 'Print'],
                               '/',
                               ['NumberedList', 'BulletedList', '-', 'JustifyLeft', 'JustifyCenter', 'JustifyRight', 'JustifyBlock'],
                               ['Image', 'Table', '-', 'Link', 'Flash', 'Smiley', 'TextColor', 'BGColor', 'Source']
                            ];
                        </script>
                    </td>
                </tr>
                <tr>
                    <td colspan="2">
                        Accept our Terms and conditions
                        @Html.CheckBoxFor(model => model.terms)
                        @Html.ValidationMessageFor(model => model.terms)
                    </td>

                </tr>
                <tr><td colspan="2"><button id="submitButton" type="submit">Submit</button></td></tr>
            </table>
        }
    </div>
</div>
Explanation
The ViewBag.Result will show the message returned from the Controller. In the View, I am showing all the controls in HTML Table format. I created them like this:
1. Name: Created with with EditorFor method – @Html.EditorFor(model => model.name). The EditorFor method will create a text box for the name property.
I have also used LabelFor for showing the ‘name’ of the property and ValidationFor for showing the validation message arising when filling bad entries.
2. Experience: Created with – @Html.EditorFor(model => model.experience). In the Model I defined this property as Int, so user will not be able to put anything accept numbers.
3. BirthDate: Created with – @Html.EditorFor(model => model.birthDate). It will be a text box accepting only date values.
4. Email: Created with – @Html.EditorFor(model => model.email), a text box accepting only emails.
5. Sex: Created with ‘DropDownListFor’ method like:
@Html.DropDownListFor(model => model.sex, new List<SelectListItem> { new SelectListItem { Text = "Select", Value = "Select" }, new SelectListItem { Text = "Male", Value = "M" }, new SelectListItem { Text = "Female", Value = "F" } })
As you remember, I validate it with custom validation class called SexValidation.
6. ExpectedSalary: Will be a text box created with @Html.EditorFor(model => model.expectedMonthlySalary).
7. Skills: will be a 6 checkbox which will be created using CheckBoxFor method like:
@Html.CheckBoxFor(m => m.skills[0].IsChecked, new { id = "csharpSkill" }) C#
@Html.CheckBoxFor(m => m.skills[1].IsChecked, new { id = "aspSkill" }) ASP.NET
@Html.CheckBoxFor(m => m.skills[2].IsChecked, new { id = "jquerySkill" }) jQuery
@Html.CheckBoxFor(m => m.skills[3].IsChecked, new { id = "mvcSkill" }) ASP.NET MVC
@Html.CheckBoxFor(m => m.skills[4].IsChecked, new { id = "razorSkill" }) Razor
@Html.CheckBoxFor(m => m.skills[5].IsChecked, new { id = "htmlSkill" }) HTML
8. UsWorkPermit: I will show radiobuttons for this so I used RadiButtonFor method:
@Html.RadioButtonFor(m => m.usWorkPermit, "True") Yes I have
@Html.RadioButtonFor(m => m.usWorkPermit, "False") No I don't
9. PreviousJobDescription: I will show it with a CKEditor. So first I create a text area for this property:
@Html.TextAreaFor(model => model.previousJobDescription)
Then use the CKEditor script to convert it to a text editor:
<script type="text/javascript" language="javascript">
    CKEDITOR.replace(@Html.IdFor(model => model.previousJobDescription));
    CKEDITOR.config.toolbar = [
        ['Styles', 'Format', 'Font', 'FontSize'],
        '/',
        ['Bold', 'Italic', 'Underline', 'StrikeThrough', '-', 'Undo', 'Redo', '-', 'Cut', 'Copy', 'Paste', 'Find', 'Replace', '-', 'Outdent', 'Indent', '-', 'Print'],
        '/',
        ['NumberedList', 'BulletedList', '-', 'JustifyLeft', 'JustifyCenter', 'JustifyRight', 'JustifyBlock'],
        ['Image', 'Table', '-', 'Link', 'Flash', 'Smiley', 'TextColor', 'BGColor', 'Source']
    ];
</script>
10. Terms: will be a checkbox created with CheckBoxFor method:
@Html.CheckBoxFor(model => model.terms)
Testing the Server Side Validations
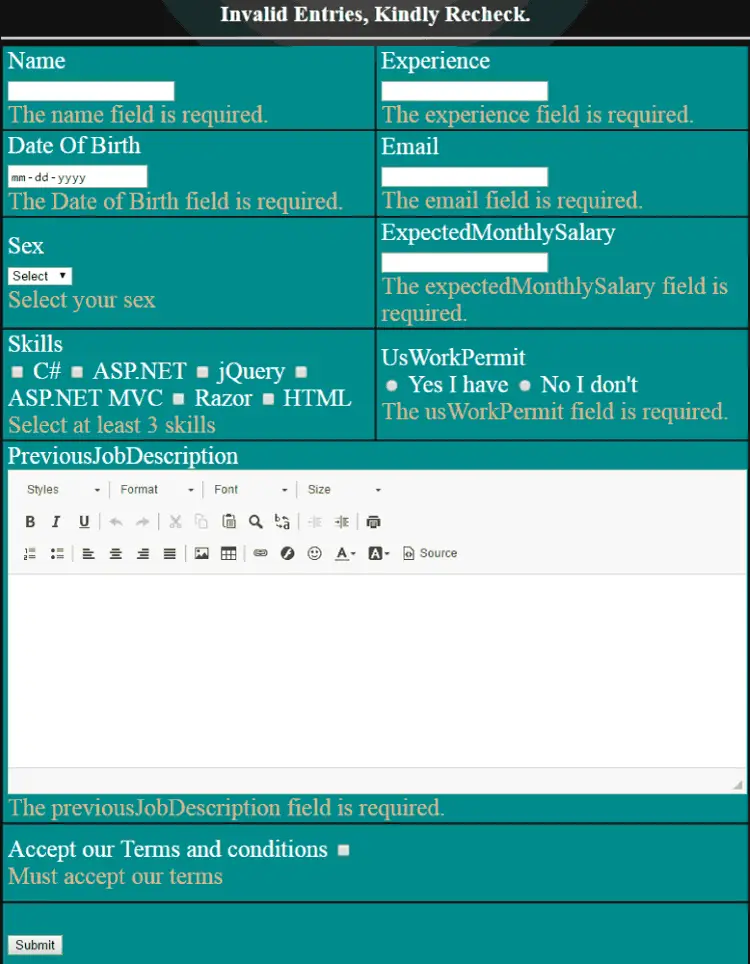
Having done with the coding part let us test the server side validations. Run the application then click the submit button. You will get validation message saying – Invalid Entries, Kindly Recheck.
The validation errors will also be shown under every control. See the below image:
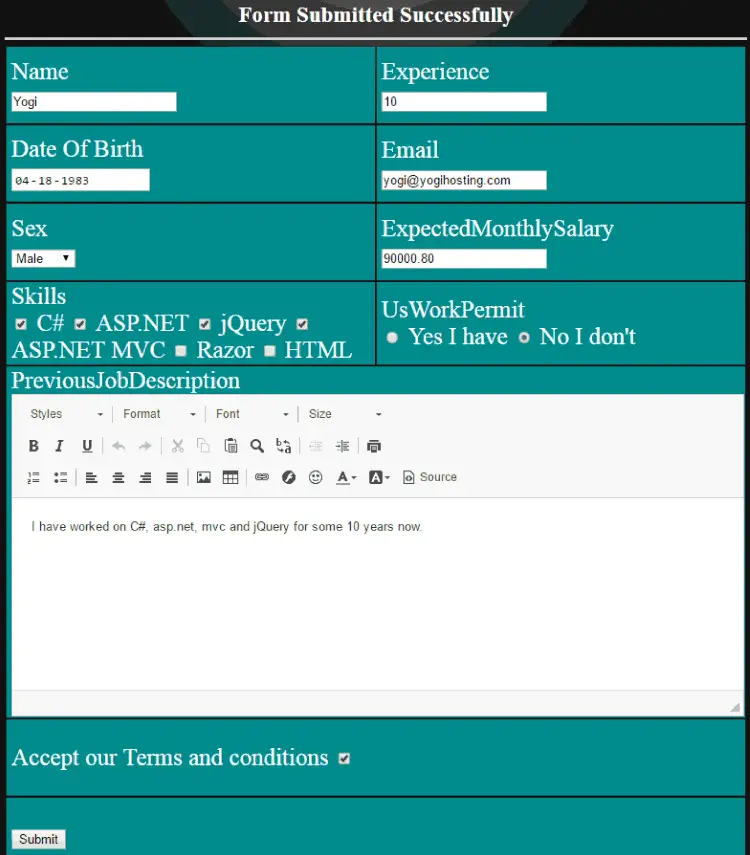
Now fill the values on each control, and submit the form. This time the form submits and you receive the message – Form Submitted Successfully.
The download link is below:
SHARE THIS ARTICLE
Related Tutorials:


ABOUT THE AUTHOR
I hope you enjoyed reading this tutorial. If it helped you then consider buying a cup of coffee for me. This will help me in writing more such good tutorials for the readers. Thank you.
HELLO EVERYONE
 Welcome to YogiHosting - A Programming Tutorial Website. It is used by millions of people around the world to learn and explore about ASP.NET Core, Blazor, jQuery, JavaScript, Docker, Kubernetes and other topics.
SUBSCRIBE TO NEWSLETTER
Enter your email address to subscribe to this blog and receive notifications of new posts by email.
Join 90K other subscribers