ASP.NET Core Configurations – Program.cs Middleware AppSettings

The ASP.NET Core Configurations settings are configured on 3 files:
- The Project File also known as “.csproj” file.
- Program.cs
- appsettings.json
These configuration settings tell the ASP.NET Core app how it should work based on the users interaction. In this tutorial we will look into the various ASP.NET Core Configurations which will provide you with a solid foundation for understanding the coming DOT NET Core topics. I will start by creating a new project using empty template so that you can clearly understand how each of the configuration settings work.
Page Contents
Create Project using Empty Template
When you create a project using Empty Template you have to do the ASP.NET Core Configurations by yourself. This is a great way to understand the things correctly. This includes:
- Adding Folders for Controllers, Views & Models.
- Adding files like appsettings.json.
- Adding layouts, scripts and so on.
Start with opening your Visual Studio and then create a new app by selecting ASP.NET Core Empty template.

Specify the location on your drive where you want the application to be created. Give the name of your application as Configuation.

Then click the ‘Create’ Button.
Now you will get another dialog box. Here select the latest version of Dot Net which is .NET 7.0 at the time of writing this tutorial.

This will create your ASP.NET Core app with Empty Template.
What is .csproj Project File
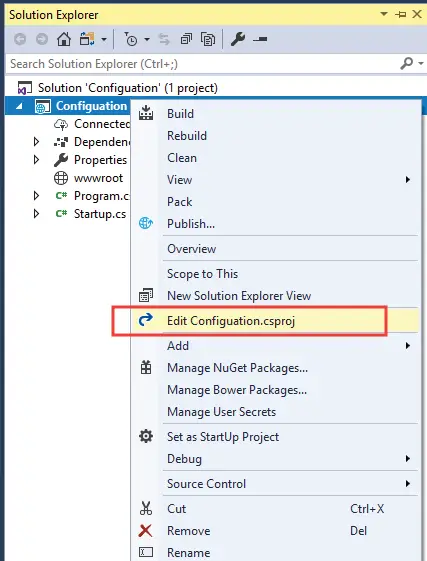
The “.csproj” is the Project file of an ASP.NET Core project. It contains name of the SDK, ASP.NET Core Version, references to Packages which the project is using, and many such things. The Project .csproj file is named as NameofProject.csproj. In this application the .csproj file is named as Configuration.csproj as we named the project “Configuration” during the time of creation. This file is hidden by Visual Studio and can be accessed by right clicking the project on Solution Explorer and selecting Edit Configuration.csproj.
The initial context of the “Configuration.csproj” file is shown below:
<Project Sdk="Microsoft.NET.Sdk.Web">

  <PropertyGroup>
    <TargetFramework>net7.0</TargetFramework>
    <Nullable>enable</Nullable>
    <ImplicitUsings>enable</ImplicitUsings>
  </PropertyGroup>

</Project>
The csproj can be used to install a NuGet Package to your ASP.NET Core project. You simply have to reference the package to the csproj file and Visual Studio will downloads that package for you. Similarly when you remove any package refrence from the csproj file then Visual Studio removes that package from your application.
Json.NET – Newtonsoft is a popular high-performance JSON package for .NET. It is used to serialize and deserialize JSON. To install this package, I reference it on the .csproj file by adding ItemGroup and PackageReference as shown below.
<Project Sdk="Microsoft.NET.Sdk.Web">

  <PropertyGroup>
    <TargetFramework>net7.0</TargetFramework>
    <Nullable>enable</Nullable>
    <ImplicitUsings>enable</ImplicitUsings>
  </PropertyGroup>

  <ItemGroup>
    <PackageReference Include="Newtonsoft.Json" Version="13.0.3" />
  </ItemGroup>

</Project>
As soon as you save the csproj file, VS will download this package from NuGet and install it to your project.
| Element | Description |
|---|---|
| Project | It is the root element, the Sdk attribute specifies that the application should be build with Microsoft.NET.Sdk.Web package. |
| PropertyGroup | Used to group related properties. |
| TargetFramework | Instructs .NET Core to use the specified version when building a project. |
| ItemGroup | Used to group related items. |
| Folder | It tells .NET Core to include a given folder when publishing the project. |
| PackageReference | It specifies dependency on the NuGet package. Example – the Microsoft.AspNetCore.All is a package providing access to all individual packages which provides ASP.NET Core and MVC functionalities. |
Install Package from NuGet Package Manager
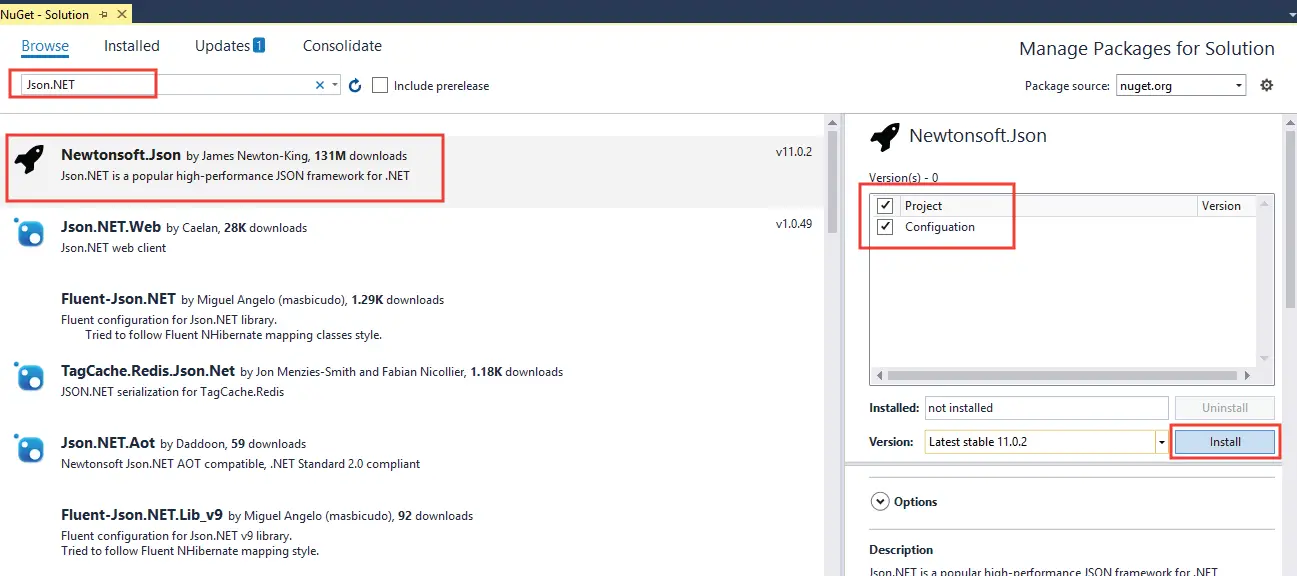
NuGet Package Manager is a tool in Visual Studio for doing the management of NuGet packages through an easy-to-use interface. Select Tools ➤ NuGet Package Manager ➤ Manage NuGet Packages for Solution to open it. Click the “Browse tab” and enter the name of package in the text box. When you see you searched package on the list, select it and then click the ‘Install’ button.
In the below image I have searched for Json.NET, and then selecting and installing it.
There is also another way to insall the package and this is through Package Manger Console. To open it follow the below procedure:
Select Tools ➤ NuGet Package Manager ➤ Packages Manager Console in your Visual Studio then enter the below given line (and press enter key) to install the Json.NET package.
PM> Install-Package Newtonsoft.JsonThis command is given on Nuget for every package. Check this link to find the command for Json.NET package.
Kestrel is an open-source, cross-platform web server for hosting ASP.NET applications on any platform (Windows, Linux, macOS). It is used automatically when running ASP.NET Core application with IIS. You can use Kestrel by itself or with a reverse proxy server, such as “IIS, Nginx, or Apache”. A reverse proxy server receives HTTP requests from the Internet and forwards them to Kestrel after some preliminary handling.
Visual Studio will use Kestrel by default, it is done by selecting “https” from the list given on the Green Arrow button. However you can also use other hosting models like IIS express.
In order to use IIS express for running ASP.NET Core application, you click the down arrow location besides the Green Arrow on Visual Studio. then select the “IIS Express”. Check the below image to understand this.

ASP.NET Core Program Class
The Program Class is the entry point of an ASP.NET Core app. It is located on the root of the app. It defines services and middleware components required by the .NET Core app.
The default code of the Program Class is shown below:
var builder = WebApplication.CreateBuilder(args);
var app = builder.Build();

app.MapGet("/", () => "Hello World!");

app.Run();
In the above code Dot Net is configuring app with predefined settings like providers, web hosting environment and so on. Next the Build() function builds the application, if no errors are found then it will run the application on the browser.
The app.MapGet("/", () => "Hello World!") simply shows the “Hello World!” message on the browser.
You can now run the app on Visual Studio by clicking the Green Arrow button. A new browser window will open and show the “Hello World!” message.

Register Services and Configure Request Pipeline
The Program.cs is used to register the different services on the app so that they can be used. Some of the commonly used predefined services which we register in this class are:
- AddControllersWithViews – which adds services for controllers, API-related features, and views in the application.
- AddRazorPages – which adds services for Razor Pages.
- AddDbContext – registers a DB Context which is commonly Entity Framework Core services.
- AddDefaultIdentity – registers Identity services to the application.
See below code of ConfigureServices method where I am registering two services – AddControllersWithViews and AddRazorPages.
var builder = WebApplication.CreateBuilder(args);

builder.Services.AddControllersWithViews();
builder.Services.AddRazorPages();

var app = builder.Build();

app.MapGet("/", () => "Hello World!");

app.Run();
In Program.cs we also configure HTTP Request pipeline for the ASP.NET Core app. The request pipeline is configured by adding middleware components. The most common ones are:
- UseDeveloperExceptionPage – adds the “ExceptionHandler” middleware that will show developer exception page with detailed information whenever unhandled request exceptions arises in the app. It should be used only when the app is running in the Development environment.
- UseExceptionHandler – adds “ExceptionHandler” middleware to catch exceptions and logs them. It should be used in Production environment i.e. when the app is running in Production.
- UseHsts – adds HSTS Middleware which enables HSTS header. HSTS full form is (HTTP Strict Transport Security).
- UseHttpsRedirection – adds HTTPS Redirection Middleware to enforce HTTPS by redirecting all HTTP requests to HTTPS.
- UseStaticFiles – adds Static File Middleware which enables static files to be served.
- UseRouting – adds Routing middleware which matches request to an endpoint.
- UseAuthorization – adds Authorization middleware.
- UseAuthentication – adds Authentication middeware.
- UseEndpoints – adds Endpoint Routing Middleware to execute the matched endpoint.
- MapControllerRoute – adds Routing middleware to match the URLs of incoming requests and map them to actions methods.
Add all the necessary services and middleware components to your Program.cs class as shown below.
var builder = WebApplication.CreateBuilder(args);

// Add services to the container.
builder.Services.AddControllersWithViews();

var app = builder.Build();

// Configure the HTTP request pipeline.
if (!app.Environment.IsDevelopment())
{
	app.UseExceptionHandler("/Home/Error");
	// The default HSTS value is 30 days.
	app.UseHsts();
}

app.UseHttpsRedirection();
app.UseStaticFiles();

app.UseRouting();

app.UseAuthorization();

app.MapControllerRoute(
	name: "default",
	pattern: "{controller=Home}/{action=Index}/{id?}");

app.Run();
What are ASP.NET Core Services
An ASP.NET Core Service can be anything in which does a particular task and is available all through the application. Examples can be:
- Service for sending a text verification code to user’s email address.
- Service for validating mobile number through OTP.
- Service that helps in recovering the user’s account password when lost.
- Entity Framework Core service.
- Identity Service.
I will create a small ASP.NET Core Service that provides the application with the total number of registered users.
Start by creating a new folder to the root of your app and name it Services or anything you like. Inside this Services folder create a class and name it TotalUsers.cs and add the following code to it:
namespace Configuation.Services
{
    public class TotalUsers
    {
        public long TUsers()
	{
	    Random rnd = new Random();
	    return rnd.Next(100, int.MaxValue);
	}
    }
}
This method Tusers() returns the total number of users registered in the application which is just a random number between 100 and max value of Int.
The next step involves registering this class in the Program class so that ASP.NET Core can make this service available throughout the application.
So go the Program.cs class and add the code line – builder.Services.AddSingleton just before the builder.Build();. The updated code of the Program class should now look:
using Configuation.Services;

var builder = WebApplication.CreateBuilder(args);

// Add services to the container.
builder.Services.AddControllersWithViews();

builder.Services.AddSingleton<TotalUsers>();

var app = builder.Build();

// Configure the HTTP request pipeline.
if (!app.Environment.IsDevelopment())
{
	app.UseExceptionHandler("/Home/Error");
	// The default HSTS value is 30 days.
	app.UseHsts();
}

app.UseHttpsRedirection();
app.UseStaticFiles();

app.UseRouting();

app.UseAuthorization();

app.MapControllerRoute(
	name: "default",
	pattern: "{controller=Home}/{action=Index}/{id?}");

app.Run();
The builder.Services.AddSingleton<TotalUsers>() will add the service which can now be shared all thought the application. Next we will inject this service on the controller and show the total number of users on the browser.
Inject ASP.NET Core Service to Controller from Dependency Injection
We can make a service available to a Controller from Dependency Injection feature. We injects the object of the service class through the constructor of the controller. In the below shown code I have created a constructor for the HomeController and added to it a parameter of “TotalUsers” class.
Recall that we have the “TotalUsers” class registered as a service on the program class so the Dependency Injection feature will automatically provide this parameter of the constructor (TotalUsers tu) with the assigned value. The assigned value will be the random value from 100 to max value of int generated by the service.
private TotalUsers totalUsers;
public HomeController(TotalUsers tu)
{
    totalUsers = tu;
}
Start by creating “Controllers” folder on the root of your application by right clicking the name of the application on the Solution Explorer and selecting Add ➤ New Folder, and then rename it to “Controllers”. Now right click on this newly created “Conrollers” folder and select Add ➤ New Item. On the items window which opens, select MVC Controller – Empty and name this controller as HomeController.cs.

Next, import the below given namespace on this controller.
using Configuation.Services;Add the following code to the controller:
using Configuation.Services;
using Microsoft.AspNetCore.Mvc;

namespace Configuation.Controllers
{
	public class HomeController : Controller
	{
		private TotalUsers totalUsers;
		public HomeController(TotalUsers tu)
		{
			totalUsers = tu;
		}

		public string Index()
		{
			return "Total Users are: " + totalUsers.TUsers();
		}
	}
}
The controller has a constructor which has our service class called TotalUsers in it’s parameter. When ASP.NET calls this controller it sees the constructor requires an object i.e. has a dependency for the service class called TotalUsers.
MVC then goes to the Program class and finds the TotalUsers class been configured as a service. So it will now create an instance of the TotalUsers class and pass it’s object to the construction of the Home Controller.
The Index action method calls the TUsers() method to get the total number of registered users. It finally returns them as string to the View.
Next, create a new folder called Views on the root of the application. Inside this folder create another folder and name it Home.
Now create a new Razor View – Empty file inside the Views ➤ Home folder and name it “Index.cshtml”. Add the following code to it.
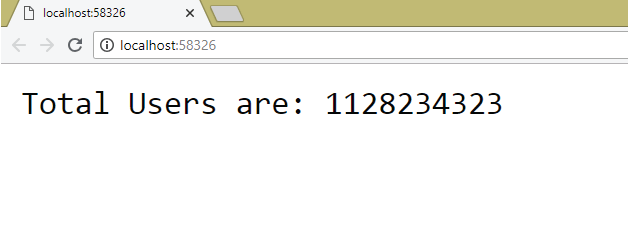
@model string
@Model
To test the service simply run your application and you will see the total number of users displayed on the browser.
Congrats, the app is working correctly and we did all this from the scratch. I hope it will be a good learning experience for you. Let us now move to a slightly more advaced topic of Middlewares.
ASP.NET Core Middleware
An ASP.NET Core Middleware is a component that sits on the HTTP Request Pipeline and handles requests and responses. There can be one or more Middlewares sitting on the HTTP pipeline in a line. When a new HTTP request arrives, it is send to the first middleware which inspects it. This Middleware will peform one of the two things:
- Generates a response and send it back to the client (request initiator).
- Pass the HTTP Request to the next Middleware in the pipeline.
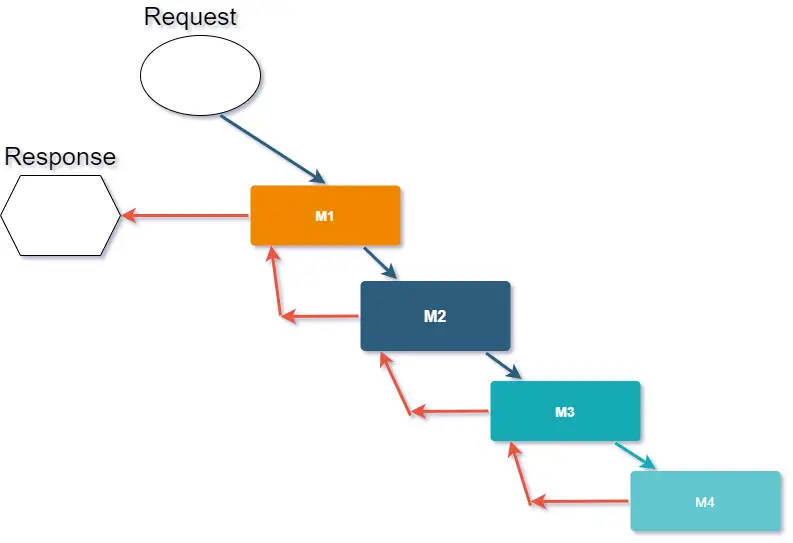
Note that the Middeware are processed on the same order in which they are applied for a request. The response is returned to the client in the “opposite” order in which the middleware are processed. Suppose we have 4 middeware – M1, M2, M3 and M4. They are applied in the order M1 > M2 > M3 > M4. So we can say, for a http request –
- The Middeware are processed in the Order M1 > M2 > M3 > M4.
- The Middeware response are returned to the client in the order M4 > M3 > M2 > M1. That is in last-come-first-serve.
Why Middleware is used in ASP.NET Core? Middleware respond to http requests made to the application. This can be inhanced to build high class features like authentication, authorization, logging and so on. There are large number of Built-in Middleware in ASP.NET Core, we can use only the ones which we need in our app and remove others which we don’t need. Thus optimizing the speed of our app.
ASP.NET Core Custom Middleware
We can also build our own Custom Middleware in ASP.NET Core. The custom middleware can be any from the 4 types, these are:
- Content-Generating Middleware.
- Short-Circuiting Middleware.
- Request-Editing Middleware.
- Response-Editing Middleware.
Each Middleware must have 2 things:
- A RequestDelegate object of Microsoft.AspNetCore.Http namespace. This object is used to process the http requests. The RequestDelegate represents the next middleware component in the http pipeline and is injected to the controller of Middleware with Dependency Injection.
- An Invoke method which is called whenver the Middleware is called. In the Invoke method we write our custom codes.
I will now build one example each for these 4 types of Custom Middleware.
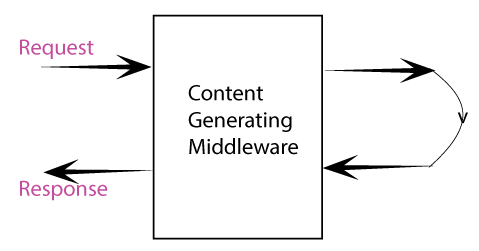
Content-Generating Middleware
The Content-Generating Middleware generates some content or Response. We create this ASP.NET Core Middeware to return Response to the client. Let us create a small exmaple of this Middleware to understand how it works.
Create a new folder on the root folder and name it Middlewares (you can name this folder anything). Next, add a class to this new folder and call it ContentMiddleware.cs. To this class add the following codes:
namespace Configuation.Middlewares
{
	public class ContentMiddleware
	{
		private RequestDelegate nextDelegate;
		public ContentMiddleware(RequestDelegate next) => nextDelegate = next;

		public async Task Invoke(HttpContext httpContext)
		{
			if (httpContext.Request.Path.ToString() == "/middleware")
			{
				await httpContext.Response.WriteAsync("This is from the content middleware");
			}
			else
			{
				await nextDelegate.Invoke(httpContext);
			}
		}
	}
}
Please note that the Middleware class doesn’t implement an interface or derive from a common base class. They have a constructor that takes a parameter of type RequestDelegate which is provided to it automatically by MVC. The RequestDelegate object represents the next middleware component in the line.
The Middleware also define an Invoke method. This method is called when .NET receives an HTTP request. The Invoke method has a parameter of type HttpContext which contains Information about the HTTP request and the response that will be returned to the client.
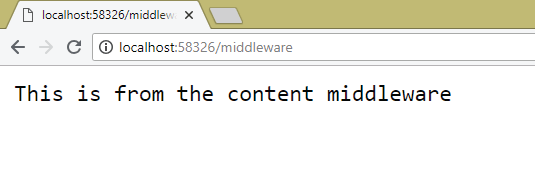
In my ContentMiddleware.cs class the Invoke method inspects the HTTP request and checks to see whether the request has been sent to the url /middleware. If it has, then it sends a simple text response – This is from the content middleware. If a different URL has been initiated, then the request is forwarded to the next Middleware in the line.
Now register the Middleware inside the Program.cs class using the UseMiddleware() method like shown below:
using Configuation.Middlewares;
using Configuation.Services;

var builder = WebApplication.CreateBuilder(args);

// Add services to the container.
builder.Services.AddControllersWithViews();
builder.Services.AddSingleton<TotalUsers>();
var app = builder.Build();

// Configure the HTTP request pipeline.
if (!app.Environment.IsDevelopment())
{
	app.UseExceptionHandler("/Home/Error");
	// The default HSTS value is 30 days.
	app.UseHsts();
}

app.UseHttpsRedirection();
app.UseStaticFiles();

app.UseMiddleware<ContentMiddleware>();

app.UseRouting();

app.UseAuthorization();

app.MapControllerRoute(
	name: "default",
	pattern: "{controller=Home}/{action=Index}/{id?}");

app.Run();
Run the application and then go to the URL – https://localhost:44343/middleware. You will see the response from the Middleware as shown by the image below:
If the URL is not – https://localhost:44343/middleware then the Content Middleware will pass the request to the next Middleware. Note that here there is no Middleware left therefore the request is returned back.
ASP.NET Core Middleware with Dependency Injection
We can inject services to Middleware with dependency injection. In the previous section I created a service called TotalUsers, now I will use this service in Middleware by injecting it in the constructor of the middleware. So, update the code for the “ContentMiddleware.cs” by adding constructor which recieves the object of “TotalUsers.cs” in it’s parameter. See highlighted code below:
using Configuation.Services;

namespace Configuation.Middlewares
{
	public class ContentMiddleware
	{
		private RequestDelegate nextDelegate;
		private TotalUsers totalUsers;

		public ContentMiddleware(RequestDelegate next, TotalUsers tu)
		{
			nextDelegate = next;
			totalUsers = tu;
		}

		public async Task Invoke(HttpContext httpContext)
		{
			if (httpContext.Request.Path.ToString() == "/middleware")
			{
				await httpContext.Response.WriteAsync("This is from the content middleware, Total Users: " + totalUsers.TUsers());
			}
			else
			{
				await nextDelegate.Invoke(httpContext);
			}
		}
	}
}
Inside the Invoke method I am adding the total users to the response message as totalUsers.TUsers(). Run you application and go to the URL – https://localhost:44343/middleware. Now you will also see total number of users (check the below image).

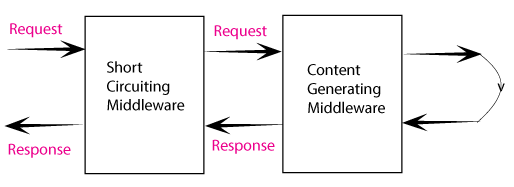
Short-Circuiting Middleware
Short-Circuiting Middleware prevents further middleware from processing the request because it short-circuits the pipeline. Let us create a Custom Short-Circuit Middleware.
Inside the Middlewares folder create a new class and name it ShortCircuitMiddleware.cs. To this class add the below code:
namespace Configuation.Middlewares
{
	public class ShortCircuitMiddleware
	{
		private RequestDelegate nextDelegate;
		public ShortCircuitMiddleware(RequestDelegate next) => nextDelegate = next;

		public async Task Invoke(HttpContext httpContext)
		{
			if (httpContext.Request.Headers["User-Agent"].Any(v => v.Contains("Firefox")))
			{
				httpContext.Response.StatusCode = StatusCodes.Status401Unauthorized;
			}
			else
			{
				await nextDelegate.Invoke(httpContext);
			}
		}
	}
}
This ASP.NET Core Middleware Returns 401 Unauthorized Status Code if the client’s browser is firefox. This is done by this code line:
httpContext.Response.StatusCode = StatusCodes.Status401Unauthorized;Now go to the Program.cs and register this short-circuit middleware. Make sure the registration is done before the previous ‘ContentMiddleware.cs’ Middleware as shown below:
// ...

app.UseMiddleware<ShortCircuitMiddleware>();
app.UseMiddleware<ContentMiddleware>();

//...
Always remember that the Middlewares execute in the order they are registered. I want ShortCircuitMiddleware to execute before ContentMiddleware so I have placed it at first position.
The Short-Circuit Middleware checks the User-Agent in the header to find out if the browser is firefox. In that case it does not forward the request and returns unauthorized status. For other browsers it forwards the request to the ContentMiddleware.cs.
If you now run your application and open the URL – https://localhost:44343/middleware in Firefox browser. You will receive a blank page. For other browsers you will get the same response which you get previously.
The Firefox screenshot is shown below:

Request-Editing Middleware
Request-Editing Middleware does not generate response instead edits http requests. Create a class inside the Middlewares folder and name it RequestEditingMiddleware.cs. Add the given code to it:
namespace Configuation.Middlewares
{
	public class RequestEditingMiddleware
	{
		private RequestDelegate nextDelegate;
		public RequestEditingMiddleware(RequestDelegate next) => nextDelegate = next;

		public async Task Invoke(HttpContext httpContext)
		{
			httpContext.Items["Firefox"] = httpContext.Request.Headers["User-Agent"].Any(v => v.Contains("Firefox"));
			await nextDelegate.Invoke(httpContext);
		}
	}
}
In the above code see that only the HTTP Request is edited and it does not sends any response. First the check is made to find out if the request is coming from firefox browser, in that case a key called Firefox is added with Boolean value ‘true’ to the HttpContext dictionary. The below given code does this work:
httpContext.Items["Firefox"] = httpContext.Request.Headers["User-Agent"].Any(v => v.Contains("Firefox"));Now open the ShortCircuitMiddleware.cs which you made earlier. Here Delete or comment out the line which checks the User-Agent.
//if (httpContext.Request.Headers["User-Agent"].Any(v => v.Contains("Firefox")))In place of it check the item named ‘Firefox’ in the HttpContext. See the below code:
if (httpContext.Items["Firefox"] as bool? == true)So the updated code of ShortCircuitMiddleware.cs Class is given below:
namespace Configuation.Middlewares
{
	public class ShortCircuitMiddleware
	{
		private RequestDelegate nextDelegate;
		public ShortCircuitMiddleware(RequestDelegate next) => nextDelegate = next;

		public async Task Invoke(HttpContext httpContext)
		{
			//if (httpContext.Request.Headers["User-Agent"].Any(v => v.Contains("Firefox")))
			if (httpContext.Items["Firefox"] as bool? == true)
			{
				httpContext.Response.StatusCode = StatusCodes.Status401Unauthorized;
			}
			else
			{
				await nextDelegate.Invoke(httpContext);
			}
		}
	}
}
Because of this change the “Short-Circuiting Middleware” will now check for the item called “Firefox” in HttpContext. Obviously we need to register the RequestEditingMiddleware.cs before short-circuit middleware for this to work.
So Register the Request Editing Middleware on the Program.cs class:
//...
app.UseMiddleware<RequestEditingMiddleware>();
app.UseMiddleware<ShortCircuitMiddleware>();
app.UseMiddleware<ContentMiddleware>();
//...

Run the application and upon the URL – https://localhost:44343/middleware in firefox. You will get the same blank page due to unauthorized HTTP request condition.
Response-Editing Middleware
As the name suggest the Response-Editing Middleware edits only the response generated by other Middleware.
Right now we are getting a blank page on the Firefox browser. Blank page is no good for real applications, we should also show some proper message. The Response-Editing Middleware will come to use here, I will provide text response which users will see only on the firefox browser.
Add a new class inside the Middlewares folder and name it ResponseEditingMiddleware.cs. Add the below code to it:
namespace Configuation.Middlewares
{
	public class ResponseEditingMiddleware
	{
		private RequestDelegate nextDelegate;
		public ResponseEditingMiddleware(RequestDelegate next)
		{
			nextDelegate = next;
		}

		public async Task Invoke(HttpContext httpContext)
		{
			await nextDelegate.Invoke(httpContext);
			if (httpContext.Response.StatusCode == 401)
			{
				await httpContext.Response.WriteAsync("Firefox browser not authorized");
			}
			else if (httpContext.Response.StatusCode == 404)
			{
				await httpContext.Response.WriteAsync("No Response Generated");
			}
		}
	}
}
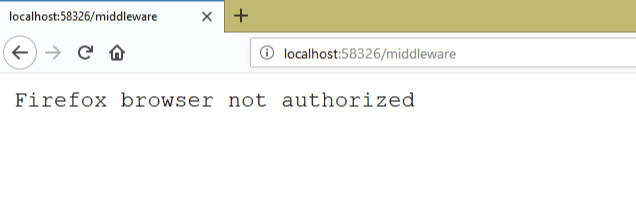
In the above code if the HTTP status code in the response is 401 then I am adding text – Firefox browser not authorized to the response. Recall that the 401 un-authorized response is generated by Short-Circuiting Middleware.
Since the Response-Editing Middleware only edits the response of other Middleware it has to be placed before other Middlewares in the HTTP pipeline. So register it below other Middleware in the Program class.
//...
app.UseMiddleware<ResponseEditingMiddleware>();
app.UseMiddleware<RequestEditingMiddleware>();
app.UseMiddleware<ShortCircuitMiddleware>();
app.UseMiddleware<ContentMiddleware>();
//...

Now run your application and go to URL – https://localhost:44343/middleware in the Firefox browser. You will get the response text – Firefox browser not authorized. This is shown in the image below.
In the Response-Editing Middleware there is an else if block:
else if (httpContext.Response.StatusCode == 404)
{
    await httpContext.Response.WriteAsync("No Response Generated");
}
This will execute when status code is 404. This status code is automatically generated when there is no resource found in the application for a url.
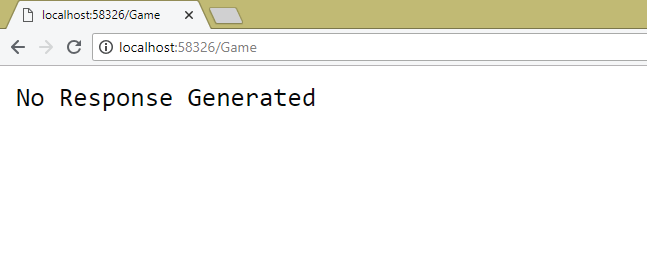
Open any random url which is not served by the application like – https://localhost:44343/tutorials. You will see No Response Generated message on your browser.

Routing Middleware
Routing middleware task is to assign requests to respective resources. Examples are assigning a particular action of a controller for showing the sales data for a given day. We create routes in program.cs class to perform such things.
We have instructed the app to use routing by the code line app.UseRouting(). We also created a default route in the program class at the very bottom.
app.MapControllerRoute(
	name: "default",
	pattern: "{controller=Home}/{action=Index}/{id?}");
ASP.NET Core Hosting Environment
ASP.NET Core Hosting Environment determines the environment in which the application is running. Environments can be of 3 types:
- Development
- Staging
- Production
ASP.NET Core Get Hosting Environment
We can get the Hosting Environment in the Program class as shown below.
if (app.Environment.IsDevelopment())
{
// do something
}
The IWebHostEnvironment has the following 3 methods to determine the hosting environment.
- IsDevelopment – returns true if environment is Development.
- IsStaging – returns true if environment is Staging.
- IsProduction – returns true if environment is Production.
In the below added code to the Program.cs class, I have shown how to use these 3 method to execute code blocks based on an envirnment.
if (app.Environment.IsDevelopment())
{
    // do something
}

if (app.Environment.IsStaging())
{
    // do something
}

if (app.Environment.IsProduction())
{
    // do something
}
ASP.NET Core Set Hosting Environment
We can set the ASP.NET Core Hosting Environment through the “Properties” page of the application. In the Solution Explorer and right click on your application name and select Properties.
In the properties page select the Debug option. There you will see the current hosting environment is set as “Development” by a variable called ASPNETCORE_ENVIRONMENT. You can change it’s value to an of the 3:
- Development
- Staging
- Production
When you are done save by pressing CTRL+S. Check the below image where I have illustrated this thing.

Once you save by pressing CTRL+S in Property page of the app. Visual Studio stores the environment in the launchSettings.json file. This file is located inside the Properties folder of the app.
Notice the line 15 and 22 which contains the ASPNETCORE_ENVIRONMENT variable value as Development. This means we have hosting envirnment set as Development for our app.
{
  "iisSettings": {
    "windowsAuthentication": false,
    "anonymousAuthentication": true,
    "iisExpress": {
      "applicationUrl": "http://localhost:57432",
      "sslPort": 44327
    }
  },
  "profiles": {
    "IIS Express": {
      "commandName": "IISExpress",
      "launchBrowser": true,
      "environmentVariables": {
        "ASPNETCORE_ENVIRONMENT": "Development"
      }
    },
    "Configuation": {
      "commandName": "Project",
      "launchBrowser": true,
      "environmentVariables": {
        "ASPNETCORE_ENVIRONMENT": "Development"
      },
      "dotnetRunMessages": "true",
      "applicationUrl": "https://localhost:5001;http://localhost:5000"
    }
  }
}
If you are comfortable in editing json files then you can change hosting environment for the ASPNETCORE_ENVIRONMENT variable here itseft without going through the “Properties” page. Suppose you want to change the environment as “Production” so you have to change line 15 and 22 of launchSettings.json file as:
"ASPNETCORE_ENVIRONMENT": "Production"We created Middleware in the previous section. We can create a condition to register these Middlewares only if the environment is Production.
if (app.Environment.IsProduction())
{
    app.UseMiddleware<ResponseEditingMiddleware>();
    app.UseMiddleware<RequestEditingMiddleware>();
    app.UseMiddleware<ShortCircuitMiddleware>();
    app.UseMiddleware<ContentMiddleware>();
}
We can Get the Hosting Environment in the Controller by injecting IWebHostEnvironment into the constructor of the controller. Next we can use the env.IsDevelopment(), env.IsStaging() and env.IsProduction() methods to find out the environment.
Check the below given code to understand this.
public class SomeController : Controller
{
    private IWebHostEnvironment hostingEnvironment;

    public SomeController (IWebHostEnvironment environment)
    {
        hostingEnvironment = environment;
    }

    public IActionResult Index()
    {
        if (env.IsDevelopment())
        {
            // ...
        }

        if (env.IsStaging())
        {
            // ...
        }

        if (env.IsProduction())
        {
            // ...
        }
        return View();
    }
}
The WebRootPath property of IWebHostEnvironment gives path of the application’s static content folder. This is the wwwroot folder. You can use this property inside a Controller inorder to get the absolute path of the files that lies in this folder.
At times we want to bind the src attribute of img tag with images kept inside the ‘wwwroot’ folder. To do this we need to get the WebRootPath of the ‘wwwroot’ folder of the application. So first inject the IWebHostEnvironment to the parameter of the constructor. The ASP.NET Core Dependency Injection will automatically provide the IWebHostEnvironment object value to the constructor. Now you can simply use the WebRootPath property to get the absolute path. See the below code where I have shown the same thing.
public class MediaController : Controller
{
    private IWebHostEnvironment hostingEnvironment;

    public MediaController(IWebHostEnvironment environment)
    {
        hostingEnvironment = environment;
    }

    public IActionResult Index()
    {
        string absolutePath = Path.Combine(hostingEnvironment.WebRootPath, "file1.jpg");
        ViewBag.ImagePath = absolutePath;
        return View();
    }
}
We can now show the image on the img tag on the view by binding scr attribute with the ViewBag:
<img src="@ViewBag.ImagePath" alt="WebRootPath example" />ASP.NET Core UseStaticFiles to serve Static files
In order to make the application serve images, JavaScript files, CSS stylesheets which are kept inside the wwwroot folder you have to add – app.UseStaticFiles() inside the Program class.
Put it just before you call app.UseRouting() method.
//...
app.UseStaticFiles();
app.UseRouting();
//...
ASP.NET Core Exception Handling Middleware
Since we created our application from empty template therefore we need to add the Exceptional Handling Middleware to get detailed message about error coming in the application. You can check it by running your application and then go to some non-existing URL like https://localhost:44343/Game. You will see a message on the browser saying – No Response Generated.
This is an Exception but the message does not state anything regarding it’s cause. User must see some proper messages like 404 for non-existing page, 401 for un-authorized, 403 for forbidden. To do this you have to enable Exception Handling.
We handle Exceptions in DOT NET by adding ExceptionHandler Middleware in the program class. This is done by adding UseDeveloperExceptionPage method to generate HTML error responses.
app.UseDeveloperExceptionPage();You can also add app.UseStatusCodePages() to handle responses with status codes between 400 and 599 that do not have a body. Add the below given 2 code lines to the program.cs class.
app.UseDeveloperExceptionPage();
app.UseStatusCodePages();
Before you check how it works, make sure you comment out the line where the Response Editing Middleware is added in the startup class. This is because this Custom Middleware is providing a specific message for 404 errors.
//app.UseMiddleware<ResponseEditingMiddleware>();Now re-run your application and re-visit the URL – https://localhost:44343/Game. You will see the full exception details:

The above Exception was caused by the non-existing action method i.e. a resource which is not found. In fact Exceptions can be cause by a number of ways, mainly due to wrong codes. I will show what happens when exception occurs inside an action method code.
Go to the Home Controller and add an action method called Exception which throws a NullReferenceException type of exception.
public IActionResult Exception()
{
    throw new System.NullReferenceException();
}
Now re-run your application and visit the URL – https://localhost:44343/Home/Exception. You will see full Exception message with Stack Trace to explore the cause of the exception.

This full Exception message with Stack Trace is very helpful to developers but it should not be shown the common users of the site.
We can also add a common Action method which will be called everything some error occurs in our application. We also want this common action method should only be called in Production environment. Let us see how to do it.
First create an action called Error to the Home Controller.
public IActionResult Error()
{
    return View();
}
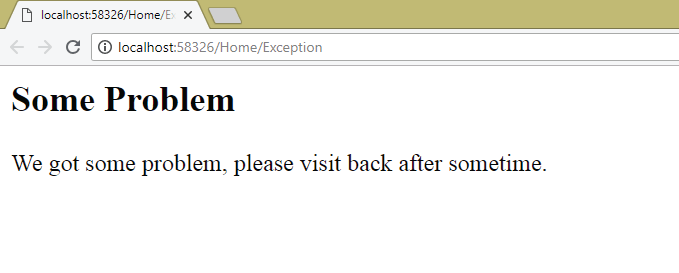
Next add a Razor View called Error inside the Views ➤ Home for the action method.
<h2>Some Problem</h2>
<p>We got some problem, please visit back after sometime.</p>
Now what we want is that:
- 1. When the application is running in production environment the users will see a simple text message telling them there is some problem which will be rectified in a moment so come back after sometime.
- 2. When the application is running in Development environment then users will see full error details.
We can now update the program.cs by adding if-else condition that will show users the proper error messages based on the environment.
if (app.Environment.IsDevelopment())
{
    app.UseDeveloperExceptionPage();
    app.UseStatusCodePages();
}
else
{
    app.UseExceptionHandler("/Home/Error");
}
What is UseExceptionHandler? The UseExceptionHandler adds Middleware to catch exceptions occurring in our ASP.NET Core applications. The app.UseExceptionHandler(“/Home/Error”) sets the error path which is “/Home/Error”, here custom user friendly error messages can be displayed to the user. In this case it will be the Error action of Home controller.
To test it, set the environment variable – ASPNETCORE_ENVIRONMENT to ‘Production’ since we want the else code to execute. Then run the application and visit the ‘/Home/Exception’ page. This time you will see the contents of the Error View.
ASP.NET Core appsettings.json
The appsettings.json contains keys and values for storing database connection strings, global variables and other configuration values for an ASP.NET Core application. The appsettings.json file lies on the root folder of the application. The contents of this file will look something like:
{
    "Key1": "Microsoft",
    "Key2": "Dot Net"
}
Here Key1 and Key2 are the keys and Microsoft and Dot Net are their values. You can have any names for the keys.
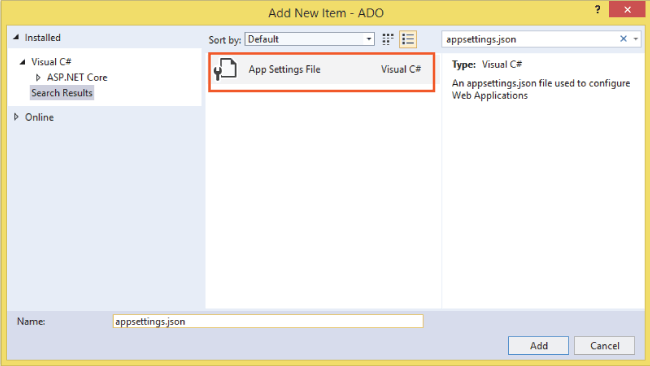
You can create this file by right clicking the project name in the Solution Explorer and selecting Add ➤ New Item. In the ‘Add New Item’ dialog box, search appsettings.json, and when this file shows up, simple add it to your app.
The below figure shows how to select the appsettings.json from the ‘Add New Item’ dialog box.
Get Values from appsettings.json
In the appsettings.json file I want to store which middleware to enable in the application. So I add the following code to this file:
{
  "Middleware": {
    "EnableContentMiddleware": true,
    "EnableShortCircuitMiddleware": true,
    "EnableRequestEditingMiddleware": true,
    "EnableResponseEditingMiddleware": false
  }
}
This JSON file contains 4 keys- EnableContentMiddleware, EnableShortCircuitMiddleware, EnableRequestEditingMiddleware & EnableResponseEditingMiddleware. I have given each of them a bool value, and I will read their values in Program.cs class. Then based on the value I will register the Middleware i.e. if the value of the key is true only then I will register the Middleware.
You can see the EnableResponseEditingMiddleware is provided value as false and others are provided value as true. So all the Middleware except the Response Editing Middleware will be registered.
In Program class we can read the configuration by app.Configuration() method. So add the following conditional code in program class that will read the configurations from appsettings and register the middlewares.
if (Convert.ToBoolean(app.Configuration["Middleware:EnableResponseEditingMiddleware"]))
{
	app.UseMiddleware<ResponseEditingMiddleware>();
}

if (Convert.ToBoolean(app.Configuration["Middleware:EnableRequestEditingMiddleware"]))
{
	app.UseMiddleware<RequestEditingMiddleware>();
}

if (Convert.ToBoolean(app.Configuration["Middleware:EnableShortCircuitMiddleware"]))
{
	app.UseMiddleware<ShortCircuitMiddleware>();
}

if (Convert.ToBoolean(app.Configuration["Middleware:EnableContentMiddleware"]))
{
	app.UseMiddleware<ContentMiddleware>();
}
In the above code I am reading the bool values of these 4 keys which are kept inside the ‘Middleware’ key. If the value is true then the corresponding Middleware is registered.
We can also read the values by using GetSection and GetValue methods as shown below:
if ((app.Configuration.GetSection("Middleware")?.GetValue<bool>("EnableResponseEditingMiddleware")).Value)
{
    app.UseMiddleware<ResponseEditingMiddleware>();
}

if ((app.Configuration.GetSection("Middleware")?.GetValue<bool>("EnableRequestEditingMiddleware")).Value)
{
    app.UseMiddleware<RequestEditingMiddleware>();
}

if ((app.Configuration.GetSection("Middleware")?.GetValue<bool>("EnableShortCircuitMiddleware")).Value)
{
    app.UseMiddleware<ShortCircuitMiddleware>();
}

if ((app.Configuration.GetSection("Middleware")?.GetValue<bool>("EnableContentMiddleware")).Value)
{
    app.UseMiddleware<ContentMiddleware>();
}
When you run the application, all except the Response Editing Middleware will be registered.
Access appsettings.json in Controller & View
We can access appsettings.json in the Controller by Injecting IConfiguration to the constructor of the Controller and they easily accessing the values of the keys as shown in the highlighted code below:
public class SomeController : Controller
{
    private IConfiguration settings;

    public SomeController(IConfiguration settings)
    {
        this.settings = settings;
    }

    public IActionResult Index()
    {
        bool contentMiddleware = Convert.ToBoolean(settings["Middleware:EnableContentMiddleware"]);
        return View();
    }
}
In large applications there might be hundreds of entries in the appsettings.json so it does not make sense for the controller to get access to every key-value entries.
A good approach would be to extract the needed section (i.e. key-values) from appsettings.json, convert it to a class then use this class to access those key-value. This is the procedure we have to follow:
- Create the class to contain the appsettings.json section values.
- Register this class with Configure<T> on the Program class.
- Retrive the class on the Controller with IOptions<T>.
So, add a new section that contains API related information on the appsettings.json as shown below. Only this API section will be made available to the controller and not the full appsettings file.
{
  "Middleware": {
    "EnableContentMiddleware": true,
    "EnableShortCircuitMiddleware": true,
    "EnableRequestEditingMiddleware": true,
    "EnableResponseEditingMiddleware": false
  },
  "APIEndpoints": {
    "Name": "OpenWeatherMap",
    "Url": "http://api.openweathermap.org/",
    "IsSecured": true
  }
}
Now create a class that will contain the values of the keys given inside the APIEndpoints section. You can name this class anything but the class members must have the same name as the keys inside this section.
I named the class as MyWebApi.cs and kept it inside Models folder. Note that the class members have the same name of the keys – Name, Url and IsSecured.
public class MyWebApi
{
    public string Name { get; set; }
    public string Url { get; set; }
    public bool IsSecured { get; set; }
}
Next, go to the Program.cs and register this class with Configure<T>.
builder.Services.Configure<MyWebApi>(builder.Configuration.GetSection("APIEndpoints"));Now in the Controller, import the Microsoft.Extensions.Options namespace that contains “IOptions”. Then add dependency of IOptions<MyWebApi> on the constructor. The Dependency Injection will make the MyWebApi class available on the controller which you can use to read the values stored in the appsettings.json.
using Configuration.Models;
using Microsoft.AspNetCore.Mvc;
using Microsoft.Extensions.Options;

namespace Configuration.Controllers
{
	public class ReadController : Controller
	{
		private IOptions<MyWebApi> settings;

		public ReadController(IOptions<MyWebApi> settings)
		{
			this.settings = settings;
		}

		public IActionResult Index()
		{
			string apiName = settings.Value.Name;
			string url = settings.Value.Url;
			bool secured = settings.Value.IsSecured;
			return View();
		}
	}
}
You can also inject IOptions<MyWebApi> on the View. Here use the inject directive as shown by the below highlighted code:
@using Microsoft.Extensions.Options;
@using Configuation.Models;
@inject IOptions<MyWebApi> settings;

<p>@settings.Value.Name</p>
<p>@settings.Value.Url</p>
<p>@settings.Value.IsSecured</p>
Once injected the IOptions will make the MyWebAPI class available on the view. We can then access the properties as @settings.Value.PropertyName.
Multiple appsettings.json for Development and Production Connection Strings
As stated earlier the appsettings.json stores the connection string for the database. During the course of application development the programmers will want to have separate appsetting.json files in their application for developement and production.
One that will be used during development and which will contains the connection string (or other variables) to local database.
The other one will be used during production (i.e. when you publish the website and put it on hosting server), and this one will contain the connection string to the production database i.e. the live database.
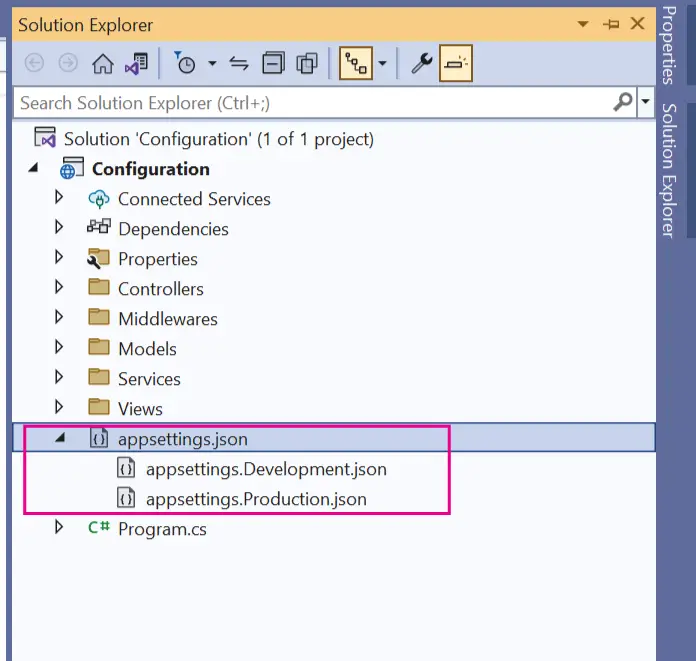
We can do this by creating 2 new appsetting file. First one by the name of appsettings.Production.json and other by the name of appsettings.Development.json.
DOT NET will automatically fetch the appsettings file based on the current environment. That is appsettings.Development.json if environment is development and appsettings.Production.json if environment is production.
First add a new file called appsettings.Production.json and add the connection string to the production database.
{
  "ConnectionStrings": {
    "DefaultConnection": "Server=SQL6003.site4now.net;Database=DB_A3CE39_y11;User Id=DB_PCE39_y11_admin;Password=admin@123Ezfx;"
  }
}
Now add another new appsetting.json file on your application root folder and give it the name – appsettings.development.json. Then add your local development database connection string as shown below.
{
  "ConnectionStrings": {
    "DefaultConnection": "Server=vaio;Database=Goldentaurus;Trusted_Connection=True;"
  }
}
This newly added files will remain hidden in the solutions explorer. To view this file right click the arrow (➤) before the appsettings.json file.
The below image explains this:
To get the connection string, add to the program class, the following code:
builder.Services.Configure<Connections>(builder.Configuration.GetSection("ConnectionStrings"));Next, create Connections.cs which will contain the connection string:
public class Connections
{
    public string DefaultConnection { get; set; }
}
Then on the constructor of the controller add dependency of IOptions<Connections>, and you can then get the connectionstring.
using Configuration.Models;
using Microsoft.AspNetCore.Mvc;
using Microsoft.Extensions.Options;

namespace Configuration.Controllers
{
	public class ConnectionController : Controller
	{
		private IOptions<Connections> cs;

		public ConnectionController(IOptions<Connections> cs)
		{
			this.cs = cs;
		}

		public IActionResult Index()
		{
			string myCS = cs.Value.DefaultConnection;
			return View();
		}
	}
}
Now the appsettings.Development.json will be used when the application is running in development environment while the appsettings.Production.json will be used when the application is running on Production.
You can download the full codes of this tutorial from the below link:
SHARE THIS ARTICLE
Related Tutorials:


ABOUT THE AUTHOR
I hope you enjoyed reading this tutorial. If it helped you then consider buying a cup of coffee for me. This will help me in writing more such good tutorials for the readers. Thank you.

HELLO EVERYONE
 Welcome to YogiHosting - A Programming Tutorial Website. It is used by millions of people around the world to learn and explore about ASP.NET Core, Blazor, jQuery, JavaScript, Docker, Kubernetes and other topics.
SUBSCRIBE TO NEWSLETTER
Enter your email address to subscribe to this blog and receive notifications of new posts by email.
Join 90K other subscribers