How to work with Claims in ASP.NET Core Identity
Page Contents
ASP.NET Core Identity Claims are name-value pair issued to users to represent what the users are allowed to do. For example, a person driving licence is issued by a driving license authority. If DOB in the driving license is 21st December, 1990. Then in this case the claim name would be DOB, the claim value would be 21st December, 1990, and the issuer would be the driving license authority. This means the user is authorized by the driving license authority to drive the car.
In the previous Identity tutorials we have seen the Authentication of a User based on his email and password stored in the data store. We also authorized only users of a particular role to access an Action method. Note that Identity Roles are Claims, but not all claims are roles. ASP.NET Core Identity offers claims for doing authentication and authorization and this tutorial will cover this topic in details.
Identity Claims based authorization, at its simplest, checks the value of a claim and allows access to a resource based upon that value.
Example: ASP.NET Core Identity Claims
Create a new controller called ClaimsController.cs and change it’s Index action to return User.Claims. The code is given below:
using Microsoft.AspNetCore.Authorization;
using Microsoft.AspNetCore.Mvc;

namespace Identity.Controllers
{
    [Authorize]
    public class ClaimsController : Controller
    {
        public ViewResult Index() => View(User?.Claims);
    }
}
How To Get Current User Claims In ASP.NET Identity? We can get user claims through the User property of the HttpContext object. It returns a ClaimsPrincipal object of the current User which contains all the claims of the User. We are returning this value to the View as a Model where it will be shown on the browser.
Now create the view called Index.cshtml inside the Views ➤ Claims folder with the following code:
@model IEnumerable<System.Security.Claims.Claim>
@{
    ViewData["Title"] = "CLAIMS";
}

<h2 class="bg-primary m-1 p-1 text-white">Claims</h2>

<table class="table table-sm table-bordered">
    <tr>
        <th>Subject</th>
        <th>Issuer</th>
        <th>Type</th>
        <th>Value</th>
    </tr>

    @foreach (var claim in Model.OrderBy(x => x.Type))
    {
        <tr>
            <td>@claim.Subject.Name</td>
            <td>@claim.Issuer</td>
            <td>@claim.Type</td>
            <td>@claim.Value</td>
        </tr>
    }
</table>
The View shows all the Claims of the Current logged in User in an HTML table.
Now run the application and login with user Tom’s credentials. Login URL is https://localhost:7263/Account/Login and tom’s credentials are given below.
2. Password – Coder77@
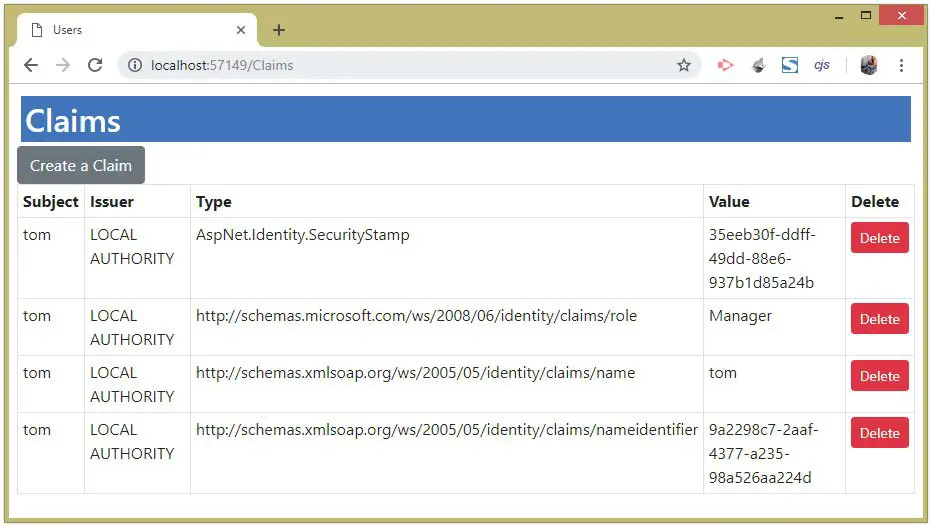
After login, go to the URL – https://localhost:7263/Claims, where we will see all the Claims associated with user tom, as shown in the below image:
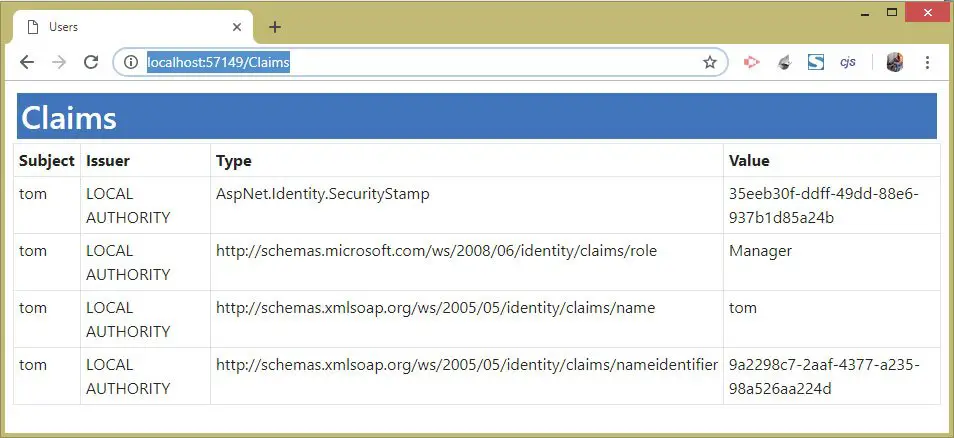
See the second row, which shows the Identity Role to which the user tom belongs. It is showing Manager role. That means a role is basically a Claim.
ASP.NET Core Identity Create and Delete User Claims
We will now Create and Delete Identity Claims for a User. So first create a new razor view called Create.cshtml inside the Views ➤ Claims folder with the following code:
@{
    ViewData["Title"] = "CREATE CLAIM";
}

<h1 class="bg-info text-white">Create Claim</h1>
<a asp-action="Index" class="btn btn-secondary">Back</a>
<div asp-validation-summary="All" class="text-danger"></div>

<form method="post">
    <div class="form-group">
        <label for="ClaimType">Claim Type:</label>
        <input name="ClaimType" class="form-control" />
    </div>
    <div class="form-group">
        <label for="ClaimValue">Claim Value:</label>
        <input name="ClaimValue" class="form-control" />
    </div>
    <button type="submit" class="btn btn-primary">Create</button>
</form>
There are 2 input controls that allow adding Claim type and Claim value for a user.
Next, update the Index.cshtml razor view to add a link to invoke the Create View, and a form that contains a delete button for deleting claims. The updated Index View code is shown in highlighted manner.
@model IEnumerable<System.Security.Claims.Claim>
@{
    ViewData["Title"] = "CLAIMS";
}

<h2 class="bg-primary m-1 p-1 text-white">Claims</h2>
<a asp-action="Create" class="btn btn-secondary">Create a Claim</a>

<table class="table table-sm table-bordered">
    <tr>
        <th>Subject</th>
        <th>Issuer</th>
        <th>Type</th>
        <th>Value</th>
        <th>Delete</th>
    </tr>

    @foreach (var claim in Model.OrderBy(x => x.Type))
    {
        <tr>
            <td>@claim.Subject.Name</td>
            <td>@claim.Issuer</td>
            <td>@claim.Type</td>
            <td>@claim.Value</td>
            <td>
                <form asp-action="Delete" method="post">
                    <input type="hidden" name="claimValues" value="@claim.Type;@claim.Value;@claim.Issuer" />
                    <button type="submit" class="btn btn-sm btn-danger">
                        Delete
                    </button>
                </form>
            </td>
        </tr>
    }
</table>
Finally we can add the Create and Delete action methods on ClaimsController.cs file. We also need to add a dependency of UserManager<T> class object on the constructor of the controller.
The updated code of the Claims Controller is given below.
using Microsoft.AspNetCore.Authorization;
using Microsoft.AspNetCore.Mvc;
using Identity.Models;
using Microsoft.AspNetCore.Identity;
using System.Security.Claims;

namespace Identity.Controllers
{
    [Authorize]
    public class ClaimsController : Controller
    {
        private UserManager<AppUser> userManager;
        public ClaimsController(UserManager<AppUser> userMgr)
        {
            userManager = userMgr;
        }

        public ViewResult Index() => View(User?.Claims);

        public ViewResult Create() => View();

        [HttpPost]
        [ActionName("Create")]
        public async Task<IActionResult> Create_Post(string claimType, string claimValue)
        {
            AppUser user = await userManager.GetUserAsync(HttpContext.User);
            Claim claim = new Claim(claimType, claimValue, ClaimValueTypes.String);
            IdentityResult result = await userManager.AddClaimAsync(user, claim);

            if (result.Succeeded)
                return RedirectToAction("Index");
            else
                Errors(result);
            return View();
        }

        [HttpPost]
        public async Task<IActionResult> Delete(string claimValues)
        {
            AppUser user = await userManager.GetUserAsync(HttpContext.User);

            string[] claimValuesArray = claimValues.Split(";");
            string claimType = claimValuesArray[0], claimValue = claimValuesArray[1], claimIssuer = claimValuesArray[2];

            Claim claim = User.Claims.Where(x => x.Type == claimType && x.Value == claimValue && x.Issuer == claimIssuer).FirstOrDefault();

            IdentityResult result = await userManager.RemoveClaimAsync(user, claim);

            if (result.Succeeded)
                return RedirectToAction("Index");
            else
                Errors(result);

            return View("Index");
        }

        void Errors(IdentityResult result)
        {
            foreach (IdentityError error in result.Errors)
                ModelState.AddModelError("", error.Description);
        }
    }
}
In the Create action method, first we get current logged in user from the userManager.GetUserAsync() method. Then we add a new claim object, and finally we add this claim object to create a new claim for the user.
The claim is created for a user by using the method – userManager.AddClaimAsync().
The Delete action method gets the claim values, which are separated with semicolon (;), in it’s parameter. Then with the split method we extract the claim type, claim value and claim issuer values.
The selected claims are fetched by using the LINQ query:
Claim claim = User.Claims.Where(x => x.Type == claimType && x.Value == claimValue && x.Issuer == claimIssuer).FirstOrDefault();The claim of a user is deleted using the userManager.RemoveClaimAsync() method.
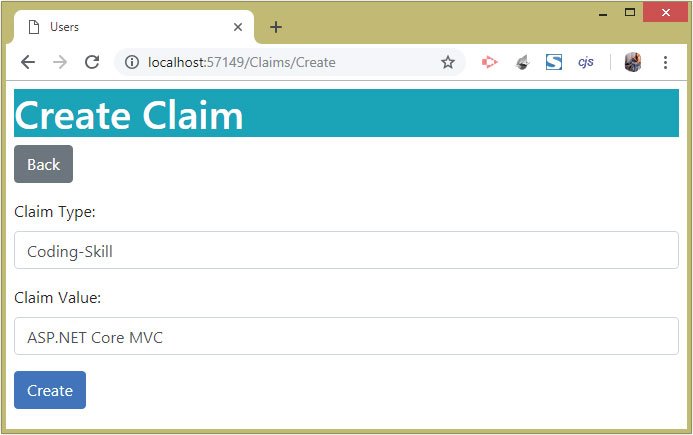
To test these features, run your app and login with user tom’s credentials. Then go to the Create Claims page, whose URL is – https://localhost:7263/Claims/Create.
Here fill the Claim type and Clam value fields like show in the below image. Then click the Create button.
Remember that once the Claim is created, we need to logout then re-login, in order to see this newly created claim. So, re-login to the tom’s account once more by going to the URL – https://localhost:7263/Account/Login.
Next, go to the claims url once again and we will see the newly created claim, as shown in the below image:
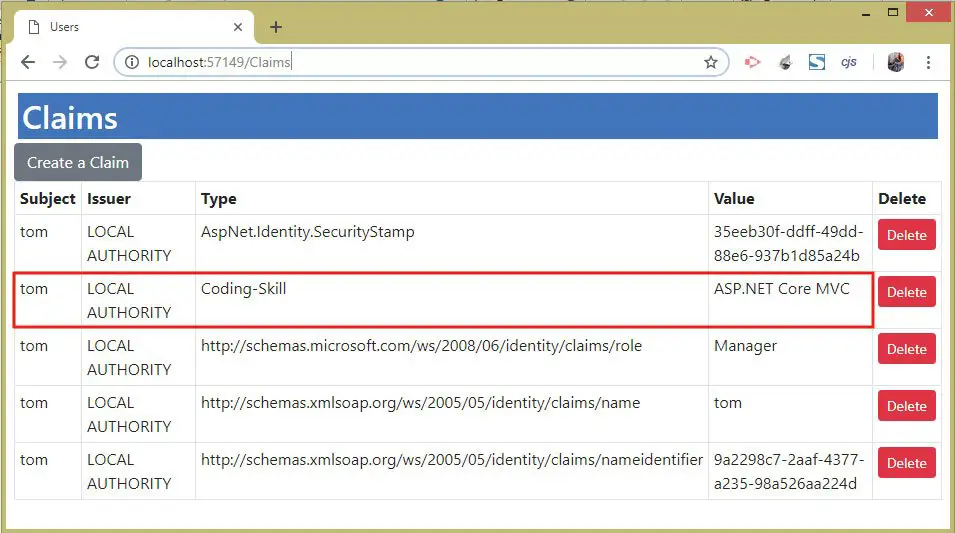
Now delete the newly added claim by clicking on the Delete button next to it.
Once the claim is deleted, we need to re-login once again, and then we can check that the claim got deleted. See the below image which shown the claim deleted from user’s toms account.
Download the full codes of this tutorial from the below link:
This completes the tutorial on ASP.NET Core Identity Claims where we saw what claims are, how to create claims for a user and how to delete them. We also created a feature to view all the claims of a logged in user in an html table. Note that for authenticating users with Identity Claims we will also need to build Identity Policies, and that is the topic of our next tutorial.


 Welcome to YogiHosting - A Programming Tutorial Website. It is used by millions of people around the world to learn and explore about ASP.NET Core, Blazor, jQuery, JavaScript, Docker, Kubernetes and other topics.