Creating Password Reset feature in ASP.NET Core Identity
When a user forgets his/her password then he needs the option to reset it. In such situations ASP.NET Core Identity Reset Password option comes out to be very handy.
ASP.NET Core Identity Reset Password
Let’s understand how Reset Password will work in identity. Suppose a user forgot his/her password then he/she can go to the Forgot Password Page. This page screenshot is given below:
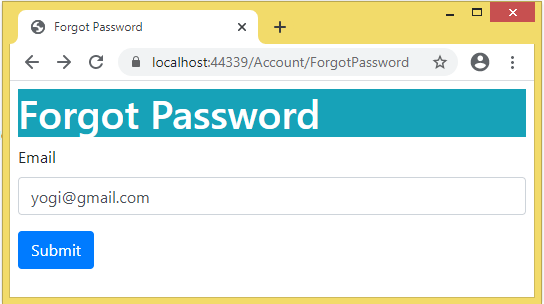
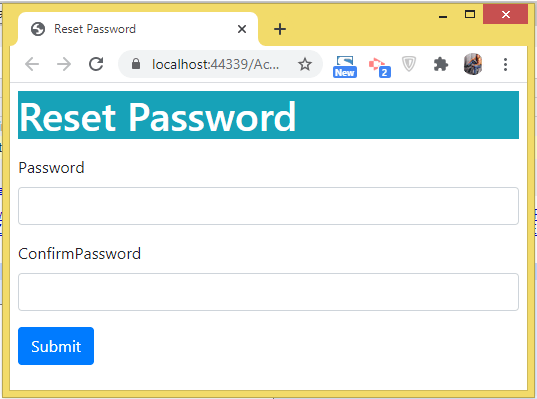
From this page he/she can request an forgot password email which will contain a link to Reset Password. When the user clicks on this link then he/she is taken to the Reset Password Page and from here he/she can create a new password to their accounts. This screenshot of Identity Reset Password page is given below:
Enable Token Generation in Identity
First add the AddDefaultTokenProviders extension method to enable the token generation in the app, add the below code to the program class.
builder.Services.AddIdentity<AppUser, IdentityRole>().AddEntityFrameworkStores<AppIdentityDbContext>().AddDefaultTokenProviders();Identity will create a token once a reset password email is sent. This token will be used to match the request coming to identity when a user clicks the reset password email. Identity will ensure that the token is valid and not expired before it allows the user to reset his/her password. It’s a great feature, isn’t it?
We can also set the time of token validity by adding the below code to the program.cs.
builder.Services.Configure<DataProtectionTokenProviderOptions>(opts => opts.TokenLifespan = TimeSpan.FromHours(10));Here we have set the token validity to 10 hours. So this means the user can change the password in under 10 hours time.
Create ASP.NET Core Identity Forgot Password
Let us create ASP.NET Core Identity Forgot Password feature. So start by adding a new action method called ForgotPassword in the AccountController. The account controller is a default controller in Identity where we perform operations for managing users. The action’s work would be to send the email, to the user’s email id, with a link to reset the password.
We have also added another action by the name of ForgotPasswordConfirmation whose work is to show the confirmation message telling the user that the reset email is sent successfully, and now they need to check their inbox for the email.
The codes of these actions are highlighted:
using Identity.Models;
using Microsoft.AspNetCore.Authorization;
using Microsoft.AspNetCore.Identity;
using Microsoft.AspNetCore.Mvc;
using System.ComponentModel.DataAnnotations;
using System.Security.Claims;

namespace Identity.Controllers
{
    [Authorize]
    public class AccountController : Controller
    {
        private UserManager<AppUser> userManager;
        private SignInManager<AppUser> signInManager;

        public AccountController(UserManager<AppUser> userMgr, SignInManager<AppUser> signinMgr)
        {
            userManager = userMgr;
            signInManager = signinMgr;
        }

        // other codes

        [AllowAnonymous]
        public IActionResult ForgotPassword()
        {
            return View();
        }

        [HttpPost]
        [AllowAnonymous]
        public async Task<IActionResult> ForgotPassword([Required]string email)
        {
            if (!ModelState.IsValid)
                return View(email);

            var user = await userManager.FindByEmailAsync(email);
            if (user == null)
                return RedirectToAction(nameof(ForgotPasswordConfirmation));

            var token = await userManager.GeneratePasswordResetTokenAsync(user);
            var link = Url.Action("ResetPassword", "Account", new { token, email = user.Email }, Request.Scheme);

            EmailHelper emailHelper = new EmailHelper();
            bool emailResponse = emailHelper.SendEmailPasswordReset(user.Email, link);

            if (emailResponse)
                return RedirectToAction("ForgotPasswordConfirmation");
            else
            {
                // log email failed
            }
            return View(email);
        }

        [AllowAnonymous]
        public IActionResult ForgotPasswordConfirmation()
        {
            return View();
        }
    }
}
Explanation: Only the below 4 lines are important to note. These are given below:
var token = await userManager.GeneratePasswordResetTokenAsync(user);
var link = Url.Action("ResetPassword", "Account", new { token, email = user.Email }, Request.Scheme);

EmailHelper emailHelper = new EmailHelper();
bool emailResponse = emailHelper.SendEmailPasswordReset(user.Email, link);
We created a password reset token from the GeneratePasswordResetTokenAsync method of the UserManager<T> class. Next we added this token to a link. This link will be served as a reset password link.
Then we called the method SendEmailPasswordReset() of EmailHelper.cs class to send the email to the user.
We created the EmailHelper.cs class inside the Models folder and has the following code:
using System.Net.Mail;

namespace Identity.Models
{
    public class EmailHelper
    {
        public bool SendEmailPasswordReset(string userEmail, string link)
        {
            MailMessage mailMessage = new MailMessage();
            mailMessage.From = new MailAddress("[email protected]");
            mailMessage.To.Add(new MailAddress(userEmail));

            mailMessage.Subject = "Password Reset";
            mailMessage.IsBodyHtml = true;
            mailMessage.Body = link;

            SmtpClient client = new SmtpClient();
            client.Credentials = new System.Net.NetworkCredential("[email protected]", "yourpassword");
            client.Host = "smtpout.secureserver.net";
            client.Port = 80;

            try
            {
                client.Send(mailMessage);
                return true;
            }
            catch (Exception ex)
            {
                // log exception
            }
            return false;
        }
    }
}
The work of this class is to send the email using SMTP.
We will also add 2 Razor View files called ForgotPassword.cshtml & ForgotPasswordConfirmation.cshtml inside the Views ➤ Account folder. Their codes are given below:
@model string

@{
    ViewData["Title"] = "Forgot Password";
}

<h1 class="bg-info text-white">Forgot Password</h1>

<form asp-action="ForgotPassword" method="post">
    <div class="form-group">
        <label>Email</label>
        <input name="email" class="form-control" />
    </div>
    <button class="btn btn-primary" type="submit">Submit</button>
</form>
@{
    ViewData["Title"] = "Forgot Password Confirmation";
}

<h1>Forgot Password Confirmation</h1>
<p>
    The email has been sent. Please check your email to reset your password.
</p>
Testing Forgot Password functionality
Run the app and go to the forgot password url and fill the email address and click the submit button to send the password reset email. See the below image.

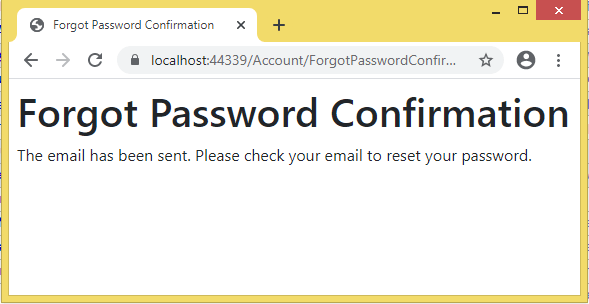
Next, we will see a confirmation message. See below image.
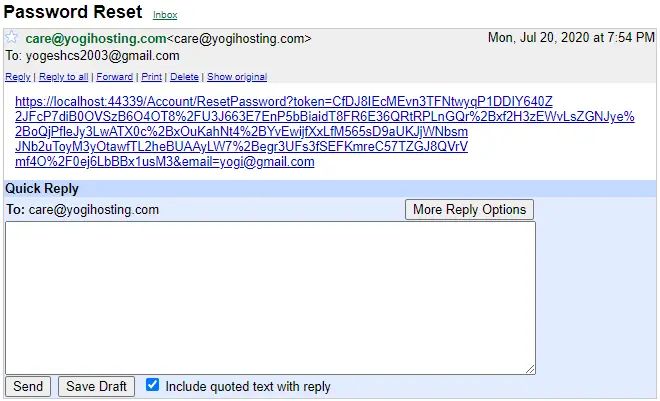
Now check the password reset email in the inbox and click it’s link. We have shown this email in the below image.
Now it’s time to allow the user to create his/her new password.
Create New Password Feature
When the user clicks the link on the password reset email then he/she is taken to the page where they can create the new password.
The link directs users to the ResetPassword action of Account controller. So add ResetPassword action along with another action called ResetPasswordConfirmation to the Account controller. Their codes are given below.
using Identity.Models;
using Microsoft.AspNetCore.Authorization;
using Microsoft.AspNetCore.Identity;
using Microsoft.AspNetCore.Mvc;
using System.ComponentModel.DataAnnotations;
using System.Security.Claims;

namespace Identity.Controllers
{
    [Authorize]
    public class AccountController : Controller
    {
        private UserManager<AppUser> userManager;
        private SignInManager<AppUser> signInManager;

        public AccountController(UserManager<AppUser> userMgr, SignInManager<AppUser> signinMgr)
        {
            userManager = userMgr;
            signInManager = signinMgr;
        }

        // other codes

        [AllowAnonymous]
        public IActionResult ResetPassword(string token, string email)
        {
            var model = new ResetPassword { Token = token, Email = email };
            return View(model);
        }

        [HttpPost]
        [AllowAnonymous]
        public async Task<IActionResult> ResetPassword(ResetPassword resetPassword)
        {
            if (!ModelState.IsValid)
                return View(resetPassword);

            var user = await userManager.FindByEmailAsync(resetPassword.Email);
            if (user == null)
                RedirectToAction("ResetPasswordConfirmation");

            var resetPassResult = await userManager.ResetPasswordAsync(user, resetPassword.Token, resetPassword.Password);
            if (!resetPassResult.Succeeded)
            {
                foreach (var error in resetPassResult.Errors)
                    ModelState.AddModelError(error.Code, error.Description);
                return View();
            }

            return RedirectToAction("ResetPasswordConfirmation");
        }

        public IActionResult ResetPasswordConfirmation()
        {
            return View();
        }
    }
}
Explanation: The HTTP GET version of ResetPassword action method is called when the users clicks on the reset password link on their email. The work of this action method is to grab the token and email address and bind them to the view.
Next, the user fills the new password and confirm password on the View (i.e. ResetPassword.cshtml) and click the button to save it. This calls the HTTP POST version of ResetPassword action method. This action method gets new password, user email and token through model binding.
The code that creates the new password of the user is:
var resetPassResult = await userManager.ResetPasswordAsync(user, resetPassword.Token, resetPassword.Password);Next, we need to create the ResetPassword.cs class inside the Models folder with the following code.
using System.ComponentModel.DataAnnotations;

namespace Identity.Models
{
    public class ResetPassword
    {
        [Required]
        public string Password { get; set; }

        [Compare("Password", ErrorMessage = "The password and confirmation password do not match.")]
        public string ConfirmPassword { get; set; }

        public string Email { get; set; }
        public string Token { get; set; }
    }
}
We will also need to create 2 views called ResetPassword.cshtml & ResetPasswordConfirmation.cshtml inside the Views ➤ Account folder with the following codes:
@model ResetPassword

@{
    ViewData["Title"] = "Reset Password";
}

<h1 class="bg-info text-white">Reset Password</h1>
<div class="text-danger" asp-validation-summary="All"></div>

<form asp-action="ResetPassword" method="post">
    <div class="form-group">
        <label asp-for="Password"></label>
        <input asp-for="Password" class="form-control" />
    </div>
    <div class="form-group">
        <label asp-for="ConfirmPassword"></label>
        <input asp-for="ConfirmPassword" class="form-control" />
    </div>
    <input type="hidden" asp-for="Email" class="form-control" />
    <input type="hidden" asp-for="Token" class="form-control" />
    <button class="btn btn-primary" type="submit">Submit</button>
</form>
@{
    ViewData["Title"] = "Reset Password Confirmation";
}

<h1>Reset Password Confirmation</h1>

<p>
    Password has been reset. Please <a asp-action="Login">Login</a>
</p>
The ResetPassword view will be the one from where the users create their new passwords while ResetPasswordConfirmation will show the confirmation message to the users once their passwords get changed successfully.
Testing Create New Password Feature
First we go to the password forgot page (url – https://localhost:7263/Account/ForgotPassword) and ask for the password reset email. Then we click on the reset password link that comes on the email address.
We reach the Reset Password page where we add our new password to the 2 input controls and click the Submit button. See the below image.
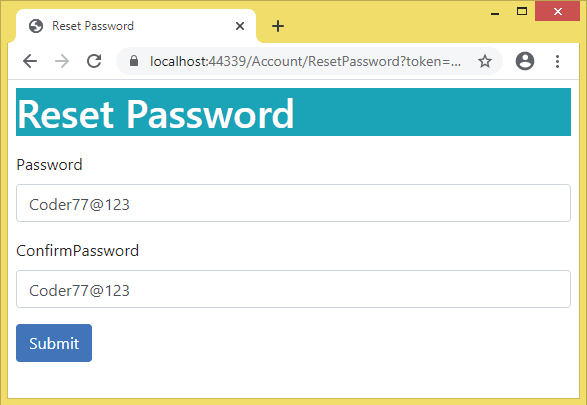
Check the url of this page which in my case is:
https://localhost:44339/Account/ResetPassword?token=CfDJ8IEcMEvn3TFNtwyqP1DDIY4nTClx%2BenhaMoFHCu3zl60nhFZG6SgbSat36BA7l%2FU%2F0UrhG2CBvXC%2BFM8cPXF0KWuqwpg2XEKA7QRzfnFbi1VHDFtxa2ZURrliBkQ%2FzStRskkuSnIpc%2F3m%2Fy6T4R48Nhp4%2FoTqnnaX12S9RVvSZMVw%2FtpKI1fb%2B1ibsAm1cSVCiOZj54wGQwHmjfpYNDoQiLMlTOi8Az%2BfboqoX4W5oKB&[email protected]Notice the token and email address are added to the query strings in the page url.
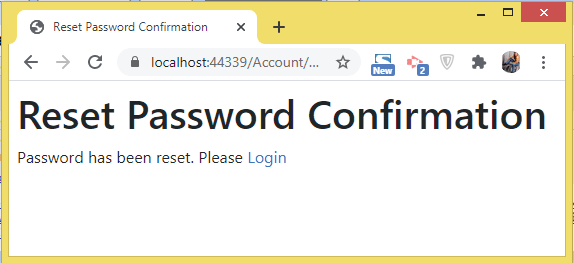
Finally we get the message that our Password has been reset. See the below image.
Now we can login to identity with our new password.
You can download the full codes of this tutorial from the below link:
In this tutorial we learned.
- Implementing forgot password functionality.
- Registering token providers and to set up the life span of a token.
- Implementing Reset Password functionality.
Hope you enjoyed learning these things.




 Welcome to YogiHosting - A Programming Tutorial Website. It is used by millions of people around the world to learn and explore about ASP.NET Core, Blazor, jQuery, JavaScript, Docker, Kubernetes and other topics.