How to Setup and Configure ASP.NET Core Identity

Page Contents
ASP.NET Core Identity is a Toolkit and an API with which you can create Authorization and Authentication features in your application. Users can create an account and login with a user name and password. This also includes Roles and Roles Management. ASP.NET Core Identity uses a SQL Server Database to store user names, passwords, roles, and profile data.
This tutorial uses the SQL Server Express LocalDB for the database. You can directly download this from the Microsoft website – Link
You can also use other versions of SQL Server database. The codes work the same.
This tutorial is a part of the ASP.NET Core Identity series
- 1. How to Setup and Configure ASP.NET Core Identity
- 2. How to Create, Read, Update & Delete users in ASP.NET Core Identity
- 3. Username, Email & Password Policy in ASP.NET Core Identity
- 4. How to do Authentication of Users in ASP.NET Core Identity
- 5. How to work with Roles in ASP.NET Core Identity
- 6. How to add Custom User Properties in ASP.NET Core Identity
- 7. How to work with Claims in ASP.NET Core Identity
- 8. How to work with Policies in ASP.NET Core Identity
- 9. How to integrate Google login feature in ASP.NET Core Identity
- 10. Two-Factor Authentication in ASP.NET Core Identity
- 11. How to perform Email Confirmation of Users in ASP.NET Core Identity
- 12. Creating Password Reset feature in ASP.NET Core Identity
- 13. User Lockout in ASP.NET Core Identity
Create the Example Project
Best way for understanding ASP.NET Core Identity is through an example. So we create a new ASP.NET Core MVC project and name it Identity. Next, we will install the necessary packages and then configure Identity in this example project.
Installing Identity Packages
ASP.NET Core Identity needs 3 packages to be installed in your application. These packages are:
- Microsoft.AspNetCore.Identity.EntityFrameworkCore
- Microsoft.EntityFrameworkCore.Design
- Microsoft.EntityFrameworkCore.SqlServer
Install them from NuGet, first go to Tools ➤ NuGet Package Manager ➤ Manage NuGet Packages for Solutions in your Visual Studio. Then search for these packages and click install. I have provided with a screenshot of these packages in the below image.

Note that install only the supported versions of the packages based on the .NET version you are using.
Configuring the Project
Go to the Program.cs class and add Authentication and Authorization Middlewares that will be needed for the project. So add the below 2 lines of code below app.UseRouting().
app.UseAuthentication();
app.UseAuthorization();Setting up ASP.NET Core Identity
The process for setting up ASP.NET Core Identity involves creating new model classes, configuration changes, controllers and actions to support authentication and authorization operations.
User Class
User class defines the Users for the application. These users are stored in the database. The User class is derived from IdentityUser class of Microsoft.AspNetCore.Identity namespace.
So, create AppUser.cs class inside the “Models” folder with the following code:
using Microsoft.AspNetCore.Identity;

namespace Identity.Models
{
    public class AppUser : IdentityUser
    {
    }
}
Notice, the AppUser.cs does not contain any property or method. This is because the IdentityUser.cs class provides it with some of the properties like the user name, e-mail, phone number, password hash, role memberships and so on.
If you want more properties that are not defined in the IdentityUser class then you can certainly add them to your User Class.
The IdentityUser class properties are defined below:
| Name | Description |
|---|---|
| Id | It contains the Unique Id of the user. |
| UserName | It contains the user’s username. |
| Claims | This property returns all the claims for the user. |
| It contains the email for the user. | |
| PasswordHash | It contains the hash form of the user password. |
| Roles | It returns all the roles for the user. |
| PhoneNumber | It returns the phone number for the user. |
| SecurityStamp | It contains a value that is changed whenever the user identity is altered. For example a password or phone number change, etc. |
Database Context
The Database Context Class is derived from the IdentityDbContext<T> where T is the User class that is AppUser in the project. The IdentityDbContext class is from Microsoft.AspNetCore.Identity.EntityFrameworkCore namespace and is used by Identity for communicating with the database through Entity Framework Core.
The Database Context Class operates on the User class. Remember we have defined the User class as AppUser.cs in the above section.
Now, create the DB Context Class inside the Models folder. You can do it by adding a new class and give it a name as AppIdentityDbContext.cs. Next add the following code to it:
using Microsoft.AspNetCore.Identity.EntityFrameworkCore;
using Microsoft.EntityFrameworkCore;

namespace Identity.Models
{
    public class AppIdentityDbContext : IdentityDbContext<AppUser>
    {
        public AppIdentityDbContext(DbContextOptions<AppIdentityDbContext> options) : base(options) { }
    }
}
Notice, I haven’t added any property or method to this class, this is because this empty class is inheriting from IdentityDbContext<AppUser> and so it is getting all it’s methods and properties.
Database Connection String
The ASP.NET Core Identity Database Connection string contains the Database name, user name and password to connect to the Identity Database. It is stored in the appsettings.json file. This file resides on the root of the project.
Mostly this file is already created in a new project. If it is missing then you right click the project name in the Solution Explorer, and select Add ➤ New Item. Then on the list of items, select App Settings File, and click the Add button.
Add the following code to your appsettings.json file.
{
  "ConnectionStrings": {
    "DefaultConnection": "Server=(localdb)\\MSSQLLocalDB;Database=IdentityDB;Trusted_Connection=True;MultipleActiveResultSets=true"
  }
}
In the Connection string, the Server name specifies the SQL Server LocalDB, Database name specifies the name of the database which I have kept as IdentityDB. You can name it anything which you want.
The Trusted_Connection is set to ‘True’ so the project will use windows authentication to connect to this database and there is no need for providing the database username and password.
Multiple Active Result Sets (MARS) is a feature that works with SQL Server to allow the execution of multiple batches on a single connection. This gives faster execution of SQL Operations. I have set it to true – MultipleActiveResultSets=true.
Now, I have to update the Program.cs file so that the application can read the connection string from the appsettings.json file.
The changes that are made to this file are highlighted below.
using Identity.Models;
using Microsoft.AspNetCore.Identity;
using Microsoft.EntityFrameworkCore;

var builder = WebApplication.CreateBuilder(args);

builder.Services.AddDbContext<AppIdentityDbContext>(options => options.UseSqlServer(builder.Configuration["ConnectionStrings:DefaultConnection"]));

// Add services to the container.
builder.Services.AddControllersWithViews();

var app = builder.Build();

//.....
Set up ASP.NET Core Identity as a Service
Now I have to perform the ASP.NET Core Identity Configuration on the Program.cs class. The updated code is given below:
using Identity.Models;
using Microsoft.AspNetCore.Identity;
using Microsoft.EntityFrameworkCore;

var builder = WebApplication.CreateBuilder(args);

builder.Services.AddDbContext<AppIdentityDbContext>(options => options.UseSqlServer(builder.Configuration["ConnectionStrings:DefaultConnection"]));

builder.Services.AddIdentity<AppUser, IdentityRole>().AddEntityFrameworkStores<AppIdentityDbContext>().AddDefaultTokenProviders();


// Add services to the container.
builder.Services.AddControllersWithViews();

var app = builder.Build();
//...
I have added the given code line to set up the ASP.NET Core Identity as a Service:
builder.Services.AddIdentity<AppUser, IdentityRole>().AddEntityFrameworkStores<AppIdentityDbContext>().AddDefaultTokenProviders();The above code specifies that:
- The AddIdentity method’s type parameter are specified with the class used to represent users (AppUser) and the class used to represent roles (Identity Role).
- The AddEntityFrameworkStores method specifies that Identity should use EF Core and the DB Content class which in the project is AppIdentityContext class.
- The AddDefaultTokenProviders method adds the default token providers used to generate tokens for reset passwords, change email and change telephone number operations, and for two factor authentication token generation.
Recall we earlier added app.UseAuthentication() to the Program.cs . By this on every HTTP Request, the user’s credentials will be added on a Cookie or URL. This will associate a give user with the HTTP request he or she makes to the application.
Creating the Identity Database using the EF Core Migration Commands
Now I am ready to create my Identity Database. I will use Entity Framework Core Migration commands to perform this task.
To run these Migration Commands I will use the Package Manager Console window. You will also need to install .NET Core CLI which are Entity Framework Core tools for running and managing migrations. Install it by running the following command on the Package Manager Console window:
dotnet tool install --global dotnet-efNext you need to go to the directory of the project file – .csproj. For this, run the dir command on the Package Manager Console window. The dir command will tell the current directory location.
When I ran the dir command it showed me my current direction location. As shown in the image given below, there are – Identity directory and Identity.sln file but no project file.
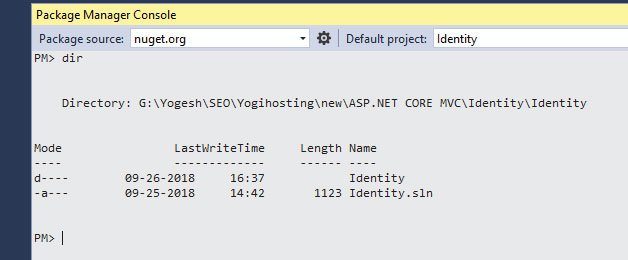
The Project file is located inside the “Identity” folder. So I have to go inside the “Identity” folder by using the cd Identity.
Then I again ran the dir command which shows the Identity.csproj file, as shown in the image given below:
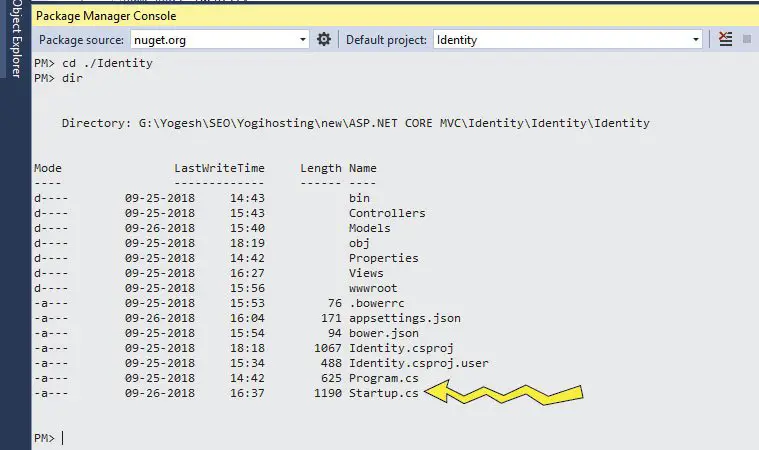
So now I can run my EF Core Migration Commands.
The first command to run is:
dotnet ef migrations add MyCommand1
The first command will take few seconds time to complete. Once completed, it will create the SQL Statements, necessary to create the database, in a few files. These files are created inside the Migrations folder.
The second command to run now is:
dotnet ef database update
This command will create your database from the files created by the first command.
You can simply skip .NET Core CLI commands and perform migrations with Package Manager Console (PMC) tools. For this you need to install the NuGet package – Microsoft.EntityFrameworkCore.Tools. Then run the following 2 commands on the Package Manager Console window.
Add-Migration MyCommand1
Update-Database
ASP.NET Core Identity Database
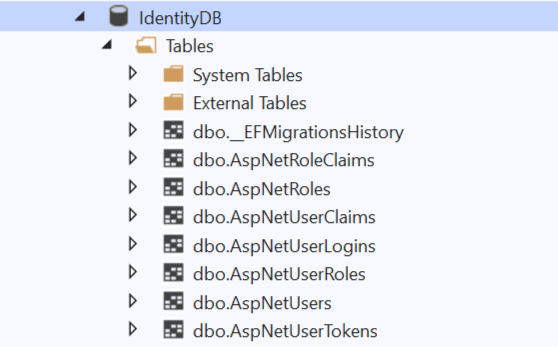
The Identity database is created by the migration commands. You can check your newly created database from the SQL Server Object Explorer window. See the below image which shows this newly created IdentityDB database.

Note: The SQL Server Object Explorer window can be opened from the View area given in the Visual Studio menu.
The Identity database has 8 tables in total. These tables contains the users record, roles, claims, token and login time details for these users.
Let’s go through them one by one.
- _EFMigrationsHistory – contains all the previous migrations undertaken.
- AspNetRoleClaims – stores the Claims by Roles.
- AspNetRoles – stores all the roles.
- AspNetUserClaims – stores Claims by Users.
- AspNetUserLogins – stores the login time for users.
- AspNetUserRoles – stores Roles of Users.
- AspNetUsers – stores all the Users.
- AspNetUserTokens – stores external authentication tokens.
You can download the full codes of this tutorial from the below link:
This completes the example project where we configured ASP.NET Core Identity. We can now add users, manage users, add roles, add users to roles, do user authentication, and so many other things with Identity. These topics are covered in the next Identity tutorials.
SHARE THIS ARTICLE
Related Tutorials:

ABOUT THE AUTHOR
I hope you enjoyed reading this tutorial. If it helped you then consider buying a cup of coffee for me. This will help me in writing more such good tutorials for the readers. Thank you.

HELLO EVERYONE
 Welcome to YogiHosting - A Programming Tutorial Website. It is used by millions of people around the world to learn and explore about ASP.NET Core, Blazor, jQuery, JavaScript, Docker, Kubernetes and other topics.
SUBSCRIBE TO NEWSLETTER
Enter your email address to subscribe to this blog and receive notifications of new posts by email.
Join 90K other subscribers