Migrations in Entity Framework Core

Entity Framework Core Migrations keep the database synchronized with the domain entity classes and configurations given on DbContext. Migrations will create or update the database in a very easy manner. When a project in under development, the programmers keep on updating the entity classes, therefore they need to run migrations inorder to keep the database schema up to date.
This tutorial is a part of Entity Framework Core series.
- 1. Introduction to Entity Framework Core
- 2. Installation of Entity Framework Core
- 3. Database-First approach in Entity Framework Core
- 4. DbContext Class in Entity Framework Core
- 5. Code-First Approach in Entity Framework Core
- 6. Migrations in Entity Framework Core
- 7. Insert Records in Entity Framework Core
- 8. Read Records in Entity Framework Core
- 9. Update Records in Entity Framework Core
- 10. Delete Records in Entity Framework Core
- 11. Conventions in Entity Framework Core
- 12. Configurations in Entity Framework Core
- 13. Fluent API in Entity Framework Core
- 14. Configure One-to-Many relationship using Fluent API in Entity Framework Core
- 15. Configure One-to-One relationship using Fluent API in Entity Framework Core
- 16. Configure Many-to-Many relationship using Fluent API in Entity Framework Core
- 17. Execute Raw SQL Queries using FromSqlRaw() method in Entity Framework Core
- 18. Execute SQL Stored Procedures using FromSqlRaw() & ExecuteSqlRawAsync() methods in Entity Framework Core
- 19. Xaero – Entity Framework Core Advanced Project
- 20. Value Converters and Comparers in Entity Framework Core
How to run Migrations
EF Core Migrations are run from the Package Manager Console window. This window can be opened from Tools ➤ NuGet Package Manager ➤ Package Manager Console menu of Visual Studio. Migrations require either .NET Core command-line interface (CLI) tools or Package Manager Console (PMC) tools to be installed.
Run the following command to install CLI tools.
PM> dotnet tool install --global dotnet-ef
If it is already installed then kindly update it to the latest version. Run the following update command to do the updation.
PM> dotnet tool update --global dotnet-ef
To install PMC tools run the following command.
PM> Install-Package Microsoft.EntityFrameworkCore.Tools
More information can be optained from Installation of Entity Framework Core. Now we are ready to look into some of the most important migration commands.
Add Migration Command
The Add Migration command will create Migration files that store information from your entity classes and DbContext. On the Tools > NuGet Package Manager > Package Manager Console execute any one of the 2 commands, that are given below, to create the migration.
PM> dotnet ef migrations add Migration1
or
PM> add-migration Migration1
Here Migration1 is the name of the migration and can be any name of our choice. The migration command will create a folder named Migrations on the root of the app. This folder contains 3 files.
- _.cs: It is the main migration file which includes migration operations named Up() and Down() methods. The Up method is responsible for creating DB objects while the Down method removes them.
- _.Designer.cs: The migrations metadata file which contains some db related information.
- ModelSnapshot.cs: A snapshot of the current model. This is used to determine what has changed when creating the next migration.
Check the below given image of these files.

Now the migration is created and we can create the database through them.
Update Migration Command
The Update Migration command will update the database to the latest migration or to a specified migration. If the database is not present then it will create a new database else the database will be updated based on the information given on the migration.
We can run either of the 2 update migration command given below:
PM> dotnet ef database update or
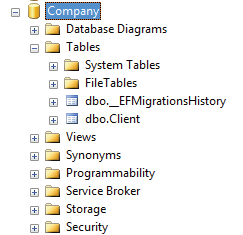
PM> Update-DatabaseOnce the update migration command finish executing, we can find a new database is created. The database will have a table called _EFMigrationsHistory which stores the name of all migrations that are applied.
If no migration name is specified then the command defaults to the last migration which is the case of the above example. We can also specify the migration name to update the database to a specified migration. See the below example.
PM> dotnet ef database update Migration10
or
PM> Update-Database Migration10
The number 0 is a special case that means “before the first migration” and causes all migrations to be reverted. Check below example.
PM> dotnet ef database update 0
or
PM> Update-Database 0
Using the –context Keyword
If an app has more than 1 Database Context file then with the –context keyword we can specify which DbContext file the migration will target.
Example – There are 2 Database Context files which are – CompanyContext.cs & EmployeeContext.cs. Then we tell migrations to target “EmployeeContext.cs” as:
PM> dotnet ef migrations add Migration1 --context EmployeeContext
PM> dotnet ef database update --context EmployeeDbContext
How to Revert Database to Previous State
We can revert EF Core migrations quite easily. Let’s see with an example. We previously had an entity class Client.cs and we already had the database containing a table “Client” for this entity.
public class Client
{
    public int Id { get; set; }
    public string Name { get; set; }
    public string Country { get; set; }
    public string TelephoneNo { get; set; }
    public string Email { get; set; }
}
Suppose we decided to add an “Address” property to the entity class.
public string Address { get; set; } We now run the entity framework core migrations (shown below) to update the “Client” table.
PM> dotnet ef migrations add Migration1
PM> dotnet ef database update
The Client table on the database will get the address field added to it.

Suppose some situation arises and you need to Revert the database to the previous state i.e. when the Client table does not have the Address field. To do this, we remove the Address property from the Client table and rerun the add and update migration commands but this time we name the migration as “Migration2”.
PM> dotnet ef migrations add Migration2
PM> dotnet ef database update Migration2
The Client table will have the Address column removed from it.

In this way Entity Framework Core revert Migration is achieved.
Remove Migration Command
With the Remove Migration command we can remove the last migration if it is not applied to the database. For doing this we can execute either of the 2 command given below:
PM> dotnet ef migrations remove
or
PM> remove-migration
If the migration has already been applied to the database then we will receive the following error – “The migration has already been applied to the database. Revert it and try again. If the migration has been applied to other databases, consider reverting its changes using a new migration.”
In such a case we can use the force parameter to forcefully roll back the changes that were applied to the database.
PM> dotnet ef migrations remove --force
or
PM> remove-migration -Force
Drop Database
To drop the database use any of the following command.
PM> dotnet ef database drop
or
PM> Drop-Database
Generate SQL Script
We can also Generate SQL Scripts of the Database. To do this, execute either of the following 2 commands.
PM> dotnet ef migrations script
or
PM> script-migration
The script command will generate a script for all the migrations by default. This generated db script can be executed to form a duplicate database if we have a requirement.
SHARE THIS ARTICLE
Related Tutorials:

ABOUT THE AUTHOR
I hope you enjoyed reading this tutorial. If it helped you then consider buying a cup of coffee for me. This will help me in writing more such good tutorials for the readers. Thank you.

HELLO EVERYONE
 Welcome to YogiHosting - A Programming Tutorial Website. It is used by millions of people around the world to learn and explore about ASP.NET Core, Blazor, jQuery, JavaScript, Docker, Kubernetes and other topics.
SUBSCRIBE TO NEWSLETTER
Enter your email address to subscribe to this blog and receive notifications of new posts by email.
Join 90K other subscribers