DbContext Class in Entity Framework Core

Entity Framework Core Database Context is an important class which is used to maintain session with the database. It thus help in performing all types database operations like creating, reading, updating and deleting records. We create a database context for the app by inheriting a class from the DbContext class of the Microsoft.EntityFrameworkCore namespace.
This tutorial is a part of Entity Framework Core series.
- 1. Introduction to Entity Framework Core
- 2. Installation of Entity Framework Core
- 3. Database-First approach in Entity Framework Core
- 4. DbContext Class in Entity Framework Core
- 5. Code-First Approach in Entity Framework Core
- 6. Migrations in Entity Framework Core
- 7. Insert Records in Entity Framework Core
- 8. Read Records in Entity Framework Core
- 9. Update Records in Entity Framework Core
- 10. Delete Records in Entity Framework Core
- 11. Conventions in Entity Framework Core
- 12. Configurations in Entity Framework Core
- 13. Fluent API in Entity Framework Core
- 14. Configure One-to-Many relationship using Fluent API in Entity Framework Core
- 15. Configure One-to-One relationship using Fluent API in Entity Framework Core
- 16. Configure Many-to-Many relationship using Fluent API in Entity Framework Core
- 17. Execute Raw SQL Queries using FromSqlRaw() method in Entity Framework Core
- 18. Execute SQL Stored Procedures using FromSqlRaw() & ExecuteSqlRawAsync() methods in Entity Framework Core
- 19. Xaero – Entity Framework Core Advanced Project
- 20. Value Converters and Comparers in Entity Framework Core
Some common tasks performed through DbContext are:
- 1. Manage Database Connection.
- 2. Configure Entities and the Relationships between them.
- 3. Reading, Creating, Updating & Deleting data in the database.
- 4. Configure change tracking.
- 5. Caching.
- 6. Transaction management
Page Contents
Entity Framework Core Example project
We will now create an Entity Framework Core Example project to understand how to work with Database Context (DBContext) class. Open Visual Studio and create a new app by selecting the ASP.NET Core Web App (Model-View-Controller) template.

Name it as EFCoreExample. Next, install the NuGet package called Microsoft.EntityFrameworkCore.SqlServer. It is the database provider for SQL Server.
Simple run the following command on the Package Manager Console to install the latest version of this package.
PM> Install-Package Microsoft.EntityFrameworkCore.SqlServerNote: On older DOT NET projects we have to install a supported version of this package. We do this by adding the version number after the above command. For example if our project is in DOT NET 6.0 version then we have to install the version 6.0.17 of this package which is compatible with 6.0 version of dot net. The installation command for this pacakge is:
PM> Install-Package Microsoft.EntityFrameworkCore.SqlServer -Version 6.0.17All the versions and their commands are listed on NuGet website.
This example project will work with a Database of a very small company. The database will have just 2 table which are:
- Department – for keeping information of the different departments of the company.
- Employee – for keeping information of the different employees of the company.
For representing these 2 tables we will need to create 2 entity model classes. So create 2 entity classes called Department.cs & Employee.cs inside the Models folder. The codes of these classes are given below:
1. Department.cs
namespace EFCoreExample.Models
{
    public class Department
    {
        public int Id { get; set; }
        public string Name { get; set; }

        public ICollection<Employee> Employee { get; set; }
    }
}
2. Employee.cs
namespace EFCoreExample.Models
{
    public class Employee
    {
        public int Id { get; set; }
        public int DepartmentId { get; set; }
        public string Name { get; set; }
        public string Designation { get; set; }

        public Department Department { get; set; }
    }
}
The “Employee” property in the Department.cs and “Department” property in the Employee.cs are navigation properties. A Navigation property hold other entities that are related to it. The entity classes are forming One-to-Many Relationship between them. We have covered relationship in Conventions in Entity Framework Core.
Now it’s time to create DbContext class.
Create DbContext for project
Start by creating a new class called CompanyContext.cs inside the “Models” folder of the app and derive it from the DbContext class of Microsoft.EntityFrameworkCore. Also add a constructor that calls the base class constructor. This class is the database context of the app.
The CompanyContext.cs will look like this:
using Microsoft.EntityFrameworkCore;

namespace EFCoreExample.Models
{
    public class CompanyContext : DbContext
    {
        public CompanyContext(DbContextOptions<CompanyContext> options) : base(options)
        {
        }
    }
}
Next add the DbSet<T> for the 2 entity class which are Department and Employee. This will tell EF core 2 things:
- The entities correspond to tables in the database.
- The properties of the entities correspond to rows in the tables.
The DbSet<T> represents a collection for a given entity and is the gateway to perform database operations against the entity.
This will make the CompanyContext.cs look this way:
using Microsoft.EntityFrameworkCore;

namespace EFCoreExample.Models
{
    public class CompanyContext : DbContext
    {
        public CompanyContext(DbContextOptions<CompanyContext> options) : base(options)
        {
        }

        public DbSet<Department> Department { get; set; }
        public DbSet<Employee> Employee { get; set; }
    }
}
A new DbContext instance is created everytime a database related task is performed and it ends when this task is completed. Examples of such tasks are – reading records, creating records, tracking entities and so on. The DbContext instance is designed for a single unit-of-work and the lifetime of a DbContext instance is usually very short.
Don’t worry, DbContext is a light object, creating and disposing one doesn’t involve a database operation. Your applications will not see any noticeable impact on performance.
The OnModelCreating() method
The OnModelCreating() method of the DbContext class allows us to tell Entity Framework Core more about the entities like:
- Length of a property of an entitiy.
- Whether a property is required by default.
- Relationships between the entities. One-to-Many, One-to-One, etc.
So, add the OnModelCreating method to the CompanyContext.cs as shown below.
using Microsoft.EntityFrameworkCore;

namespace EFCoreExample.Models
{
    public class CompanyContext : DbContext
    {
        public CompanyContext(DbContextOptions<CompanyContext> options) : base(options)
        {
        }

        public DbSet<Department> Department { get; set; }
        public DbSet<Employee> Employee { get; set; }

        protected override void OnModelCreating(ModelBuilder modelBuilder)
        {
            modelBuilder.Entity<Department>(entity =>
            {
                entity.Property(e => e.Name)
                    .IsRequired()
                    .HasMaxLength(50)
                    .IsUnicode(false);
            });

            modelBuilder.Entity<Employee>(entity =>
            {
                entity.Property(e => e.Designation)
                    .IsRequired()
                    .HasMaxLength(25)
                    .IsUnicode(false);

                entity.Property(e => e.Name)
                    .IsRequired()
                    .HasMaxLength(100)
                    .IsUnicode(false);

                entity.HasOne(d => d.Department)
                    .WithMany(p => p.Employee)
                    .HasForeignKey(d => d.DepartmentId)
                    .OnDelete(DeleteBehavior.ClientSetNull)
                    .HasConstraintName("FK_Employee_Department");
            });
        }
    }
}
We have configured both the Department and the Employee entities. By using IsRequired(), we are making the Name property of the Department class as the required one. Similarly the HasMaxLength(100) method is used to set the maximum length for the Name property of the employee class.
We also set the One-to-Many relationship between these entities with a foreign key through the code.
.HasForeignKey(d => d.DepartmentId)
.OnDelete(DeleteBehavior.ClientSetNull)
.HasConstraintName("FK_Employee_Department");Register the Database Context
We need to register the DbContext of the app as a service in the program class of the app. We register the DbContext on the Program.cs class by adding the highlighted code which is given below.
using EFCoreExample.Models;
using Microsoft.EntityFrameworkCore;

var builder = WebApplication.CreateBuilder(args);

builder.Services.AddDbContext<CompanyContext>(options =>
  options.UseSqlServer(builder.Configuration.GetConnectionString("DefaultConnection")));

// Add services to the container.
builder.Services.AddControllersWithViews();

var app = builder.Build();
.....
We already discussed that a new DbContext instance is created for every database operating and that instance is disposed when that operation is done. We can change this type of working and make EF Core to pool the context instances when disposing the context.
EF Core resets it’s state and stores it in an internal pool, so that when a new instance is requested, that pooled instance is returned instead of setting up a new one. Context pooling allows us to pay context setup costs only once at program startup, rather than again and again.
To enable context pooling, use AddDbContextPool as shown below.
builder.Services.AddDbContextPool<CompanyContext>(
    o => o.UseSqlServer(builder.Configuration.GetConnectionString("DefaultConnection")));
Use this only when your app is extremely big and you are seeing performance degradation.
Storing Database Connection String in “appsettings.json”
We will be storing the database connection string in the appsettings.json file of the app. So add the Database Connection String to it as shown below.
{
    "ConnectionStrings": {
        "DefaultConnection": "Data Source=(localdb)\\MSSQLLocalDB;Initial Catalog=Company;Integrated Security=True;Connect Timeout=30;Encrypt=False;TrustServerCertificate=true;ApplicationIntent=ReadWrite;MultiSubnetFailover=False"
    }
}
If we want to use sql authentication then provide the sql userid and password in the connection string:
{
    "ConnectionStrings": {
        "DefaultConnection": "Data Source=(localdb)\\MSSQLLocalDB;Initial Catalog=MovieDB;Persist Security Info=True;User ID=SA;Password=vV5r9tn0M4@;TrustServerCertificate=true;"
    }
}
Running EF Core Migrations
It’s time to run the Migrations in order to create the database from the entity classes. Before that make sure you have the package “Microsoft.EntityFrameworkCore.Tools” installed in your project.
On the Package Manager Console window run these 2 commands one by one:
1. Add Migration Command
PM> add-migration Migration1After this command is executed we will find a new folder called Migrations is created in the project folder. Check the Solution Explorer in Visual studio to find 2 .cs files inside the Migrations folder. We have shown this in the below image.

2. Update Migration Command
Next run the below given command which will create the database from the migration files.
PM> Update-DatabaseNow check the SQL server where we will find the Company database is created. We have shown this in the below image.

DbContext Methods
Some important methods of Entity Framework Core DbContext class are.
| Method | Description |
|---|---|
| Add | Adds a new entity with Added state |
| AddRange | Adds a collection of new entities with Added state |
| Attach | Attaches a new or existing entity with Unchanged state |
| AttachRange | Attaches a collection of new or existing entity with Unchanged state |
| Remove | Attaches an entity with Deleted state |
| RemoveRange | Attaches a collection of entities with Deleted state |
| Update | Attaches disconnected entity with Modified state |
| UpdateRange | Attaches collection of disconnected entity with Modified state |
| SaveChanges | Execute INSERT, UPDATE or DELETE command to the database for the entities with Added, Modified or Deleted state. |
Now it’s time to test if everything is working correctly or not. So let us insert a record into the database through Entity Framework Core. So add the below given code to the HomeController.cs file.
using EFCoreExample.Models;
using Microsoft.AspNetCore.Mvc;
using Microsoft.EntityFrameworkCore;

namespace EFCoreExample.Controllers
{
    public class HomeController : Controller
    {
        private CompanyContext context;
        public HomeController(CompanyContext cc)
        {
            context = cc;
        }

        public IActionResult Index()
        {
            var dept = new Department()
            {
                Name = "Designing"
            };
            context.Entry(dept).State = EntityState.Added;
            context.SaveChanges();

            return View();
        }
    }
}
First we added a dependency for the database context in the constructor of the controller. The dependency injection technique will provide us with the object of our DbContext which is registered on the program class as a service.
private CompanyContext context;
public HomeController(CompanyContext cc)
{
    context = cc;
}
After that we are perfoming a new record creation in the database with EF Core.
var dept = new Department()
{
    Name = "Designing"
};
context.Entry(dept).State = EntityState.Added;
context.SaveChanges();
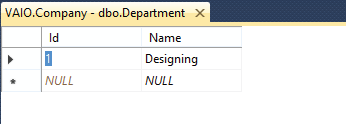
Now run the project and initiate this action’s in the browser. This will insert a new record on the Department table of the database. Open the table to find the newly added record. See the below image of the database table.
The OnConfiguring() method
The OnConfiguring() method of the DbContext class can be used to configure the data source for Entity Framework Core. Add this method to the CompanyContext.cs class as shown below. Notice we are providing the database connection string to the UseSqlServer() method of the DbContextOptionsBuilder() class object.
protected override void OnConfiguring(DbContextOptionsBuilder optionsBuilder)
{
    if (!optionsBuilder.IsConfigured)
    {
        optionsBuilder.UseSqlServer(@"Server=vaio;Database=Company;Trusted_Connection=True;");
    }
}
If we use this method then we don’t have to add the connection string to the appsettings.json nor we have to register the DbContext file. However don’t use it on production since it is a poor coding style.
You can download the source code from the below link.
In this tutorial we covered A-Z of EF Core Database Context which is going to help in the development of your projects. Now we can easily create, update, read and delete records from the database. So let’s move forward to our next tutorial.
SHARE THIS ARTICLE
Related Tutorials:


ABOUT THE AUTHOR
I hope you enjoyed reading this tutorial. If it helped you then consider buying a cup of coffee for me. This will help me in writing more such good tutorials for the readers. Thank you.

HELLO EVERYONE
 Welcome to YogiHosting - A Programming Tutorial Website. It is used by millions of people around the world to learn and explore about ASP.NET Core, Blazor, jQuery, JavaScript, Docker, Kubernetes and other topics.
SUBSCRIBE TO NEWSLETTER
Enter your email address to subscribe to this blog and receive notifications of new posts by email.
Join 90K other subscribers