Configure One-to-One relationship using Fluent API in Entity Framework Core

We can configure Entity Framework Core One-to-One Relationship by the use of Fluent API. The One-to-One Relationship is established by using the HasOne – WithOne pattern. Note that we can also create this relationship by using EF Core Conventions.
Page Contents
Example: Fluent API One-to-One Relationship
Let’s create Entity Framework Core One-to-One relationship between City and CityInformation entities using Fluent API.
The 2 entity classes are:
public class City
{
    public int Id { get; set; }

    public string Name { get; set; }

    public CityInformation CityInformation { get; set; }
}

public class CityInformation
{
    public int Id { get; set; }

    public int Population { get; set; }

    public string OtherName { get; set; }

    public string MayorName { get; set; }

    public int CityId { get; set; }

    public City City { get; set; } = null!;
}
The City entity has a Reference Navigation Property called CityInformation.
public CityInformation CityInformation { get; set; }Similary the CityInformation entity has a Reference Navigation Property called City
public City City { get; set; } = null!;Next configure the OnModelCreating method in the DB Context Class of Entity Framework Core as shown below.
public class CountryContext: DbContext
{
    public DbSet<City> City { get; set; }
    public DbSet<CityInformation> CityInformation { get; set; }

    public CountryContext(DbContextOptions<CountryContext> options) : base(options)
    {
    }

    protected override void OnModelCreating(ModelBuilder modelBuilder)
    {
        //Write Fluent API configurations here

        modelBuilder.Entity<City>()
                    .HasOne(e => e.CityInformation)
                    .WithOne(e => e.City)
                    .HasForeignKey<CityInformation>(e => e.CityId)
                    .IsRequired();
    }
}
In the above code we have used the HasOne – WithOne pattern to create One-to-One Relationship between City & CityInformation entities. The call to .IsRequired() method make the relationship as “Required” i.e. every dependent entity must be associated with some principal entity. Similarly, .IsRequired(false) will make the relationship as optional.
You can also create the same relationship the other way around like what we did in the below code.
modelBuilder.Entity<CityInformation>()
            .HasOne(e => e.City)
            .WithOne(e => e.CityInformation)
            .HasForeignKey<CityInformation>(e => e.CityId)
            .IsRequired();
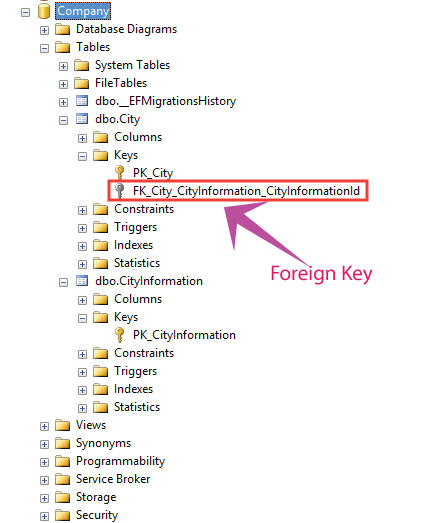
On doing the EF Core Migrations the foreign key i.e. one-to-one relationship is created which is shown in the below image:

Understanding in Details
Let’s understand it in step by step.
- modelBuilder.Entity<City>() starts configuring the City entity.
- The HasOne(e => e.CityInformation ) method specifies that the City entity includes one CityInformation reference navigation property.
- The .WithOne(e => e.City) configures the other end of the relationship, i.e. the CityInformation entity. It specifies that the ‘CityInformation’ entity includes a reference navigation property of ‘City’ type.
- The .HasForeignKey<CityInformation>(e => e.CityId) specifies the foreign key property name which is the CityId column.
One-to-One Relationship with Alternate Key
The foreign key on the dependent entity can be constrained to differnt property than the primary key on the principal entity. This will then become an alternate key for the principal entity.
public class City
{
    public int Id { get; set; }

    public string Name { get; set; }

    public int AlternateId { get; set; } // Alternate key

    public CityInformation CityInformation { get; set; }
}

public class CityInformation
{
    public int Id { get; set; }

    public int Population { get; set; }

    public string OtherName { get; set; }

    public string MayorName { get; set; }

    public int CityId { get; set; }

    public City City { get; set; } = null!;
}
With Fluent apis we can configure this through .HasPrincipalKey() method as shown below.
modelBuilder.Entity<City>()
            .HasOne(e => e.CityInformation)
            .WithOne(e => e.City)
            .HasPrincipalKey<City>(e => e.AlternateId)
            .HasForeignKey<CityInformation>(e => e.CityId)
            .IsRequired();
One-to-One Relationship with Composite Key
Composite Keys can be formed by more than one property. When their is a composite key, then the foreign key must also be a composite key with the same number of properties. See below given entities forming 1-1 relationship.
public class City
{
    public int Id1 { get; set; } // Composite key part 1
    public int Id2 { get; set; } // Composite key part 2

    public string Name { get; set; }

    public CityInformation CityInformation { get; set; }
}

public class CityInformation
{
    public int Id { get; set; }

    public int Population { get; set; }

    public string OtherName { get; set; }

    public string MayorName { get; set; }

    public int CityId1 { get; set; } // Required foreign key property part 1
    public int CityId2 { get; set; } // Required foreign key property part 2

    public City City { get; set; } = null!;
}
See the below fluent api code where we have configured One-to-One relationship through the HasKey() method.
protected override void OnModelCreating(ModelBuilder modelBuilder)
{
    modelBuilder.Entity<City>()
        .HasKey(e => new { e.Id1, e.Id2 });
}
One-to-One relationship without Cascade Delete
By default the required relationships are configured to cascade delete. So once a principal entity is deleted that it’s dependents are automatically deleted to. We can change it, so that in such cases an exception is raised. See below configuration which changes the cascade delete to restrict mode.
modelBuilder.Entity<City>()
            .HasOne(e => e.CityInformation)
            .WithOne(e => e.City)
            .HasForeignKey<CityInformation>(e => e.CityId)
            .OnDelete(DeleteBehavior.Restrict);
Self-referencing One-to-One Relationship
In the below example their is just one entity called “Person” and each Person is optionally related to another Person.
public class Person
{
    public int Id { get; set; }

    public int? HusbandId { get; set; } // Optional foreign key property
    public Person? Husband { get; set; } // Optional reference navigation to principal
    public Person? Wife { get; set; } // Reference navigation to dependent
}
The fluent api configuration is given below.
protected override void OnModelCreating(ModelBuilder modelBuilder)
{
    modelBuilder.Entity<Person>()
        .HasOne(e => e.Husband)
        .WithOne(e => e.Wife)
        .HasForeignKey<Person>(e => e.HusbandId)
        .IsRequired(false);
}
Download the source code:


 Welcome to YogiHosting - A Programming Tutorial Website. It is used by millions of people around the world to learn and explore about ASP.NET Core, Blazor, jQuery, JavaScript, Docker, Kubernetes and other topics.