ASP.NET Core JWT Authentication and Authorization of Web API [Detailed]
![ASP.NET Core JWT Authentication and Authorization of Web API [Detailed]](https://www.yogihosting.com/wp-content/uploads/2020/03/JWT-JSON-Web-Token.png "ASP.NET Core JWT Authentication and Authorization of Web API [Detailed]")
Page Contents
What is JWT in .NET – JWT which stands for “JSON Web Tokens” is an open standard method for securely transmitting information between parties as a JSON object (commonly known as ‘Token’). The token is digitally signed using a secret (with the HMAC algorithm) or a public/private key pair using RSA or ECDSA. Since the token is signed with a public/private key pairs, the signature certifies that only the party holding the private key is the one that signed it. The JWT is generated by the authentication server when a client successfully logs in. This token contains the user’s identity and access rights and is then sent with every API request (which the client makes) as a bearer token in the authorization header.
In the below image I have shown a JWT Token which looks like xxxxx.yyyyy.zzzzz.
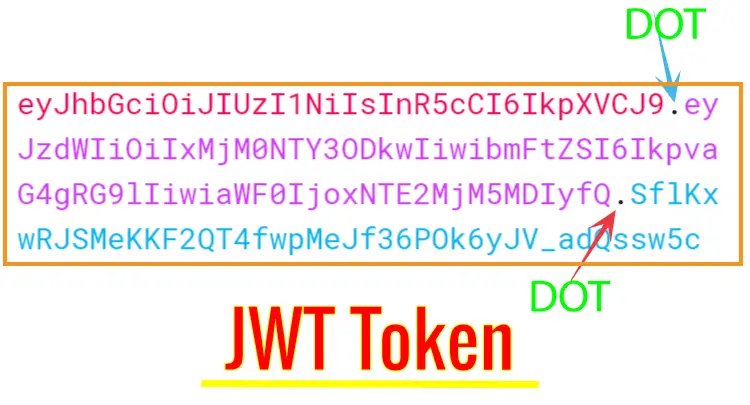
A JWT Web Token consists of 3 parts separated with 2 dots. These parts are:
- Header – the part of the token before the first dot is header. The Header consists of two parts, the first part contains the type of the token which is JWT. The second part contains the signing algorithm being used, such as HMAC SHA256 or RSA.
- Payload – the part between the first and the second dot is Payload. It contains claims (which are statements about the data/user), these are iss (issuer), exp (expiration time), sub (subject), aud, etc. Claims are divided into public, private and registered types.
- Signature – the part after the 2nd dot is Signature. The signature is created by taking the encoded header, the encoded payload, a secret, the algorithm specified in the header, and then signing them. This will create the Signature. The signature is used to verify that the message is not changed along the path and the token is signed with a private key. Signature can also verify the identity of the sender.
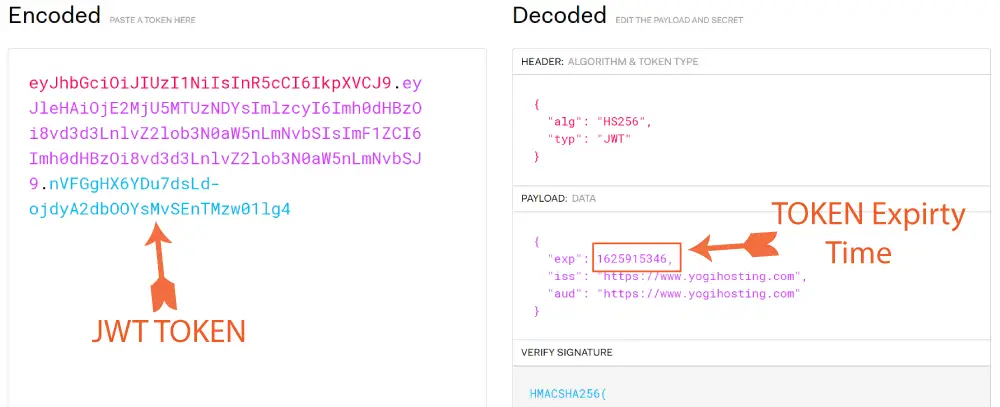
How do I know if my JWT Token is expired in .NET ?
Copy the token and paste it on the token box given at https://jwt.io/. This will decode your JWT token and show the header, payload and signature in JSON. On the “payload” json, copy the value of “exp” key. This is the expiry time of the token expressed in Unix time. Now use C# function DateTimeOffset.FromUnixTimeSeconds("unix time") to convert the unix time to an understandable date and time value. I have shown this in the below image:
This tutorial is a part of series called JSON Web Token (JWT) in ASP.NET Core. There are 3 tutorials to master it:
- ASP.NET Core JWT Authentication and Authorization of Web API [Detailed]
- Implementing JWT Refresh Token in ASP.NET Core MVC
- How to call a JWT secured APIs with jQuery AJAX [with source codes]
How is JWT implemented in .NET
The implementation is as follows.
- Client authenticates itself with Username and Password to the Server.
- On successful authentication, the Server creates JWT token and sends it to the client.
- Client signs the Token with Private key, and sends it to the server in HTTP Authorization Header whenever it makes a request to secured resources.
- Server receives a request, validates the JWT token, and sends secured data to the client.

Web API with JWT Authentication
There are 2 steps to use jwt authentication with web api. Step 1: Add configurations on the Program class to use JWT authentication. Step 2: Add the [Authorize] attribute on the Web API controller. This will secure it with JWT authentication.
Let us create a JWT example to create Web API Security feature. This ensures that clients must send JWT token in the HTTP Authorization Header in order to access data from the API.
Step #1: Create a New ASP.NET Core app
In Visual Studio, create a new ASP.NET Core MVC app and name it JWTAPI.

Next, select .NET 8.0 framework from the dropdown and create the app.

Step #2: Install JwtBearer package from Nuget and configure Program.cs
You need to install the package called Microsoft.AspNetCore.Authentication.JwtBearer from NuGet. This package adds the middleware that enables an ASP.NET Core application to receive a Bearer Token in the Request Pipeline.

Next, configure JWT authentication in the project. To do this, register a JWT authentication schema by using AddAuthentication() method in the Program.cs file. The code which you have to add is given below:
builder.Services.AddAuthentication(options =>
{
    options.DefaultAuthenticateScheme = JwtBearerDefaults.AuthenticationScheme;
    options.DefaultChallengeScheme = JwtBearerDefaults.AuthenticationScheme;
    options.DefaultScheme = JwtBearerDefaults.AuthenticationScheme;
}).AddJwtBearer(options =>
  {
      options.SaveToken = true;
      options.RequireHttpsMetadata = false;
      options.TokenValidationParameters = new Microsoft.IdentityModel.Tokens.TokenValidationParameters()
      {
          ValidateIssuer = true,
          ValidateAudience = true,
          ValidAudience = "dotnetclient",
          ValidIssuer = "https://www.yogihosting.com",
          ClockSkew = TimeSpan.Zero,// It forces tokens to expire exactly at token expiration time instead of 5 minutes later
          IssuerSigningKey = new SymmetricSecurityKey(Encoding.UTF8.GetBytes("MynameisJamesBond007_MynameisJamesBond007"))
      };
  });
Explanation: The AddAuthentication is configured with AuthenticationOptions which has 3 properties:
- DefaultAuthenticateScheme
- DefaultChallengeScheme
- DefaultScheme
These 3 are set to the default value JwtBearerDefaults.AuthenticationScheme.
Next, I used the AddJwtBearer() method to configure the JwtBearerOptions. Also note I set the JWT SymmetricSecurityKey which is “MynameisJamesBond007_MynameisJamesBond007”.
I used the TokenValidationParameters property to specify how the token will be validated on the server. For this I set true for the Issuer and Audience.
ValidIssuer is contained by the iss claim inside the token and here it is set as “https://www.yogihosting.com”. So this means the access to a resource is given only when the iss claim value is “https://www.yogihosting.com”. You can change it to your needs. Also note that iss claim is added to the token by the JWT Server during the time of creation of the token.
ValidAudience is contained by aud claim inside the token and it is the client application id. I have given it the value of “dotnetclient”.
The most important property here is the IssuerSigningKey that is used to set the security key with SymmetricSecurityKey class. The security key is the Private key. Through this key the token is signed by the client. The server validate the token which it get’s in the client request header. If the private key is in-correct then the token is faulty and so the request to the resource is not processed.
I am using ‘MynameisJamesBond007_MynameisJamesBond007’ as my security key, you can use any key you want (min 16 characters in length).
Next, tell the app to use authentication and authorization. You add the below 2 lines of code after the app.UseRouting().
app.UseAuthentication();
app.UseAuthorization();
Some related API tutorials which you need to read are:
- 1. Implementing Google Contacts API Version 3.0 & OAuth 2.0 in cSharp and ASP.NET [Updated]
- 2. Example: How to use JQuery AJAX Method to Call an API
- 3. Implementing TheMovieDB (TMDB) API in ASP.NET MVC – [with full codes]
- 4. Implementing TheMovieDB (TMDB) API with jQuery AJAX
- 5. Tutorial – Implementing your own ASP NET Web API from Start [with Code]
- 6. Tutorial – Consuming ASP.NET Web API from Start [with Code]
- 7. How to Implement Discord API in ASP.NET MVC & C#
Step #3: JWT Authentication and Authorization
Now I will create the API method to return data to the client in JSON. This data will be a list of flight reservations. The Web API will also have JWT Authentication added to it. So create a new class called Reservation.cs preferably inside the ‘Models’ folder, and add to it the code given below:
public class Reservation
{
    public int Id { get; set; }
    public string Name { get; set; }
    public string StartLocation { get; set; }
    public string EndLocation { get; set; }
}
Next, create a new controller called ReservationController.cs. This controller will have the task to return reservations to the client whenever request to the API is made.
The full code of this controller is given below:
using JWTAPI.Models;
using Microsoft.AspNetCore.Authorization;
using Microsoft.AspNetCore.Mvc;

namespace JWTAPI.Controllers
{
    [Route("[controller]")]
    [ApiController]
    [Authorize]
    public class ReservationController : ControllerBase
    {
        [HttpGet]
        public IEnumerable<Reservation> Get() => CreateDummyReservations();

        public List<Reservation> CreateDummyReservations()
        {
            List<Reservation> rList = new List<Reservation> {
            new Reservation { Id=1, Name = "Ankit", StartLocation = "New York", EndLocation="Beijing" },
            new Reservation { Id=2, Name = "Bobby", StartLocation = "New Jersey", EndLocation="Boston" },
            new Reservation { Id=3, Name = "Jacky", StartLocation = "London", EndLocation="Paris" }
            };
            return rList;
        }
    }
}
Explanation : I have marked this controller with [Authorize] attribute of the Microsoft.AspNetCore.Authorization namespace. This is done specifically in order to secure the API with JWT Authentication. This means if the token is missing or faulty then web api methods will not be initiated. While for proper tokens the Web API will be authorized to the request.
I have created some dummy reservations inside the CreateDummyReservations () function and these are returned by the API in JSON. The HttpGet method of the API does this work of returning these reservations in JSON.
[HttpGet]
public IEnumerable<Reservation> Get() => CreateDummyReservations();
You have successfully secured your API with JWT. Now request from the clients will be authenticated beforehand and only then the Web API will provide them with the reservation data. In technical terms – the Web API will authenticate the request from the clients and if these requests contain a correct JWT token then only the Web API will authorize the request to view the reservations.
Let us perform some testing. Comment out the [Authorize] attribute on the ‘ReservationController’ by applying ‘//’ before it. Next, run your application on visual studio. When the browser starts, open the URL of the ‘ReservationController’ which in my case is:
https://localhost:7154/ReservationYou will see the JSON containing the reservations as shown below:

Now remove the ‘//’ before the [Authorize] attribute (i.e. un-comment it) and refresh the same URL. This time you will see Http Error 401 which tells – you are unauthorized to access the reservation controller. Congratulations, JWT is implemented successfully on your JWTAPI project.

We have done the JWT Configuration on our project. Let’s now create the login feature.
Step #4: Install package – ‘IdentityModel.Tokens.Jwt’ from NuGet
We need to nstall the package called IdentityModel.Tokens.Jwt. This package is used to Create, Serialize and Validate JWT Tokens. Check the screenshot from NuGet:

Step #5: Create JWT Token and store it in a Cookie
We are ready to create JWT Token but we also need a place to store this token. Normally websites store the token in a database or in a cookie. Here we will store the token in a JWT Cookie. This cookie is just a normal cookie which will be storing the JWT Token. Whenever we need to call the web api, we will read this cookie to get the JWT Token and add this token on the authorization header of the request.
Now you are ready to make API Calls. So create a new controller called CallAPIController.cs.
We will also need to install Newtonsoft.json package which will convert the json returned by the web api to List<Reservation>. You can install it by running the command on the Package Manager Console window – Install-Package Newtonsoft.Json.
Now add Index action methods which will validate for the username and password. Recall the JWT Token is created only when the user is successfully validated on the login screen. So when user is successfully logged in, a JWT Token is created and stored in a JWT Cookie. The code for this is shown in provided below:
using Microsoft.AspNetCore.Mvc;
using Microsoft.IdentityModel.Tokens;
using System.IdentityModel.Tokens.Jwt;
using System.Text;

namespace JWTAPI.Controllers
{
    public class CallAPIController : Controller
    {
        public IActionResult Index(string message)
        {
            ViewBag.Message = message;
            return View();
        }

        [HttpPost]
        public IActionResult Index(string username, string password)
        {
            if ((username != "secret") || (password != "secret"))
                return View((object)"Login Failed");

            var accessToken = GenerateJSONWebToken();
            SetJWTCookie(accessToken);

            return RedirectToAction("FlightReservation");
        }

        private string GenerateJSONWebToken()
        {
            var securityKey = new SymmetricSecurityKey(Encoding.UTF8.GetBytes("MynameisJamesBond007_MynameisJamesBond007"));
            var credentials = new SigningCredentials(securityKey, SecurityAlgorithms.HmacSha256);

            var token = new JwtSecurityToken(
                issuer: "https://www.yogihosting.com",
                audience: "dotnetclient",
                expires: DateTime.Now.AddHours(3),
                signingCredentials: credentials
                );

            return new JwtSecurityTokenHandler().WriteToken(token);
        }

        private void SetJWTCookie(string token)
        {
            var cookieOptions = new CookieOptions
            {
                HttpOnly = true,
                Expires = DateTime.UtcNow.AddHours(3),
            };
            Response.Cookies.Append("jwtCookie", token, cookieOptions);
        }
    }
}
Explanation: To successfully login we need to enter “secret” for both username and password. You can replace this code with something that checks the username and password of the user from the database. Next See the code – var accessToken = GenerateJSONWebToken();. Here a function is called to create a new JWT Token once user successfully logs in. It also assigns the values of issuer, audience, expires and signingCredentials on the token. Next, SetJWTCookie(accessToken); calls a function which will set this JWT Token inside a cookie.
Note the values of issuer and audience which are the same which we added on the program class earlier.
issuer: "https://www.yogihosting.com",
audience: "dotnetclient",
How to set JWT Token expiration time in .NET
We use JwtSecurityToken class “expires” property to set the expiry time of the JWT Token. Example: to set the expirty time of the token to be 3 hours after it is created, the C#.NET code for this will be expires: DateTime.Now.AddHours(3). I have shown this in highlighted way in the below code:
var securityKey = new SymmetricSecurityKey(Encoding.UTF8.GetBytes(key));
var credentials = new SigningCredentials(securityKey, SecurityAlgorithms.HmacSha256);

var token = new JwtSecurityToken(
    issuer: "https://www.yogihosting.com",
    audience: "dotnetclient",
    expires: DateTime.Now.AddHours(3),
    signingCredentials: credentials
    );
We can also use DateTime.Now.AddMinutes to set expiry time in minutes or DateTime.Now.AddSeconds to set the time in seconds.
The JWT Token is returned by the GenerateJSONWebToken() function and the variable accessToken stores it. The function SetJWTCookie() creates a cookie by the name of “jwtCookie” and stores the JWT Token on it.
Notice the JWT token expires after 3 hours and the cookie also expires in 3 hours. We will talk more about the expiry time in just a moment. Next, I will adds the JWT Token to the HTTP authorization header.
Step #6: Call the Web API with JWT token added to HTTP authorization header
Add a new action method called “FlightReservation” to the CallAPIController.cs controller class. Here we will make the call to the Web API with JWT Token added to the HTTP authorization header. This action method code is given below.
public async Task<IActionResult> FlightReservation()
{
    var jwt = Request.Cookies["jwtCookie"];

    List<Reservation> reservationList = new List<Reservation>();

    using (var httpClient = new HttpClient())
    {
        httpClient.DefaultRequestHeaders.Authorization = new AuthenticationHeaderValue("Bearer", jwt);
        using (var response = await httpClient.GetAsync("https://localhost:7154/Reservation")) // change API URL to yours
        {
            if (response.StatusCode == System.Net.HttpStatusCode.OK)
            {
                string apiResponse = await response.Content.ReadAsStringAsync();
                reservationList = JsonConvert.DeserializeObject<List<Reservation>>(apiResponse);
            }

            if (response.StatusCode == System.Net.HttpStatusCode.Unauthorized)
            {
                return RedirectToAction("Index", new { message = "Please Login again" });
            }
        }
    }

    return View(reservationList);
}
I first read the jwtCookie value which contains the JWT token.
var jwt = Request.Cookies["jwtCookie"];Next, with HttpClient class, I am calling the Web API. Notice I am adding the JWT Token to the authorization header with the below code line.
httpClient.DefaultRequestHeaders.Authorization = new AuthenticationHeaderValue("Bearer", tokenString);And finally making the call to the Web API located at the URL – https://localhost:7154/Reservation.
The API response can be of 2 types:
- HttpStatusCode.OK – when the JWT token is validated successfully. Here we get the json containing all the reservations.
- HttpStatusCode.Unauthorized – when the JWT token is validated “un-successfully”. This happens when JWT token has expired.
So for HttpStatusCode.OK case, I serialized the response to List<Reservation> which is send to the view to be displayed on a table. For the HttpStatusCode.Unauthorized case, the user is redirected to the login page with a message “Please Login again” on the route. This message will be displayed on the view.
Step #7: Create Login View
Create Index.cshtml razor view inside the Views/CallAPI folder. This view will ask the user to enter his/her username and password.
@{ ViewBag.Title = "Login";}

@model string
<h2>Login</h2>

@if (Model != null)
{
    <div class="alert-danger">Login Failed</div>
}

@if (ViewBag.Message != null)
{
    <div class="alert-danger">@ViewBag.Message</div>
}

<form method="post">
    <table class="w-25 table table-striped table-bordered">
        <tbody>
            <tr>
                <td>Username</td>
                <td><input type="text" name="username" /></td>
            </tr>
            <tr>
                <td>Password</td>
                <td><input type="text" name="password" /></td>
            </tr>
            <tr>
                <td colspan="2">
                    <button>Submit</button>
                </td>
            </tr>
        </tbody>
    </table>
</form>
Next, add FlightReservation.cshtml view inside the same Views/CallAPI folder. In this view we will be displaying the reservations which we get from the Web API. It’s code is given below:
@model IEnumerable<Reservation>
@{ ViewBag.Title = "All Reservations";}

<h2>All Reservations</h2>
<table class="table table-sm table-striped table-bordered m-2">
    <thead><tr><th>ID</th><th>Name</th><th>Start Location</th><th>End Location</th></tr></thead>
    <tbody>
        @if (Model != null)
        {
            foreach (var r in Model)
            {
                <tr>
                    <td>@r.Id</td>
                    <td>@r.Name</td>
                    <td>@r.StartLocation</td>
                    <td>@r.EndLocation</td>
                </tr>
            }
        }
    </tbody>
</table>
Perfect, now it’s now time to test it.
Coming to the testing part, run your app in visual studio. Now open the url https://localhost:7154/CallAPI which will open the Login view. Enter “secret” for both username and password.

Click the Submit button, you will be redirected to FlightReservation action which will make the API call and show all the flight reservations. Check the below image:

Recall we set the JWT Token expiry time as 3 hours and also the cookie expiry time was set as 3 hours. So we can access the Secured Web API for 3 continuous hours without any need to login again.
Wait for 3 hours and refresh the page again. This time the JWT token has expired and so is the cookie, and now you will be redirected to the login page. The login page will also show you the message saying “Please Login again”. Check the below image where I have marked this message.

If you Don’t want to wait for 3 hours then change it to 1 minute for both jwt token and cookie and then test to see you being redirected to the login page.
expires: DateTime.Now.AddMinutes(1) // for jwt token
Expires = DateTime.UtcNow.AddMinutes(1) // for jwt cookie
The full JWT integration is completed and is working successfully. I hope you enjoyed reading this tutorial.
You can download the full codes of this tutorial from the below link:
JWT Claims
JWT Claims are pieces of information added to the token. For example, a JWT token may contain a claim called “Roles” that asserts the Role of the user currently logged in.
First create a Users.cs class to the “Models” folder. This class will contain the Username, Password and Roles for the users that can be loggod in to the application.
public class Users
{
    public string Username { get; set; }
    public string Password { get; set; }
    public string Role { get; set; }
}
Now we will modify things we created before to include JWT Claims. First we will change the “CallAPIController.cs” code to include JWT claims. So change login code given on the Index action method as shown in highlighted color below:
[HttpPost]
public IActionResult Index(string username, string password)
{
    Users loginUser = CreateDummyUsers().Where(a => a.Username == username && a.Password == password).FirstOrDefault();
    if (loginUser == null)
        return View((object)"Login Failed");

    var claims = new[] {
        new Claim(ClaimTypes.Role, loginUser.Role)
    };

    var accessToken = GenerateJSONWebToken(claims);
    SetJWTCookie(accessToken);

    return RedirectToAction("FlightReservation");
}
The changes include checking user’s credentials from a dummy repository which is called by CreateDummyUsers() method. If we find the user in the repository then we add “Role” claim.
var claims = new[] {
        new Claim(ClaimTypes.Role, loginUser.Role)
    };
The “Role” claim is passed to the function which creates the JWT token.
var accessToken = GenerateJSONWebToken(claims);We now change the GenerateJSONWebToken() method code to add the claims to the JWT Token. See the change shown in highlighted color:
private string GenerateJSONWebToken(Claim[] claims)
{
    var securityKey = new SymmetricSecurityKey(Encoding.UTF8.GetBytes("MynameisJamesBond007_MynameisJamesBond007"));
    var credentials = new SigningCredentials(securityKey, SecurityAlgorithms.HmacSha256);

    var token = new JwtSecurityToken(
        issuer: "https://www.yogihosting.com",
        audience: "dotnetclient",
        expires: DateTime.Now.AddHours(3),
        signingCredentials: credentials,
        claims: claims
        );

    return new JwtSecurityTokenHandler().WriteToken(token);
}
We also need to add CreateDummyUsers() method which holds 3 dummy users along with their roles.
public List<Users> CreateDummyUsers()
{
    List<Users> userList = new List<Users> {
        new Users { Username = "jack", Password = "jack", Role = "Admin" },
        new Users { Username = "donald", Password = "donald", Role = "Manager" },
        new Users { Username = "thomas", Password = "thomas", Role = "Developer" }
    };
    return userList;
}
Notice user jack has Admin role, donald has Manager role while thomas has Developer role.
JWT Authorization of Roles
We want our API to be accessed only by a specific role. We want the user to have “Manager” role, only then he can access the secured Web API. This process is know an Authorization of Roles through Claims.
We already have added the feature where the logged in users get their roles added to “Roles” claim on the token. Next we change the authorization attribute on web api to [Authorize(Roles = "Manager")] which specifies that only Manager roles claims can access the Web API. So make this change which is shown in the highlighted code given below.
[Route("[controller]")]
[ApiController]
[Authorize(Roles = "Manager")]
public class ReservationController : ControllerBase
{
    [HttpGet]
    public IEnumerable<Reservation> Get() => CreateDummyReservations();

    public List<Reservation> CreateDummyReservations()
    {
        ...
    }
}
With this change the Web API is only accessible by user “donald” since he has “Manager” role. In the below video I have shown the login by user “jack” which does not receives any reservation data from the api as he is not in the Manager role. While when I logged in with “donald”, I receive reservations from the api.
GET JWT Claims
The HttpContext.User.Claims provides all the claims added to the JWT Token. We can use it to create conditions on web api to dynamically return data based on the claims. Suppose we added a claim called “Name” to the JWT Token during the time of it’s creation.
var claims = new[] {
        new Claim("Name", person)
    };
Next, we want to filter the records so that the record with a Name same as given on the “Name” claim is fetched. This can be done as shown below:
[HttpGet]
public IEnumerable<Reservation> Get()
{
    var claims = HttpContext.User.Claims;
    return CreateDummyReservations().Where(t => t.Name == claims.FirstOrDefault(c => c.Type == "Name").Value);
}JWT is a great way to secure your API without having to spend much time in integration process. I tried to show how easy the whole procedure is. I hope you like this tutorial so please share it on your reddit, facebook, twitter and other social accounts.
SHARE THIS ARTICLE
Related Tutorials:


ABOUT THE AUTHOR
I hope you enjoyed reading this tutorial. If it helped you then consider buying a cup of coffee for me. This will help me in writing more such good tutorials for the readers. Thank you.

Comments
Leave a Reply
HELLO EVERYONE
 Welcome to YogiHosting - A Programming Tutorial Website. It is used by millions of people around the world to learn and explore about ASP.NET Core, Blazor, jQuery, JavaScript, Docker, Kubernetes and other topics.
SUBSCRIBE TO NEWSLETTER
Enter your email address to subscribe to this blog and receive notifications of new posts by email.
Join 90K other subscribers
Hi i would be really interesting in an article with these features:
– A secured webapi (project): ASP.NET WebApi (net core 3.1) with JWT authentication / autorization an roles.
– A secured client (project): ASP.NET MVC Core 3.1 application with his own authentication and roles, which invokes the secured webapi.
– The secured client, should invoke the secured webapi, generate token and refresh tokens.
I could make a small donation if you provide a example / solution with those requirements. Pleas let me know if possible.
Hello Eduardo, Right now I don’t have any project which does this work. You can download the source code of this tutorial and will have to add these features by your own. Check the JWT authentication docs to get more info on them. Slowly and steadily you will be able to create all these features by your own.
Thank you.
Hello Yogi,
love you tutorial but i am somewhat confused in
this one…
(How to secure APIs with JWT in ASP.NET Core 3.1)
When i need to connect to a API with autentication and get a token its the api that checks my user and pass and give me a token for the session.
But in your example you put the user verification and token criation on the client side… I think you inverted things!
Hello Pedro Martins,
In the client project the call to the API is made. JWT Token is also created on the same step. Download the source codes and run the application from Visual Studio, put breakpoints on the Controller code and then debug. This way you will understand the full code very easily.
Thank you.
Hello Yogi, but shouldn´t the username validation bbeing done on the Api side and should it result in the api also supply the token to the Client?
In your example its the client that validates the username and password are correct and crates the token.
Thanks in advance,
Pedro
Hello Pedro,
Yes, you can do username validation on the API side. The client side main work is JWT Token generations done from the line
var tokenString = GenerateJSONWebToken(). So API will check this token for the request it receives.Thank you.
first of all thanku for making such of tutorial which is very helpful when i used jQuery for taking data to api nothing is happened.
Hello Rajeev,
I think you may be getting some jQuery errors please check the console of the browser for errors. Make sure the URL of the action in jQuery ajax method is correct. Also try applying breakpoint to debug.
thank you.