ADO.NET – Update Records in ASP.NET Core

We can Update Database Records with ADO.NET in any ASP.NET Core application quite easily. Let’s add Update Records feature in our project. With this feature we will have the power to update any previously created records in the database.
Is ADO.NET fast? ADO.NET is very fast as it works with the databases directly. ORMs like Entity Framework Core and Dapper are created as a layer above ADO.NET and so they are slower by a few milliseconds when compared with ADO.NET.
This tutorial is a part of ADO.NET series.
- 1. Learn ADO.NET by building CRUD Operations in ASP.NET Core
- 2. ADO.NET – Create Records in ASP.NET Core
- 3. ADO.NET – Read Records in ASP.NET Core
- 4. ADO.NET – Update Records in ASP.NET Core
- 5. ADO.NET – Delete Records in ASP.NET Core
- 6. How to do ADO.NET SqlTransaction with Try Catch Block
- 7. Learn to use ADO.NET SqlBulkCopy class with Example
In the previous tutorial we displayed all the database records on the Index View in the form of an HTML table. Now, in this HTML table we can create a new column with an update link, on clicking this link the user will be redirected to another View called Update.cshtml. In this update view the user can update the record with new values.
So we add this new column in the HTML table of Index View as shown by highlighted code given below:
@model IEnumerable<Inventory>
@{
	ViewData["Title"] = "Read Inventory";
}

<h1>Inventory <a asp-action="Create" class="btn btn-sm btn-secondary">Create</a></h1>
<table class="table table-bordered table-sm table-striped">
	<thead>
		<tr>
			<th>Id</th>
			<th>Name</th>
			<th>Price</th>
			<th>Quantity</th>
			<th>Added On</th>
			<th>Update</th>
		</tr>
	</thead>
	<tbody>
		@if (Model == null)
		{
			<tr><td colspan="6" class="text-center">No Model Data</td></tr>
		}
		else
		{
			@foreach (var p in Model)
			{
				<tr>
					<td>@p.Id</td>
					<td>@p.Name</td>
					<td>@string.Format(new System.Globalization.CultureInfo("en-US"),"{0:C2}", p.Price)</td>
					<td>@p.Quantity</td>
					<td>@string.Format("{0:dddd, dd MMMM yyyy}", p.AddedOn)</td>
					<td><a asp-action="Update" asp-route-id="@p.Id">Update</a></td>
				</tr>
			}
		}
	</tbody>
</table>
You can see we added a new th element called “Update” inside the thead element:
<th>Update</th>We also added a new td element inside the foreach loop:
<td><a asp-action="Update" asp-route-id="@p.Id">Update</a></td>The asp-action="Update" is a Built-In Tag Helpers in ASP.NET Core which sets the href attribute of the anchor tag to the Update Action.
We also added asp-route-id="@p.Id" to the anchor so that the Id of the clicked records is added to the url. This means the links formed in the update column will be like shown below:
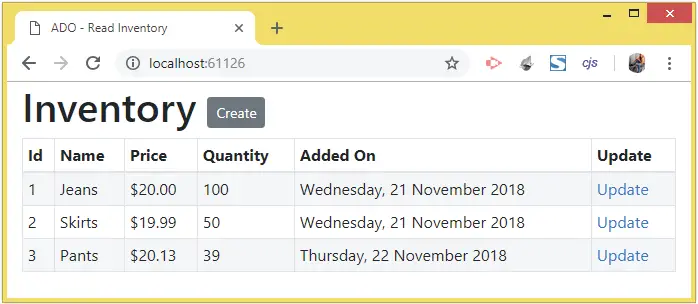
<a href="/Home/Update/1">Update</a>
<a href="/Home/Update/2">Update</a>
<a href="/Home/Update/3">Update</a>
Check the below image which illustrates the Update links in the HTML table.
Next, we need to create Update Actions (GET and POST type) in the Home Controller. There codes are shown below:
public IActionResult Update(int id)
{
    string connectionString = Configuration["ConnectionStrings:DefaultConnection"];

    Inventory inventory = new Inventory();
    using (SqlConnection connection = new SqlConnection(connectionString))
    {
        string sql = $"Select * From Inventory Where Id='{id}'";
        SqlCommand command = new SqlCommand(sql, connection);

        connection.Open();

        using (SqlDataReader dataReader = command.ExecuteReader())
        {
            while (dataReader.Read())
            {
                inventory.Id = Convert.ToInt32(dataReader["Id"]);
                inventory.Name = Convert.ToString(dataReader["Name"]);
                inventory.Price = Convert.ToDecimal(dataReader["Price"]);
                inventory.Quantity = Convert.ToInt32(dataReader["Quantity"]);
                inventory.AddedOn = Convert.ToDateTime(dataReader["AddedOn"]);
            }
        }

        connection.Close();
    }
    return View(inventory);
}

[HttpPost]
public IActionResult Update(Inventory inventory, int id)
{
    string connectionString = Configuration["ConnectionStrings:DefaultConnection"];
    using (SqlConnection connection = new SqlConnection(connectionString))
    {
        string sql = $"Update Inventory SET Name='{inventory.Name}', Price='{inventory.Price}', Quantity='{inventory.Quantity}' Where Id='{id}'";
        using (SqlCommand command = new SqlCommand(sql, connection))
        {
            connection.Open();
            command.ExecuteNonQuery();
            connection.Close();
        }
    }

    return RedirectToAction("Index");
}
The first one is the HTTP GET type of Update Action Method. It has an int parameter called id, which gets the id value of the records sent in the URL.
For example – if the URL is – /Home/Update/2, then the id parameter will get the value “2”. ASP.NET Core does this thing automatically by Model Binding technique.
We then create an SQL query by using the id parameter as:
string sql = $"Select * From Inventory Where Id='{id}'";This will help to fetch only the record of the particular id which is sent in the URL of the page.
Next, the query with the SqlCommand object is executed and it gives a SqlDataReader object. With this object, we add values to the Inventory class variable, and at the last ,return this variable as the Model.
The codes which do this work are:
using (SqlDataReader dataReader = command.ExecuteReader())
{
    while (dataReader.Read())
    {
        inventory.Id = Convert.ToInt32(dataReader["Id"]);
        inventory.Name = Convert.ToString(dataReader["Name"]);
        inventory.Price = Convert.ToDecimal(dataReader["Price"]);
        inventory.Quantity = Convert.ToInt32(dataReader["Quantity"]);
        inventory.AddedOn = Convert.ToDateTime(dataReader["AddedOn"]);
    }
}
Now coming to the HttpPost type of Update action, where we are doing the updation of the records. This action receives 2 arguments and both of them gets their value from the model binding feature, these arguments are:
- Inventory inventory – it will get it’s value from the form which the user will submit in the Update View.
- int id – it will get it’s value from the URL.
In this action we create the update SQL Query text from the values the user submits in the form.
string sql = $"Update Inventory SET Name='{inventory.Name}', Price='{inventory.Price}', Quantity='{inventory.Quantity}' Where Id='{id}'";Next, this SQL query is executed by the SqlCommand object.
using (SqlCommand command = new SqlCommand(sql, connection))
{
    connection.Open();
    command.ExecuteNonQuery();
    connection.Close();
}
In the last line users are redirecting to the Index Action method so that they can see the updated values of the records.
return RedirectToAction("Index");
Finally we have to add the Update View razor file inside the Views ➤ Home folder. It’s code is given below.
@model Inventory

@{
	ViewData["Title"] = "Update Inventory";
}

<h1>Update an Inventory <a asp-action="Index" class="btn btn-sm btn-secondary">Back</a></h1>
<form method="post">
	<div class="form-group">
		<label asp-for="Name"></label>
		<input class="form-control" asp-for="Name" />
	</div>
	<div class="form-group">
		<label asp-for="Price"></label>
		<input class="form-control" asp-for="Price" />
	</div>
	<div class="form-group">
		<label asp-for="Quantity"></label>
		<input class="form-control" asp-for="Quantity" />
	</div>
	<div class="text-center panel-body">
		<button type="submit" class="btn btn-sm btn-primary">Update</button>
	</div>
</form>
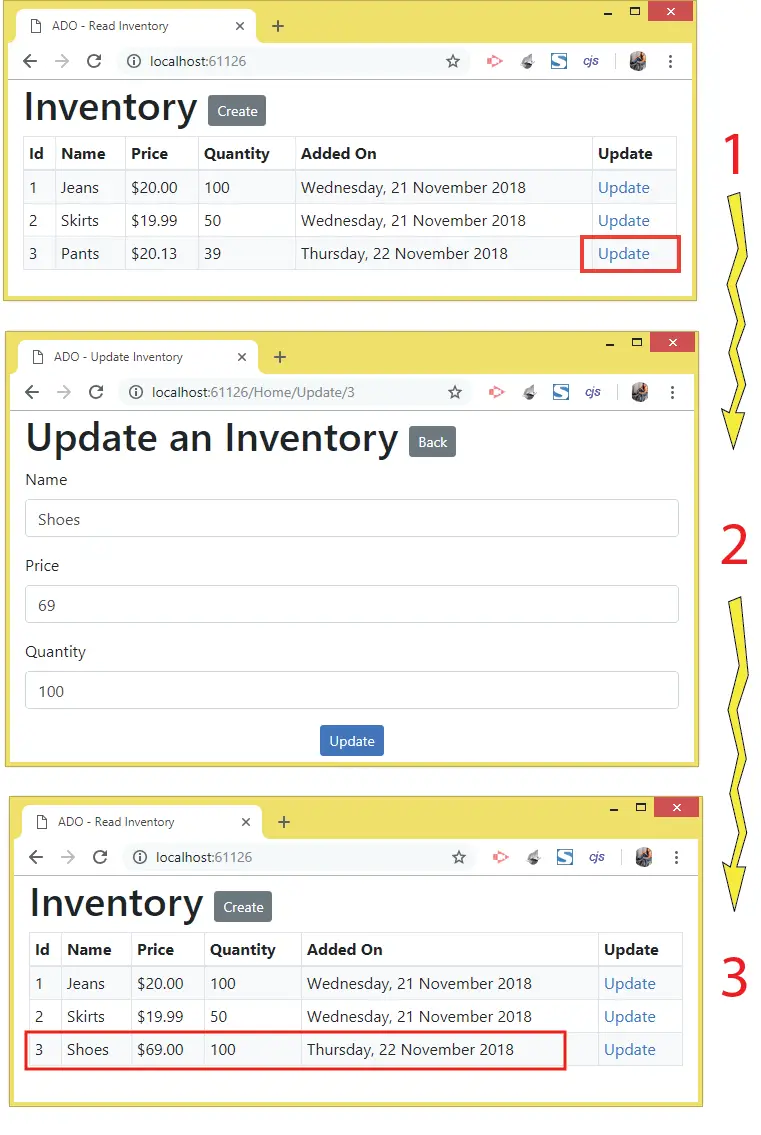
You can now test the Update functionality. Run your project and click the Update link of the 3rd record i.e. the Shoes record. When it opens in the update view, change it’s:
- 1. Name to ‘Shoes’
- 2. Price to ‘69’
- 3. Quantity to ‘100’
Click the Update button to save the changes. We will be redirected to the Index View where we will find the records is now updated. Check the below large image which explains this feature.
You can download the source code using the below link:
In this tutorial we learned to Update Records from a database table using ADO.NET. In the next tutorial we will perform deletion of these records from the database – ADO.NET – Delete Records in ASP.NET Core.
SHARE THIS ARTICLE
Related Tutorials:


ABOUT THE AUTHOR
I hope you enjoyed reading this tutorial. If it helped you then consider buying a cup of coffee for me. This will help me in writing more such good tutorials for the readers. Thank you.

HELLO EVERYONE
 Welcome to YogiHosting - A Programming Tutorial Website. It is used by millions of people around the world to learn and explore about ASP.NET Core, Blazor, jQuery, JavaScript, Docker, Kubernetes and other topics.
SUBSCRIBE TO NEWSLETTER
Enter your email address to subscribe to this blog and receive notifications of new posts by email.
Join 90K other subscribers