Model Binding in ASP.NET Core from Beginner to Advanced

What is model binding in ASP.NET Core? It is a process to Extract Data from HTTP Requests and provide them to the arguments of Action Method. Models contain the data that forms the business logic of the app. They are basically C# classes that contain the data from a database or other data source.
In ASP.NET Core there are 2 most important topics dealing with Models:
- 1. Model Binding – a process of extracting data from HTTP request and providing them to the action method’s arguments.
- 2. Model Validation – a process to validate the Model properties so that invalid entries are not entered in the database.
In this tutorial you will learn about Model Binding process in details.
Page Contents
ASP.NET Core Model Binding Example
We will create a new project where we will understand the concept of Model Binding through a lot of examples. So make sure to open Visual Studio 2022 and create a new project by selecting the ASP.NET Core Web App (Model-View-Controller) template. Name the project as ModelBindingValidation.
Add a new class called EmployeeDetails.cs class to the Models folder. Here we define 2 classes and an enum:
namespace ModelBindingValidation.Models
{
    public class Employee
    {
        public int Id { get; set; }
        public string Name { get; set; }
        public DateTime DOB { get; set; }
        public Address HomeAddress { get; set; }
        public Role Role { get; set; }
    }

    public class Address
    {
        public string HouseNumber { get; set; }
        public string Street { get; set; }
        public string City { get; set; }
        public string PostalCode { get; set; }
        public string Country { get; set; }
    }

    public enum Role
    {
        Admin,
        Designer,
        Manager
    }
}
Next, create a class file called Repository.cs to the Models folder, and here define an Interface and implementation class as shown below:
namespace ModelBindingValidation.Models
{
    public interface IRepository
    {
        IEnumerable<Employee> Employee { get; }
        Employee this[int id] { get; set; }
    }

    public class EmployeeRepository : IRepository
    {
        private Dictionary<int, Employee> employee = new Dictionary<int, Employee>
        {
            [1] = new Employee
            {
                Id = 1,
                Name = "John",
                DOB = new DateTime(1980, 12, 25),
                Role = Role.Admin
            },
            [2] = new Employee
            {
                Id = 2,
                Name = "Michael",
                DOB = new DateTime(1981, 5, 13),
                Role = Role.Designer
            },
            [3] = new Employee
            {
                Id = 3,
                Name = "Rachael",
                DOB = new DateTime(1982, 11, 25),
                Role = Role.Designer
            },
            [4] = new Employee
            {
                Id = 4,
                Name = "Anna",
                DOB = new DateTime(1983, 1, 20),
                Role = Role.Manager
            }
        };

        public IEnumerable<Employee> Employee => employee.Values;

        public Employee this[int id]
        {
            get
            {
                return employee.ContainsKey(id) ? employee[id] : null;
            }
            set
            {
                employee[id] = value;
            }
        }
    }
}
We just create a repository with 4 employees in it. We will be using these 4 employee data when working on the Model Binding concept.
Edit the HomeControllers.cs file on the Controllers folder to include dependency injection for receiving the EmployeeRepository which is the repository containing employee data.
The updated HomeController.cs file’s code is shown below:
using Microsoft.AspNetCore.Mvc;
using ModelBindingValidation.Models;

namespace ModelBindingValidation.Controllers
{
    public class HomeController : Controller
    {
        private IRepository repository;
        public HomeController(IRepository repo)
        {
            repository = repo;
        }
        public IActionResult Index(int id = 1)
        {
            return View(repository[id]);
        }
    }
}
Now edit the Index.cshtml Razor view file kept inside the Views ➤ Home folder so that it receives a model of type Employee and binds some of the employee properties inside a Html table.
The Index View code is:
@model Employee
@{
    ViewData["Title"] = "Index";
}

<h2>Employee</h2>

<table class="table table-sm table-bordered table-striped">
    <tr><th>Id:</th><td>@Model.Id</td></tr>
    <tr><th>Name:</th><td>@Model.Name</td></tr>
    <tr><th>Date of Birth:</th><td>@Model.DOB.ToShortDateString()</td></tr>
    <tr><th>Role:</th><td>@Model.Role</td></tr>
</table>
In the Program.cs class we will have to register a service for the EmployeeRepository class so that the controller can gain access to this class using dependency injection. This is done by including the code:
builder.Services.AddSingleton<IRepository, EmployeeRepository>();The Program class updated code is shown in highlighted manner.
using ModelBindingValidation.Models;

var builder = WebApplication.CreateBuilder(args);

// Add services to the container.
builder.Services.AddSingleton<IRepository, EmployeeRepository>();
builder.Services.AddControllersWithViews();

var app = builder.Build();
...
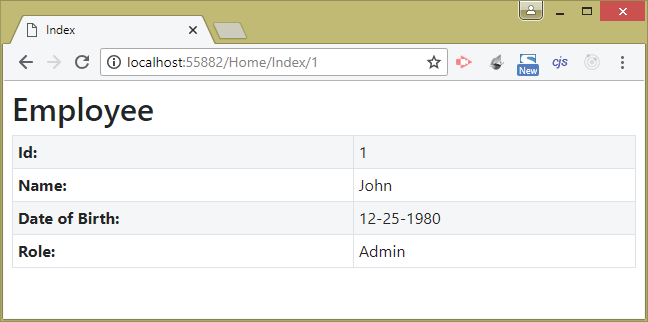
Now run your project and go to URL – /Home/Index/1. We will see the record of the employee number 1 gets displayed on the browser. This is shown in the image below:
Understanding Model Binding
How ASP.NET Core Model Binding process comes to play? We requested the URL which contained the value of employee id (given on the 3rd segment of the URL which is 1).
/Home/Index/1The app has a default route given on the Program.cs class. This route specifies that the 3rd segment of the URL is for the Id variable.
app.MapControllerRoute(
    name: "default",
    pattern: "{controller=Home}/{action=Index}/{id?}");
Now, we can also see that the Index Action method is also having the Id parameter.
public IActionResult Index(int id = 1)
{
    return View(repository[id]);
}
So ASP.NET Core employs Model Binding process to extract the id’s value from the URL (which is 1) and provides it to the id parameter of the action method.
The DOT NET Framework search for this value in the following 3 places:
- 1. Form data values
- 2. Routing variables
- 3. Query strings
Each place is inspected starting from Form data values, then Routing variable and finally with Query String. In this case the framework does not find the value of Id in Form data values, it then checked the routing variables where there is routing variable called id. So the search ended here, without the query string search performed.
The order of search is important. If we open the URL – /Home/Index/2?id=1 then we will see the record of Employee id 2 record, as shown in the image below:
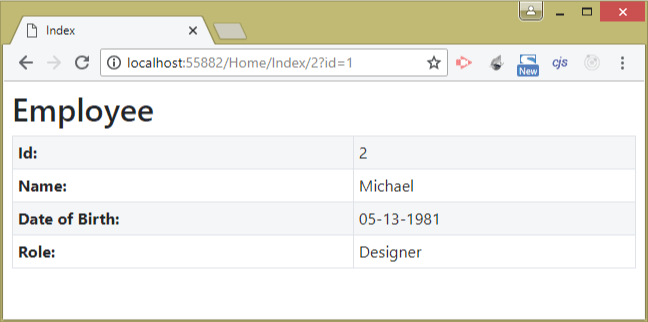
The reason why Employee id 2 is displayed is because the framework finds the value of id (i.e 2) in the routing variable before the value of id (i.e. 1) in the query sting so value of 2 is provided to the action method’s argument.
If we open the URL – Home/Index?id=3 then the Employee id 3 is displayed as shown in the image below:
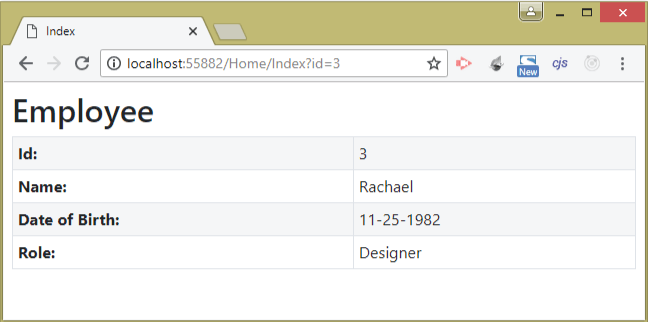
In this case the framework does not find the id value in the URL segment so it moves to search the query string where it found the id value of 3.
Model Binding Default Values
What happen if ASP.NET Core does not find the values to bind in any of the three locations – Form data values, Routing variables & Query strings. In such cases it will provide the default values based on the type defined for the action method’s parameter. These default values are:
- 0 for int
- “” for string
- 01-01-0001 00:00:00 for DateTime
- 0 for float
In order to test the Model Binding Default Values change the Index action code as shown below:
public IActionResult Index(int id)
{
    if (id == 0)
        id = 1;
    return View(repository[Convert.ToInt32(id)]);
}
Here we removed the default value given to the id parameter. Next put a breakpoint on the Index action method then run the application and go to URL – /Home/Index. Note that in this url there is no 3rd argument where employee id is given. So now Model Binding will apply the default values.
When the break-point hits, put the mouse pointer over the id variable to check it’s value. You will see the value 0, as shown by the image given below:
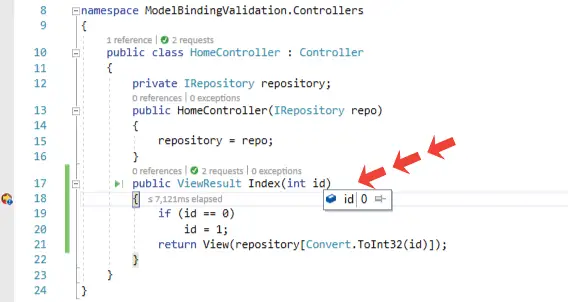
When ASP.NET Core detects no value for employee id therefore it binds default value for the id parameter. The “id” parameter is int type whose default value is 0 and hence Model Binding gives it a default value which is 0.
Yes you got it – if the “id” parameter type is changed to string then Model Binding will give it a default value of “”.
Note that the default values of nullable types are null. Now change the Index action to have a nullable int argument as shown in the code below:
public IActionResult Index(int? id)
{
    if (id == null)
        id = 1;
    return View(repository[Convert.ToInt32(id)]);
}
Run your application and go to URL – /Home/Index. Now check the id value when breakpoint is hit, you will find it’s value is null this time.
Model Binding for Simple Types
When Binding Simple Types the ASP.NET Core converts the values into the types of action method’s arguments. The Simple Types are – string, int, bool, float, datetime, decimal, etc.
Let us see it with an example of the Index Action which is shown below:
public IActionResult Index(int? id)
{
    if (id == null)
        id = 1;
    return View(repository[Convert.ToInt32(id)]);
}
The id argument of the Index action is an int type therefore ASP.NET Core framework automatically parses the value of the id segment variable given on the url to an int value.
When we request URL which contains id value as int like – /Home/Index/1 then the framework successfully parse value of 1 to int and so the id argument of the action method receives 1.
Now if you request a URL where the id value is a string like – /Home/Index/John then in this case the framework will try to parse John to int value. It fails to parse so id argument of the action method receives null value.
Model Binding for Complex Types
When the argument of the action method is a complex type like a class object then Model Binding will perform the binding for each of the public properties of the complex type.
The Model Binding looks for the values of these public properties in the following 3 places:
- 1. Form data values
- 2. Routing variables
- 3. Query strings
This is a very important concept which you will be using again and again in your projects. This is also asked very often during interviews. So we will create an example to understand it properly.
Add Create Action Methods on the Home Controller. The codes for these 2 actions are given below:
public IActionResult Create() => View();

[HttpPost]
public IActionResult Create(Employee model) => View("Index", model);
The HTTP GET version of the Create Action Method selects the default View and did not pass any model to it. The HTTP POST version of the Create Action Method has an argument of Employee class type (which is a complex type).
The Model Binding feature will extract the value of the Employee class’s public properties from the HTTP request and provide it to the arguments of the create action method. The action method then passes the Employee object as Model to the default view.
Next create the Create View inside the Views ➤ Home folder. It’s code is given below:
@model Employee
@{
    ViewData["Title"] = "Create Employee";
}

<h2>Create Employee</h2>

<form asp-action="Create" method="post">
    <div class="form-group">
        <label asp-for="Id"></label>
        <input asp-for="Id" class="form-control" />
    </div>
    <div class="form-group">
        <label asp-for="Name"></label>
        <input asp-for="Name" class="form-control" />
    </div>
    <div class="form-group">
        <label asp-for="DOB"></label>
        <input asp-for="DOB" class="form-control" />
    </div>
    <div class="form-group">
        <label asp-for="Role"></label>
        <select asp-for="Role" class="form-control"
                asp-items="@new SelectList(Enum.GetNames(typeof(Role)))"></select>
    </div>
    <button type="submit" class="btn btn-primary">Submit</button>
</form>
The View contains a form and binds some of the public properties of the Employee model. When the form is submitted these values are posted to the HTTP POST version of the Create Action method.
The create action requires an Employee objects in it’s parameter. So the Model Binding process first look for the value of each public property (Id, Name, DOB, Role) of the Employee object in the form data.
The form data contains these values as these are set up using asp-for tag helper on input elements. Example – the id property is bound to the input control as shown below.
<input asp-for="Id" class="form-control" />In the same way the Name property is bound as shown below.
<input asp-for="Name" class="form-control" />Therefore the Model Binding process binds these values to the properties of Employee object which is given in the argument of the create action method. This way the Employee type argument of the create action gets the value from the Model Binding technique.
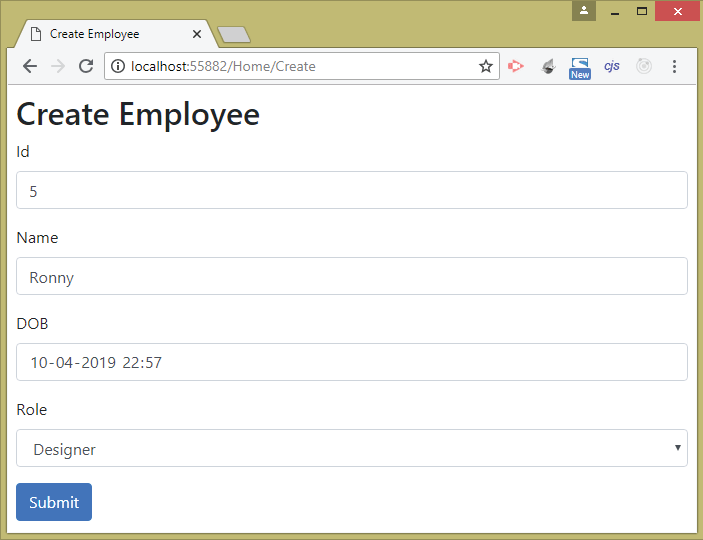
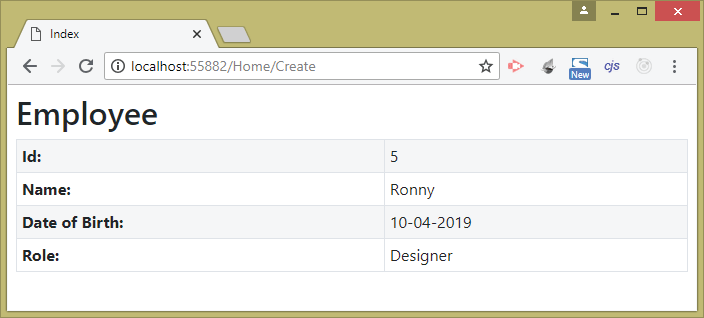
The Post version of the Create Action invokes the Index View and passes to it the Employee object as a Model. Now run your application and go to URL – /Home/Create. Fill all form values and click the submit button and we will see the filled values displayed on the browser.
The below 2 images shows the filling and submitting of the form:
Complex Object containing Complex Object
The EmployeeDetails.cs class contains a public property called HomeAddress and this property is of Address type. So here a Complex Object is containing another Complex Object.
public class Employee
{
    public int Id { get; set; }
    public string Name { get; set; }
    public DateTime DOB { get; set; }
    public Address HomeAddress { get; set; }
    public Role Role { get; set; }
}

public class Address
{
    public string HouseNumber { get; set; }
    public string Street { get; set; }
    public string City { get; set; }
    public string PostalCode { get; set; }
    public string Country { get; set; }
}
When binding the HomeAddress property the Model Binding process does the same thing like before:
- 1. Finds out all the public properties of the HomeAddress (i.e HouseNumber, Street, City, PostalCode, Country).
- 2. Searches the values of these public properties in the form data. Note that routing & query sting variables cannot contain complex types.
Now update the Create.cshtml view file to bind all the five properties of the HomeAddress type. See the highlighted code lines which needs to be added.
@model Employee
@{
    ViewData["Title"] = "Create Employee";
}

<h2>Create Employee</h2>

<form asp-action="Create" method="post">
    <div class="form-group">
        <label asp-for="Id"></label>
        <input asp-for="Id" class="form-control" />
    </div>
    <div class="form-group">
        <label asp-for="Name"></label>
        <input asp-for="Name" class="form-control" />
    </div>
    <div class="form-group">
        <label asp-for="DOB"></label>
        <input asp-for="DOB" class="form-control" />
    </div>
    <div class="form-group">
        <label asp-for="Role"></label>
        <select asp-for="Role" class="form-control"
                asp-items="@new SelectList(Enum.GetNames(typeof(Role)))"></select>
    </div>
    <div class="form-group">
        <label asp-for="HomeAddress.HouseNumber"></label>
        <input asp-for="HomeAddress.HouseNumber" class="form-control" />
    </div>
    <div class="form-group">
        <label asp-for="HomeAddress.City"></label>
        <input asp-for="HomeAddress.City" class="form-control" />
    </div>
    <div class="form-group">
        <label asp-for="HomeAddress.Street"></label>
        <input asp-for="HomeAddress.Street" class="form-control" />
    </div>
    <div class="form-group">
        <label asp-for="HomeAddress.PostalCode"></label>
        <input asp-for="HomeAddress.PostalCode" class="form-control" />
    </div>
    <div class="form-group">
        <label asp-for="HomeAddress.Country"></label>
        <input asp-for="HomeAddress.Country" class="form-control" />
    </div>
    <button type="submit" class="btn btn-primary">Submit</button>
</form>
Note that we have to include “HomeAddress” when binding it’s properties. See the tag helper asp-for="HomeAddress.HouseNumber" where we are binding the HouseNumber property. We do the same for other properties.
Next edit the Index View to display the properties of the HomeAddress object as shown by the code below:
@model Employee
@{
    ViewData["Title"] = "Index";
}

<h2>Employee</h2>

<table class="table table-sm table-bordered table-striped">
    <tr><th>Id:</th><td>@Model.Id</td></tr>
    <tr><th>Name:</th><td>@Model.Name</td></tr>
    <tr><th>Date of Birth:</th><td>@Model.DOB.ToShortDateString()</td></tr>
    <tr><th>Role:</th><td>@Model.Role</td></tr>
    <tr><th>House No:</th><td>@Model.HomeAddress?.HouseNumber</td></tr>
    <tr><th>Street:</th><td>@Model.HomeAddress?.Street</td></tr>
    <tr><th>City:</th><td>@Model.HomeAddress?.City</td></tr>
    <tr><th>Postal Code:</th><td>@Model.HomeAddress?.PostalCode</td></tr>
    <tr><th>Country:</th><td>@Model.HomeAddress?.Country</td></tr>
</table>
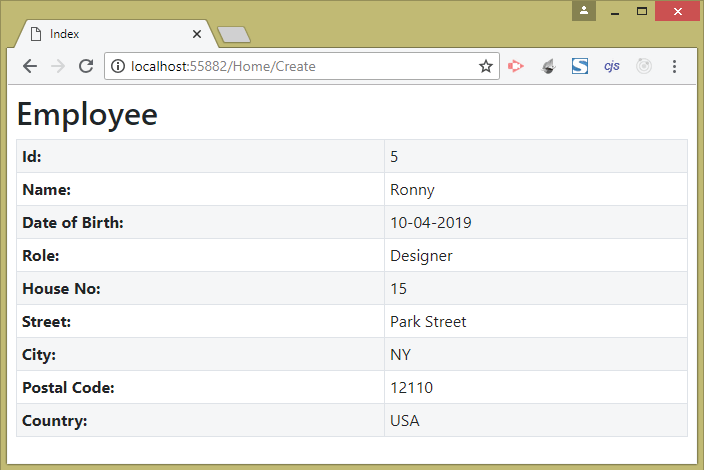
Now run your application and go to URL – /Home/Create. Fill and submit the form and we will find the properties of the address type get displayed, as shown in the image below:
Notice the html source code generated for these HouseNumber property by the browser.
<div class="form-group">
    <label for="HomeAddress_HouseNumber">HouseNumber</label>
    <input class="form-control" type="text" id="HomeAddress_HouseNumber" name="HomeAddress.HouseNumber" value="" />
</div>
<div class="form-group">
    <label for="HomeAddress_City">City</label>
    <input class="form-control" type="text" id="HomeAddress_City" name="HomeAddress.City" value="" />
</div>
<div class="form-group">
    <label for="HomeAddress_Street">Street</label>
    <input class="form-control" type="text" id="HomeAddress_Street" name="HomeAddress.Street" value="" />
</div>
<div class="form-group">
    <label for="HomeAddress_PostalCode">PostalCode</label>
    <input class="form-control" type="text" id="HomeAddress_PostalCode" name="HomeAddress.PostalCode" value="" />
</div>
<div class="form-group">
    <label for="HomeAddress_Country">Country</label>
    <input class="form-control" type="text" id="HomeAddress_Country" name="HomeAddress.Country" value="" />
</div>
The HouseNumber input control gets the name attribute value as HomeAddress.HouseNumber while the id attribute value becomes HomeAddress_HouseNumber. In the same way the City input control gets the name attribute value as HomeAddress.City while the id attribute value becomes HomeAddress_City, and so on for other controls.
In C# code we can also get the HouseNumber value in the action method by using Request.Form method as shown below:
string houseNo = Request.Form["HomeAddress.HouseNumber"];
And this is all the same for other values.
Complex Types Binding with [Bind(Prefix)] Attribute
We can change the default manner of Model Binding for Complex Types by using [Bind(Prefix)] Attribute . This is a case when we want to bind to a different object than what the Model Binding feature is looking.
Let us understand this with an example. Create a new Model class called PersonAddress.cs with the following code:
namespace ModelBindingValidation.Models
{
    public class PersonAddress
    {
        public string City { get; set; }
        public string Country { get; set; }
    }
}
Next, add a new action called DisplayPerson to the HomeController class.
[HttpPost]
public IActionResult DisplayPerson(PersonAddress personAddress)
{
    return View(personAddress);
}
Next, change the value of asp-action tag helper in the Create View to target the DisplayPerson action as shown below:
<form asp-action="DisplayPerson" method="post">
    ...
</form>
Now this means when we fill and submit the form on the Create View then the data will be posted to the DisplayPerson action.
Also create the DisplayPerson view inside the Views ➤ Home folder. This View has the model of type PersonAddress and displays the City and Country given in the Model object.
The code for the DisplayPerson view is given below:
@model PersonAddress
@{
    ViewData["Title"] = "Person";
}

<h2>Person</h2>

<table class="table table-sm table-bordered table-striped">
    <tr><th>City:</th><td>@Model.City</td></tr>
    <tr><th>Country:</th><td>@Model.Country</td></tr>
</table>
Now run your application and go to the URL – /Home/Create. Fill the complete form and click the submit button.
You will notice that the city and country values do not contain any value since model binding has failed, see the image below:
![asp.net core model binding [Bind(Prefix)] Attribute](https://www.yogihosting.com/wp-content/uploads/2019/05/empty-data-in-model.png)
The reason for failure of Model Binding is because the name attribute of the city and country input controls contain string HomeAddress prefixed to their names. Check the source code for these input controls on the browser to find this thing.
<input class="form-control" type="text" id="HomeAddress_City" name="HomeAddress.City" value="">
<input class="form-control" type="text" id="HomeAddress_Country" name="HomeAddress.Country" value="">
To fix this problem we apply the [Bind(Prefix)] Attribute to the action method’s parameter. This will tell ASP.NET Core that the model binding should be done specifically based on the prefix whose value should be “HomeAddress”.
So change the DisplayPerson action method to include [Bind(Prefix = nameof(Employee.HomeAddress))] as shown below:
public IActionResult DisplayPerson
([Bind(Prefix = nameof(Employee.HomeAddress))] PersonAddress personAddress)
{
    return View(personAddress);
}
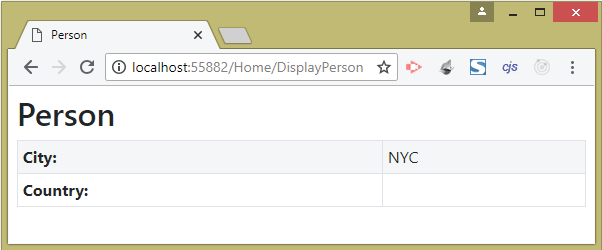
Now once again submit the form and this time we will find the City and Country values are displayed on the browser, see the below image:
![model binding [Bind(Prefix)] Attribute](https://www.yogihosting.com/wp-content/uploads/2019/05/bind-prefix-attribute.png)
Binding Selective Properties only with [Bind]
We can prevent properties from binding. For this use the first argument of the Bind method to specify all the properties that should only be used for model binding i.e. all the other properties will not be bind.
Give the first argument of the Bind() method all the names of the properties (in a comma-separated list) that should be only included by model binding. This means the properties that are left will not bind at all.
Change the DisplayPerson action method code to include Bind method containing only the city property.
public IActionResult DisplayPerson
([Bind(nameof(PersonAddress.City),
Prefix = nameof(Employee.HomeAddress))] PersonAddress personAddress)
{
    return View(personAddress);
}
Test it by filing and submitting the form, you will see that only the City value is displayed, see the image below:
The same code can be recreated by decorating the Country property of the PersonAddress class with the [BindNever] attribute. The BindNever specifies the property which the Model Binding should ignore.
namespace ModelBindingValidation.Models
{
    public class PersonAddress
    {
        public string City { get; set; }

        [BindNever]
        public string Country { get; set; }
    }
}
Model Binding for File Upload
We can also upload files through Model Binding technique. Here we have to do 3 things:
- Add input
type="file"control in the view. - Add
enctype="multipart/form-data"attribute on the html form tag. - Add IFormFile type parameter to the action method for binding the uploaded file.
Let’s create an example for File Upload feature. First add a new controller and name it FileUploadController.cs. It’s code is given below:
using Microsoft.AspNetCore.Mvc;

namespace ModelBindingValidation.Controllers
{
    public class FileUploadController : Controller
    {
        private IWebHostEnvironment hostingEnvironment;
        public FileUploadController(IWebHostEnvironment environment)
        {
            hostingEnvironment = environment;
        }

        public IActionResult Index() => View();

        [HttpPost]
        public async Task<IActionResult> Index(IFormFile file)
        {
            string path = Path.Combine(hostingEnvironment.WebRootPath, "Images/" + file.FileName);
            using (var stream = new FileStream(path, FileMode.Create))
            {
                await file.CopyToAsync(stream);
            }
            return View((object)"Success");
        }
    }
}
We added a dependency for IWebHostEnvironment to get the full path of “wwwroot” folder. Note the Index action has a IFormFile type parameter which will be provided with the uploaded file by Model Binding. Inside the action we are saving the file to the “wwwroot/Images” folder of the app.
Make sure you create “Images” folder inside the “wwwroot” folder for this feature to work.
Next add the “Index” view file inside the Views/FileUpload folder with the given code.
@model string
@{
    ViewData["Title"] = "Upload File";
}

<h2>Upload File</h2>
<h3>@Model</h3>

<form method="post" enctype="multipart/form-data">
    <div class="form-group">
        <input type="file" name="file" />
    </div>
    <button type="submit" class="btn btn-primary">Submit</button>
</form>
This is how this will look on the browser.
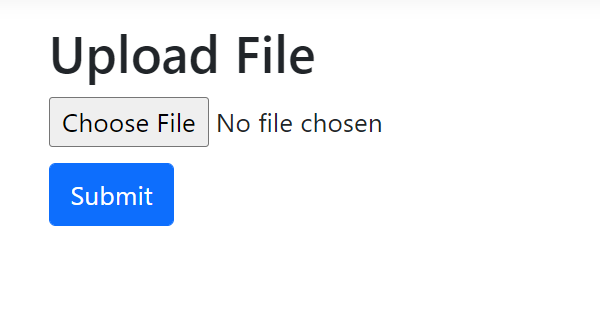
You can check how the file upload works by uploading any type of file.
Download the full source codes using the below link:
Model binding is an important concept of ASP.NET Core. It makes it easy for developers for transferring data from views to controllers. In this tutorial we took a lot of Model Binding Examples which will certainly help you in your projects. Use the codes given here freely.
SHARE THIS ARTICLE
Related Tutorials:


ABOUT THE AUTHOR
I hope you enjoyed reading this tutorial. If it helped you then consider buying a cup of coffee for me. This will help me in writing more such good tutorials for the readers. Thank you.

HELLO EVERYONE
 Welcome to YogiHosting - A Programming Tutorial Website. It is used by millions of people around the world to learn and explore about ASP.NET Core, Blazor, jQuery, JavaScript, Docker, Kubernetes and other topics.
SUBSCRIBE TO NEWSLETTER
Enter your email address to subscribe to this blog and receive notifications of new posts by email.
Join 90K other subscribers