Controllers in ASP.NET Core

Controllers are the brain of an ASP.NET Core application. They process incoming requests, perform operations on data provided through Models, and selects Views to render on the browser. Controllers are stored inside the Controllers folder in the root of the app. They are basically C# classes whose Public methods are called as Action Methods. These Action Methods handle the HTTP requests and prepare the response to be sent to the clients.
An ASP.NET Core View is a user interface (UI) which displays data sent from the Controller to the user (in the browser). Through Views we can also submit data back to the controllers. Views resides inside the Views folder which is located on the root of the application.
This Views folder contains separate folders for every controller present in the app. Inside these folders, separate views for each of the controller’s action methods are placed. For example, the views of HomeController, resides in Views ➤ Home folder. In the same way, views for StudentController will resides inside Views ➤ Student folder.
Page Contents
ASP.NET Core Controller Example
First create a new ASP.NET Core Web App (Model-View-Controller) app in visual studio and name it UnderstandingControllersViews.
When Visual Studio finished creating the app. Open the Controllers folder in Solution Explorer and you will find a file called HomeController.cs present there. This is the default controller present in every ASP.NET Core MVC app.

Double click on this file to see it’s code. I have shown it’s full code below.
using Microsoft.AspNetCore.Mvc;
using System.Diagnostics;
using UnderstandingControllersViews.Models;

namespace UnderstandingControllersViews.Controllers
{
    public class HomeController : Controller
    {
        private readonly ILogger<HomeController> _logger;

        public HomeController(ILogger<HomeController> logger)
        {
            _logger = logger;
        }

        public IActionResult Index()
        {
            return View();
        }

        public IActionResult Privacy()
        {
            return View();
        }

        [ResponseCache(Duration = 0, Location = ResponseCacheLocation.None, NoStore = true)]
        public IActionResult Error()
        {
            return View(new ErrorViewModel { RequestId = Activity.Current?.Id ?? HttpContext.TraceIdentifier });
        }
    }
}
Points to note here:
- The Home Controller derives from Controller class.
- It has 3 action method – Index, Privacy & Error.
- On the controller’s constructor ILogger service is injected through Dependency Injection.
To understand the workings of the Controller we only need Index action and nothing more so kindly delete the other action methods and the Dependency Injection code. After deletion the updated code of the home controller will look as shown below:
using Microsoft.AspNetCore.Mvc;

namespace UnderstandingControllersViews.Controllers
{
    public class HomeController : Controller
    {
        public IActionResult Index()
        {
            return View();
        }
    }
}
The Index action of the controller will have it’s view file called Index.cshtml located inside the View ➤ Home folder. Double click on it to see it’s codes.
@{
    ViewData["Title"] = "Home Page";
}

<div class="text-center">
    <h1 class="display-4">Welcome</h1>
    <p>Learn about <a href="https://docs.microsoft.com/aspnet/core">
building Web apps with ASP.NET Core</a>.</p>
</div>
The View contains 2 types of codes:
- Razor expression inside “@” symbol. Here we enter C# codes like ViewData (a dictionary type object) in our case.
- HTML markups to design the UI of the view.
Let’s remove the contents of the div an add a welcome message there.
@{
    ViewData["Title"] = "Home Page";
}

<div class="text-center">
    <p>Welcome from <b>Index View</b> of <b>Home Controller</p>
</div>
Run your application and you will see this view is rendered on the browser.

What is ViewData and how to use it ?
ViewData is a ViewDataDictionary object accessed through string keys. It is like a dictionary object and is used to transfer values from Controllers to Views and also from Views to Layout view. In our view we are setting a ViewData object like ViewData["Title"] = "Home Page". This value is read on the layout view file called _Layout.cshtml (located inside Views ➤ Shared folder). The layout file uses it to set the title of the page.
Check the code of the _Layout.cshtml and see how the title of the page is set with this ViewData’s value – ViewData["Title"]. See highlighted code below.
<!DOCTYPE html>
<html lang="en">
<head>
    <meta charset="utf-8" />
    <meta name="viewport" content="width=device-width, initial-scale=1.0" />
    <title>@ViewData["Title"] - UnderstandingControllersViews</title>
    <link rel="stylesheet" href="~/lib/bootstrap/dist/css/bootstrap.min.css" />
    <link rel="stylesheet" href="~/css/site.css" asp-append-version="true" />
    <link rel="stylesheet" href="~/UnderstandingControllersViews.styles.css" asp-append-version="true" />
</head>
....
You can use viewdata to tranfer any type of value like simple data types (like strings, int, float) or class type objects. In the below code I am using 2 ViewData objects:
- For storing Name of the person.
- For storing address of the person. Note that “Address.cs” is a class containing 2 properties “HouseNo” and “City”.
public IActionResult SomeAction()
{
    ViewData["Name"] = "Yogi";
    ViewData["Address"]  = new Address()
    {
        HouseNo = "Steve",
        City = "Hudson",
    };

    return View();
}
Now on the View I can show the values contained by these 2 ViewData objects like:
@{
    // casting address to Address.cs class object
    var address = ViewData["Address"] as Address;
}

<p>Hello: @ViewData["Name"]</p>
<p>With Address: @address.HouseNo, @address.City</p>
You must have noticed a css class for the div – class="text-center". This is a Bootstrap class. Bootstrap is an HTML, CSS and JavaScript framework for making modern web designs. This app already has Bootstrap installed so we are able to use it. However, if we create apps from Empty template in Visual Studio then we have to install Bootstrap manually.
I have written an article that explains how to install Bootstrap in ASP.NET Core apps. You can use – LibMan or Bower to install Bootstrap package in Visual Studio. The Bootstrap package will be added inside the wwwroot ➤ lib folder of your app.
Transfer Data from Views to Controllers
The Views can have html forms which the users can fill and submit. On submission, the data from these forms are transferred to the Controllers. Now we will learn how data is transferred from the views to the controllers.
Their are 3 ways to transer the data from views to controllers. These are through – FormData objects, Query strings, and model binding. Let’s take some examples.
1. Controllers Request Property – Request.Form
The Request property of the ControllerBase class returns an HttpRequest object that describes the request received from the client.
What is ControllerBase class? It is an abstract class which does not supports working with Views. We use controllers that derives from this class when building web api features.
The HttpRequest contains a Form property which returns a dictionary of FormData object. You can use the ‘Form’ property to read the data transferred from the View.
Let’s create a form on the view and receive the data in the controller.
So change the Index View’s code of the Home Controller as given below. You will find the Index.cshtml file inside – View ➤ Home folder.
@{
	ViewData["Title"] = "Home Page";
}

<form asp-action="ReceivedDataByRequest">
	<div class="form-group">
		<label>Name:</label>
		<input class="form-control" name="name" />
	</div>
	<div class="form-group">
		<label>Sex:</label>
		<select class="form-control" name="sex">
			<option value="M">Male</option>
			<option value="F">Female</option>
		</select>
	</div>
	<div class="m-1">
		<button class="btn btn-primary" type="submit">Submit</button>
	</div>
</form>
I applied the Bootstrap CSS classes for designing of the form. These css classes are form-group, form-control, btn btn-primary, m-1.
This form will look like:
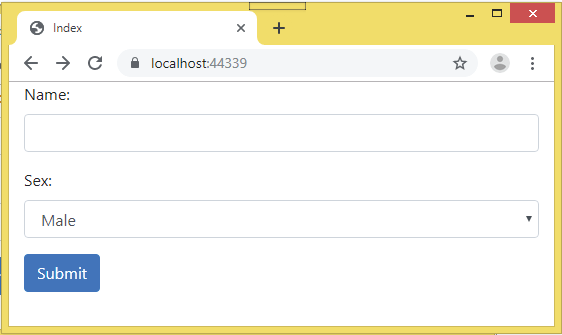
I have added 2 HMTL tags – input tag called name of type input & select tag called sex. User will fill or select a value on these tags and click the submit button. The values of these controls will have to be transferred to the Controller which I will show in just a minute. Note the names of these 2 controls are name and sex while the ‘labels’ are only for displaying purpose.
The Form tag contains the attribute asp-action="ReceivedDataByRequest" which is a tag helper. This tag helper creates the action property for the form. So in this case the controller’s action method by the name of ReceivedDataByRequest will be called when the submit is clicked by the user.
Now I have to create ReceivedDataByRequest action method in my Home Controller. This action method will receive data from the view i.e. the data filled on the form. So, add the below code to create this action method:
using Microsoft.AspNetCore.Mvc;

namespace UnderstandingControllersViews.Controllers
{
    public class HomeController : Controller
    {
        public IActionResult Index()
        {
            return View();
        }

        public IActionResult ReceivedDataByRequest()
        {
            string name = Request.Form["name"];
            string sex = Request.Form["sex"];
            return View("ReceivedDataByRequest", $"{name} sex is {sex}");
        }
    }
}
Look how I am capturing the form’s value in the action method using the Request.Form. It returns the dictionary of form’s data.
So Request.Form["name"] will give me the value of the input control by the name of name. In the same way the Request.Form["sex"] will give the selected value of the select control which has the name – sex.
Note that I am returning to another View called ReceivedDataByRequest in the last line of the Action method. This is done by using signature of the View method that takes 2 parameters and is shown below:
View("ReceivedDataByRequest", $"{name} sex is {sex}")The 1st parameter is for the View name to be rendered and 2nd one is for the data in object form that will be transferred to the view.
Now we need to create a View file for this action method. So right click on Views ➤ Home folder and select Add ➤ New Item. Then on the dialog select Razor View – Empty option and name the view ReceivedDataByRequest.
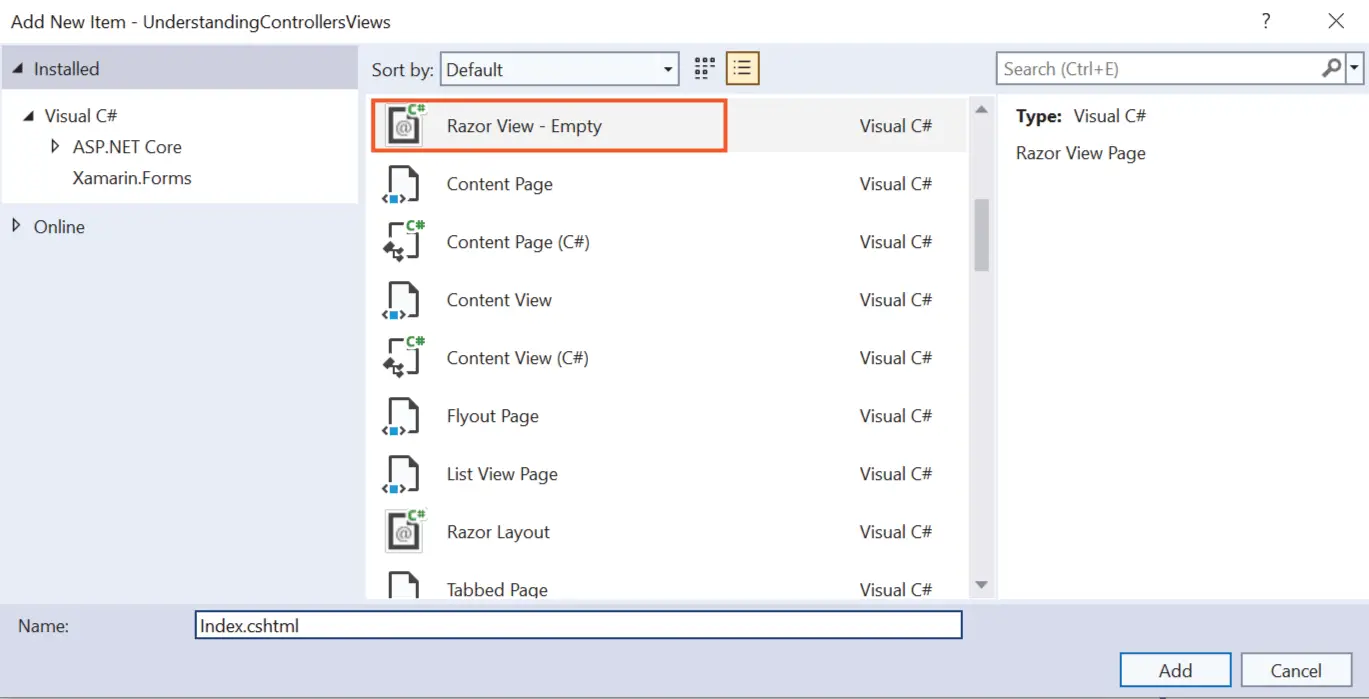
Add the following code to this view:
@model string
<h1>@Model</h1>
This View is fairly simple and contains just 2 code lines. The view accepts string data (see 2nd parameter of View() method on the last line of the action method), so I have defined the model as – @model string. Finally I have shown that data inside the h1 tag – @Model (note capital ‘M’). So whatever we pass from the action method, this View will dispaly it inside the h1 tag.
Now run your application, fill the form and press the submit button. Your submitted values will be displayed on the browser, as shown by the following image:

2. Receive Data in the “Parameters” of Action Methods
Data from the Views can easily be transferred in the “Parameters” of Action Methods. Let us understand this thing. Our form has 2 html controls that allow users to enter their name and sex. We can add parameters on the action method which will receive the values of these 2 controls. But note that the names of the parameters “must be the same” as these 2 controls.
On the HomeController.cs file, add a new action method called ReceivedDataByParameter with the following code.
public IActionResult ReceivedDataByParameter(string name, string sex)
{
    return View("ReceivedDataByParameter", $"{name} sex is {sex}");
}
Notice the 2 parameters of the Action method – name & sex. These have the names same as given to the 2 html controls. I have provided strings type to the 2 parameters because the name and sex values are going to be string type. However if you want to accept int values for a new field “age” then you can add a new int type parameter on the action. However it is not necessary as strings can accept int values in DOT NET.
Next, perform a small change on the Index View by changing the asp-action="ReceivedDataByRequest" tag helper to asp-action="ReceivedDataByParameter". This will change the action property of the form to “ReceivedDataByParameter” and hence when the submit button is clicked then “ReceivedDataByParameter” action will be called.
The changed code is highlighted below:
<form asp-action="ReceivedDataByParameter">
    ...
</form>
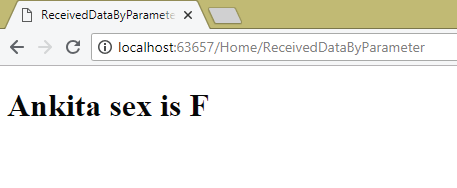
Finally, add a new Razor View inside the Views ➤ Home folder and name it ReceivedDataByParameter. This view will show message (inside h1 tag) which is returned by the action method.
@model string
<h1>@Model</h1>
Run the application and fill the form. On clicking the submit button you will get to see your form controls values displayed on the browser. Check the below image:
3. Passing data from Query String
Controllers can capture query string values of the URL very easily. Just add an anchor tag on the Index view with name and sex in the query string as shown below.
<a href="/Home/ReceivedDataByParameter?name=jack sparrow&sex=m" class="link-primary">Primary link</a>When this anchor tag is clicked the query strings will carry name and sex values. The parameters of the ReceivedDataByParameter action method will receive these values.
4. Transfer View’s data to Controller with Model Binding
In Model Binding you will have to create a Model which is an ordinary class file in the “Models” folder. Then you have to map this model class properties with the form.
Finally, in order to receive the values in the Controller, add a parameter of this model class type in the Action method. Let us see this through an example.
Start by creating a new class by the name of Person.cs inside the Models folder. Include the following code in this class:
namespace UnderstandingControllersViews.Models
{
    public class Person
    {
        public string name { get; set; }
        public string sex { get; set; }
    }
}
The class has 2 public properties that .NET will automatically fill with the values from the html controls given on the View.
Next add a new action method called ReceivedDataByModelBinding to the Home Controller as shown below:
using Microsoft.AspNetCore.Mvc;
using UnderstandingControllersViews.Models;

namespace UnderstandingControllersViews.Controllers
{
    public class HomeController : Controller
    {
        //...

        public IActionResult ReceivedDataByModelBinding(Person person)
        {
            return View("ReceivedDataByModelBinding", person);
        }
    }
}
This action has a parameter of type Person and therefore .NET applies Model Binding technique. On the last line of the code, the Person’s object is returning to the ReceivedDataByModelBinding View. So it means this view will accept Model of type Person.
Now create the ReceivedDataByModelBinding View inside the Views ➤ Home folder with the code given below, the View is slightly different that the other Views you built previously. It accepts model of type Person and shows the values of the name and sex properties of the Person class inside h1 tag.
@model Person
<h1>@Model.name sex is @Model.sex</h1>
Now comes the final part. You need to update the Form given on the Index View so that ASP.NET Core runtime understands that this form is mapping with the Person’s class properties (i.e. name & sex). I have highlighted these changes (see below code).
@model Person
@{
	ViewData["Title"] = "Home Page";
}

<form asp-action="ReceivedDataByModelBinding">
	<div class="form-group">
		<label>Name:</label>
		<input class="form-control" asp-for="name" />
	</div>
	<div class="form-group">
		<label>Sex:</label>
		<select class="form-control" asp-for="sex">
			<option value="M">Male</option>
			<option value="F">Female</option>
		</select>
	</div>
	<div class="m-1">
		<button class="btn btn-primary" type="submit">Submit</button>
	</div>
</form>
- The View accepts the model of type person – @model Person.
- Form’s asp-action tag helper’s value is changed to ReceivedDataByModelBinding.
- The html controls (input & select) are now binding with the name and sex property of the Person’s class. The
asp-for="class_property"tag helper is used to bind these control with a properties of the model class.
Run the application, fill the form and click the submit button. You will see the Model Binding feature comes into play and the data filled by the user is shown on the ReceivedDataByModelBinding View. Check below image:

ASP.NET Core Controller for File Uploading
We can also create Files Upload feature in ASP.NET Core. The only thing to note here is that we have to use form method as post – method="post" and enctype type as multipart/form-data – enctype="multipart/form-data".
Add the below form to the Index View. Note that I have not specified the action name by using “asp-action” tag helper like before, so it means the same action method will be called when the form is submitted. In short the action which this view belongs is called which in our case is “Index” action of the Home controller. Also note the input type file is used for uploading the file and name of this control is kept as “photo”.
<form method="post" enctype="multipart/form-data">
    <div class="form-group">
        <label>Photo:</label>
	<input type="file" class="form-control" name="photo" />
    </div>
    <div class="m-1">
	<button class="btn btn-primary" type="submit">Upload</button>
    </div>
</form>
Next I add the Index action of Post type on the Home Controller and it will contain IFormFile photo parameter to get the uploaded file from the view. I will upload this file on the “wwwroot” folder so I have to inject IWebHostEnvironment on the controller’s constructor.
using Microsoft.AspNetCore.Mvc;
using UnderstandingControllersViews.Models;

namespace UnderstandingControllersViews.Controllers
{
    public class HomeController : Controller
    {
        private IWebHostEnvironment hostingEnvironment;
        public HomeController(IWebHostEnvironment environment)
        {
            hostingEnvironment = environment;
        }

        public IActionResult Index()
        {
            return View();
        }

        [HttpPost]
        public async Task<IActionResult> Index(IFormFile photo)
        {
            // code to save the uploaded file in wwwroot folder
            using (var stream = new FileStream(Path.Combine(hostingEnvironment.WebRootPath, photo.FileName), FileMode.Create))
            {
                 await photo.CopyToAsync(stream);
            }

            return View();
        }

        //...
    }
}
You can test the file upload feature on your own. If you find this feature very basic then I have also created an extremely complicated file upload feature which you should certainly see – Multi File Upload with Progress Bar in ASP.NET CORE.
You can download the full codes of this tutorial from the below link:
In this tutorial I explained Controllers and their usage in ASP.NET Core MVC 6.0 Framework. I hope you find it useful. Next tutorial is – Actions in ASP.NET Core, do check it to.
SHARE THIS ARTICLE
Related Tutorials:


ABOUT THE AUTHOR
I hope you enjoyed reading this tutorial. If it helped you then consider buying a cup of coffee for me. This will help me in writing more such good tutorials for the readers. Thank you.

HELLO EVERYONE
 Welcome to YogiHosting - A Programming Tutorial Website. It is used by millions of people around the world to learn and explore about ASP.NET Core, Blazor, jQuery, JavaScript, Docker, Kubernetes and other topics.
SUBSCRIBE TO NEWSLETTER
Enter your email address to subscribe to this blog and receive notifications of new posts by email.
Join 90K other subscribers