ASP.NET Core Routing Generating URLs

The concept of Routing is very vast and I have covered it in 6 tutorials which are:
- 1. Learn ASP.NET Core Convention-Based Routing
- 2. What is Endpoint Routing, Implementing it from start [with codes]
- 3. Learn ASP.NET Core Route Constraint in details with lots of examples
- 4. ASP.NET Core Attribute Routing
- 5. ASP.NET Core Routing Generating URLs
- 6. Areas and Routing in ASP.NET Core
So make sure you cover each of these one by one.
Page Contents
In ASP.NET Core apps, the links are created based on the Routes defined in the app. This addresses an important maintenance issue as in case of any change made in the routes, the links created are automatically updated based on the new route. So you don’t have to manually update the links one by one.
ASP.NET Core Routing generates links to action methods of controllers based on 2 tag helpers which are:
- asp-controller
- asp-action
Links Generation based on Default Route
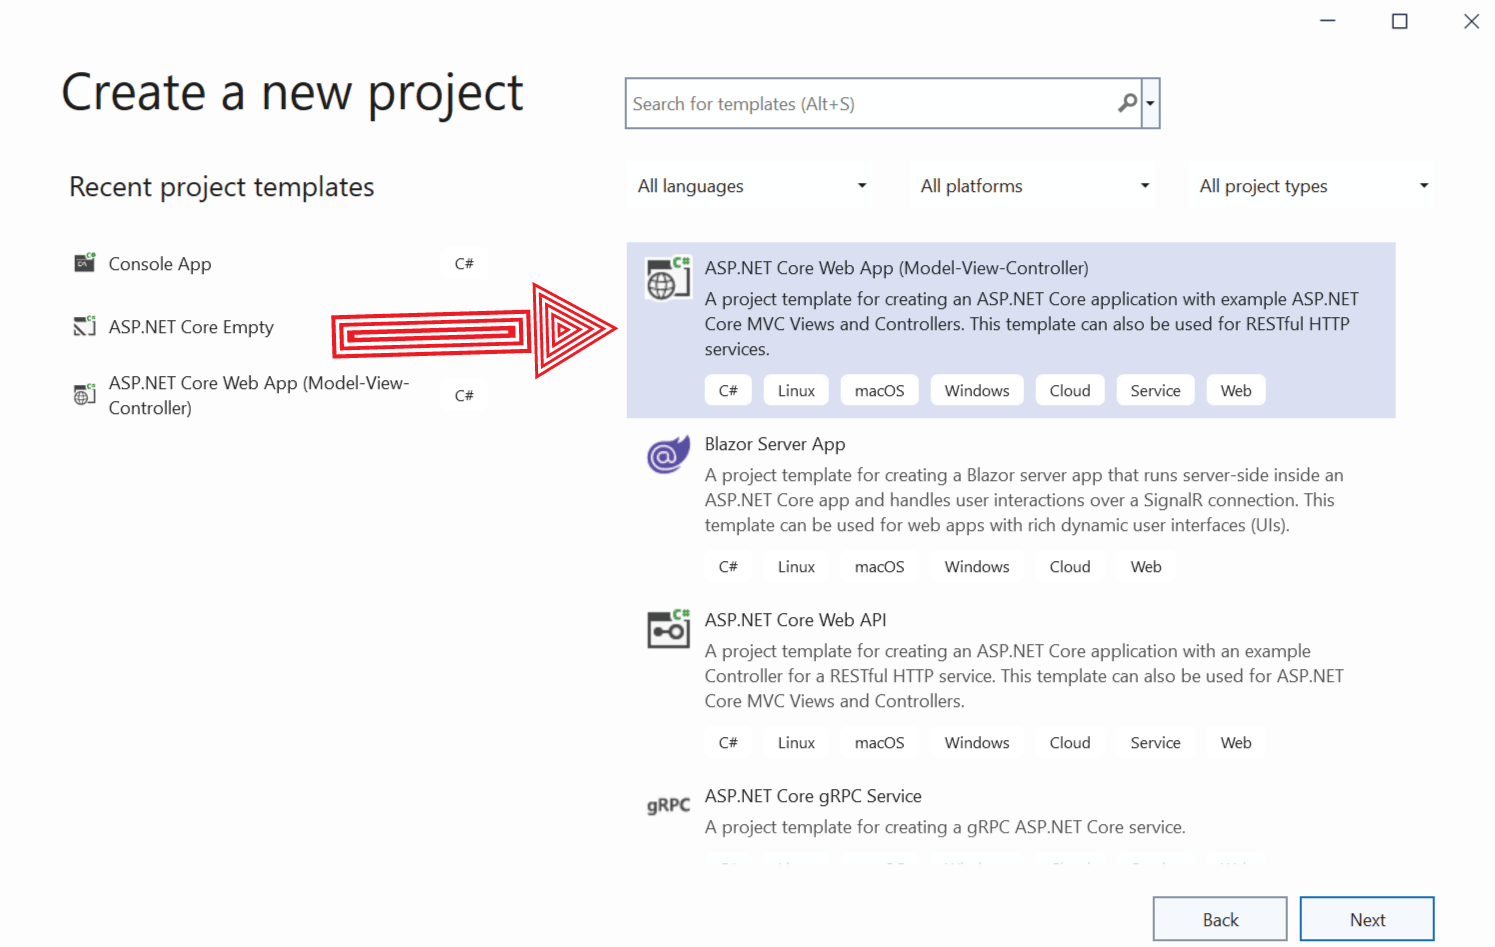
Let us understand how links are created based on the routes defined in the app. So first create a new ASP.NET Core project by selecting the ASP.NET Core Web App (Model-View-Controller) template and name it “RouteLinks”.
Once the project is created, you can see a default route given on the Program.cs class. See below code of this route:
app.MapControllerRoute(
    name: "default",
    pattern: "{controller=Home}/{action=Index}/{id?}");
Next go to the Index View on your Home Controller and add the below code line:
<a asp-controller="Home" asp-action="Check">Outgoing URL</a>Run your application and check the link which is formed. You can do this by using the Developer Tools of your browser. So right click on the browser and select Inspect then click the link to check it’s HTML. You will find the HTML of this Link is:
<a href="/Home/Check">Outgoing URL</a>Check the below image where I have shown the html of this link by using chrome developer tools:
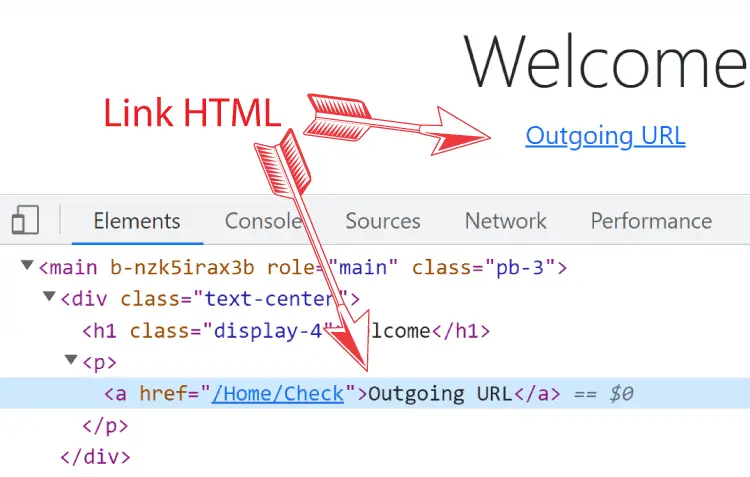
This link is formed because I used asp-controller and asp-action tag helpers – asp-controller="Home" asp-action="Check" on the anchor tag. These tag helpers instruct DOT NET to create href attribute of the anchor tag and target the “Check” action method of the “Home” controller.
Dot Net will then apply the routes given on the app to create a full url for the “Check” action method. Right now our app has only the default route so the URL will be formed by applying this default route. If we have more than one route then DOT NET will match the routes one by one, the route which matches – DOT NET will then create the URL based on the matched route. We will understand how the routes are matched later on the tutorial.
If we want to target action method in a differnt controller, say “Check” action of “Customer” controller then the below code will do this work.
<a asp-controller="Customer" asp-action="Check">Check action of Customer Controller</a>The link formed in this case will be:
<a href="/Customer/Check">Check action of Customer Controller</a>
Go to the Check action method of the Home Controller and create a link targeting the Index action method.
<a asp-action="Index">Go to Index</a>You will find the link formed in this case contains just / and not Home/Index, see below:
<a href="/">Go to Index</a>The reason for this is that the default route has provided the default value for both controller and action. That is: Home for the default Controller and Index for the default action. These are the same given for asp-controller and asp-action tag helpers. So ASP.NET Core does not adds the Controller and Action names on the Href attribute.
Generating links from Attribute Routes
Outgoing links can also be generated based on Attribute Routing. Add a new controller to your app and name it AdminController.cs, and add the following code to it.
using Microsoft.AspNetCore.Mvc;

namespace RouteLinks.Controllers
{
    [Route("News/[controller]/USA/[action]/{id?}")]
    public class AdminController : Controller
    {
        public IActionResult Index()
        {
            return View();
        }
    }
}
The admin controller has been applied with an Attribute Route and our job is to create an anchor link to it based on this attriubute route.
Go to the Index Action of Home Controller and simply add an anchor tag targetting the Index action of Admin Controller. We do this by using asp-controller and asp-action tag helpers. The anchor tag code is given below.
<a asp-controller="Admin" asp-action="Index">Index Action of Admin Controller</a>
This will form the link based on Attribute Routing, and is given below:
<a href="/News/Admin/USA/Index">Index Action of Admin Controller</a>
Outgoing Links Generation when Multiple Routes are present
An app can have multiple routes present. So when we create an outgoing link the routing middleware processes the routes in the order in which they are defined on the Program or Startup class depending upon the DOT NET framework version we are using. It tries to match the route turn by turn and this matching condition is based upon the 3 rules:
- 1. Every URL segment must be provided with a value.
- 2. For the default-only variables, we must either not provide the value or provide the value that matches the default value.
- 3. The values of segment variables should satisfy the route constraint.
Default-only variables are those that are not present in the URL but there default value is provided on the route itself. Consider an example: a route which is shown below has a default value for controller variable. So for the route middleware to make the match, we should either not provide the value for this variable or provide a value which is USA since it is it’s default value.
app.MapControllerRoute(
    name: "defaultonly",
    pattern: "{controller}/{action}",
    defaults: new { controller = "USA" });
Example: Link Generation when Multiple Routes are present
Suppose you have 2 routes in your application which are given below:
app.MapControllerRoute(
    name: "stock",
    pattern: "Stock/{action}",
    defaults: new { controller = "Home" });

app.MapControllerRoute(
    name: "default",
    pattern: "{controller=Home}/{action=Index}/{id?}");
Now go to your Index View of the Home Controller and add the below codes to generate anchor links:
<a asp-action="Index">Link1</a>
<a asp-controller="Product">Link2</a>
The code for the links formed is given below:
<a href="/Stock/Index">Link1</a>
<a href="/Product">Link2</a>
Here the first link is formed by the first route (stock) and the second link is formed by second route. In the first link – <a asp-action="Index">Link1</a> we did not provide the controller value since it has a default one. So our 2nd rule gets satisfied. We can also form the same link by – <a asp-controller="Home" asp-action="Index">Link1<</a>. Here we provided a value “Home” to the controller parameter which is the default value and so 2nd rule will also get matched in this case.
asp-route-{value}
Till now you have seen how to make links targeting Controllers and Action methods. What If you want to pass values to other segment variable like id ? To do this make use of asp-route-{value} Tag Helper. Replace the * with the name of the segment variable like id. Let’s create a link that passes a value for the Id segment.
Create a new controller called ProductController.cs and add an Index Action method to it.
using Microsoft.AspNetCore.Mvc;

namespace RouteLinks.Controllers
{
    public class ProductController : Controller
    {
        public string Index(int id)
        {
            return "Id Value is: " + id;
        }
    }
}
To link to this action method from Home Controller’s Index View we will have to pass a value for the Id segment. I make use of the asp-route-{value} tag helper by adding the below code link to the Home Controller’s Index View:
<a asp-controller="Product" asp-action="Index" asp-route-id="100">Pass 100 to the id segment</a>Now run the application and check the link formed, which will be –
<a href="/Product/Index/100">Pass 100 to the id segment</a>Click the link and it wil take us to the index action of product controller, which will show the value of Id segment. This id segment’s value is 100 as we had set this value with the asp-route-{value} tag helper on the anchor tag.

What if I pass value to a segment variable which is not described on the route ? In this case the ASP.NET Core will pass that value in Query String.
Suppose there is only 1 route present which is:
app.MapControllerRoute(
    name: "default",
    pattern: "{controller=Home}/{action=Index}/{id?}");
Change the Index Action of the Product Controller to include a string parameter as shown:
public string Index(int id, string name)
{
    return "Id Value is: " + id + " Name value is: " + name;
}
Now in the Index View of the Home Controller create a link to target the Index Action of the Product Controller as shown below:
<a asp-controller="Product" asp-action="Index" asp-route-id="100" asp-route-name="Apple">Query String</a>Notice we added asp-route-name="Apple" to the anchor tag.
The link formed will be:
<a href="/Product/Index/100?name=Apple">Query String</a>The link has a name value passed as query string since there is no segment variable by the name of name present in the route.
Click the link and the Index action of Product Controller is initiated where it shows the value of name segment. The below image shows this:

You can pass any number of query stings using the above method.
Generating Links from a Specific Route
You can also generate links from a specific route by specifying it’s name to the asp-route tag helper. Suppose there is a route which is given below:
app.MapControllerRoute(
    name: "sales",
    pattern: "sales/{controller=Home}/{action=Index}");
Now to create a link from this route we use the asp-route tag helper like – asp-route="sales". Here “sales” is the name of this route.
That means in your View we add the below code:
<a asp-route="sales">Sales</a>The anchor formed will be:
<a href="/sales">Sales</a> Note that the asp-route attribute can be used only when the asp-controller and asp-action tag helpers are absent. That means the route should have the default values for the Controller and Action.
Url.Action
We can generate urls to action methods by using Url.Action() method which generates the URLs based on the routes given on the app. Go to the Index Action of the Home Controller and add the below link:
<p>@Url.Action("List", "Product", new { id = 10 })</p>You will find the URL as:
/Product/List/10The Url.Action() method takes the following parameters:
- Controller name.
- Action name.
- asp-route-{value}
You can also use the Url.Action() method in the action method. See the below C# code that uses it.
string url = Url.Action("CustomVariable", "Home", new { id = 100 });
Here first parameter is for the controller name, second for action name and third for the asp-route-{value}.
URL Fragment (#)
The URL fragment which is denoted by a hash mark (#) is the optional last part of a URL. It is typically used to identify a portion of a web page. For example, in the anchor tag shown below, has url fragment by the name of “Printing”. So when we click on this anchor, the browser will search the html tag that has id value of “Printing” an scrolls down to that tag.
<a href="/Product/List#Printing">Printing</a>To create a URL Fragment use the asp-fragment="fragment-name" tag helper.
<a asp-controller="Product" asp-action="List" asp-fragment="Printing">
    URL Fragment
</a>
Append Trailing slash (/) to the URLs
The RouteOptions is also used to configure URL generation so that they contain a trailing slash (/). Go to the Program.cs class and add the code – options.AppendTrailingSlash = true to the part where you configured the RouteOptions.
The code below explains it.
builder.Services.Configure<RouteOptions>(options =>
{
    options.AppendTrailingSlash = true;
});
The URLs formed now will be like:
https://localhost:7248/Stock/Index/
https://localhost:7248/Product/
https://localhost:7248/Product/Index/100/Lowercase URLs
To make all URLs in Lowercase you can add the code – options.LowercaseUrls = true inside where configuration of RouteOptions are done.
The below code explains it:
builder.Services.Configure<RouteOptions>(options =>
{
    options.LowercaseUrls = true;
});
Now routing middleware will create lowercase routes that is all the URL are in lowercase.
Example: the URL formed for the check action method will be – http://localhost:58470/home/check/.
You can download the full codes of this tutorial from the below link:
In this tutorial you learned to generate URLs from Routes in ASP.NET Core. Make sure to check other tutorials to.
SHARE THIS ARTICLE
Related Tutorials:


ABOUT THE AUTHOR
I hope you enjoyed reading this tutorial. If it helped you then consider buying a cup of coffee for me. This will help me in writing more such good tutorials for the readers. Thank you.

HELLO EVERYONE
 Welcome to YogiHosting - A Programming Tutorial Website. It is used by millions of people around the world to learn and explore about ASP.NET Core, Blazor, jQuery, JavaScript, Docker, Kubernetes and other topics.
SUBSCRIBE TO NEWSLETTER
Enter your email address to subscribe to this blog and receive notifications of new posts by email.
Join 90K other subscribers