Built-In Tag Helpers in ASP.NET Core

Many of the ASP.NET Core Tag Helpers comes pre-built in the framework and are represented as asp-* attributes. They perform tasks like enhancing forms, validation messages, designing layouts and so on. In this section I am going to discuss about the built in Tag Helpers for Form, Input, Select, Label, Anchor, Text Area elements, CSS, JS and Cache.
This tutorial is a part of the series called Tag Helpers in ASP.NET Core. It contains 3 tutorials.
- 1. Introduction to Tag Helpers in ASP.NET Core
- 2. Built-In Tag Helpers in ASP.NET Core
- 3. Custom Tag Helper in ASP.NET Core
Page Contents
ASP.NET Core Tag Helpers in Forms
ASP.NET Core Form Tag Helpers are used to increase the productively of HTML forms by creating robust forms. These forms are highly maintainable even when the business logic changes. These tag helpers generates action attribute value for the forms along with hidden Request Verification Token to prevent cross-site request forgery.
The ASP.NET Core Form Tag Helpers are used for generating the action attribute of the HTML Form. These are given on the below list:
| Method | Description |
|---|---|
| asp-controller | Specify the controller to target based on routing of the app. If omitted the current controller is used. |
| asp-action | Specify the Action method to target based on the routes in the app. If omitted the current action is used. |
| asp-route-* | Specify the additional segment value for the URL. Eg asp-route-id is used to provide value for the ‘id’ segment. |
| asp-route | Specify the name of the route to target for generating action attribute. |
| asp-area | Specify the name of the area to target. |
| asp-antiforgery | Generates a hidden Request Verification Token to prevent cross-site request forgery. It is used with the [ValidateAntiForgeryToken] attribute in the HTTP Post action method. |
Example: If our app has only one route defined on the Program.cs class:
app.MapControllerRoute(
    name: "default",
    pattern: "{controller=Home}/{action=Index}/{id?}");
Now when we create a form by using the tag helpers as shown below:
<form method="post" asp-controller="Home" asp-action="Create">
...
</form>
In this case the form’s action will be formed as – /Home/Create. On checking the html created for this form we find it as:
<form method="post" action="/Home/Create">
...
</form>In the app create a new razor view inside Views ➤ Home folder and name it Create.cshtml. Add the below code to it:
@model Product

@{
    ViewData["Title"] = "Create";
}

<h2>Create</h2>

<form method="post" asp-controller="Home" asp-action="Create">
    <div class="form-group">
        <label for="Name">Name:</label>
        <input class="form-control" name="Name" />
    </div>
    <div class="form-group">
        <label for="Price">Price:</label>
        <input class="form-control" name="Price" />
    </div>
    <div class="form-group">
        <label for="Quantity">Quantity:</label>
        <input class="form-control" name="Quantity" />
    </div>
    <button type="submit" class="btn btn-primary">Add</button>
</form>
In this View, I created a form tag. Notice the use of asp-controller="Home" and asp-action="Create" Tag Helpers to create the action attribute of the html form.
The form has the method of type post so that means when the form will be submitted then the Create Action of type HttpPost will be invoked. So go to the Home Controller and add the 2 Create actions, one for HttpGet and the Other for HttpPost.
The Codes for these 2 Actions are shown below:
using Microsoft.AspNetCore.Mvc;
using TagHelpers.Models;
using static TagHelpers.Models.Repository;

namespace TagHelpers.Controllers
{
    public class HomeController : Controller
    {
        private IRepository repository;
        public HomeController(IRepository repo)
        {
            repository = repo;
        }

        public IActionResult Index()
        {
            return View(repository.Products);
        }

        public ViewResult Create()
        {
            return View();
        }

        [HttpPost]
        public IActionResult Create(Product product)
        {
            repository.AddProduct(product);
            return RedirectToAction("Index");
        }
    }
}
I have applied the HTML for attribute on the label elements. It specifies the element the label is bound to.
The Input elements have been given names – ‘Name’, ‘Price’ & ‘Quantity’. These are the names of the properties of the Model class called Product.cs. By giving them these names I will bind these values to the parameters of action method by a technique called Model Binding.
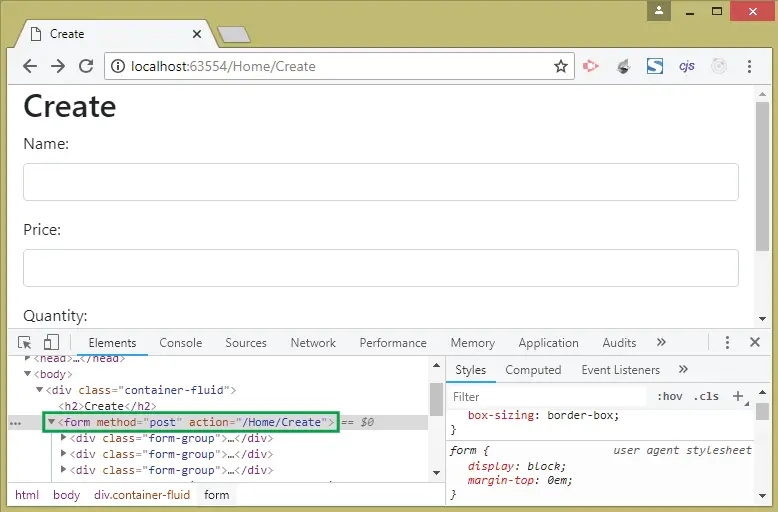
Now run your application and go to the URL – https://localhost:7076/Home/Create (port may be different for you). Here you will see a form, so inspect the form element in your browser and you will see the action attribute created as /Home/Create.
This is shown by the Image given below:
Next fill the create form and click the Add button (see the below image).
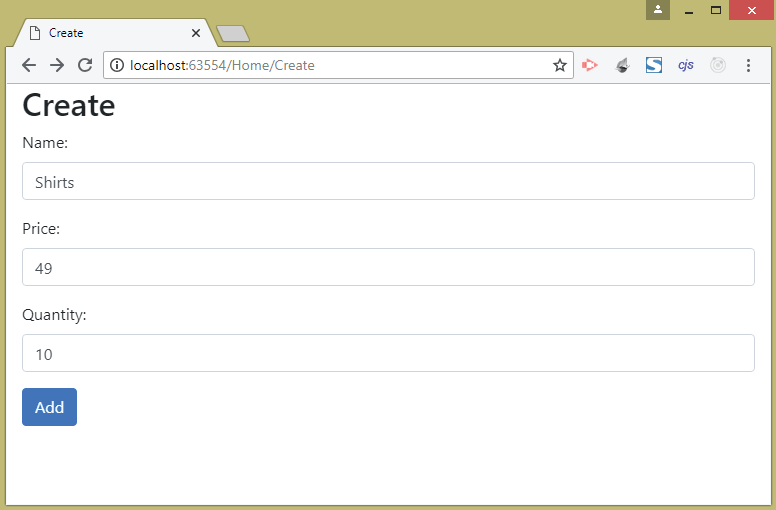
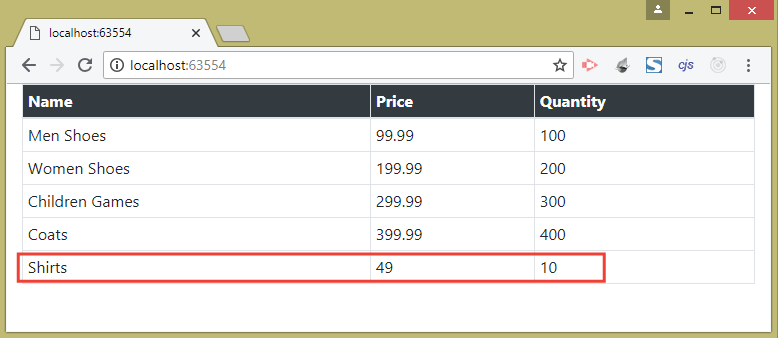
On submitting the form the new product is added to the repository. You will be redirected to the Index View which will show this product (at the last) on the product list.
See the image below:
Note : Since the form resides in the Create View which is the view of action method of home controller therefore therefore there is no need to apply asp-action and asp-controller tag helpers.
The below code will also work just fine:
<form method="post">
....
</form>
asp-antiforgery Attribute
The asp-antiforgery attribute Generates a hidden Request Verification Token known as antiforgerytoken. This token prevents cross-site request forgery (CSRF) attacks. When you use this attribute in your Form element, then ASP.NET Core does two things:
- 1. Adds a security token in a hidden input element to the form.
- 2. Adds a cookie to the response.
The application will process the request only if it contains both the cookie and the hidden value from the form, which the malicious site cannot access, and hence CSRF is prevented.
To use this feature add the tag helper – asp-antiforgery="true" to the form element and add the attribute [ValidateAntiForgeryToken] over the the Action method.
Go to the Create View and add the asp-antiforgery attribute to the form:
@model Product

@{
    ViewData["Title"] = "Create";
}

<h2>Create</h2>

<form method="post" asp-controller="Home" asp-action="Create" asp-antiforgery="true">
    // removed for clarity
</form>
Next add the [ValidateAntiForgeryToken] attribute on the HttpPost version of the Create Action method. I have highlighted this code line (see below code).
[HttpPost]
[ValidateAntiForgeryToken]
public IActionResult Create(Product product)
{
    repository.AddProduct(product);
    return RedirectToAction("Index");
}
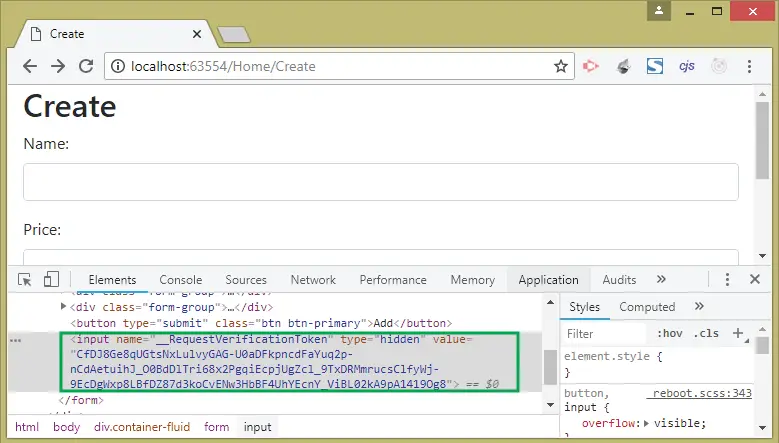
Re-run your application and check the HTML code generated for the Create View. You will find the hidden input field created inside the form element and it contains the security token as shown by the image given below:
Now in the Developer Tools window, go to the Application tab then click Cookies on the left panel. You will see the anti-forgery cookie created by DOT NET and it will be sent to the controller along with the response (see below image).
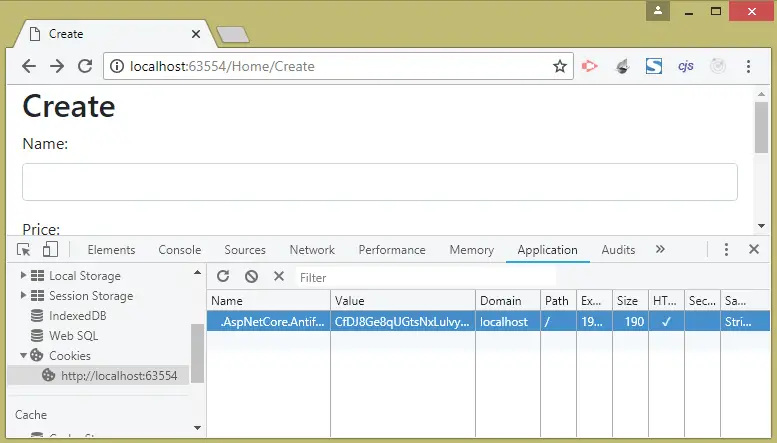
On the action the the attribute – [ValidateAntiForgeryToken] will automatically validate this cookie and security token.
ASP.NET Core Label Tag Helper
The ASP.NET Core Label Tag Helper sets the for attribute for an HTML Label. We add “asp-for” attribute on the label which creates the for attribute of the label. To test this change the labels given on the Create View to include “asp-for” attribute as shown below:
@model Product

@{
    ViewData["Title"] = "Create";
}

<h2>Create</h2>

<form method="post" asp-controller="Home" asp-action="Create" asp-antiforgery="true">
    <div class="form-group">
        <label asp-for="Name"></label>
        <input class="form-control" name="Name" />
    </div>
    <div class="form-group">
        <label asp-for="Price"></label>
        <input class="form-control" name="Price" />
    </div>
    <div class="form-group">
        <label asp-for="Quantity"></label>
        <input class="form-control" name="Quantity" />
    </div>
    <button type="submit" class="btn btn-primary">Add</button>
</form>
Now inspect the generated html of this page on the browser to find these label includes the for attribute:
<label for="Name">Name</label>
<label for="Price">Price</label>
<label for="Quantity">Quantity</label>
What is asp-for attribute ? The asp-for attribute can be applied to a number of HTML tag to make them strongly typed with a model property. It does a number of things which are –
- Creating the “for” attribute for the label elements.
- Creates the name, Id, type and Value for input, select, radio, text area elements.
ASP.NET Core Input Tag Helper
The ASP.NET Core Input Tag Helper binds the input element to a model expression – asp-for="expression". When we add the asp-for attribute to the input it sets the name, Id, type and value attributes of the Input element to the model expression.
Let’s build an example: On the Create View, use the asp-for attribute for the input elements as shown in the below highlighted code.
@model Product

@{
    ViewData["Title"] = "Create";
}

<h2>Create</h2>

<form method="post" asp-controller="Home" asp-action="Create" asp-antiforgery="true">
    <div class="form-group">
        <label asp-for="Name"></label>
        <input class="form-control" asp-for="Name" />
    </div>
    <div class="form-group">
        <label asp-for="Price"></label>
        <input class="form-control" asp-for="Price" />
    </div>
    <div class="form-group">
        <label asp-for="Quantity"></label>
        <input class="form-control" asp-for="Quantity" />
    </div>
    <button type="submit" class="btn btn-primary">Add</button>
</form>
Here we have included asp-for attribute on the 3 input tags and set it to a property (Name, Price & Quantity) of the Product.cs class.
Run your application and go to the URL – https://localhost:7076/Home/Create that initiates the create action. Now check the HTML source of the Input elements on the browser. We will find the HTML of these Input elements now contains name, Id, type and Value attributes as shown on the below code:
<input class="form-control" type="text" id="Name" name="Name" value>

<input class="form-control" type="text" data-val="true" data-val-number="The field Price must be a number." data-val-required="The Price field is required." id="Price" name="Price" value>

<input class="form-control" type="number" data-val="true" data-val-required="The Quantity field is required." id="Quantity" name="Quantity" value>You will find the Name and Price inputs are of type text but the Quantity input has the type number. The reason is because the ASP.NET Core provides the type value to HTML controls based on the Model Property Types.
The below table tells about the how the different type values are given:
| Model Type | Type attribute for Input Element |
|---|---|
| byte, sbyte, int, uint, short, ushort, long, ulong | Number |
| float, double, decimal | text |
| string | text |
| bool | checkbox |
| DateTime | datetime |
Note : The asp-for attribute can also be applied to a text area to set it’s id and name to that of the specified Model Property.
ASP.NET Core Select Tag Helper
There Select Tag Helper specifies the model property name and the option elements for the html select element (dropdownlist). There are 2 attributes that can be applied to a select element which are given on the table below.
| Name | Description |
|---|---|
| asp-for | Sets the id and name attribute of the Select element to the Model Property name. |
| asp-items | Specifies the source of values for the option elements contained inside the Select element. |
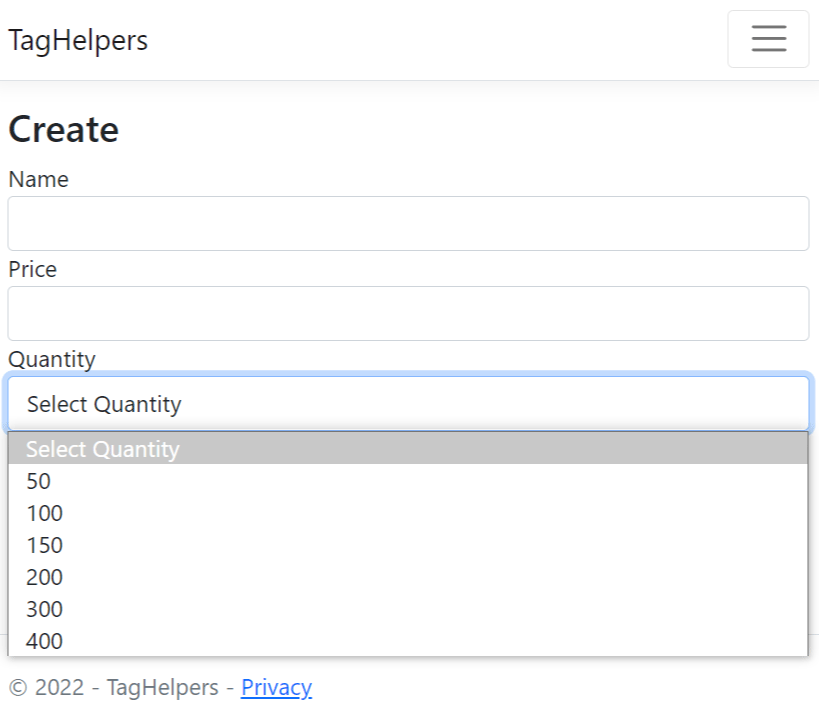
Let change the Create View’s quantity field from input to select as shown below:
<select class="form-control" asp-for="Quantity">
    <option disabled selected value="">Select Quantity</option>
    <option>50</option>
    <option>100</option>
    <option>150</option>
    <option>200</option>
    <option>300</option>
    <option>400</option>
</select>
This will create a select control for the Quantity property.
Now check the HTML code created for the select element in the browser. You will see the that it contains the id and value attributes set to the Quantity property of the Product.cs class. See the below code:
<select class="form-control" data-val="true" data-val-required="The Quantity field is required." id="Quantity" name="Quantity">
    <option disabled="" selected="" value="">Select Quantity</option>
    <option>50</option>
    <option>100</option>
    <option>150</option>
    <option>200</option>
    <option>300</option>
    <option>400</option>
</select>
The ASP.NET Core framework is very intelligent as it also automatically selects a default value for the select control. To understand it add an Edit Action to the Home Controller. This action will return the last added record from the repository. The action method code is:
using Microsoft.AspNetCore.Mvc;
using TagHelpers.Models;
using static TagHelpers.Models.Repository;

namespace TagHelpers.Controllers
{
    public class HomeController : Controller
    {
        // removed for clarity

        public ViewResult Edit() => View("Create", repository.Products.Last());
    }
}
Now go to the url of Edit action which is – https://localhost:7076/Home/Edit. We can clearly see the last record Quantity which is 400 is automatically selected on the Select control.

Check the HTML source of the select element and notice the selected attribute (selected="selected") applied to the option that contains 400th value, as shown by the below code:
<select class="form-control" data-val="true" data-val-required="The Quantity field is
required." id="Quantity" name="Quantity">
    <option disabled="" selected="" value="">Select Quantity</option>
    <option>50</option>
    <option>100</option>
    <option>200</option>
    <option>300</option>
    <option selected="selected">400</option>
</select>
This shows the intelligence of the ASP.NET Core Tag Helpers.
asp-items Attribute
The asp-items attributes is used to specify the option elements for html Select. It helps to generate the option elements from a data source.
Change the Create View’s select element’s code which now use asp-items attribute:
<select class="form-control" asp-for="Quantity" asp-items="ViewBag.Quantity">
    <option disabled selected value="">Select a Country</option>
</select>
We specified a ViewBag.Quantity as the value of asp-items attribute. The viewbag will contain a SelectList object that will form the options in the select element. Now change the Create and Edit actions (HTTP GET Type) as shown in highlighted manner.
using Microsoft.AspNetCore.Mvc;
using Microsoft.AspNetCore.Mvc.Rendering;
using TagHelpers.Models;
using Microsoft.AspNetCore.Mvc.Rendering;

namespace TagHelpers.Controllers
{
    public class HomeController : Controller
    {
        private IRepository repository;
        public HomeController(IRepository repo)
        {
            repository = repo;
        }

        public IActionResult Index()
        {
            return View(repository.Products);
        }

        public ViewResult Create()
        {
            ViewBag.Quantity = new SelectList(repository.Products
                                              .Select(c => c.Quantity).Distinct());
            return View();
        }

        [HttpPost]
        [ValidateAntiForgeryToken]
        public IActionResult Create(Product product)
        {
            repository.AddProduct(product);
            return RedirectToAction("Index");
        }

        public ViewResult Edit()
        {
            ViewBag.Quantity = new SelectList(repository.Products
                                              .Select(c => c.Quantity).Distinct());
            return View("Create", repository.Products.Last());
        }
    }
}
The ViewBag.Quantity property is set to a SelectList object that is populated with the unique values for the Quantity property in the repository. With this change we have made the Select dynamic.
The SelectList object resided inside the Microsoft.AspNetCore.Mvc.Rendering namespace.
Run your application and request the https://localhost:7076/Home/Create or https://localhost:7076/Home/Edit URLs and you will find that this time the option elements are created from the ViewBag.Quantity data source.
Cache Tag Helper
ASP.NET Core Cache Tag Helper is used to cache contents to cache provider for improving the performace of the application. You can keep a content in cache as shown below:
<cache>
    Some Content
</cache>
Go to the _Layout.cshtml file and add the cache element for caching the current time in hours-minutes-seconds like shown below:
...
<div class="container">
	<main role="main" class="pb-3">
		<div class="bg-info text-warning">
			<cache>
				Date Time: @DateTime.Now.ToString("HH:mm:ss")
			</cache>
		</div>
		@RenderBody()
	</main>
</div>
...
Now run your application and you will see the current time displayed on the top. Shown by the image given below:

Now refresh the page and you will notice the time in hours, minutes and seconds remains the same. This is because the time is cached.
Some important attributes for Cache Tag Helper are given below:
| Name | Description |
|---|---|
| expires-on | Specify an absolute time in datetime value at which the cache expires. |
| expires-after | Specifies the relative time in TimeSpan value at which the cache expires. |
| expires-sliding | Sliding time is the period since the last usage. So it specifies the sliding time in TimeSpan value at which cache expires. |
| vary-by-query | Specifies the query string key that will be used to manage, the different versions of the cache. |
| vary-by-cookie | Specifies the cookie name that will be used to manage the different versions of the cache. |
| vary-by | Specifies a key to manage different versions of cache. |
Change the cache code in the _Layout.cshtml file to use the expires-after attribute as shown below.
<cache expires-after="@TimeSpan.FromSeconds(20)">
    Date Time: @DateTime.Now.ToString("HH:mm:ss")
</cache>
This means now the cache expires after 20 seconds time.
Now change the cache code in the _Layout.cshtml view to use the expires-on attribute:
<cache expires-on="@DateTime.Parse("2050-01-01")">
    Date Time: @DateTime.Now.ToString("HH:mm:ss")
</cache>
This time the cache is cached until the year 2050.
Now change the cache code in the _Layout.cshtml view to use sliding time expiry by adding expires-sliding attribute.
<cache expires-sliding="@TimeSpan.FromSeconds(20)">
    Date Time: @DateTime.Now.ToString("HH:mm:ss")
</cache>
This will make the cache to expire in 20 second time from the last used time.
To test this thing, keep on reloading the page every 2 second, you will see the same time. Now wait for 20 seconds and then reload the page, and this time you will see a new time. This is because the cache expired after 20 seconds from the last reload time.
The vary-by attribute is used to specify a key to manage different versions of cache.
Change the cache element on the _Layout.cshtml view as:
<cache expires-sliding="@TimeSpan.FromSeconds(10)" vary-by="@ViewContext.RouteData.Values["action"]">
    Date Time: @DateTime.Now.ToString("HH:mm:ss")
</cache>
This means the cache is made based on current action. Since there are 3 actions – Index, Edit and Create, so 3 versions of cache will be created (1 for each action method).
The expire-sliding attribute sets the sliding expiry time for these versions.
The concept of Routing is covered in 6 tutorials which are:
ASP.NET Core Anchor Tag Helper
Anchor Tag Helper is most widely used Built in tag helper in ASP.NET Core framework. It enhances anchor tag by adding new attributes. These attributes builds the href of anchor tag based on the routes given on the app.
The table below lists some of the important attributes that can be used with the anchor tag helper.
| Name | Description |
|---|---|
| asp-controller | Specifies the controller the URL will target. |
| asp-action | Specifies the action the URL will target. |
| asp-area | Specifies the area the URL will target. |
| asp-fragment | Specifies the URL fragment (appearing after ‘#’ character) |
| as-route | Specifies the route name the URL will target. |
| asp-route-* | Specifies the additional value for the URL to target. Example asp-route-id="10" provide the value 10 to the id segment of the route. |
Go to the Index View and create an anchor link targeting the Create View as shown in the code below:
@model IEnumerable<Product>

<table class="table table-sm table-bordered">
    <thead class="bg-dark text-white">
        <tr>
            <th>Name</th>
            <th>Price</th>
            <th>Quantity</th>
        </tr>
    </thead>
    <tbody>
        @foreach (var product in Model)
        {
            <tr>
                <td>@product.Name</td>
                <td>@product.Price</td>
                <td>@product.Quantity</td>
            </tr>
        }
    </tbody>
</table>
<a asp-action="Create" class="btn btn-primary">Create</a>
This will create a link:
<a class="btn btn-primary" href="/Home/Create">Create</a>Check the below image:
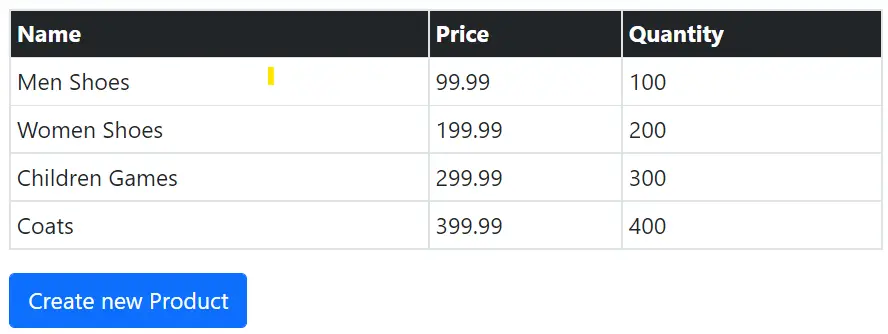
We did not provide the asp-controller tag helper because we are targetting the same controller (Index and Create actions resides on the same controller).
If we use the asp-route-* attribute on the anchor tag helper like shown below:
<a asp-action="Create" asp-route-id="20" class="btn btn-dark">Create</a> Then the link formed will include the id route as the 3rd segment of the URL.
<a class="btn btn-dark" href="/Home/Create/20">Create</a>JavaScript Tag Helper
The JavaScript Tag Helper manages inclusion and exclusion of JavaScript files from the Views. Some important attributes used with JavaScript Tag Helper are:
| Name | Description |
|---|---|
| asp-src-include | Specifies the JavaScript files to be included from the View. |
| asp-src-exclude | Specifies the JavaScript files to be excluded from the View. |
| asp-append-version | Specifies whether file version is appended to src url. This is used for Cache Busting |
| asp-fallback-src-include | Specifies the JavaScript file to include if there is some problem with the Content Delivery Network. |
| asp-fallback-src-exclude | Specifies the JavaScript file to exclude if there is some problem with the Content Delivery Network. |
| asp-fallback-test | Specifies a fragment of JavaScript that will be used to determine whether the JavaScript is correctly loaded from the Content Delivery Network. |
We can also use sets of wildcard characters to create pattern for matching files. These patterns can be used with asp-src-include, asp-src-exclude, asp-fallback-src-include and asp-fallback-src-exclude.
The Common patterns are:
| Pattern | Example | Description |
|---|---|---|
| ? | JS/myscript?.js | Matches single patter excluding ‘/’. The example on the left matches ‘JS/myscript1.js’, ‘JS/myscriptZ.js’, ‘JS/myscripts.js’, etc |
| * | JS/*.js | Matches any number of characters except ‘/’. The example given on the left side matches ‘JS/myscript.js’, ‘JS/validate.js’, ‘JS/js123.js’, etc |
| ** | JS/**.js | Matches any number of characters including ‘/’. The example given on the left side matches ‘JS/Validate/myscript.js’, ‘JS/jQuery/validate.js’, ‘JS/js123.js’, etc |
The patterns are very helpful because they provide us the ability to create rules for matching files based on our own custom logic.
Let us include a bootstrap.js file in the _Layout.cshtml. The location of the file is wwwroot/lib/bootstrap/dist/js/bootstrap.js.
The location is shown in the image below:
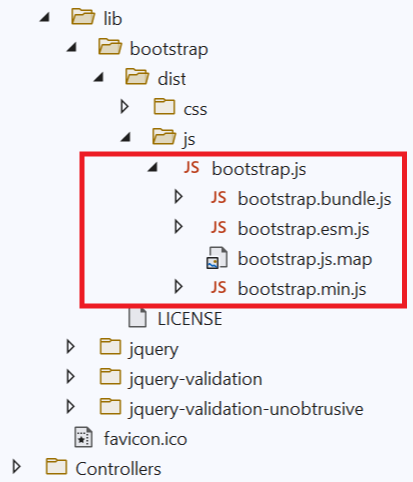
You will notice that there are 5 JS files in the same location:
bootstrap.js
bootstrap.bundle.js
bootstrap.esm.js
bootstrap.js.map
bootstrap.min.js
Now go to the _Layout.cshtml file and add a script tag with asp-src-include attribute as shown in the highlighted code line:
<!DOCTYPE html>
<html lang="en">
<head>
	<meta charset="utf-8" />
	<meta name="viewport" content="width=device-width, initial-scale=1.0" />
	<title>@ViewData["Title"] - TagHelpers</title>
	<link rel="stylesheet" href="~/lib/bootstrap/dist/css/bootstrap.min.css" />
	<link rel="stylesheet" href="~/css/site.css" asp-append-version="true" />
	<link rel="stylesheet" href="~/TagHelpers.styles.css" asp-append-version="true" />
    <script asp-src-include="lib/bootstrap/**/*.js"></script>
</head>
<body>
	...
</body>
</html>
Run your application and inspect the generated Html Source Code. You will find all given below JS files added to the head section.
<script src="/lib/bootstrap/dist/js/bootstrap.js"></script>
<script src="/lib/bootstrap/dist/js/bootstrap.bundle.js"></script>
<script src="/lib/bootstrap/dist/js/bootstrap.bundle.min.js"></script>
<script src="/lib/bootstrap/dist/js/bootstrap.esm.js"></script>
<script src="/lib/bootstrap/dist/js/bootstrap.esm.min.js"></script>
<script src="/lib/bootstrap/dist/js/bootstrap.min.js"></script>
This happens because we used asp-src-include attribute to include these file by using wildcard patterns as described earlier.
If we want only the bootstrap.bundle.js file to be included, then the following code is used:
<script asp-src-include="lib/bootstrap/**/*bundle.js"></script>The asp-src-exclude attribute is used to exclude js files from the View.
Now this time use the below code in the layout file. This will remove all the ‘slim’, ‘min’ & ‘bundle’ JavaScript files from adding to the View.
<script asp-src-include="/lib/bootstrap/**/b*.js" asp-src-exclude="**.slim.*,**.min.*,**.bundle.*"></script>Run your application and check the HTML source code created. You will find only the bootstrap.js and bootstrap.esm.js are included. See the below code:
<script src="/lib/bootstrap/dist/js/bootstrap.js"></script>
<script src="/lib/bootstrap/dist/js/bootstrap.esm.js"></script>
Cache Busting asp-fragment Attribute
The web browser downloads the Images, CSS files and JavaScript files only once and cache them locally. When user visits a page the browser provides these files from it’s cache. This makes the page to load faster as these files are not downloaded from the server.
Suppose we change the JavaScript file on your server but the browser will continue to provide this JavaScript file from it’s cache. So new JavaScript file is not loaded and hence the user will not see new changes.
So how to cope up with this problem? There has to be some way to tell the browser to download the file from the server when changes are done on the js file. Addressing this problem is called Cache Busting.
Cache Busting is done with asp-fragment attribute. It adds a query string to the URL of the JS file that contains a checksum that acts as a version number. Now when any change is maded to the JavaScript file then the checksum automatically changes and the browser knows that it now needs to download the latest JS file from the server and do it’s caching again.
Use the asp-fragment attribute to create Cache Busting feature.
<script asp-src-include="/lib/bootstrap/**/b*.js"
        asp-src-exclude="**.slim.*,**.min.*,**.bundle.*"
        asp-append-version="true">
</script>
The HTML code now formed contains a checksome:
<script src="/lib/bootstrap/js/bootstrap.js?v=82SVOjZ1qLdrq8VUmAisFapCSq1bpgavtXQaDGLPAAg"></script>When the browser issues a next request to the server, if finds out that the checksome of the js file on the server haas changed so it downloads the latest verson of the file from the server. The newly downloaded file is then cached and new checksome is added after the “?” character.
Content Delivery Network (CDN) Tag Helper
Content Delivery Networks (CDN) contains a number of Data Servers distributed around the globe. All of these Data Servers have a saved copy of a website’s static files like images, CSS, JS. When a user opens a website on the browser then rather than requesting the static files from the website’s servers, browser requests them from the Data Server that is closest to the geographic location of the user.
This reduces the loading time of the website and also saves the bandwidth. I advise you to use CDN even if your website is small.
The asp-fallback-src-include, asp-fallback-src-exclude and asp-fallback-test attributes are made specifically to work with CDNs. Suppose, in case of some problem, the CDN fails to provide jQuery. In such a case we should load the jQuery locally from the website hosting server.
So update the layout’s file to add the below script:
<script src="http://ajax.aspnetcdn.com/ajax/jQuery/jquery-3.2.1.min.js"
        asp-fallback-src-include="/lib/jquery/**/*.min.js"
        asp-fallback-src-exclude="**.slim.**"
        asp-fallback-test="window.jQuery">
</script>
The src attribute specifies the ASPNET CDN location to load jQuery.
The asp-fallback-src-include and asp-fallback-src-exclude are used to include and exclude local jQuery files in case of a CDN failure.
The asp-fallback-test Tag Helper defines a JavaScript code (here ‘window.jQuery’) that will be evaluated on the browser. It will tell whether jQuery is successfully loaded from the CDN or not. If the code fails then we are assured that the CDN is down and so asp-fallback-src-include and asp-fallback-src-exclude will play their parts.
CSS Tag Helper
The CSS Tag Helper in ASP.NET Core is used for managing inclusion and exclusion of CSS files from the Views. Various attributes can be used that are described below:
| Name | Description |
|---|---|
| asp-href-include | Specifies the CSS files to be included in the View. |
| asp-href-exclude | Specifies the CSS files to be excluded from the View. |
| asp-append-version | Specifies the query string for the version of CSS file to be applied to the CSS file’s path. This is used for Cache Busting. |
| asp-fallback-href-include | Specifies the CSS file to include if there is some problem with the Content Delivery Network. |
| asp-fallback-href-exclude | Specifies the CSS file to exclude from local server if there is some problem with the Content Delivery Network. |
| asp-fallback-href-test-class | Specifies a CSS class that will be used to test the Content Delivery Network. |
| asp-fallback-href-test-property | Specifies a CSS class property that will be used to test the Content Delivery Network. |
| asp-fallback-href-test-value | Specifies a test value to find out whether Content Delivery Network is up or down. |
The app has Bootstrap CSS files located under the wwwroot/lib/bootstrap/dist/css folder as shown by the image given below:
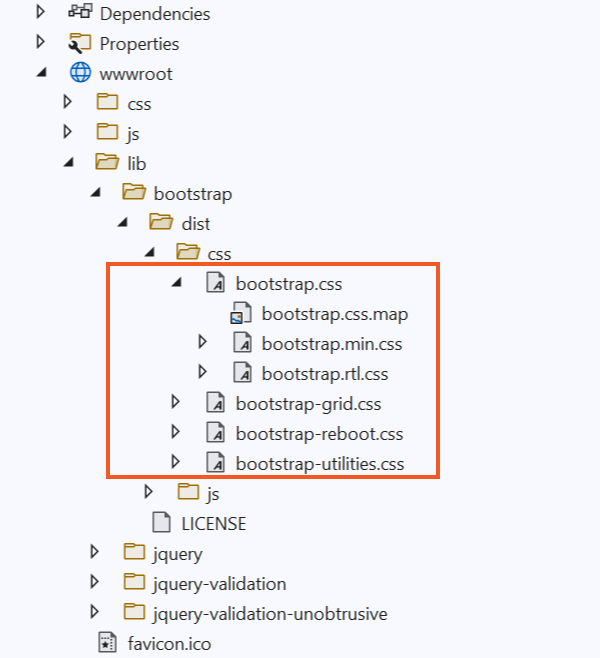
To include all the bootstrap CSS files from the asp-href-include attribute add the below code to the html head section in the _Layout.cshtml file.
<link rel="stylesheet" asp-href-include="/lib/bootstrap/**/*min.css" />We have used the patters (** and *) for matching the CSS files.
- ** – for any number of characters, including character ‘/’.
- * – for any number of characters, excluding character ‘/’.
This will add the files whose name end with .css. So the following css files are included.
<link rel="stylesheet" href="/lib/bootstrap/dist/css/bootstrap-grid.min.css" />
<link rel="stylesheet" href="/lib/bootstrap/dist/css/bootstrap-grid.rtl.min.css" />
<link rel="stylesheet" href="/lib/bootstrap/dist/css/bootstrap-reboot.min.css" />
<link rel="stylesheet" href="/lib/bootstrap/dist/css/bootstrap-reboot.rtl.min.css" />
<link rel="stylesheet" href="/lib/bootstrap/dist/css/bootstrap-utilities.min.css" />
<link rel="stylesheet" href="/lib/bootstrap/dist/css/bootstrap-utilities.rtl.min.css" />
<link rel="stylesheet" href="/lib/bootstrap/dist/css/bootstrap.min.css" />
<link rel="stylesheet" href="/lib/bootstrap/dist/css/bootstrap.rtl.min.css" />
A lot of unnecessary css files like grid, reboot, rtl are also added which we can remove them using asp-href-exclude attribute (explained next).
The asp-href-exclude attribute is used to exclude CSS files from View. Now use this to remove the reboot and grid CSS files. See the code below which does this work:
<link rel="stylesheet" asp-href-include="/lib/bootstrap/**/*min.css" asp-href-exclude="**/*reboot*,**/*grid*,**/*rtl*,**/*utilities*" />Now this time only 1 CSS file is included:
<link rel="stylesheet" href="/lib/bootstrap/dist/css/bootstrap.min.css" />CSS files from Content Delivery Networks
We can also include CSS files from Content Delivery Networks using Tag Helpers. Add the below code to the layout view to add bootstrap from MaxCDN:.
<link href="https://maxcdn.bootstrapcdn.com/bootstrap/4.0.0-alpha.6/css/bootstrap.min.css" asp-fallback-href-include="/lib/bootstrap/**/*.min.css" asp-fallback-href-exclude="**/*reboot*,**/*grid*" asp-fallback-test-class="btn" asp-fallback-test-property="display" asp-fallback-test-value="inline-block" rel="stylesheet" />The href attribute specifies the CDN URL which in my case is the MaxCDN URL for bootstrap.min.cs file. The asp-fallback-href-include and asp-fallback-href-exclude are used to select the files from the local website directory if the CDN is unavailable.
The next 3 Tag Helpers are used to test whether the bootstrap file is correctly downloaded from the CDN or not. These tag helpers are:
- 1. asp-fallback-test-class
- 2. asp-fallback-test-property
- 3. asp-fallback-test-value
They work by adding a meta element to the document that has been added to the class defined by the asp-fallback-test-class tag helper.
In my case the meta element added to the document will be:
<meta name="x-stylesheet-fallback-test" class="btn" />Now the asp-fallback-test-property is used to specify a CSS property that is set by this CSS class (here ‘btn’), and the asp-fallback-test-value tag helper is used to specify the value to set.
These attributes also add JavaScript to the view that tests the value of the CSS property on the meta element to figure out whether the CSS file has been loaded perfectly from the CDN or not. If the JavaScript test fails then the fallback CSS files (from local directory) are used instead.
You can download the source code using the below link:
In this tutorial I have covered Built-in Tag Helpers. In the next tutorial I will teach how to make Custom Tag Helpers.
SHARE THIS ARTICLE
Related Tutorials:


ABOUT THE AUTHOR
I hope you enjoyed reading this tutorial. If it helped you then consider buying a cup of coffee for me. This will help me in writing more such good tutorials for the readers. Thank you.

HELLO EVERYONE
 Welcome to YogiHosting - A Programming Tutorial Website. It is used by millions of people around the world to learn and explore about ASP.NET Core, Blazor, jQuery, JavaScript, Docker, Kubernetes and other topics.
SUBSCRIBE TO NEWSLETTER
Enter your email address to subscribe to this blog and receive notifications of new posts by email.
Join 90K other subscribers