How to work with Policies in ASP.NET Core Identity

ASP.NET Core Identity Policy is a collection of requirements a user must have for him to be authorized to access a resource on the app. Identity Policy based Authorization can contains additional requirements for Identity Roles and Claims for a user to have, and this helps us to build richer authorization structures in our apps.
For example – we can create an Identity Policy named “MIT” that contains 3 requirements say “Grade A in High School”, “18 Years or less”, “Nationality American”. Now we can apply this policy on the MIT portal and this will allow only those students to apply for a graduate course who have these 3 things:
- Grade A in High School
- 18 Years or less
- Nationality American
Page Contents
Create ASP.NET Core Identity Policy
We create an Identity Policy inside the Program.cs class, see the highlighted code shown below where we created a policy called AspManager.
using Identity.Models;
using Microsoft.AspNetCore.Identity;
using Microsoft.EntityFrameworkCore;

var builder = WebApplication.CreateBuilder(args);

builder.Services.AddDbContext<AppIdentityDbContext>(options => options.UseSqlServer(builder.Configuration["ConnectionStrings:DefaultConnection"]));
builder.Services.AddIdentity<AppUser, IdentityRole>().AddEntityFrameworkStores<AppIdentityDbContext>().AddDefaultTokenProviders();

builder.Services.AddAuthorization(opts => {
    opts.AddPolicy("AspManager", policy => {
        policy.RequireRole("Manager");
        policy.RequireClaim("Coding-Skill", "ASP.NET Core MVC");
    });
});

// Add services to the container.
builder.Services.AddControllersWithViews();

var app = builder.Build();
...
The AspManager Identity Policy has 2 requirements:
- 1. User should be in Manager Role.
- 2. User should have claim type as Coding-Skill and it’s value should be ASP.NET Core MVC.
We use the AddPolicy method to create Identity Policies. Inside this method we use the RequireRole and RequireClaim methods to create the policy requirements for Roles and Claims as shown below:
builder.Services.AddAuthorization(opts => {
    opts.AddPolicy("AspManager", policy => {
        policy.RequireRole("Manager");
        policy.RequireClaim("Coding-Skill", "ASP.NET Core MVC");
    });
});
Some important methods to create a Policy are given below.
| Name | Description |
|---|---|
| RequireUserName(name) | Specifies the specific user is required. |
| RequireClaim(type, value) | Specifies that the user has a claim of the specified type and with one of a range of values. The claim values can be expressed as comma-separated arguments or as an IEnumerable. |
| RequireRole(roles) | Specifies that the user should be a member of a specified Role. Multiple roles can be specified as comma-separated arguments or as an IEnumerable. |
| AddRequirements(requirement) | Specifies a custom requirement to the policy. We will cover it in the coming sections. |
ASP.NET Core Identity Policy Authorization
With the policy created, we can apply it with the [Authorize] attribute on any controller or action method. This will create the Identity Policy based Authorization feature in the app.
In the ClaimsController.cs file, add a new action method called Project. Apply [Authorize(Policy = "AspManager")] attribute on it which states that the policy value should be AspManager for initiating this action method:
using Microsoft.AspNetCore.Authorization;
using Microsoft.AspNetCore.Mvc;
using Identity.Models;
using Microsoft.AspNetCore.Identity;
using System.Security.Claims;

namespace Identity.Controllers
{
    [Authorize]
    public class ClaimsController : Controller
    {
        private UserManager<AppUser> userManager;

        public ClaimsController(UserManager<AppUser> userMgr)
        {
            userManager = userMgr;
        }

        //...

        [Authorize(Policy = "AspManager")]
        public IActionResult Project() => View("Index", User?.Claims);
    }
}
Now, ASP.NET Core Identity authorizes only those users who are in Manager Role and have Claim called Coding-Skill with value of ASP.NET Core MVC to invoke the Project action method.
Testing Identity Policy based Authorization
We will test this feature with a user called pintu. First I log in with pintu’s credentials which are:
Email – [email protected]
Password – Coder77@1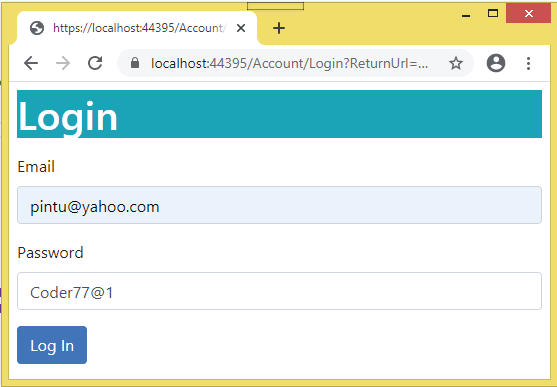
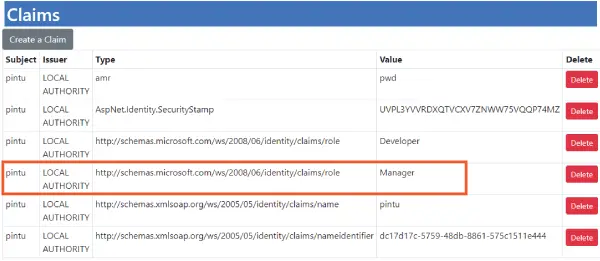
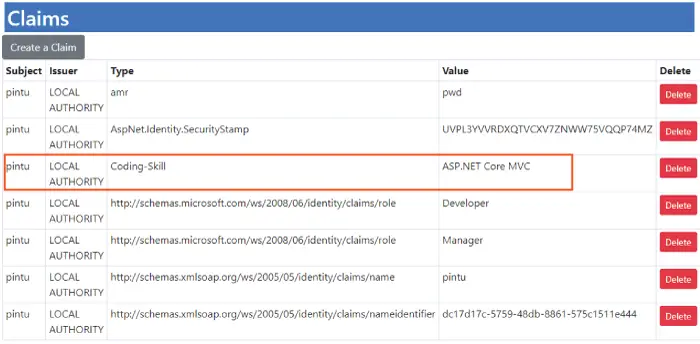
Although this Identity User belongs to the Role called Manager but does not have the Claim called Coding-Skill. We can check this by going to the url – https://localhost:7263/Claims once you did the login. Check the below image which shows the Claims of this user.
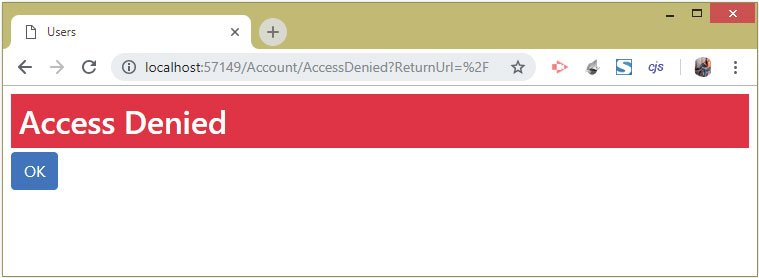
Now we try accessing the url of the Project action of the Claims controller having the url – https://localhost:7263/Claims/Project. We simply fail to access it and get Access Denied message.
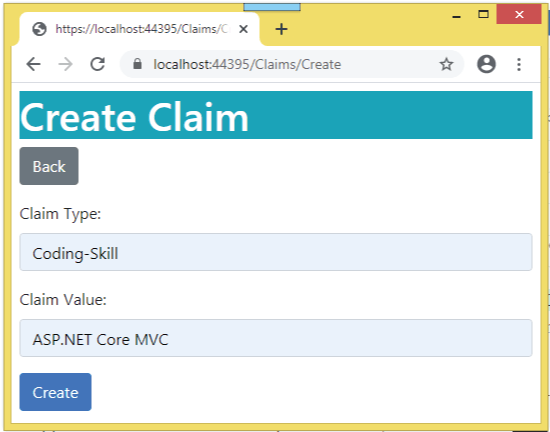
So, we need to add the Claim called Coding-Skill with value ASP.NET Core MVC for the user pintu. This can done from the Create Claim Page whose url is – https://localhost:7263/Claims/Create (see below image).
After adding the claim we log-out from pintu’s account and re-login once again. This is a necessary step to see the added claims.
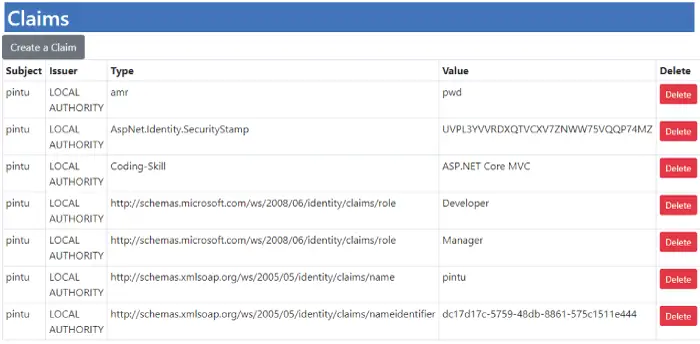
Next going to the claims page whose url is – https://localhost:7263/Claims. Here we can see the recently added claim. See the below image.
Finally accessing the url of the Project action of the Claims controller which is https://localhost:7263/Claims/Project. We are able to access it this time, and it shown all the Claims associated with user Pintu’s account. Check below image.
Custom Requirement to an Identity Policy
Suppose we want to create an Identity Policy to allow only the user called Tom to access an action method. To do this we will have to create:
- 1. A class that will implement the IAuthorizationRequirement Interface. It provides mechanism for tracking whether authorization is successful or not.
- 2. A Custom Authorization Handler which is a sub-class of the AuthorizationHandler class and whose work is to evaluate the authorization requirements.
So, create a class called AllowUserPolicy.cs inside a folder called CustomPolicy. This folder can be anything you want. The AllowUserPolicy.cs class code is given below.
using Microsoft.AspNetCore.Authorization;

namespace Identity.CustomPolicy
{
    public class AllowUserPolicy : IAuthorizationRequirement
    {
        public string[] AllowUsers { get; set; }

        public AllowUserPolicy(params string[] users)
        {
            AllowUsers = users;
        }
    }
}
The AllowUserPolicy class implements the IAuthorizationRequirement interface and gets all the allowed users through the parameter of it’s constructor.
Next, create another class called AllowUsersHandler.cs inside the CustomPolicy folder with the code given below.
using Microsoft.AspNetCore.Authorization;

namespace Identity.CustomPolicy
{
    public class AllowUsersHandler : AuthorizationHandler<AllowUserPolicy>
    {
        protected override Task HandleRequirementAsync(AuthorizationHandlerContext context, AllowUserPolicy requirement)
        {
            if (requirement.AllowUsers.Any(user => user.Equals(context.User.Identity.Name, StringComparison.OrdinalIgnoreCase)))
            {
                context.Succeed(requirement);
            }
            else
            {
                context.Fail();
            }
            return Task.CompletedTask;
        }
    }
}
The AllowUsersHandler class is an authorization handler as it inherits the AuthorizationHandler class. The HandleRequirementAsync() method is called when the authorization system needs to check access to an Action method.
The arguments to the method are an AuthorizationHandlerContext object and the AllowUserPolicy class that provides allowed user names.
The members of the AuthorizationHandlerContext class are:
| Name | Description |
|---|---|
| Succeed(requirement) | This method is called if the request meets the requirement. The argument, to this method is the AllowUserPolicy object received by the method. |
| Fail() | This method is called if the request fails to meet the requirement. |
| Resource | This property returns an object that is used to authorize access to a resource. |
So, in the HandleRequirementAsync() method, we check if the Current Logged in User comes in the allowed user names. In that case we called the Succeed method else fail method is called.
Notice that we get the logged in user’s name by – context.User.Identity.Name.
Now we have to create a Policy that will send the Allowed User names to the AllowUserPolicy class. We will use the AddRequirements(requirement) method to specify the Custom Requirements to my Policy.
In the below given code of the Program.cs class, we did 2 things which are:
- 1. Added a Custom Requirement to a Policy called AllowTom. In order to create the Custom Requirement we have used the AddRequirements(requirement) method and passed to it a new object of the AllowUserPolicy.cs class.
- 2. We also registered the authorization handler class with the service provider as an implementation of the IAuthorizationHandler interface.
builder.Services.AddTransient<IAuthorizationHandler, AllowUsersHandler>();
builder.Services.AddAuthorization(opts => {
    opts.AddPolicy("AllowTom", policy => {
        policy.AddRequirements(new AllowUserPolicy("tom"));
    });
});
Now, all we have to do is to apply this Identity Policy to an action method of a controller. So we added a new action method called TomFiles to the Claims Controller and applied this policy to it. See the below code.
using Microsoft.AspNetCore.Authorization;
using Microsoft.AspNetCore.Mvc;
using Identity.Models;
using Microsoft.AspNetCore.Identity;
using System.Security.Claims;

namespace Identity.Controllers
{
    [Authorize]
    public class ClaimsController : Controller
    {
        //...

        [Authorize(Policy = "AllowTom")]
        public ViewResult TomFiles() => View("Index", User?.Claims);
    }
}
This action method will only be invoked if the current logged in Identity user is Tom. If any other user tries to invoke it then he will be redirected to the Access Denied page.
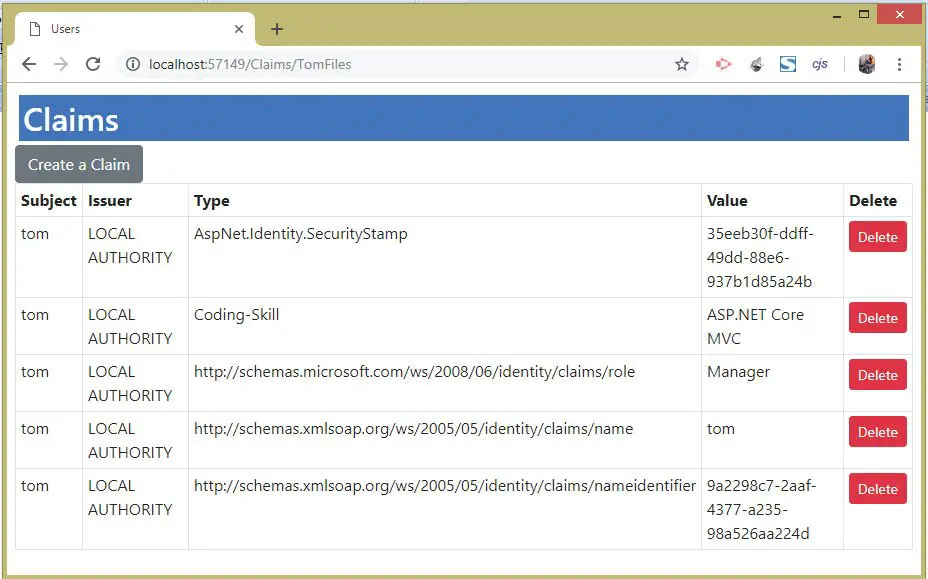
To test it log in with tom’s credentials and then go to the URL – https://localhost:7263/Claims/TomFiles. We will find the Action method gets invoked and we see the user claims on the browser. Check the below given image.
Now log-in with some other account, and go to the same URL, and this time we will fail to invoke this action method and will be redirected to the Access Denied Page.
Apply Policy without [Authorize] attribute
So far we have seen that a Policy is applied with the [Authorize] attribute on the Action method or a controller. But sometimes there comes a situation where we want to apply an Identity Policy without using the [Authorize(Policy = "SomePolicy")] attribute.
You do this setup by the help of IAuthorizationService Interface.
Let us understand it with an example. So create a new class called AllowPrivatePolicy.cs inside the CustomPolicy folder with the following code:
using Microsoft.AspNetCore.Authorization;

namespace Identity.CustomPolicy
{
    public class AllowPrivatePolicy : IAuthorizationRequirement
    {
    }

    public class AllowPrivateHandler : AuthorizationHandler<AllowPrivatePolicy>
    {
        protected override Task HandleRequirementAsync(AuthorizationHandlerContext context, AllowPrivatePolicy requirement)
        {
            string[] allowedUsers = context.Resource as string[];

            if (allowedUsers.Any(user => user.Equals(context.User.Identity.Name, StringComparison.OrdinalIgnoreCase)))
            {
                context.Succeed(requirement);
            }
            else
            {
                context.Fail();
            }
            return Task.CompletedTask;
        }
    }
}
Next, register the authorization handler class, and create a new policy called PrivateAccess in the Program.cs of the app:
builder.Services.AddTransient<IAuthorizationHandler, AllowPrivateHandler>();
builder.Services.AddAuthorization(opts =>
{
    opts.AddPolicy("PrivateAccess", policy =>
    {
        policy.AddRequirements(new AllowPrivatePolicy());
    });
});
Notice we are not passing any argument to the AllowPrivatePolicy class – policy.AddRequirements(new AllowPrivatePolicy()), instead we will pass the information from the Controller.
Finally, go to the Claims controller and add a dependency of IAuthorizationService interface to it’s constructor. Then add an action method called PrivateAccess that validates the request against the newly created PrivateAccess policy. It does this by using the authService.AuthorizeAsync method.
The updated code is given below:
using Microsoft.AspNetCore.Authorization;
using Microsoft.AspNetCore.Mvc;
using Identity.Models;
using Microsoft.AspNetCore.Identity;
using System.Security.Claims;

namespace Identity.Controllers
{
    [Authorize]
    public class ClaimsController : Controller
    {
        private UserManager<AppUser> userManager;
        private IAuthorizationService authService;

        public ClaimsController(UserManager<AppUser> userMgr, IAuthorizationService auth)
        {
            userManager = userMgr;
            authService = auth;
        }

        //... removed for brevity

        public async Task<IActionResult> PrivateAccess(string title)
        {
            string[] allowedUsers = { "tom", "alice" };
            AuthorizationResult authorized = await authService.AuthorizeAsync(User, allowedUsers, "PrivateAccess");

            if (authorized.Succeeded)
                return View("Index", User?.Claims);
            else
                return new ChallengeResult();
        }
    }
}
This PrivateAccess action method can only be invoked when the logged in user is either tom or alice.
Notice we provide the values of the allowedUsers variable to the AllowPrivateHandler class in the second argument of the AuthorizeAsync() method. Check this code:
AuthorizationResult authorized = await authService.AuthorizeAsync(User, allowedUsers, "PrivateAccess");The AllowPrivateHandler class gets the allowedUsers value from it’s AuthorizationHandlerContext class’s Resource property. Check this code:
string[] allowedUsers = context.Resource as string[];The ChallengeResult initialization forces the users other than tom and alice to the login page.
Test it by login with user alice credentials, and then go to the URL – https://localhost:7263/Claims/PrivateAccess. We will find the action method is invoked, as shown by the image below:
![Identity Policy without [Authorize] attribute Identity Policy without [Authorize] attribute](https://www.yogihosting.com/wp-content/uploads/2018/12/action-invoked-by-users-tom-and-alice-only.jpg)
Now log in with mary’s account and go to the same URL, only to find that we are now redirected to the login page.
This is a classic example of validating a request against a policy by sending validating requirements to the Authorization Handler.
You can download the full codes of this tutorial from the below link:
This completes the tutorial on ASP.NET Core Identity Policy. Now we can easily create codes for Policy based Authorization.




 Welcome to YogiHosting - A Programming Tutorial Website. It is used by millions of people around the world to learn and explore about ASP.NET Core, Blazor, jQuery, JavaScript, Docker, Kubernetes and other topics.