User Lockout in ASP.NET Core Identity

The ASP.NET Core Identity User Lockout feature improves the application security by locking out a user who enters the password incorrectly several times. This technique is very useful in protecting against brute force attacks, where a hacker repeatedly tries to guess a password.
In this tutorial we will learn to implement the user lockout feature in identity.
Identity User Lockout Configuration
To enable the User Lockout in Identity use the IdentityOptions object to configure it in the Program.cs class.
builder.Services.Configure<IdentityOptions>(opts =>
{
    opts.Lockout.AllowedForNewUsers = true;
    opts.Lockout.DefaultLockoutTimeSpan = TimeSpan.FromMinutes(10);
    opts.Lockout.MaxFailedAccessAttempts = 3;
});
We enabled the ASP.NET Core Identity User Lockout feature is by setting the AllowedForNewUsers property to “true”. Additionally, we also configured a lockout time span to 10 minutes from the property called DefaultLockoutTimeSpan. We also set maximum failed login attempts to three from another property called MaxFailedAccessAttempts.
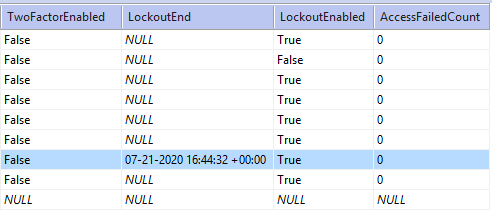
The AspNetUsers table of Identity database has 3 columns to store lockout settings of a user. These are:
- LockoutEnabled column will specify if user’s lockout is enabled or not.
- AccessFailedCount column value will increase for every failed login attempt and reset once the account is locked out.
- LockoutEnd column will have a DateTime value to represent the period until this account is locked out.
We have shown them in the below screenshot.

Implementing User Lockout in the Login Page
We already have created the login feature which Implements the Authentication of Users in ASP.NET Core Identity. Now we will modify it to check if the user’s account is locked out and give them this message during login time.
In our case the login feature is located on the Login action of the Account Controller.
We have added a check called result.IsLockedOut to find out if the user is locked out or not, and telling him to wait for 10 minutes time, and then try login once again. We have highlighted the necessary code shown below.
[HttpPost]
[AllowAnonymous]
[ValidateAntiForgeryToken]
public async Task<IActionResult> Login(Login login)
{
    if (ModelState.IsValid)
    {
        AppUser appUser = await userManager.FindByEmailAsync(login.Email);
        if (appUser != null)
        {
            await signInManager.SignOutAsync();
            Microsoft.AspNetCore.Identity.SignInResult result = await signInManager.PasswordSignInAsync(appUser, login.Password, false, true);
            if (result.Succeeded)
                return Redirect(login.ReturnUrl ?? "/");

            if (result.IsLockedOut)
                ModelState.AddModelError("", "Your account is locked out. Kindly wait for 10 minutes and try again");
        }
        ModelState.AddModelError(nameof(login.Email), "Login Failed: Invalid Email or password");
    }
    return View(login);
}
Notice that we have passed true for the 4th column of the “SignInResult”, which is lockoutOnFailure, of the PasswordSignInAsync method to enable the Identity lockout functionality.
Microsoft.AspNetCore.Identity.SignInResult result = await signInManager.PasswordSignInAsync(appUser, login.Password, false, true);Test the functionality by running the application on Visual Studio. Then try login one time in an account with a wrong password and then check the value of AccessFailedCount column of the AspNetUsers table of Identity database. We will notice the value is increased to 1 as shown by the below image.

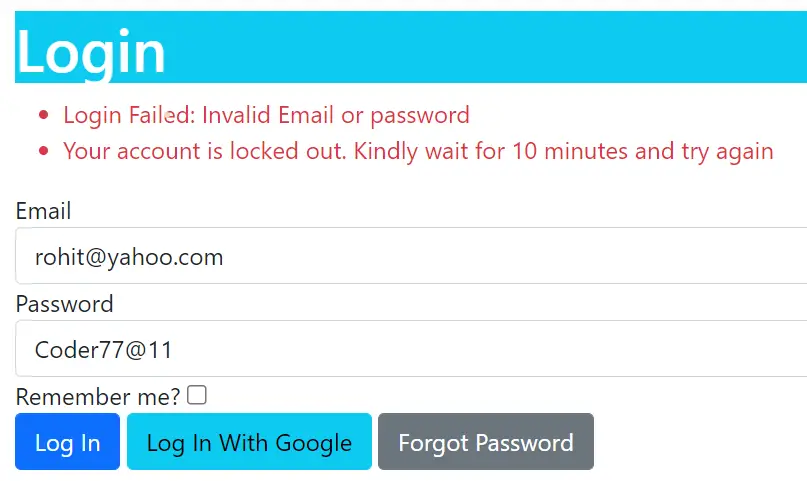
Try login with wrong password for 2 more times (in total 3 times). We will receive message saying – “Your account is locked out. Kindly wait for 10 minutes and try again”. See the below image.

Check the value of AccessFailedCount column. We will see the AccessFailedCount column’s value is reset to 0 and column called LockoutEnd has a date time value specifying time when the lockout will end.
We have shown this in the below image.

In fact we can go one step further by informing the user about a locked out account. Ask him to reset the password or report that something is strange because they didn’t try to log in, which means that someone is trying to hack the account. We have already explained How to create the Reset Password feature in ASP.NET Core Identity in our previous tutorial, and you will find it very useful.
You can download the full codes of this tutorial from the below link:
In this article we covered a lot of things which are:
- How to create a ASP.NET Core Identity User Lockout feature.
- How to implement User Lockout.


 Welcome to YogiHosting - A Programming Tutorial Website. It is used by millions of people around the world to learn and explore about ASP.NET Core, Blazor, jQuery, JavaScript, Docker, Kubernetes and other topics.