How to perform Email Confirmation of Users in ASP.NET Core Identity

ASP.NET Core Identity Email Confirmation verifies that the registered users have provided authentic email address and that they’re likely to to be real persons. It means that registered users are indeed owners of their provided emails. Identity also provides the option to enable email confirmation during the time of user registration process.
Enable Email Confirmation in ASP.NET Core Identity
We can enable email confirmation in Identity by setting the IdentityOptions property called RequireConfirmedEmail to true i.e. RequireConfirmedEmail = true. We setthis inside the Program.cs class as shown by the below code.
builder.Services.Configure<IdentityOptions>(opts =>
{
    opts.SignIn.RequireConfirmedEmail = true;
});
The Identity database table called AspNetUsers contains a column named EmailConfirmed which keeps a track on whether an email of a user is confirmed or not. Confirmed ones have the value true while unconfirmed emails have false.
See the below image of the AspNetUsers table where we have shown the EmailConfirmed column’s values for the registered users.

Implementing Email Confirmation in Identity
During the time of User Registration process we should add the Email Confirmation procedure. We earlier wrote an article on Creation, Reading, Updation & Deletion of Identity Users. Now we will update the Create action of Admin Controller to include the Email Confirmation functionality.
See the highlighted code (given below) of the Create action of Admin Controller which brings out the email confirmation functionality.
[HttpPost]
public async Task<IActionResult> Create(User user)
{
    if (ModelState.IsValid)
    {
        AppUser appUser = new AppUser
        {
            UserName = user.Name,
            Email = user.Email
        };

        IdentityResult result = await userManager.CreateAsync(appUser, user.Password);
        if (result.Succeeded)
        {
            var token = await userManager.GenerateEmailConfirmationTokenAsync(appUser);
            var confirmationLink = Url.Action("ConfirmEmail", "Email", new { token, email = user.Email }, Request.Scheme);
            EmailHelper emailHelper = new EmailHelper();
            bool emailResponse = emailHelper.SendEmail(user.Email, confirmationLink);

            if (emailResponse)
                return RedirectToAction("Index");
            else
            {
                // log email failed
            }
        }
        else
        {
            foreach (IdentityError error in result.Errors)
                ModelState.AddModelError("", error.Description);
        }
    }
    return View(user);
}
The code to look out here is:
var token = await userManager.GenerateEmailConfirmationTokenAsync(appUser);
var confirmationLink = Url.Action("ConfirmEmail", "Email", new { token, email = user.Email }, Request.Scheme);
EmailHelper emailHelper = new EmailHelper();
bool emailResponse = emailHelper.SendEmail(user.Email, confirmationLink);
First we used the GenerateEmailConfirmationTokenAsync() method of UserManager class to generate the email confirmation token for the user who is currenty being registerd.
Next we generated the confirmation link with the code – var confirmationLink = Url.Action("ConfirmEmail", "Email", new { token, email = user.Email }, Request.Scheme). This link will be send to the user’s email address. Clearly we can see the link point to the ConfirmEmail action of the Email controller. The token and email will be added to the link as query string values. The email Controller’s ConfirmEmail action will get their values through Model Binding feature of ASP.NET Core.
Sending Confirmation Email with SMTP
ASP.NET Core Identity Sends Email to the user during the registration process. The 2 lines of code given below create an object of EmailHelper class and then calls the SendEmail() method in order to send the confirmation email to the user.
EmailHelper emailHelper = new EmailHelper();
bool emailResponse = emailHelper.SendEmail(user.Email, confirmationLink);
So create a class called EmailHelper.cs inside Models folder. This class will be sending the email using SMTP. The code of this class is given below:
using System.Net.Mail;

namespace Identity.Models
{
    public class EmailHelper
    {
        public bool SendEmail(string userEmail, string confirmationLink)
        {
            MailMessage mailMessage = new MailMessage();
            mailMessage.From = new MailAddress("[email protected]");
            mailMessage.To.Add(new MailAddress(userEmail));

            mailMessage.Subject = "Confirm your email";
            mailMessage.IsBodyHtml = true;
            mailMessage.Body = confirmationLink;

            SmtpClient client = new SmtpClient();
            client.Credentials = new System.Net.NetworkCredential("[email protected]", "yourpassword");
            client.Host = "smtpout.secureserver.net";
            client.Port = 80;

            try
            {
                client.Send(mailMessage);
                return true;
            }
            catch (Exception ex)
            {
                // log exception
            }
            return false;
        }
    }
}
Performing Email Confirmation/Verification
ASP.NET Core Identity Verify email of a user once the user clicks the confirm link on his/her email address. We have to create the EmailController.cs file having ConfirmEmail action method. This action will be invoked when the user clicks the verify link. It’s full code is given below.
using Identity.Models;
using Microsoft.AspNetCore.Identity;
using Microsoft.AspNetCore.Mvc;

namespace Identity.Controllers
{
    public class EmailController : Controller
    {
        private UserManager<AppUser> userManager;
        public EmailController(UserManager<AppUser> usrMgr)
        {
            userManager = usrMgr;
        }

        public async Task<IActionResult> ConfirmEmail(string token, string email)
        {
            var user = await userManager.FindByEmailAsync(email);
            if (user == null)
                return View("Error");

            var result = await userManager.ConfirmEmailAsync(user, token);
            return View(result.Succeeded ? "ConfirmEmail" : "Error");
        }
    }
}
To support this controller we need to add 2 razor views inside the Views ➤ Email folder these Views are:
@{
    ViewData["Title"] = "ConfirmEmail";
}

<h1>Confirm Email</h1>
<p>
    Thank you for confirming your email.
</p>
@{
    ViewData["Title"] = "Error";
}

<h1 class="text-danger">Error</h1>
<h2 class="text-danger">
  An error occurred while processing your request.
  Please try again later.
</h2>
Testing the Email Confirmation
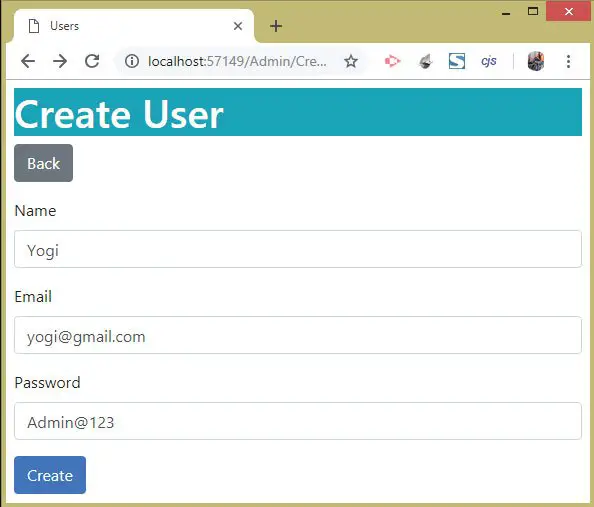
Let’s create a new user as shown by the below image:

Next, we check the email inbox to find the confirmation email. The screenshot of confirmation email is given below:

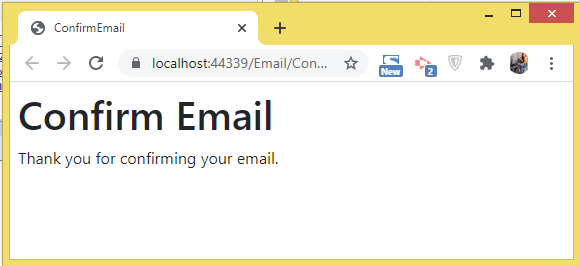
On clicking the confirmation email link we are redirected to the app and the email gets confirmed. See the below screenshot.

Next confirm this in AspNetUsers table of Identity database. We find EmailConfirmed column’s values as true which proves the registeed account’s email is verified by Identity. See below image.

Modifying the Login Action to Support Email Confirmation
ASP.NET Core Identity will not let an unconfirmed email user to log in to the application. So we should notify the user about email confirmation error during login.
The UserManager class has a method called IsEmailConfirmedAsync() which tells whether the email is confirmed or not. We can use this method in the Login action of Account controller to provide this message to the user during login time. See the highlighted code below.
[HttpPost]
[AllowAnonymous]
[ValidateAntiForgeryToken]
public async Task<IActionResult> Login(Login login)
{
    if (ModelState.IsValid)
    {
        AppUser appUser = await userManager.FindByEmailAsync(login.Email);
        if (appUser != null)
        {
            await signInManager.SignOutAsync();
            Microsoft.AspNetCore.Identity.SignInResult result = await signInManager.PasswordSignInAsync(appUser, login.Password, false, false);
            if (result.Succeeded)
                return Redirect(login.ReturnUrl ?? "/");

            bool emailStatus = await userManager.IsEmailConfirmedAsync(appUser);
            if (emailStatus == false)
            {
                ModelState.AddModelError(nameof(login.Email), "Email is unconfirmed, please confirm it first");
            }
        }
        ModelState.AddModelError(nameof(login.Email), "Login Failed: Invalid Email or password");
    }
    return View(login);
}
You can download the full codes of this tutorial from the below link:
We have covered all the things that are required for successful email confirmation in ASP.NET Core Identity. Next you should read – Creating Password Reset feature in ASP.NET Core Identity.


 Welcome to YogiHosting - A Programming Tutorial Website. It is used by millions of people around the world to learn and explore about ASP.NET Core, Blazor, jQuery, JavaScript, Docker, Kubernetes and other topics.