How to integrate Google login feature in ASP.NET Core Identity

ASP.NET Core Identity External Login through Third-Party like Google, Facebook, Microsoft and Twitter is easy to integrate. Here we will create a feature that will allow users to Login to Identity with their Google credentials.
Page Contents
This tutorial is a part of the ASP.NET Core Identity series
- 1. How to Setup and Configure ASP.NET Core Identity
- 2. How to Create, Read, Update & Delete users in ASP.NET Core Identity
- 3. Username, Email & Password Policy in ASP.NET Core Identity
- 4. How to do Authentication of Users in ASP.NET Core Identity
- 5. How to work with Roles in ASP.NET Core Identity
- 6. How to add Custom User Properties in ASP.NET Core Identity
- 7. How to work with Claims in ASP.NET Core Identity
- 8. How to work with Policies in ASP.NET Core Identity
- 9. How to integrate Google login feature in ASP.NET Core Identity
- 10. Two-Factor Authentication in ASP.NET Core Identity
- 11. How to perform Email Confirmation of Users in ASP.NET Core Identity
- 12. Creating Password Reset feature in ASP.NET Core Identity
- 13. User Lockout in ASP.NET Core Identity
There are 2 main steps to do when creating Google login feature.
- 1. Create a new Project in Google Cloud Console.
- 2. Use Google APIs to communicate with the Project located in Google Cloud Console.
Create a new Project in Google Cloud Console
Google Cloud Console is the place where we can create the Google Projects.
The first step is to create a new Project in Google Cloud Console, which we can do from this URL. Give the project a name like Google Log In and click CREATE button, this is shown in the below image:

After a few seconds, the project will be created, and we will be taken to the Project Dashboard page. In this page, on the top left corner, find the navigation menu. Click this menu and select APIs & Services ➤ Credentials. Check the below image for understanding:

We will now reach Credentials Page where we will be asked to create the credentials. Here we will need to create the OAuth Client ID.
So, click the Create Credentials button, and then on the options that open up, click the OAuth client ID like shown in the image below:

Next, we will be asked to Configure consent screen. So click on the Configure consent screen button, as shown by below image:

Next, we will reach OAuth Consent Screen where we need to give the application a name. Then click the Save button. Check the below image:

Next, we will be taken to the Create OAuth client ID page. In this page do the following things:
- 1. For Application type option, select Web application.
- 2. Give the name field some value
- 3. On the Authorised redirect URIs field give 2 urls:
https://localhost:7263/Account/GoogleResponse
https://localhost:7263/signin-googleNote: these URLs will be different in your case based on your localhost port or domain. Next click the Create button once you are done.
This is shown in the below image:

Authorized redirect URIs contains the URL of your application to which Google will redirect users after they are authenticated.
For the URL – /Account/GoogleResponse, we will create an action method called GoogleResponse in AccountController of the project.
The URL – /signin-google, is the default URL set by ASP.NET Core Identity for Google OAuth.
On clicking the Create button, we will now get your Client Id and Secret displayed in a window (see below image). Save them in a secure place, as we will be making Google API calls using these.

If you are dealing with OAuth for the first time, then consider it as an authentication procedure to authenticate users with your application using their Google credentials.
On successful authentication, Google will provide a token to the application, by using this token we can make API calls to Google.
The OAuth Client ID is created, now we have to enable the Google+ API. On the same page you will see Google APIs logo, click on it to reach the Google APIs Dashboard. Check the below image:

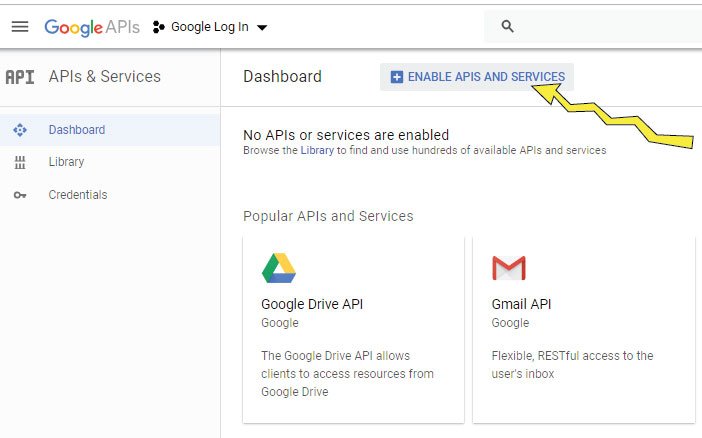
On the Google APIs Dashboard, click the ENABLE APIS AND SERVICES button, as shown in the below image:
On the Next page you have to find Google+ API. To do this, on the search box type Google+, then when you get the Google+ API result, simply click on it. Check the image below:

We will now reach the Google+ API page. All we have to do is to enable it. So, click on the Enable button and we are now ready to go. Check the below image:

Communicate with Google Cloud Console project
ASP.NET Core Identity has a built in support for authentication service that works on OAuth like Google, Facebook, Microsoft, LinkedIn, Twitter, etc. Their are extension methods to register them in the dot net app.
First we need to install the package called Microsoft.AspNetCore.Authentication.Google from NuGet.
Go to your Program.cs file, and set up the Google Authentication Service and provide the OAuth credentials we got from the Google console.
The code is shown below.
builder.Services.AddAuthentication()
        .AddGoogle(opts =>
        {
            opts.ClientId = "717469225962-3vk00r8tglnbts1cgc4j1afqb358o8nj.apps.googleusercontent.com";
            opts.ClientSecret = "babQzWPLGwfOQVi0EYR-7Fbb";
            opts.SignInScheme = IdentityConstants.ExternalScheme;
});Note: The IdentityConstants class resides inside the Microsoft.AspNetCore.Identity namespace so we need to include this namespace first.
After the User is authenticated with Google OAuth then we will create the User’s Account in the Identity Database.
Next, go to the Login.cshtml view file of the Account Controller and add the link that enables user to log in with Google. See the highlighted code of the Login View:
@model Login
@{
    ViewData["Title"] = "Login";
}

<h1 class="bg-info text-white">Login</h1>
<div class="text-danger" asp-validation-summary="All"></div>

<form asp-action="Login" method="post">
    <input type="hidden" asp-for="ReturnUrl" />
    <div class="form-group">
        <label asp-for="Email"></label>
        <input asp-for="Email" class="form-control" />
    </div>
    <div class="form-group">
        <label asp-for="Password"></label>
        <input asp-for="Password" class="form-control" />
    </div>
    <div class="form-group">
        Remember me? <input type="checkbox" asp-for="Remember" />
    </div>
    <button class="btn btn-primary" type="submit">Log In</button>
    <a class="btn btn-info" asp-action="GoogleLogin">Log In With Google</a>
</form>
The new link targets the GoogleLogin action on the Account controller. See this action along with the changes we made to the Account controller (code is given below). Basically we added 2 new methods which are GoogleLogin & GoogleResponse.
using Microsoft.AspNetCore.Mvc;
using Microsoft.AspNetCore.Authorization;
using Microsoft.AspNetCore.Identity;
using Identity.Models;
using System.Security.Claims;

namespace Identity.Controllers
{
    [Authorize]
    public class AccountController : Controller
    {
        private UserManager<AppUser> userManager;
        private SignInManager<AppUser> signInManager;

        public AccountController(UserManager<AppUser> userMgr, SignInManager<AppUser> signinMgr)
        {
            userManager = userMgr;
            signInManager = signinMgr;
        }

        // other methods

        public IActionResult AccessDenied()
        {
            return View();
        }

        [AllowAnonymous]
        public IActionResult GoogleLogin()
        {
            string redirectUrl = Url.Action("GoogleResponse", "Account");
            var properties = signInManager.ConfigureExternalAuthenticationProperties("Google", redirectUrl);
            return new ChallengeResult("Google", properties);
        }

        [AllowAnonymous]
        public async Task<IActionResult> GoogleResponse()
        {
            ExternalLoginInfo info = await signInManager.GetExternalLoginInfoAsync();
            if (info == null)
                return RedirectToAction(nameof(Login));

            var result = await signInManager.ExternalLoginSignInAsync(info.LoginProvider, info.ProviderKey, false);
            string[] userInfo = { info.Principal.FindFirst(ClaimTypes.Name).Value, info.Principal.FindFirst(ClaimTypes.Email).Value };
            if (result.Succeeded)
                return View(userInfo);
            else
            {
                AppUser user = new AppUser
                {
                    Email = info.Principal.FindFirst(ClaimTypes.Email).Value,
                    UserName = info.Principal.FindFirst(ClaimTypes.Email).Value
                };

                IdentityResult identResult = await userManager.CreateAsync(user);
                if (identResult.Succeeded)
                {
                    identResult = await userManager.AddLoginAsync(user, info);
                    if (identResult.Succeeded)
                    {
                        await signInManager.SignInAsync(user, false);
                        return View(userInfo);
                    }
                }
                return AccessDenied();
            }
        }
    }
}
The GoogleLogin method creates a redirectUrl variable that contains the URL of the GoogleResponse action method, it then uses the signInManager.ConfigureExternalAuthenticationProperties() method to configures the redirect URL (to the ‘redirectUrl’ value) and user identifier for the Google Authentication. The associated code for this is:
string redirectUrl = Url.Action("GoogleResponse", "Account");
var properties = signInManager.ConfigureExternalAuthenticationProperties("Google", redirectUrl);
Finally, it is redirecting user to the Google OAuth URL using the below code:
return new ChallengeResult("Google", properties);After authenticating user, Google will redirect them to the GoogleResponse action method. Inside this method we get the details of the User’s Google account using the code shown below:
ExternalLoginInfo info = await signInManager.GetExternalLoginInfoAsync();The ExternalLoginInfo class defines an ExternalPrincipal property that returns a ClaimsPrincipal object. It contains the claims provided for the user by Google. Next, we sign the user to the Application using these claims, see the below code:
var result = await signInManager.ExternalLoginSignInAsync(info.LoginProvider, info.ProviderKey, false);If the sign-in fails, then it is due to the fact that there is no user in the database that represents the Google user. We solve this by creating the new user and associating the Google credentials with it. See the below code that does this work:
IdentityResult identResult = await userManager.CreateAsync(user);
identResult = await userManager.AddLoginAsync(user, info);
The Name and Email of the user is returned to the View using the code:
string[] userInfo = { info.Principal.FindFirst(ClaimTypes.Name).Value, info.Principal.FindFirst(ClaimTypes.Email).Value };
return View(userInfo);
And finally the view file called GoogleResponse.cshtml shows the user details. It’s code is given below.
@model IEnumerable<string>

<h1 class="bg-info text-white">Your Login Details</h1>

<table class="table table-sm table-bordered">
    <tr><th>Name</th><th>Email</th></tr>
    <tr>
        @foreach (string info in Model)
        {
            <td>@info</td>
        }
    </tr>
</table>Run your project and go to the Login URL – /Account/Login, where you we see the Log In With Google button, as shown by the image given below:

Click the Log In With Google button, and this will start the Google Authentication Process, where we will be asked to Sign in with your Google account, as shown by the image below:

Select the Google Account and enter the password, as shown in the below image:

Once the Google Authentication is completed, we will be redirected to the ASP.NET Core Application and we will see our Google account details. Check the below image:

Multiple authentication providers
When the app requires multiple providers then chain the provider extension methods behind AddAuthentication method:
builder.Services.AddAuthentication()
    .AddMicrosoftAccount(microsoftOptions => { ... })
    .AddGoogle(googleOptions => { ... })
    .AddTwitter(twitterOptions => { ... })
    .AddFacebook(facebookOptions => { ... });
You can download the full codes of this tutorial from the below link:
Now we have learned to integrate Google Login in Identity. In the same way use external authentication providers like Facebook, Twitter, Linked and Microsoft to.
SHARE THIS ARTICLE
Related Tutorials:


ABOUT THE AUTHOR
I hope you enjoyed reading this tutorial. If it helped you then consider buying a cup of coffee for me. This will help me in writing more such good tutorials for the readers. Thank you.

HELLO EVERYONE
 Welcome to YogiHosting - A Programming Tutorial Website. It is used by millions of people around the world to learn and explore about ASP.NET Core, Blazor, jQuery, JavaScript, Docker, Kubernetes and other topics.
SUBSCRIBE TO NEWSLETTER
Enter your email address to subscribe to this blog and receive notifications of new posts by email.
Join 90K other subscribers