Two-Factor Authentication in ASP.NET Core Identity
ASP.NET Core Identity Two-Factor Authentication is a process where a user enters his credentials on the login page. After successful password validation, he receives an OTP (one-time-password) via email or SMS. The user needs to enter this OTP in the Two-Step Verification form to log in. This procedure greatly increases the security of the application.
In this tutorial we are going to implement the Two-Factor Authentication in ASP.NET Core Identity.
Enable Two-Factor Authentication in Identity
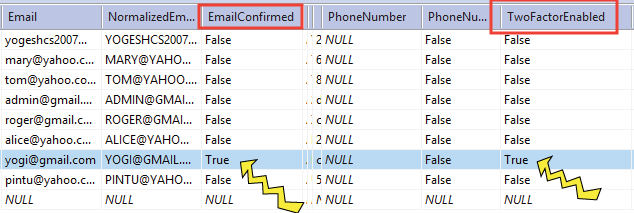
The AspNetUsers table of the Identity Database has a column named TwoFactorEnabled which keeps track of a user’s Two-Factor Authentication status. A true value specifies that it is enabled for a given user, while a false value specifies it is disabled. The default value of TwoFactorEnabled column is false.
See the below image where we have shown this column and the values for different Identity Users.

Note: The Two-Factor Authentication for a user also needs the EmailConfirmed column value to be true.
We have a user registered in Identity who has both these columns (TwoFactorEnabled & EmailConfirmed) set to “true”. See the below image where we have shown them. This user becomes a perfect case for Two-Factor Authentication.
In the tutorial called How to Create, Read, Update & Delete users in ASP.NET Core Identity, we created a code for registering new users to Identity. You will find the Create action method in the AdminController.cs file. We can update this code to enable 2 Factor Authentication during the time of creation of a new user. Check the highlighted code below which sets the TwoFactorEnabled property of the user to true.
[HttpPost]
public async Task<IActionResult> Create(User user)
{
    if (ModelState.IsValid)
    {
        AppUser appUser = new AppUser
        {
            UserName = user.Name,
            Email = user.Email,
            TwoFactorEnabled = true
        };

        IdentityResult result = await userManager.CreateAsync(appUser, user.Password);

        if (result.Succeeded)
            return RedirectToAction("Index");
        else
        {
            foreach (IdentityError error in result.Errors)
                ModelState.AddModelError("", error.Description);
        }
    }
    return View(user);
}
In the same way we can also enable it in the Update action method by setting user’s TwoFactorEnabled property to true. See the below code
[HttpPost]
public async Task<IActionResult> Update(string id, string email, string password)
{
    AppUser user = await userManager.FindByIdAsync(id);
    user.TwoFactorEnabled = true;
    if (user != null)
    {
        if (!string.IsNullOrEmpty(email))
            user.Email = email;
        else
            ModelState.AddModelError("", "Email cannot be empty");

        if (!string.IsNullOrEmpty(password))
            user.PasswordHash = passwordHasher.HashPassword(user, password);
        else
            ModelState.AddModelError("", "Password cannot be empty");

        if (!string.IsNullOrEmpty(email) && !string.IsNullOrEmpty(password))
        {
            IdentityResult result = await userManager.UpdateAsync(user);
            if (result.Succeeded)
                return RedirectToAction("Index");
            else
                Errors(result);
        }
    }
    else
        ModelState.AddModelError("", "User Not Found");
    return View(user);
}
You can read more about the User Class of ASP.NET Core Identity in another article written by me.
Implementing Two-Factor Authentication in Identity
To implement ASP.NET Core Identity Two-Factor Authentication we need to update our Login Action code which is located inside the AccountController.cs file. See the highlighted code given below which shows the newly added codes that need to be entered.
[HttpPost]
[AllowAnonymous]
[ValidateAntiForgeryToken]
public async Task<IActionResult> Login(Login login)
{
    if (ModelState.IsValid)
    {
        AppUser appUser = await userManager.FindByEmailAsync(login.Email);
        if (appUser != null)
        {
            await signInManager.SignOutAsync();
            Microsoft.AspNetCore.Identity.SignInResult result = await signInManager.PasswordSignInAsync(appUser, login.Password, false, true);
            if (result.Succeeded)
                return Redirect(login.ReturnUrl ?? "/");

            if (result.RequiresTwoFactor)
            {
                return RedirectToAction("LoginTwoStep", new { appUser.Email, login.ReturnUrl });
            }
        }
        ModelState.AddModelError(nameof(login.Email), "Login Failed: Invalid Email or password");
    }
    return View(login);
}
We can clearly see that during login, a check is performed to find out whether the user requires 2-Factor authentication or not. If true, we am redirecting him to the LoginTwoStep action method. See the below code which does this work.
if (result.RequiresTwoFactor)
{
    return RedirectToAction("LoginTwoStep", new { appUser.Email, login.ReturnUrl });
}
Next, add the LoginTwoStep action methods to the account controller. Their code is given below.
[AllowAnonymous]
public async Task<IActionResult> LoginTwoStep(string email, string returnUrl)
{
    var user = await userManager.FindByEmailAsync(email);

    var token = await userManager.GenerateTwoFactorTokenAsync(user, "Email");

    EmailHelper emailHelper = new EmailHelper();
    bool emailResponse = emailHelper.SendEmailTwoFactorCode(user.Email, token);

    return View();
}

[HttpPost]
[AllowAnonymous]
public async Task<IActionResult> LoginTwoStep(TwoFactor twoFactor, string returnUrl)
{
    if (!ModelState.IsValid)
    {
        return View(twoFactor.TwoFactorCode);
    }

    var result = await signInManager.TwoFactorSignInAsync("Email", twoFactor.TwoFactorCode, false, false);
    if (result.Succeeded)
    {
        return Redirect(returnUrl ?? "/");
    }
    else
    {
        ModelState.AddModelError("", "Invalid Login Attempt");
        return View();
    }
}
The important thing to note is how we am creating the token using the GenerateTwoFactorTokenAsync() method of the UserManager<T> class.
var token = await userManager.GenerateTwoFactorTokenAsync(user, "Email");And then sending this token to the user’s email address with the below code.
EmailHelper emailHelper = new EmailHelper();
bool emailResponse = emailHelper.SendEmailTwoFactorCode(user.Email, token);
We used the EmailHelper.cs class kept on the Models folder. The work of this class is to send the token to the user’s registered email address. The code of this class is given below.
using System.Net.Mail;

namespace Identity.Models
{
    public class EmailHelper
    {
        // other methods

        public bool SendEmailTwoFactorCode(string userEmail, string code)
        {
            MailMessage mailMessage = new MailMessage();
            mailMessage.From = new MailAddress("[email protected]");
            mailMessage.To.Add(new MailAddress(userEmail));

            mailMessage.Subject = "Two Factor Code";
            mailMessage.IsBodyHtml = true;
            mailMessage.Body = code;

            SmtpClient client = new SmtpClient();
            client.Credentials = new System.Net.NetworkCredential("[email protected]", "yourpassword");
            client.Host = "smtpout.secureserver.net";
            client.Port = 80;

            try
            {
                client.Send(mailMessage);
                return true;
            }
            catch (Exception ex)
            {
                // log exception
            }
            return false;
        }
    }
}
Finally when the user enters the token then it is validated by the TwoFactorSignInAsync method and user is logged in to Identity.
var result = await signInManager.TwoFactorSignInAsync("Email", twoFactor.TwoFactorCode, false, false);Next create a class called TwoFactor.cs inside the Models folder. The code is below.
using System.ComponentModel.DataAnnotations;

namespace Identity.Models
{
    public class TwoFactor
    {
        [Required]
        public string TwoFactorCode { get; set; }
    }
}
Also add the view for the action. Name it LoginTwoStep.cshtml and keep it inside the Views ➤ Account folder. It’s code is given below.
@model TwoFactor

@{
    ViewData["Title"] = "Login Two Step";
}

<h1 class="bg-info text-white">Login Two Step</h1>
<div class="text-danger" asp-validation-summary="All"></div>

<p>Enter your authentication code</p>

<form asp-action="LoginTwoStep" method="post">
    <div class="form-group">
        <label>Code</label>
        <input asp-for="TwoFactorCode" class="form-control" />
    </div>
    <button class="btn btn-primary" type="submit">Log In</button>
</form>
Testing the Entire functionality
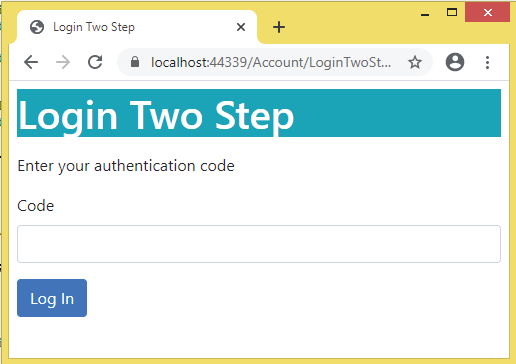
On the login page as soon as we enter a valid credentials, we will see a new form that will ask for the authentication code. See the below image.
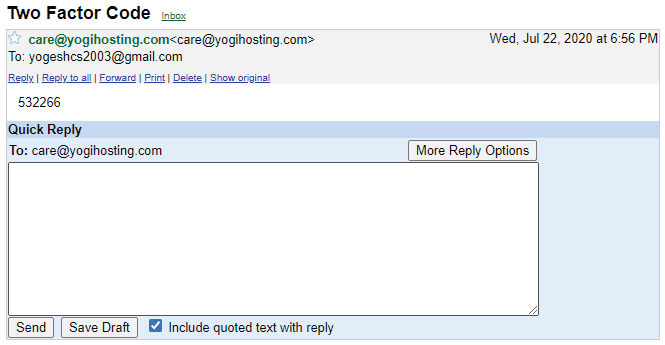
Now go to your mail inbox to find this authentication code (shown by the image below).
Finally, after we enter that token in the input field, we are going to be redirected either to the home view or to some other page. This depends on what you tried to access without authentication.
You can download the full codes of this tutorial from the below link:
So, in this tutorial we learned how to use a Identity’s two-factor authentication process to authenticate a user by using an email provider. But, we don’t have to use only the email provider. SMS is also an option that can be used for the process. The same logic applies to the SMS provider. All we have to do is change the email sending part at the LoginTwoStep action with the SMS sending code. See below code:
[AllowAnonymous]
public async Task<IActionResult> LoginTwoStep(string email, string returnUrl)
{
    var user = await userManager.FindByEmailAsync(email);

    var token = await userManager.GenerateTwoFactorTokenAsync(user, "Email");

    //EmailHelper emailHelper = new EmailHelper();
    //bool emailResponse = emailHelper.SendEmailTwoFactorCode(user.Email, token);

    SMSHelper smsHelper = new SMSHelper();
    bool smsResponse = smsHelper.SendSMSTwoFactorCode(user.PhoneNumber, token);

    return View();
}




 Welcome to YogiHosting - A Programming Tutorial Website. It is used by millions of people around the world to learn and explore about ASP.NET Core, Blazor, jQuery, JavaScript, Docker, Kubernetes and other topics.
When we use :SMSHelper smsHelper = new SMSHelper(); code in our project
error shows.which nugatpackage is need?.
How can we use this?
SMSHelper is just a demonstration of how to send SMS using some external service like Twilio. I have not implemented it here, use Twilio docs for it.