Username, Email & Password Policy in ASP.NET Core Identity

Page Contents
In this tutorial we will look into Username, Email & Password Policy in ASP.NET Core Identity. First we will explain what Identity offers by default and how can we customize it. Later we will understand how to create Custom Username, Email & Password Policy in ASP.NET Core Identity.
This tutorial is a part of the ASP.NET Core Identity series
- 1. How to Setup and Configure ASP.NET Core Identity
- 2. How to Create, Read, Update & Delete users in ASP.NET Core Identity
- 3. Username, Email & Password Policy in ASP.NET Core Identity
- 4. How to do Authentication of Users in ASP.NET Core Identity
- 5. How to work with Roles in ASP.NET Core Identity
- 6. How to add Custom User Properties in ASP.NET Core Identity
- 7. How to work with Claims in ASP.NET Core Identity
- 8. How to work with Policies in ASP.NET Core Identity
- 9. How to integrate Google login feature in ASP.NET Core Identity
- 10. Two-Factor Authentication in ASP.NET Core Identity
- 11. How to perform Email Confirmation of Users in ASP.NET Core Identity
- 12. Creating Password Reset feature in ASP.NET Core Identity
- 13. User Lockout in ASP.NET Core Identity
ASP.NET Core Identity Password Policy
By default, ASP.NET Core Identity Password Policy requires passwords to satisy the following conditions:
Passwords must be at least 6 characters.
Passwords must have at least one non alphanumeric character.
Passwords must have at least one digit ('0'-'9').
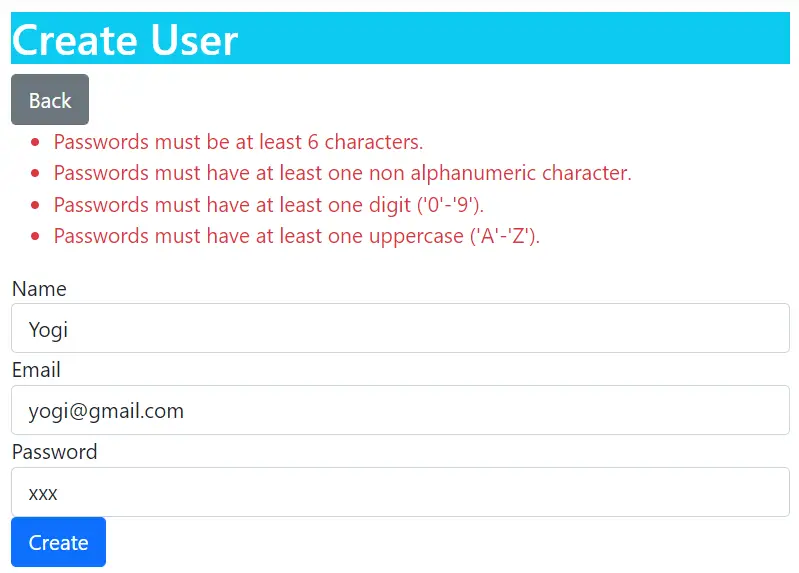
Passwords must have at least one uppercase ('A'-'Z').Open the “Create User” page in the project (url – https://localhost:7263/Admin/Create). Next enter:
- Name: Yogi
- Email: yogi@gmail.com
- Password: xxx
On clicking the “Create” button we will see these password errors.
We can enforce Password Policy in ASP.NET Core Identity so that the User passwords are made stronger by blocking weak passwords. For examples we can enforce that the passwords:
- Must have at least 8 characters in it.
- Must contain at least one lowercase letter (a-z).
We can configure the password Policy in the Program.cs class by using IdentityOptions object whose properties are set to enforce the password policy, as shown in the below code:
builder.Services.Configure<IdentityOptions>(opts =>
{
    opts.Password.RequiredLength = 8;
    opts.Password.RequireLowercase = true;
});
The below table provides some of the Properties of the IdentityOptions that we used:
| Name | Description |
|---|---|
| RequiredLength | Use this property to provide the minimum length required for the password. |
| RequireNonAlphanumeric | Controls whether we want at least one Non Alphanumeric character in the password. By default it is already required in Identity. We can set it to “false” if we don’t need any Non Alphanumeric character in the passworld. Non Alphanumeric characters are those that are not a digit nor an alphabet. Example – @, !, #, $. |
| RequireLowercase | When we set this property to true then Identity will require at least one lowercase character in the password. |
| RequireUppercase | When we set this property to false then Identity will not require at least one Uppercase character in the password. |
| RequireDigit | When we set this property to false then Identity will not require at least one digit in the password. |
We can now test this feature by going to the URL – https://localhost:7263/Admin/Create, and try creating a new user account by giving the name as Yogi, email as yogi@gmail.com, and a weak password as ABC.
We will fail in registering the user account and will see new password validation errors –
Passwords must be at least 8 characters.
Passwords must have at least one lowercase ('a'-'z').
See the below image where we have shown these errors:

Now change the password to Secret@123. Since it satisfies the password criteria so this time we will be able to create the new user account in Identity.
Identity Custom Password Policy
We can build our own Custom Password Policy for ASP.NET Core Identity so that user passwords satisfy rules that are defined by us. We can do it by inheriting the PasswordValidator<T> class of Microsoft.AspNetCore.Identity namespace.
- Passwords must not contain the username.
- Passwords must not contain the 123 sequence. This will prevent users for using Admin123, Happy123 like weak passwords.
Let us now create a Custom Password Policy, so create a new folder called IdentityPolicy on the root of the project. Inside this folder create a class called CustomPasswordPolicy.cs. Add the following code to this class.
using Identity.Models;
using Microsoft.AspNetCore.Identity;

namespace Identity.IdentityPolicy
{
    public class CustomPasswordPolicy : PasswordValidator<AppUser>
    {
        public override async Task<IdentityResult> ValidateAsync(UserManager<AppUser> manager, AppUser user, string password)
        {
            IdentityResult result = await base.ValidateAsync(manager, user, password);
            List<IdentityError> errors = result.Succeeded ? new List<IdentityError>() : result.Errors.ToList();

            if (password.ToLower().Contains(user.UserName.ToLower()))
            {
                errors.Add(new IdentityError
                {
                    Description = "Password cannot contain username"
                });
            }
            if (password.Contains("123"))
            {
                errors.Add(new IdentityError
                {
                    Description = "Password cannot contain 123 numeric sequence"
                });
            }
            return errors.Count == 0 ? IdentityResult.Success : IdentityResult.Failed(errors.ToArray());
        }
    }
}
We inherited the class from the PasswordValidator<T> class which defines ValidateAsync() method. We have override the ValidateAsync() method in the class and inside this method we implemented the custom password policy logic.
The first code line – IdentityResult result = await base.ValidateAsync(manager, user, password) validates the password according to the password rules given in the Program class. It then returns an IdentityResult object.
The IdentityResult object has a Succeeded property through which we check if the password validates successfully or not, and accordingly the password errors are added to a List object. The below line does this work:
List<IdentityError> errors = result.Succeeded ? new List<IdentityError>() : result.Errors.ToList();We then check if the password contains the username or the numeric sequence of 123. In that case we are adding the errors to the List object:
if (password.ToLower().Contains(user.UserName.ToLower()))
{
    errors.Add(new IdentityError
    {
        Description = "Password cannot contain username"
    });
}

if (password.Contains("123"))
{
    errors.Add(new IdentityError
    {
        Description = "Password cannot contain 123 numeric sequence"
    });
}
Finally, in the last line of code – return errors.Count == 0 ? IdentityResult.Success : IdentityResult.Failed(errors.ToArray()), we check the error’s count. If the count is 0 then we return IdentityResult.Success else IdentityResult.Failed is returned with the errors in an array object.
The password validation functionality is defined by the IPasswordValidator interface of the Microsoft.AspNetCore.Identity namespace. So we need to register CustomPasswordPolicy.cs class as the password validator for AppUser objects.
We add the code inside the Program.cs class as shown below:
builder.Services.AddTransient<IPasswordValidator<AppUser>, CustomPasswordPolicy>();Now it’s time to check my created functionally. Run the application and go to the URL – https://localhost:7263/Admin/Create. Here register a new user by providing the following values:
1. Name – Ronny
2. Email – rons@gmail.com
3. Password – ronny123
On clicking the Create button we will see the errors which are due to our Custom Password Policy.
- 1. Password cannot contain username
- 2. Password cannot contain 123 numeric sequence
These errors come from the CustomPasswordPolicy class which validates the password based on the policy we implemented. See the below image which shows these password errors:

ASP.NET Core Identity Username and Email Policy
We can configure ASP.NET Core Identity Username and Email Policy so that only those usernames and emails are allowed that fulfill the rules defined by us. Here we will configure policy for username and password in the Program.cs class by using the IdentityOptions properties.
So update the code by adding the below 2 code lines that are shown in highlighted way below.
builder.Services.Configure<IdentityOptions>(opts =>
{
    opts.User.RequireUniqueEmail = true;
    opts.User.AllowedUserNameCharacters = "abcdefghijklmnopqrstuvwxyz";
    opts.Password.RequiredLength = 8;
    opts.Password.RequireLowercase = true;
});
By setting the RequireUniqueEmail property to true, we enforced that no 2 users can be registered in Identity with the same email address.
The next property which we used is the AllowedUserNameCharacters. This sets a list of characters that can only be used when creating a username in Identity.
Suppose we have a user registered with email admin@gmail.com in Identity. Now when we try registering a new user with the same email – admin@gmail.com then we will get errors. Replicate these errors by going to the URL – https://localhost:7263/Admin/Create and try registering a new user having the following values:
1. Name – admin1
2. Email – admin@gmail.com
3. Password – Admin77@#
We will receive 2 errors which are:
User name 'admin1' is invalid, can only contain letters or digits.
Email 'admin@gmail.com' is already taken.
These errors are shown in the image given below:

Identity Custom Username and Email Policy
To create an ASP.NET Core Identity Custom Username and Email Policy, we will need to use the UserValidator class. This class provides the validation service for usernames and emails.
Let us place 2 restrictions:
- Prevent adding username called Google.
- Allow only yahoo.com email addresses.
So, create a new class called CustomUsernameEmailPolicy.cs inside the Identity folder. Inherit it from UserValidator class and override the ValidateAsync() method to create your our own custom username and email policy.
The full code of the CustomUsernameEmailPolicy class is given below:
using Identity.Models;
using Microsoft.AspNetCore.Identity;

namespace Identity.IdentityPolicy
{
    public class CustomUsernameEmailPolicy : UserValidator<AppUser>
    {
        public override async Task<IdentityResult> ValidateAsync(UserManager<AppUser> manager, AppUser user)
        {
            IdentityResult result = await base.ValidateAsync(manager, user);
            List<IdentityError> errors = result.Succeeded ? new List<IdentityError>() : result.Errors.ToList();

            if (user.UserName == "google")
            {
                errors.Add(new IdentityError
                {
                    Description = "Google cannot be used as a user name"
                });
            }

            if (!user.Email.ToLower().EndsWith("@yahoo.com"))
            {
                errors.Add(new IdentityError
                {
                    Description = "Only yahoo.com email addresses are allowed"
                });
            }
            return errors.Count == 0 ? IdentityResult.Success : IdentityResult.Failed(errors.ToArray());
        }
    }
}
Next, register the CustomUsernameEmailPolicy class in the Program class as shown below.
builder.Services.AddTransient<IUserValidator<AppUser>, CustomUsernameEmailPolicy>();Now it’s time to check this feature. Go to the https://localhost:7263/Admin/Create url and try adding a new user by providing the following values:
1. Name – tom
2. Email – tom@gmail.com
3. Password – Coder77@
You will receive errors stating that Only yahoo.com email addresses are allowed, as shown in the below image:

In the same way try adding a username called google by entering the following information:
1. Name – google
2. Email – tom@yahoo.com
3. Password – Coder77@
This time we will get error stating – Google cannot be used as a user name. See the below image which shows this error.

These errors come because of the custom username & email policy play a part in these cases.
ASP.NET Core Identity Update Policy
The ASP.NET Core Identity Password, Username and Email Policies which we added in the above sections will not be automatically applied when updating an existing user.
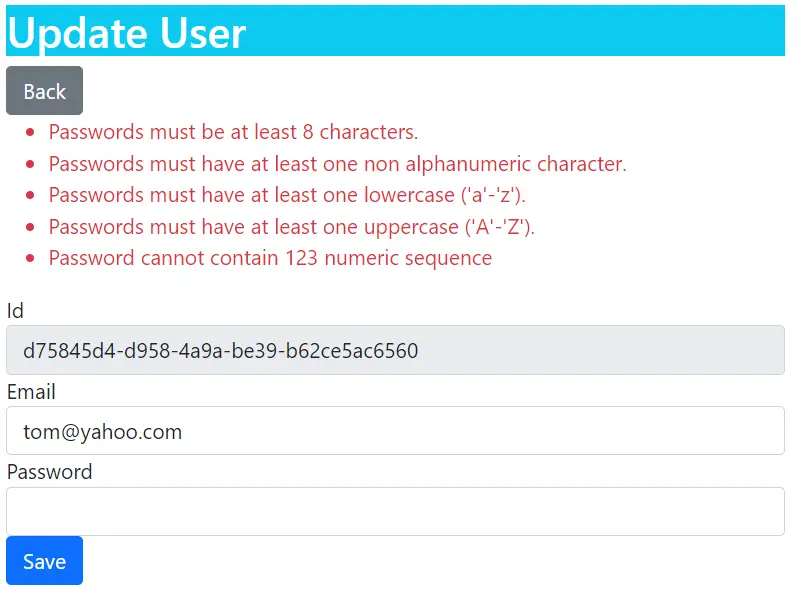
This can be confirmed by running the app and going to the URL – https://localhost:7263/Admin where we will see all the previously created users records. Here click the Update link against any of the User’s record. When the user’s record opens for updating, put 123 for the password and click the save button. We will notice that the user account gets updated and we do not get the error – Password cannot contain 123 numeric sequence this time. This confirms the policies are not applied when updating a user.
In order to apply the Identity Custom Password, Username and Email Policies when Updating a User Account, we have to update the Update Action method as given below:
[HttpPost]
public async Task<IActionResult> Update(string id, string email, string password)
{
    AppUser user = await userManager.FindByIdAsync(id);
    if (user != null)
    {
        IdentityResult validEmail = null;
        if (!string.IsNullOrEmpty(email))
        {
            validEmail = await userValidator.ValidateAsync(userManager, user);
            if (validEmail.Succeeded)
                user.Email = email;
            else
                Errors(validEmail);
        }
        else
            ModelState.AddModelError("", "Email cannot be empty");

        IdentityResult validPass = null;
        if (!string.IsNullOrEmpty(password))
        {
            validPass = await passwordValidator.ValidateAsync(userManager, user, password);
            if (validPass.Succeeded)
                user.PasswordHash = passwordHasher.HashPassword(user, password);
            else
                Errors(validPass);
        }
        else
            ModelState.AddModelError("", "Password cannot be empty");

        if (validEmail != null && validPass != null && validEmail.Succeeded && validPass.Succeeded)
        {
            IdentityResult result = await userManager.UpdateAsync(user);
            if (result.Succeeded)
                return RedirectToAction("Index");
            else
                Errors(result);
        }
    }
    else
        ModelState.AddModelError("", "User Not Found");

    return View(user);
}
We also have to add the dependencies for IPasswordValidator and IUserValidator in the constructor of the Admin Controller.
public class AdminController : Controller
{
    private UserManager<AppUser> userManager;
    private IPasswordHasher<AppUser> passwordHasher;
    private IPasswordValidator<AppUser> passwordValidator;
    private IUserValidator<AppUser> userValidator;

    public AdminController(UserManager<AppUser> usrMgr, IPasswordHasher<AppUser> passwordHash, IPasswordValidator<AppUser> passwordVal, IUserValidator<AppUser> userValid)
    {
        userManager = usrMgr;
        passwordHasher = passwordHash;
        passwordValidator = passwordVal;
        userValidator = userValid;
    }

    // removed for brevity
}
Notice that to use my Custom Validation policies for Email and Password, we are using the IPasswordValidator and IUserValidator objects as in the code below:
validEmail = await userValidator.ValidateAsync(userManager, user);
// validates the email according to the email policies
// (both given in 'Program.cs' & 'CustomUsernameEmailPolicy.cs')

validPass = await passwordValidator.ValidateAsync(userManager, user, password);
// validates the password according to the password policies
// (both given in 'Program.cs' & 'CustomPasswordPolicy.cs')
Now try to update the user once again and notice the policies are getting applied. The below image shows the error – Password cannot contain 123 numeric sequence coming due to the policy
You can download the full codes of this tutorial from the below link:
This completes this tutorial and now you are in a position to create your own custom policies in Identity.
SHARE THIS ARTICLE
Related Tutorials:


ABOUT THE AUTHOR
I hope you enjoyed reading this tutorial. If it helped you then consider buying a cup of coffee for me. This will help me in writing more such good tutorials for the readers. Thank you.

HELLO EVERYONE
 Welcome to YogiHosting - A Programming Tutorial Website. It is used by millions of people around the world to learn and explore about ASP.NET Core, Blazor, jQuery, JavaScript, Docker, Kubernetes and other topics.
SUBSCRIBE TO NEWSLETTER
Enter your email address to subscribe to this blog and receive notifications of new posts by email.
Join 90K other subscribers