ADO.NET – Create Records in ASP.NET Core

In this tutorial we will Create Database Records with ADO.NET in an ASP.NET Core application. Creating Records is the first thing we do when making CRUD Operations. Here we will Create an Inventory form on the ASP.NET Core app. From this form we will be able to create a new inventory records in the SQL Server database.
On the last ADO.NET tutorial we went through ADO.NET, it’s components and how to use it when doing database operations. You can check this tutorial from Learn ADO.NET by building CRUD Operations in ASP.NET Core.
Page Contents
This tutorial is a part of ADO.NET series.
- 1. Learn ADO.NET by building CRUD Operations in ASP.NET Core
- 2. ADO.NET – Create Records in ASP.NET Core
- 3. ADO.NET – Read Records in ASP.NET Core
- 4. ADO.NET – Update Records in ASP.NET Core
- 5. ADO.NET – Delete Records in ASP.NET Core
- 6. How to do ADO.NET SqlTransaction with Try Catch Block
- 7. Learn to use ADO.NET SqlBulkCopy class with Example
Create Records Example in ADO.NET
Start by adding a new Razor View file called Create.cshtml inside the Views ➤ Home folder and add the below code to it:
@model Inventory
@{
    ViewData["Title"] = "Create Inventory";
}

<h1>Create an Inventory</h1>
<h2 class="alert-danger">@ViewBag.Result</h2>
<form method="post">
	<div class="form-group">
		<label asp-for="Name"></label>
		<input class="form-control" asp-for="Name" />
	</div>
	<div class="form-group">
		<label asp-for="Price"></label>
		<input class="form-control" asp-for="Price" />
	</div>
	<div class="form-group">
		<label asp-for="Quantity"></label>
		<input class="form-control" asp-for="Quantity" />
	</div>
	<div class="text-center panel-body">
		<button type="submit" class="btn btn-sm btn-primary">Create</button>
	</div>
</form>
This View takes a model of type Inventory class type, and we are creating the labels and Input controls in the form, by using asp-for tag helper with the model fields.
Next, we need to add the Create action method to the Home Controller class. In the Create action we do the Insertion of the Inventory records in the database by using ADO.NET. Note that these records are filled by the user on the form contained by the create view.
In the appsettings.json file we have added the database connection string (shown below).
{
  "ConnectionStrings": {
    "DefaultConnection": "Server=(localdb)\\MSSQLLocalDB;Database=Company;Trusted_Connection=True;MultipleActiveResultSets=true"
  }
}
The Create action will get the connection string information from the appsettings.json file by ASP.NET Core Dependency Injection feature.
Next, add a constructor to the Home Controller that takes a parameter of IConfiguration type. Inside this constructor set the value of an IConfiguration type property to the constructor’s parameter value.
This code is shown highlighted.
using Microsoft.AspNetCore.Mvc;

namespace ADO.Controllers
{
    public class HomeController : Controller
    {
        public IConfiguration Configuration { get; }
        public HomeController(IConfiguration configuration)
        {
            Configuration = configuration;
        }

        public IActionResult Index()
        {
            return View();
        }
    }
}
Now we have set the mechanism to get the Database Connection string in the Controller. Next, add 2 Create action methods in the Controller, one of type GET and other of type POST. In the POST one we the ADO.NET database operation.
The updated controller’s code containing the Create actions is given below:
using Microsoft.AspNetCore.Mvc;
using ADO.Models;
using System.Data;
using System.Data.SqlClient;

namespace ADO.Controllers
{
    public class HomeController : Controller
    {
        public IConfiguration Configuration { get; }
        public HomeController(IConfiguration configuration)
        {
            Configuration = configuration;
        }

        public IActionResult Index()
        {
            return View();
        }

        public IActionResult Create()
        {
            return View();
        }

        [HttpPost]
        public IActionResult Create(Inventory inventory)
        {
            string connectionString = Configuration["ConnectionStrings:DefaultConnection"];
            using (SqlConnection connection = new SqlConnection(connectionString))
            {
                string sql = $"Insert Into Inventory (Name, Price, Quantity) Values ('{inventory.Name}', '{inventory.Price}','{inventory.Quantity}')";

                using (SqlCommand command = new SqlCommand(sql, connection))
                {
                    command.CommandType = CommandType.Text;

                    connection.Open();
                    command.ExecuteNonQuery();
                    connection.Close();
                }
            }
            ViewBag.Result = "Success";
            return View();
        }
    }
}
The ASP.NET Core MVC uses dependency injection feature to provide the IConfiguration type property, called Configuration, with the appsettings.json file’s connection string value.
In the first line we fetched the DefaultConnection node’s value (that resides inside the ConnectionStrings node in the appsettings.json file), and this gives the connection string’s value. This code is:
string connectionString = Configuration["ConnectionStrings:DefaultConnection"];
Next, we create an SqlConnection class object (namespace System.Data.SqlClient), by passing the connection string to it’s constructor. This code is given below:
using (SqlConnection connection = new SqlConnection(connectionString))
{
//...
}
We will be working with SqlCommand class (also from the namespace System.Data.SqlClient), in order to create an Inventory record in the database.
The SqlCommand class has a method called ExecuteNonQuery to Execute an SQL statement and SQL Stored procedure.
Here we execute an SQL statement, so we create the SQL statement in a string variable like:
string sql = $"Insert Into Inventory (Name, Price, Quantity) Values ('{inventory.Name}', '{inventory.Price}','{inventory.Quantity}')";Note that we are adding the values of Name, Price and Quantity to this string variable called sql from the Inventory class object’s parameter, like inventory.Name, inventory.Price, inventory.Quantity.
Next we create the SqlCommand class object by passing 2 parameters to it:
- 1. SQL Statement String
- 2. SQL Connection Object
This code is:
using (SqlCommand command = new SqlCommand(sql, connection))
{
//...
}
Then we set the CommandType property to CommandType.Text enum because we are usinging SQL string statement and not SQL procedure (for which it will be CommandType.StoredProcedure). This code is given below:
command.CommandType = CommandType.Text;
Since the ExecuteNonQuery method works in a connected environment therefore we have to open the connection before execution and also close the connection after execution is done.
The code which does this work is given work
connection.Open();
command.ExecuteNonQuery();
connection.Close();
Now it’s time to create a new inventory record in the database. So run your project and go to the URL – https://localhost:7298/Home/Create, in your browser (the port may be different in your case).
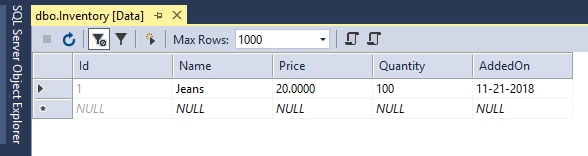
In the form fill:
- Jeans for ‘Name’
- 20 for ‘Price’
- 100 for ‘Quantity’
Then click the Create button.

Now go to your SQL Server Object Explorer and right click the Inventory table and select View Data.
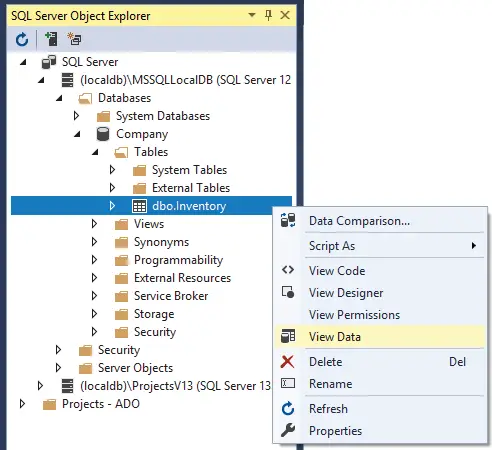
This will open the Inventory table and we will see the record has been created in the table.
Parameterized Command Objects
In the above section we used hard-coded string literal for the SQL query, as shown below:
string sql = $"Insert Into Inventory (Name, Price, Quantity) Values ('{inventory.Name}', '{inventory.Price}','{inventory.Quantity}')";A parameterized query is a query in which placeholders are used for parameters with the ‘@’ sign, like shown below.
string sql = "Insert Into Inventory (Name, Price, Quantity) Values (@Name, @Price, @Quantity)";Here @Name, @Price and @Quantity are the parameters, and we will have to define and provide them with values.
A Parameterized query serves 2 important things:
- 1. Avoid SQL injection attacks, which is a very common attack.
- 2. Faster execution than literal SQL string because they are pre-compiled SQL statement. So we need to only supply the “parameter’s values”.
To use Parameterized Command Object we have to specify parameters for the SqlCommand. This is done by the SqlParameter class.
Important members of the SqlParameter class are shown in the below table:
| Name | Description |
|---|---|
| ParameterName | Gets or sets the name of the parameter. |
| Value | Gets or sets the value of the parameter. |
| SqlDbType | Gets or sets the SQL Server’s data type of the parameter. |
| Size | Gets or sets the maximum parameter size of the data in bytes. |
| IsNullable | Gets or sets whether the parameter accepts null values. |
| Direction | Gets or sets whether the parameter is input-only, output-only, bidirectional, or a return value parameter. |
Now it’s time to change the Create View code to a parameterized one. So replace your Create View code with this updated code given below:
[HttpPost]
public IActionResult Create(Inventory inventory)
{
    string connectionString = Configuration["ConnectionStrings:DefaultConnection"];
    using (SqlConnection connection = new SqlConnection(connectionString))
    {
        string sql = "Insert Into Inventory (Name, Price, Quantity) Values (@Name, @Price, @Quantity)";

        using (SqlCommand command = new SqlCommand(sql, connection))
        {
            command.CommandType = CommandType.Text;

            // adding parameters
            SqlParameter parameter = new SqlParameter
            {
                ParameterName = "@Name",
                Value = inventory.Name,
                SqlDbType = SqlDbType.VarChar,
                Size = 50
            };
            command.Parameters.Add(parameter);

            parameter = new SqlParameter
            {
                ParameterName = "@Price",
                Value = inventory.Price,
                SqlDbType = SqlDbType.Money
            };
            command.Parameters.Add(parameter);

            parameter = new SqlParameter
            {
                ParameterName = "@Quantity",
                Value = inventory.Quantity,
                SqlDbType = SqlDbType.Int
            };
            command.Parameters.Add(parameter);

            connection.Open();
            command.ExecuteNonQuery();
            connection.Close();
        }
    }
    ViewBag.Result = "Success";
    return View();
}
There are just very few minute changes done in the code. First we changed the SQL query string to contain parameters like:
string sql = "Insert Into Inventory (Name, Price, Quantity) Values (@Name, @Price, @Quantity)";Then we defined and gave these parameters the values which the user filled in the form.
SqlParameter parameter = new SqlParameter
{
    ParameterName = "@Name",
    Value = inventory.Name,
    SqlDbType = SqlDbType.VarChar,
    Size = 50
};
We added these parameters to the SqlCommand object like:
command.Parameters.Add(parameter);
Also notice that for the @Name parameter, since we defined the Name column in the Inventory table as VARCHAR(50), therefore we set the SqlDbType as SqlDbType.VarChar and Size as 50.
Similarly look we defined the @Price parameter:
parameter = new SqlParameter
{
    ParameterName = "@Price",
    Value = inventory.Price,
    SqlDbType = SqlDbType.Money
};
We gave the SqlDbType value as SqlDbType.Money (as Price column is Money type). We did not provide the Size field as Money type columns in SQL Server does not have a size value.
Now coming to the @Quantity parameter to which we provided the SqlDbType value as SqlDbType.Int
parameter = new SqlParameter
{
    ParameterName = "@Quantity",
    Value = inventory.Quantity,
    SqlDbType = SqlDbType.Int
};
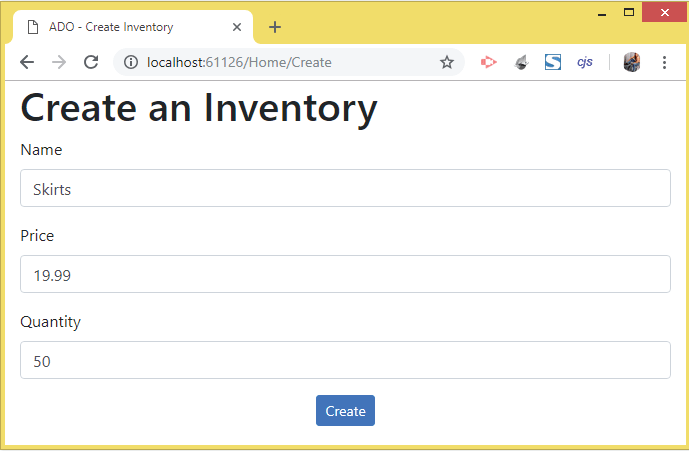
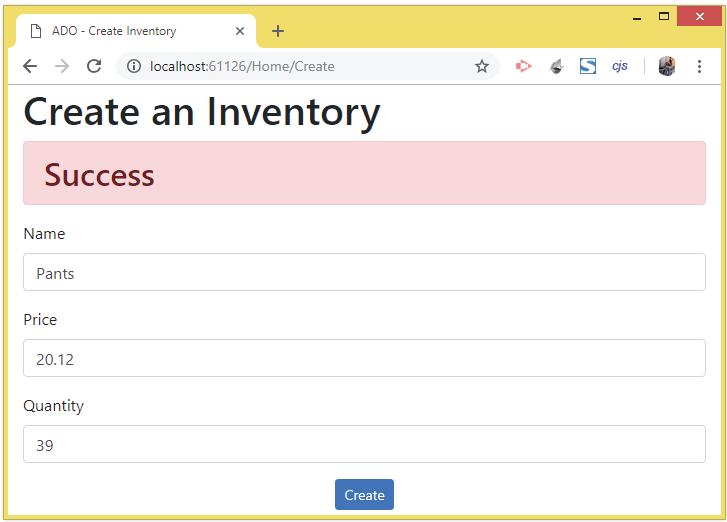
Run your application and go to the URL – https://localhost:7298/Home/Create. Put ‘Skirts’ for Name, 19.99 for ‘Price’ and 50 for ‘Quantity’. Then click the Create button, see below image:
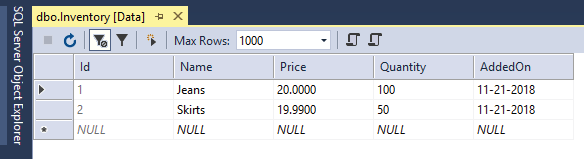
Now check the Inventory table data, where you will find this record inserted. This shown the Parameterized SqlCommand Object worked perfectly, see below image:
Executing a Stored Procedure
A Stored Procedure (short form ‘SP’) is an SQL Code Block stored on the database. They can do any type of work like read, insert, update, delete records, etc from the database table. Stored Procedures can also have parameters (input or output direction).
We will now create a stored procedure that will insert records to the same inventory table. This SP will have 4 parameters in total, out of these four, three will be of input direction and 1 output direction.
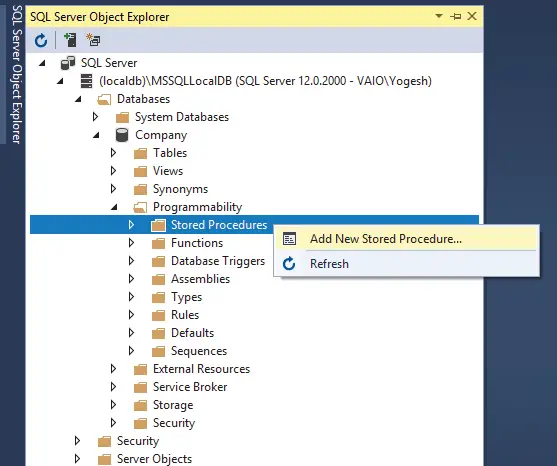
In your SQL Server Object Explorer window, reach out the Stored Procedures node. You can do this by opening the Databases ► Company ►Programmability node.
Then right click on the Stored Procedures node and select Add New Stored Procedures. See the below image which illustrates this.
A new window will open in Visual Studio, and provides you a template for creating a stored procedure, see below image:
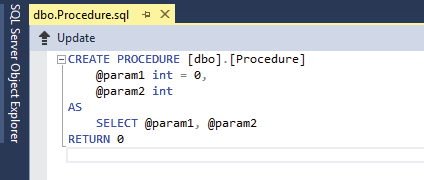
Replace all the code in this window with the below SP code. Then click the “Update” button and then “Update Database” button.
CREATE PROCEDURE [dbo].[CreateInventory]
    @Name       VARCHAR(50),
    @Price        MONEY,
    @Quantity   INT,
    @Result VARCHAR(50) OUTPUT
AS
BEGIN
    Insert Into Inventory (Name, Price, Quantity) Values (@Name, @Price, @Quantity)
    SET @Result='Success'
END
This Stored Procedure called CreateInventory has 3 input parameter – @Name, @Price and @Quantity. We have to provide the values for these parameters from the ADO.NET code.
The procedure also has an output parameter called @Result, whose work is to return the Success message when the SP executes successfully. This success message will signify that the record has inserted successfully.
Now replace the Create action of HttpPost type with the new updated version. This version executes the CreateInventory stored procedure from the ADO.NET Code.
[HttpPost]
public IActionResult Create(Inventory inventory)
{
    string connectionString = Configuration["ConnectionStrings:DefaultConnection"];
    using (SqlConnection connection = new SqlConnection(connectionString))
    {
        string sql = "CreateInventory";

        using (SqlCommand command = new SqlCommand(sql, connection))
        {
            command.CommandType = CommandType.StoredProcedure;

            // adding parameters
            SqlParameter parameter = new SqlParameter
            {
                ParameterName = "@Name",
                Value = inventory.Name,
                SqlDbType = SqlDbType.VarChar,
                Size = 50
            };
            command.Parameters.Add(parameter);

            parameter = new SqlParameter
            {
                ParameterName = "@Price",
                Value = inventory.Price,
                SqlDbType = SqlDbType.Money
            };
            command.Parameters.Add(parameter);

            parameter = new SqlParameter
            {
                ParameterName = "@Quantity",
                Value = inventory.Quantity,
                SqlDbType = SqlDbType.Int
            };
            command.Parameters.Add(parameter);

            parameter = new SqlParameter
            {
                ParameterName = "@Result",
                SqlDbType = SqlDbType.VarChar,
                Size = 50,
                Direction = ParameterDirection.Output
            };
            command.Parameters.Add(parameter);

            connection.Open();

            // Execute the stored procedure
            command.ExecuteNonQuery();

            // Output parameter value
            string result= Convert.ToString(command.Parameters["@Result"].Value);
            ViewBag.Result = result;

            connection.Close();
        }
    }
    return View();
}
There are just a few changes which are done, in order to execute the SP. The first one is that instead of the text query we now have assigned the stored procedure’s name to the string variable.
string sql = "CreateInventory";Therefore now the SqlCommand object will receive the SP name in it’s first parameter instead of the string query.
We have changed the CommandType property to CommandType.StoredProcedure, this will tell ADO.NET that we need to execute a Stored Procedure this time.
command.CommandType = CommandType.StoredProcedure;We also added a new @Result parameter and specified it’s direction as Output:
parameter = new SqlParameter
{
    ParameterName = "@Result",
    SqlDbType = SqlDbType.VarChar,
    Size = 50,
    Direction = ParameterDirection.Output
};
command.Parameters.Add(parameter);
Then after the ExecuteNonQuery statement, we an get the value returned by this output parameter like:
string result= Convert.ToString(command.Parameters["@Result"].Value);We can easily use this return value to tell the user about the outcome of this operation.
Wee have added the @Result parameter’s value to a ViewBag variable like ViewBag.Result = result.
And showing the ViewBag’s value inside an H2 tag in the Create View:
<h2 class="alert alert-danger">@ViewBag.Result</h2>
Test this feature by inserting a new inventory record. You will find the message Success get displayed on the View.
You can download the source code using the below link:
In this tutorial we learned to create records in a database table using ADO.NET. In the next tutorial we will learn how to ADO.NET – Read Records in ASP.NET Core and display them to the users in the application.
SHARE THIS ARTICLE
Related Tutorials:


ABOUT THE AUTHOR
I hope you enjoyed reading this tutorial. If it helped you then consider buying a cup of coffee for me. This will help me in writing more such good tutorials for the readers. Thank you.

HELLO EVERYONE
 Welcome to YogiHosting - A Programming Tutorial Website. It is used by millions of people around the world to learn and explore about ASP.NET Core, Blazor, jQuery, JavaScript, Docker, Kubernetes and other topics.
SUBSCRIBE TO NEWSLETTER
Enter your email address to subscribe to this blog and receive notifications of new posts by email.
Join 90K other subscribers