Model Validation in ASP.NET Core [Beginner to Expert]
![Model Validation in ASP.NET Core [Beginner to Expert]](https://www.yogihosting.com/wp-content/uploads/2019/05/aspnet-core-model-validation.png "Model Validation in ASP.NET Core [Beginner to Expert]")
What is Model Validation in ASP.NET Core? Model Validation is a technique to provide rules for model properties and validating these rules so that they are not broken. When rules are broken then appropriate error messages are displayed to the clients and this helps the clients to rectify the problems.
In this tutorial we are going to learn Model Validation with examples. So let us start without any delay.
Page Contents
Model Validations are of 2 types:
- Server Side Validations
- Client Side Validations
ASP.NET Core Model State
What is ModelState in ASP.NET Core? ModelState is a collection of name and value pairs containing errors that originate during Model Binding and Model Validation. For example – an integer field is provided with a string value will be giving an error that will be contained by ASP.NET Core ModelState.
For doing Model Validation we have to know 2 things:
- 1. AddModelError() method
- 2. ModelState.IsValid property
AddModelError() method
The AddModelError() method is used to record a Model Validation error for a specified property field. The syntax of AddModelError() method is:
AddModelError(property, message);property – it is a property of the model class.
message – a string that specifies the error message for the property.
ModelState.IsValid property
The ModelState.IsValid is a property that returns true if all the model properties are valid i.e. no error is associated with them in the ModelState, and returns false otherwise. We use it in IF ELSE code block as shown below.
if (ModelState.IsValid)
{
... do something
}
else
{
... do something
}
ASP.NET Core Model Validation Example
Let’s applay Model Validation to a Job Application form. In this form there are different types of controls used for entering:
- Name in an Input control.
- Date of Birth in an Input control.
- Sex in a radio button.
- Experience in select control.
- Accept Terms in a checkbox.
So, first create JobApplication.cs class inside the Models folder of your app with codes as shown below:
namespace ModelBindingValidation.Models
{
    public class JobApplication
    {
        public string Name { get; set; }

        public DateTime DOB { get; set; }

        public string Sex { get; set; }

        public string Experience { get; set; }

        public bool TermsAccepted { get; set; }
    }
}
The JobApplication class defines various properties for which Model Validation will be applied later on. Create 2 razor view files inside the Views ➤ Job folder. These Views are:
@model JobApplication
@{
    ViewData["Title"] = "Job Application";
}

<h2>Job Application</h2>

<form class="m-1 p-1" method="post">
    <div class="form-group">
        <label asp-for="Name"></label>
        <input asp-for="Name" class="form-control" />
    </div>
    <div class="form-group">
        <label asp-for="DOB"></label>
        <input asp-for="DOB" type="text" asp-format="{0:d}" class="form-control" />
    </div>
    <div class="form-group">
        <label asp-for="Sex"></label>
        <div>
            <input asp-for="Sex" type="radio" value="M" />Male
            <input asp-for="Sex" type="radio" value="F" />Female
        </div>
    </div>
    <div class="form-group">
        <label asp-for="Experience"></label>
        <select asp-for="Experience" class="form-control">
            <option value="Select">Select</option>
            <option value="0">Fresher</option>
            <option value="1">0-1 years</option>
            <option value="2">1-2 years</option>
            <option value="3">2-3 years</option>
            <option value="4">3-4 years</option>
            <option value="5">4-5 years</option>
        </select>
    </div>
    <div class="form-group">
        <input asp-for="TermsAccepted" />
        <label asp-for="TermsAccepted" class="form-check-label">
            I accept the terms & conditions
        </label>
    </div>
    <button type="submit" class="btn btn-primary">Submit Application</button>
</form>
The view contains a Job Application form where the users will fill their detaila and then submit the form by clicking the Submit Application button.
@model JobApplication
@{
    Layout = "_Layout";
    ViewData["Title"] = "Accepted";
}

<h2>Accepted</h2>

<table class="table table-bordered">
    <tr>
        <th>Your name is:</th>
        <td>@Model.Name</td>
    </tr>
    <tr>
        <th>Your date of birth is:</th>
        <td>@Model.DOB.ToString("d")</td>
    </tr>
    <tr>
        <th>Your sex is:</th>
        <td>@Model.Sex</td>
    </tr>
    <tr>
        <th>Your experience is:</th>
        <td>@Model.Experience</td>
    </tr>
    <tr>
        <th>Have you accepted terms:</th>
        <td>@Model.TermsAccepted</td>
    </tr>
</table>
<a class="btn btn-success" asp-action="Index">Back</a>
This view will show the client’s submitted values in an html table. Next create a controller file called JobController.cs and add 2 action methods to it, these are:
- 1. HttpGet version of Index – which renders the Index View for the users to fill the form.
- 2. HttpPost version of Index – which will be invoked once the users submit the form. It renders the Accepted View where the user’s submitted details are shown in a html table.
The HTTP POST version of Index action receives the values filled by the user in the form by Model Binding technique.
The code for these action methods are given below:
using Microsoft.AspNetCore.Mvc;
using ModelBindingValidation.Models;

namespace ModelBindingValidation.Controllers
{
    public class JobController : Controller
    {
        public IActionResult Index()
        {
            return View();
        }

        [HttpPost]
        public IActionResult Index(JobApplication jobApplication)
        {
            return View("Accepted", jobApplication);
        }
    }
}
Now run your application and go to the URL – /Job, where you will find the Job Application form. The form looks normal but note that there is No Model Validation applied to it.
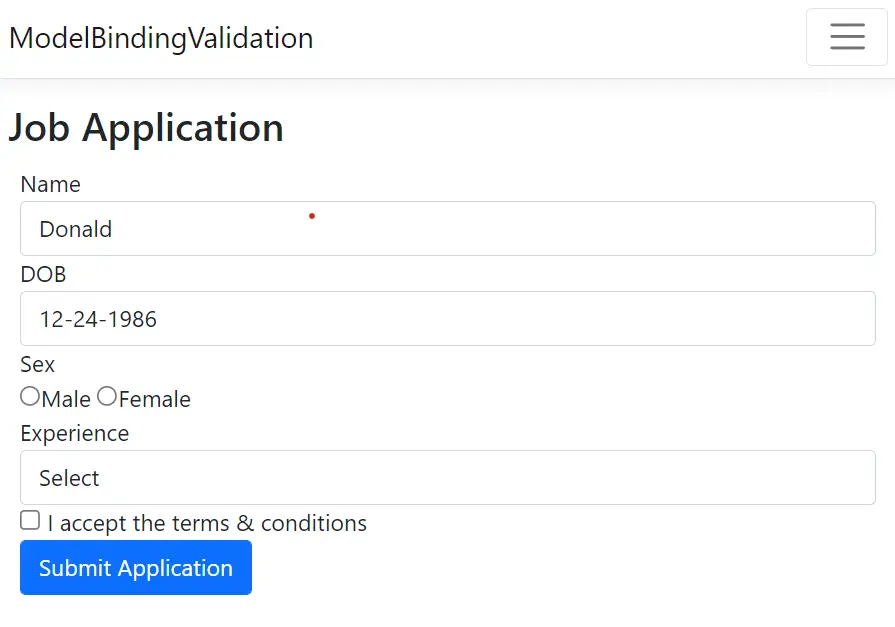
Fill the values on the controls as given below:
2. DOB – 12-24-1986
3. Sex – leave it untouched
4. Experience – leave it untouched
5. I accept the terms & conditions – leave it untouched
When the submit button is clicked, the filled values are displayed on the browser:
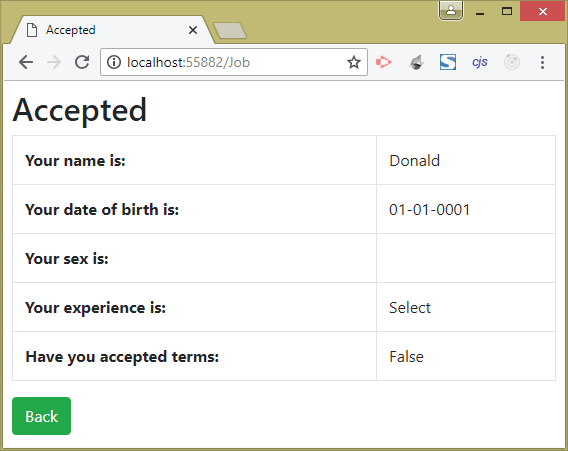
But Wait! There is some flaw. We filled 12-24-1986 for DOB field but it shows 01-01-0001.
This happens because the DOB field requires DD-MM-YYYY format date but we entered it in MM-DD-YYYY format, and so this value does not bind to the DOB property of the JobApplication object given as the parameter of the action method. So this shows us the default value of a DataTime which is 01-01-0001.
The form also has no way to force the user to choose his/her sex, experience and Terms-Conditions. To prevent users from entering wrong date for DOB and force him/her to enter all his/her information in the controls, we use the process of Model Validation.
Now we will apply the Model Validation Technique so that the invalid inputs are prevented from entering in the application form. We will be performing ASP.NET Core Server Side Model Validations in this case. So, change the HttpPost version of Index Action Method as shown by highlighted code given below:
using Microsoft.AspNetCore.Mvc;
using ModelBindingValidation.Models;

namespace ModelBindingValidation.Controllers
{
    public class JobController : Controller
    {
        public IActionResult Index()
        {
            return View();
        }

        [HttpPost]
        public IActionResult Index(JobApplication jobApplication)
        {
            if (string.IsNullOrEmpty(jobApplication.Name))
                ModelState.AddModelError(nameof(jobApplication.Name), "Please enter your name");

            if (jobApplication.DOB == Convert.ToDateTime("01-01-0001 00:00:00"))
                ModelState.AddModelError(nameof(jobApplication.DOB), "Please enter your Date of Birth");
            else if (jobApplication.DOB > DateTime.Now)
                ModelState.AddModelError(nameof(jobApplication.DOB), "Date of Birth cannot be in the future");
            else if (jobApplication.DOB < new DateTime(1980, 1, 1))
                ModelState.AddModelError(nameof(jobApplication.DOB), "Date of Birth should not be before 1980");

            if (string.IsNullOrEmpty(jobApplication.Sex))
                ModelState.AddModelError(nameof(jobApplication.Sex), "Please select your sex");

            if (jobApplication.Experience.ToString() == "Select")
                ModelState.AddModelError(nameof(jobApplication.Experience), "Please select your experience");

            if (!jobApplication.TermsAccepted)
                ModelState.AddModelError(nameof(jobApplication.TermsAccepted), "You must accept the Terms");

            if (ModelState.IsValid)
                return View("Accepted", jobApplication);
            else
                return View();
        }
    }
}
In the above highlighted code block, we have applied checks on every property of the JobApplication class to ensure that the users are forced to provide valid values in the form. Let us discuss what should be the valid values for each of fields one by one.
For the Name property the code – if (string.IsNullOrEmpty(jobApplication.Name)) checks if the user has not filled his/her name in the name control field, in that case the code – ModelState.AddModelError(nameof(jobApplication.Name), "Please enter your name") gets executed and Model Validation Error is recorded in the ModelState for the Name property.
There are 3 checks done for the DOB property which are:
Check 1 – If user has not filled the DOB or provided some invalid date like “apple” for this field. Then it is detected by the code – if (jobApplication.DOB == Convert.ToDateTime("01-01-0001 00:00:00")). The DateTime property has the default value of 01-01-0001 00:00:00 which happens when user has not supplied any value.
Check 2 – If user has provided a future date (from the current day time). It is checked by the code line – else if (jobApplication.DOB > DateTime.Now).
Check 3 – If the user has provided the DOB before the year 1980. It is checked by the code – else if (jobApplication.DOB < new DateTime(1980, 1, 1)).
Appropriate validation error messages are provided whenever these checks fail.
Two radio buttons are provided for selecting the sex of the user. If the user does not select his/her sex, which is checked by the code – if (string.IsNullOrEmpty(jobApplication.Sex)). In such a case error message is recorded in the ModelState for the Sex property by the code line – ModelState.AddModelError(nameof(jobApplication.Sex), "Please select your experience").
A select control is provided on the razor view file for selecting the Experience. The default selected value is Select, so the code if (jobApplication.Experience.ToString() == "Select") determines if the user has not selected the experience. In such a case an error message is recorded for the Experience property.
If the user has not selected the checkbox control for the TermsAccepted property then an error message is recorded for this. The code – if (!jobApplication.TermsAccepted) finds if the checkbox is unchecked.
Finally, we use the code line – ModelState.IsValid to see if the ModelState is valid. This happens only when there are “no validation errors”. In that case we are returning to the Accepted view, and providing the jobApplication object as a model.
It ModelState.IsValid returns false then it means there are some model errors so we are simply returning the same view i.e. the Index View. Here user will see the errors and can fix them by correcting the invalid values he/she provided.
The below code does this checking for the ModelState:
if (ModelState.IsValid)
    return View("Accepted", jobApplication);
else
    return View();
Next we will show these validation errors on the view.
Model Validation adds CSS class called input-validation-error to all the controls that have failed the validation checks.
To check this, open the URL – /Job and click the Submit Application button without filling any values on the form. Now check the HTML formed for the ‘Name’ control by the browser. We use the Developer Tools of the browser to do this work.
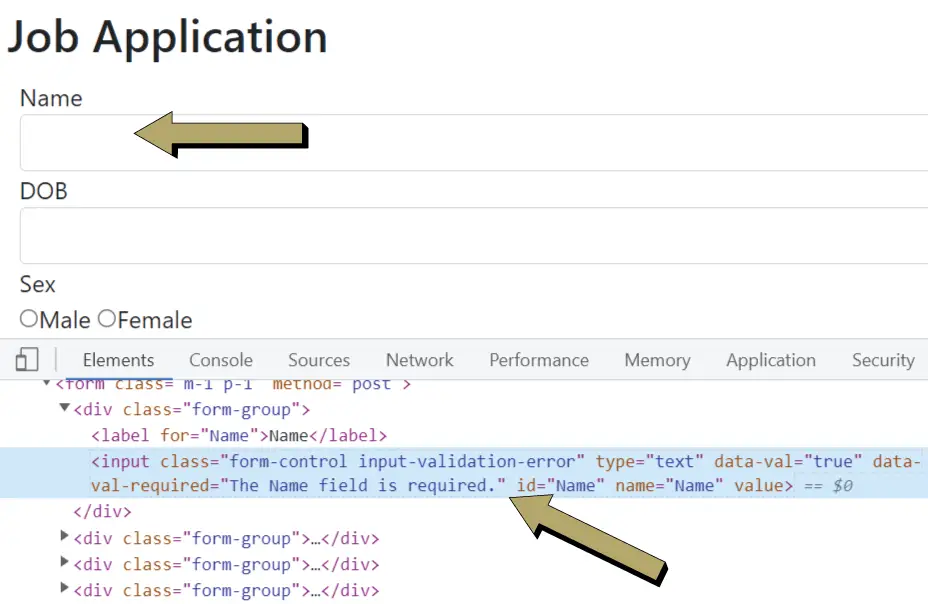
We will notice that it contain this class – input-validation-error as shown below:
<input class="form-control input-validation-error" type="text" data-val="true" data-val-required="The Name field is required." id="Name" name="Name" value="">Note that we will find the input-validation-error css on all the controls since they all failed the validation checks.
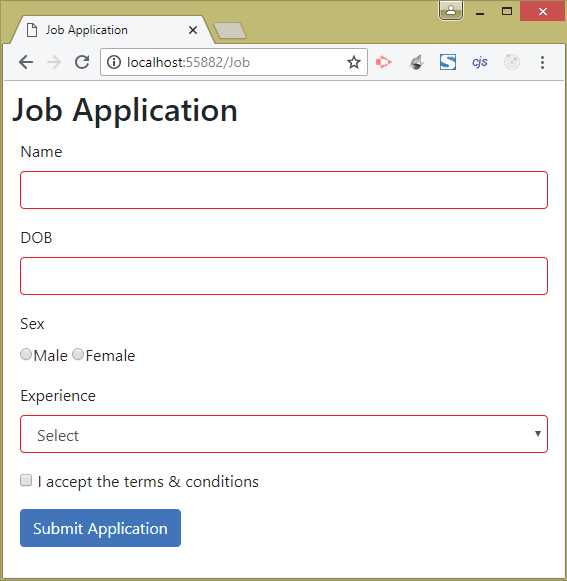
We can add red borders on the controls that have errors by adding some CSS code. So add a style block on the Index Razor View of the Job Controller like shown below:
@model JobApplication
@{
    Layout = "_Layout";
    ViewData["Title"] = "Job Application";
}

<style>
    .input-validation-error {
        border-color: red;
    }
</style>

<h2>Job Application</h2>

<form class="m-1 p-1" method="post">
...
</form>
Test the feature once again and notice the controls will show red borders when validation errors occur. See below image:
Displaying Model Validation Errors in “asp-validation-summary” Tag Helper
What is ASP.NET Core validation summary? The asp-validation-summary Tag Helper is used to show the validation errors that have been added in the ModelState. We add this Tag Helper to a html div tag in the Razor View and all the validation errors will be shown on this div.
See the below code where we have applied asp-validation-summary on a div tag.
@model JobApplication
@{
    Layout = "_Layout";
    ViewData["Title"] = "Job Application";
}

<h2>Job Application</h2>

<div asp-validation-summary="All" class="text-danger"></div>

<form class="m-1 p-1" method="post">
    ...
</form>

<style>
    .input-validation-error {
        border-color: red;
    }
</style>
The asp-validation-summary Tag Helper is applied on the div so the validation errors will be shown on this element. Note that the text-danger is a Bootstrap class that gives red color to text.
Now re-run your application and submit the form, given on the URL – /Job once again, without filling any value in any control. We will see all the Model Validation Messages are displayed, as shown by the image below:
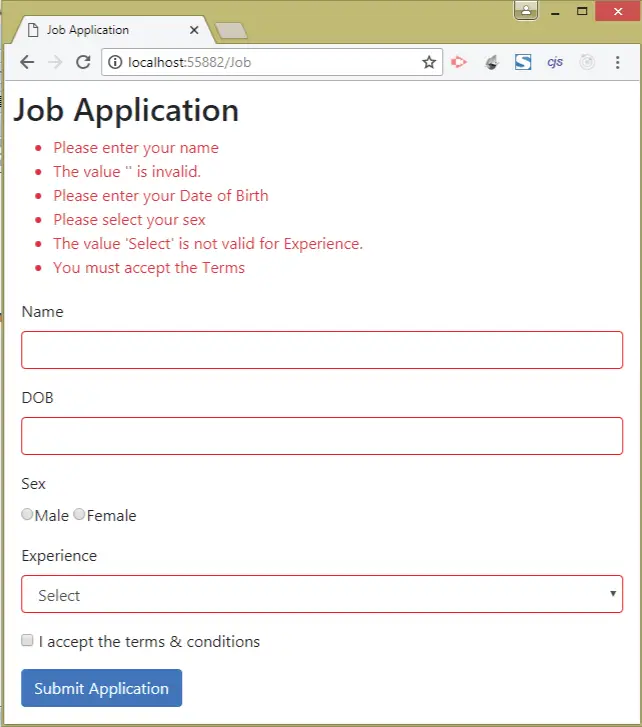
We can give 3 values to the asp-validation-summary Tag Helper, these are given below:
| Name | Description |
|---|---|
| All | Displays all the recorded validation messages. |
| ModelOnly | Displays only the validation message that are recorded for the entire model. It excludes those validation messages that are recorded for individual properties. |
| None | Does not displays any validation message. |
Displaying Individual Model Validation Error Messages
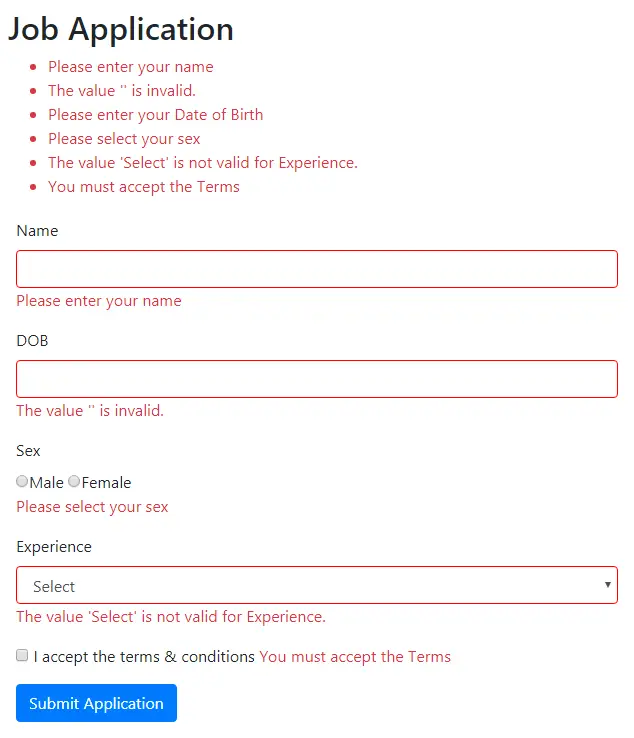
Obviously, it is more useful to display the Model Validation Error Messages alongside the controls that contain the problematic values. This you can achieve by using the asp-validation-for tag helper.
For example – to show validation error messages for the name property, add this tag helper to a new span element like:
<span asp-validation-for="Name"></span>Now go to the Index View of the Job Controller and add this span control next to the input tag for the “Name” property. We do the same thing for each and every property but will change the value of the tag helper to the property name – asp-validation-for=”property”.
Check the below updated code of the view.
@model JobApplication
@{
    Layout = "_Layout";
    ViewData["Title"] = "Job Application";
}

<style>
    .input-validation-error {
        border-color: red;
    }
</style>

<h2>Job Application</h2>

<div asp-validation-summary="All" class="text-danger"></div>

<form class="m-1 p-1" method="post">
    <div class="form-group">
        <label asp-for="Name"></label>
        <input asp-for="Name" class="form-control" />
        <span asp-validation-for="Name" class="text-danger"></span>
    </div>
    <div class="form-group">
        <label asp-for="DOB"></label>
        <input asp-for="DOB" type="text" asp-format="{0:d}" class="form-control" />
        <span asp-validation-for="DOB" class="text-danger"></span>
    </div>
    <div class="form-group">
        <label asp-for="Sex"></label>
        <div>
            <input asp-for="Sex" type="radio" value="M" />Male
            <input asp-for="Sex" type="radio" value="F" />Female
        </div>
        <span asp-validation-for="Sex" class="text-danger"></span>
    </div>
    <div class="form-group">
        <label asp-for="Experience"></label>
        <select asp-for="Experience" class="form-control">
            <option value="Select">Select</option>
            <option value="0">Fresher</option>
            <option value="1">0-1 years</option>
            <option value="2">1-2 years</option>
            <option value="3">2-3 years</option>
            <option value="4">3-4 years</option>
            <option value="5">4-5 years</option>
        </select>
        <span asp-validation-for="Experience" class="text-danger"></span>
    </div>
    <div class="form-group">
        <input asp-for="TermsAccepted" />
        <label asp-for="TermsAccepted" class="form-check-label">
            I accept the terms & conditions
        </label>
        <span asp-validation-for="TermsAccepted" class="text-danger"></span>
    </div>
    <button type="submit" class="btn btn-primary">Submit Application</button>
</form>
Run the application once more and submit the form without filling any value. This time you will see the individual error messages displayed besides each control. The below image shows these error messages:
Model-Level Error Messages
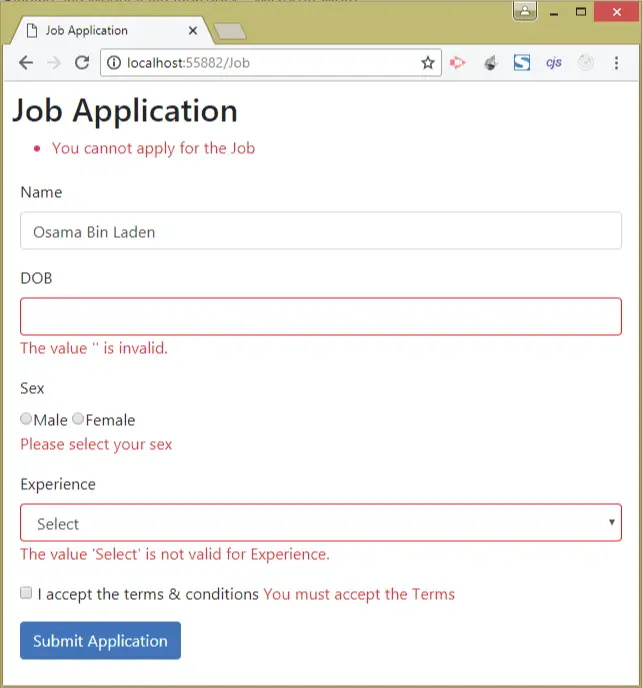
Model-Level Error Messages are those that are applicable to the model as a whole and not to individual properties. We can apply them by providing empty string (“”) to the property parameter of the AddModelError() method as shown by the below code.
ModelState.AddModelError("", "Some Model-Level error"); Take for example, suppose we do not want a person named Osama Bin Laden to apply for the Job. For implementing this, we add a new else if block to check whether the name is ‘Osama Bin Laden’ and then provide a Model-Level validation error message. This is shown in the code given below.
[HttpPost]
public IActionResult Index(JobApplication jobApplication)
{
    if (string.IsNullOrEmpty(jobApplication.Name))
        ModelState.AddModelError(nameof(jobApplication.Name), "Please enter your name");
    else if(jobApplication.Name=="Osama Bin Laden")
        ModelState.AddModelError("", "You cannot apply for the Job");

    // removed for clarity
}
We also have to change the asp-validation-summary to ModelOnly.
...

<h2>Job Application</h2>

<div asp-validation-summary="ModelOnly" class="text-danger"></div>
<form class="m-1 p-1" method="post">
    ...
</form>

<style>
    .input-validation-error {
        border-color: red;
    }
</style>
Check this feature by filling Osama Bin Laden for the name control. This time we will only see the Model-Level error message saying – “You cannot apply for the Job”.
See the image below:
Model Validation Attributes from Data Annotations
ASP.NET Core provides a number of Validation attribute that can be applied to the properties of model classes for specifying validation rules. These attribute can be found in the System.ComponentModel.DataAnnotations namespace. This process of doing validations is an easy and fast way, and also removes code duplication.
What is System ComponentModel DataAnnotations? It is a namespace that contains a number of in-built validation Attributes provided by Microsoft. We can use them to do validations in our application. We have to apply a given attributes over a property of the model class to validate it for a set of rules defined in the attribute. These attributes are described in the table below:
| Name | Description |
|---|---|
| [Required(ErrorMessage = “Some Message”)] | Ensures that the value is not empty. Can be applied to values who have a default value of null type like int?, float?, string. |
| [StringLength(max,min)] | Ensures that the string’s length is from min to max values (min & max are included). Example [StringLeght(2,5)] allows all string from length 2 to 5. |
| [Compare(“OtherProperty”)] | Ensures that the property to which it is applied and the property it specifies (i.e. OtherProperty) have the same value. |
| [Range(min,max)] | Ensures that the numeric value lies from the min to max values, min and max values are included. Example [Range(2,5)] allows values from 2,3,4 and 5. |
| [RegularExpression(“pattern”)] | Ensures that the value matches the regular expression pattern. Example for allowing proper email addresses. |
Now go to the JobApplication class and import the namespace called System.ComponentModel.DataAnnotations, and then add the attributes to the properties like shown in the code below:
using System.ComponentModel.DataAnnotations;

namespace ModelBindingValidation.Models
{
    public class JobApplication
    {
        [Required]
        [Display(Name = "Job applicant name")]
        public string Name { get; set; }

        public DateTime DOB { get; set; }

        [Required(ErrorMessage = "Please select your sex")]
        public string Sex { get; set; }

        [Range(0, 5)]
        public string Experience { get; set; }

        [Range(typeof(bool), "true", "true", ErrorMessage = "You must accept the Terms")]
        public bool TermsAccepted { get; set; }
    }
}
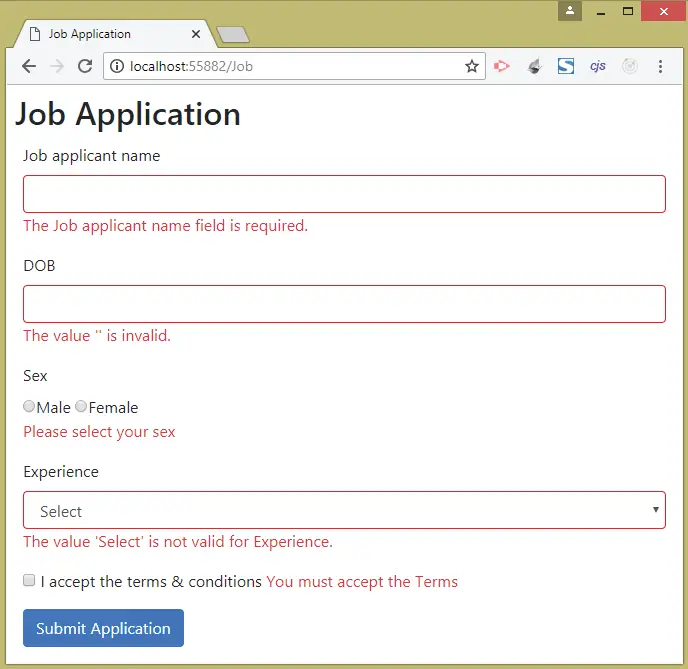
In the Name property we applied 2 attributes, which are:
- 1. Display
- 2. Required
[Required]
[Display(Name = "Job applicant name")]
public string Name { get; set; }
The [Display(Name = "Job applicant name")] attribute applied on the property changes the display name of the property in the View to Job applicant name. The [Required] attribute specifies that the property requires a value. Also note that since the [Required] attribute has no value specified for the ErrorMessage therefore the Name property’s value, which is ‘Job applicant name’ of the ‘Display’ attribute, is automatically taken as the value for ErrorMessage.
There is no need to apply any validation attribute for DOB field which is of type DateTime. This is because the DateTime field has a default value of 01-01-0001 00:00:00 so when user does not fill any value then this default value will be used, thus making the [Required] attribute useless.
So in such a case an error message – The value ” is invalid will be shown.
However if we still want to apply [Required] on this property then we have to make it a nullable type like:
[Required(ErrorMessage = "Please enter your Date of Birth")]
public DateTime? DOB { get; set; }
In the above code lines we have applied the [Required(ErrorMessage = "Please enter your Date of Birth")] attribute so it ensures that the values for the DOB field cannot be empty and should be in proper date format.
In the same way the [Required] attribute is applied for the Sex field.
In the Experience field only the Range attribute is applied. This is because we want the experience from 0 to 5 only.
[Range(0, 5)]
public int Experience { get; set; }
Finally on the TermsAccepted field we have applied the [Range] attribute like:
[Range(typeof(bool), "true", "true", ErrorMessage = "You must accept the Terms")]
public bool TermsAccepted { get; set; }
We cannot use the [Required] attribute and force the user to check the checkbox because this field is of type bool. This means a default value of false will be sent if the checkbox is not checked, and thus making the Required attribute useless.
We have used the [Range] attribute and provided a type of bool as the value for it’s first parameter. We have also set both the min and max values as true and thus forcing the user to check the checkbox.
Now finally we have to remove the previous validation codes from the action method. So change your Index Action of the Job Controller as shown below.
using Microsoft.AspNetCore.Mvc;
using ModelBindingValidation.Models;

namespace ModelBindingValidation.Controllers
{
    public class JobController : Controller
    {
        public IActionResult Index()
        {
            return View();
        }

        [HttpPost]
        public IActionResult Index(JobApplication jobApplication)
        {
            if (ModelState.IsValid)
                return View("Accepted", jobApplication);
            else
                return View();
        }
    }
}
We have simplified the code by removing a full loads of validations from the action method. Now we are only validating if the ModelState is valid. Rerun the app and see the form will work just like before but this time with simplified codes.
The image below shows it:
What happened for validating Osama Bin Laden, future date, and DOB only before 1980? The validation for these types will be done inside the action method.
The below code includes these validations in the action method:
[HttpPost]
public IActionResult Index(JobApplication jobApplication)
{
    if (jobApplication.Name == "Osama Bin Laden")
        ModelState.AddModelError(nameof(jobApplication.Name), "You cannot apply for the Job");

    if (jobApplication.DOB > DateTime.Now)
        ModelState.AddModelError(nameof(jobApplication.DOB), "Date of Birth cannot be in the future");
    else if (jobApplication.DOB < new DateTime(1980, 1, 1))
        ModelState.AddModelError(nameof(jobApplication.DOB), "Date of Birth should not be before 1980");

    if (ModelState.IsValid)
        return View("Accepted", jobApplication);
    else
        return View();
}
Model Validation of Email Address
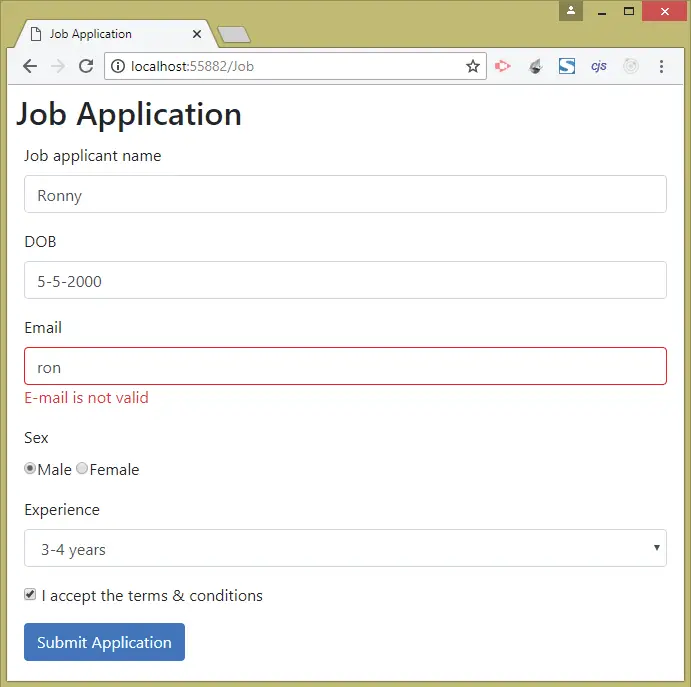
Suppose we want to include an email field and ensure the email address is in a correct format. For this we will use the [RegularExpression] validation attribute and provide a pattern for validating email format. This pattern is – ^[a-zA-Z0-9_\\.-]+@([a-zA-Z0-9-]+\\.)+[a-zA-Z]{2,6}$.
Examples of invalid emails:
ron
ron@
ron@gmail
Examples of correct email addresses:
ron@gmail.com
ron_smith@yahoo.in
ron22@live.ca
So to the JobApplication.cs class, add a new email field as shown in highlighted code.
using System.ComponentModel.DataAnnotations;

namespace ModelBindingValidation.Models
{
    public class JobApplication
    {
        [Required]
        [Display(Name = "Job applicant name")]
        public string Name { get; set; }

        public DateTime DOB { get; set; }

        [Required(ErrorMessage = "Please select your sex")]
        public string Sex { get; set; }

        [Range(0, 5)]
        public string Experience { get; set; }

        [Range(typeof(bool), "true", "true", ErrorMessage = "You must accept the Terms")]
        public bool TermsAccepted { get; set; }

        [RegularExpression("^[a-zA-Z0-9_\\.-]+@([a-zA-Z0-9-]+\\.)+[a-zA-Z]{2,6}$", ErrorMessage = "E-mail is not valid")]
        public string Email { get; set; }
    }
}
Then go to the view and add:
@model JobApplication
@{
    Layout = "_Layout";
    ViewData["Title"] = "Job Application";
}

<style>
    .input-validation-error {
        border-color: red;
    }
</style>

<h2>Job Application</h2>

<div asp-validation-summary="All" class="text-danger"></div>

<form class="m-1 p-1" method="post">
    <div class="form-group">
        <label asp-for="Name"></label>
        <input asp-for="Name" class="form-control" />
        <span asp-validation-for="Name" class="text-danger"></span>
    </div>
    <div class="form-group">
        <label asp-for="DOB"></label>
        <input asp-for="DOB" type="text" asp-format="{0:d}" class="form-control" />
        <span asp-validation-for="DOB" class="text-danger"></span>
    </div>
    <div class="form-group">
        <label asp-for="Email"></label>
        <input asp-for="Email" type="text" class="form-control" />
        <span asp-validation-for="Email" class="text-danger"></span>
    </div>
    <div class="form-group">
        <label asp-for="Sex"></label>
        <div>
            <input asp-for="Sex" type="radio" value="M" />Male
            <input asp-for="Sex" type="radio" value="F" />Female
        </div>
        <span asp-validation-for="Sex" class="text-danger"></span>
    </div>
    <div class="form-group">
        <label asp-for="Experience"></label>
        <select asp-for="Experience" class="form-control">
            <option value="Select">Select</option>
            <option value="0">Fresher</option>
            <option value="1">0-1 years</option>
            <option value="2">1-2 years</option>
            <option value="3">2-3 years</option>
            <option value="4">3-4 years</option>
            <option value="5">4-5 years</option>
        </select>
        <span asp-validation-for="Experience" class="text-danger"></span>
    </div>
    <div class="form-group">
        <input asp-for="TermsAccepted" />
        <label asp-for="TermsAccepted" class="form-check-label">
            I accept the terms & conditions
        </label>
        <span asp-validation-for="TermsAccepted" class="text-danger"></span>
    </div>
    <button type="submit" class="btn btn-primary">Submit Application</button>
</form>
And this is all we have to do to add a new email field with proper validations. The below image shows the error message when email is not in a proper format.
Note: we can also do email validation with the [EmailAddress] validation attribute.
[EmailAddress]
public string Email { get; set; }
Custom Model Validation Attribute
How to create a custom validation attribute in .NET core? A Custom Model Validation Attribute class can handle validations in the manner defined by us. We have to inherit this class from:
- 1. Attribute class
- 2. IModelValidator interface
The Attribute class is the base class for custom attributes. The IModelValidator is an interface that defines Validate() method which we implement in the validation attribute class. In this method we write our custom validation codes.
The skeleton of the Validate() method is given below:
public IEnumerable<ModelValidationResult> Validate(ModelValidationContext context)
{
    ...
}
In the parameter we receive information about the property (which is to being validated) through an instance of the ModelValidationContext class. The ModelValidationContext class properties are described in the table below:
| Name | Description |
|---|---|
| Model | Returns the property value that is to be validated. |
| Container | Returns the object that contains the property. |
| ActionContext | It provides the context data. |
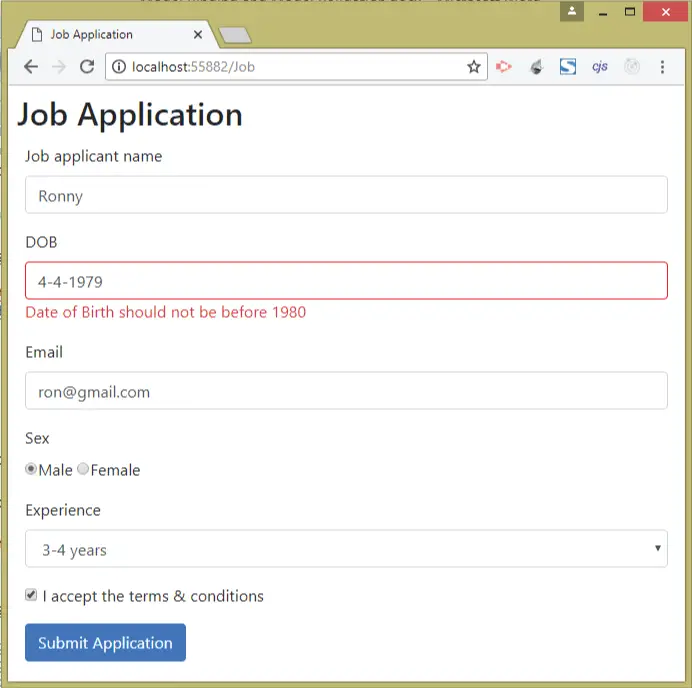
In this example we will create a Custom Model Validation attribute for the Date of Birth (DOB) property. So first create a new folder called Infrastructure in your project root folder and add a class called CustomDate.cs inside it. Next, add the following code to this class:
using Microsoft.AspNetCore.Mvc.ModelBinding.Validation;

namespace ModelBindingValidation.Infrastructure
{
    public class CustomDate : Attribute, IModelValidator
    {
        public IEnumerable<ModelValidationResult> Validate(ModelValidationContext context)
        {

            if (Convert.ToDateTime(context.Model) > DateTime.Now)
                return new List<ModelValidationResult> {
                    new ModelValidationResult("", "Date of Birth cannot be in the future")
                };
            else if (Convert.ToDateTime(context.Model) < new DateTime(1980, 1, 1))
                return new List<ModelValidationResult> {
                    new ModelValidationResult("", "Date of Birth should not be before 1980")
                };
            else
                return Enumerable.Empty<ModelValidationResult>();
        }
    }
}
See the Validate() method where the custom validations are performed for the DOB field. Here the following 2 conditions are checked:
- 1. If the date is in the future.
- 2. If the date is before 1980.
If any of the above 2 condition fails then we are creating a new ModelValidationResult object and returning it in a list manner. The first argument of ModelValidationResult method is the name of the property to which the error is associated. It is specified as the empty string when validating individual properties. The second argument is the Error message in string format.
If both the conditions passes then we are returning empty enemurable object – return Enumerable.Empty().
Now add this attribute to the DOB field as shown below:
using ModelBindingValidation.Infrastructure;
using System.ComponentModel.DataAnnotations;

namespace ModelBindingValidation.Models
{
    public class JobApplication
    {
        [Required]
        [Display(Name = "Job applicant name")]
        public string Name { get; set; }

        [CustomDate]
        public DateTime DOB { get; set; }

        [Required(ErrorMessage = "Please select your sex")]
        public string Sex { get; set; }

        [Range(0, 5)]
        public string Experience { get; set; }

        [Range(typeof(bool), "true", "true", ErrorMessage = "You must accept the Terms")]
        public bool TermsAccepted { get; set; }

        [RegularExpression("^[a-zA-Z0-9_\\.-]+@([a-zA-Z0-9-]+\\.)+[a-zA-Z]{2,6}$", ErrorMessage = "E-mail is not valid")]
        public string Email { get; set; }
    }
}
Also remove the custom validation code for the DOB field from the action method:
[HttpPost]
public IActionResult Index(JobApplication jobApplication)
{
    if (ModelState.IsValid)
        return View("Accepted", jobApplication);
    else
        return View();
}
Now test your DOB validation which will work just fine. The below image shows the error message for date that is before the year 1980:
We will now create another Custom Model Validation Attribute for preventing some user with a particular name. So create a new class called NameValidate.cs inside the Infrastructure folder and add the following code to it:
using Microsoft.AspNetCore.Mvc.ModelBinding.Validation;

namespace ModelBindingValidation.Infrastructure
{
    public class NameValidate : Attribute, IModelValidator
    {
        public string[] NotAllowed { get; set; }
        public string ErrorMessage { get; set; }
        public IEnumerable<ModelValidationResult> Validate(ModelValidationContext context)
        {

            if (NotAllowed.Contains(context.Model as string))
                return new List<ModelValidationResult> {
                    new ModelValidationResult("", ErrorMessage)
                };
            else
                return Enumerable.Empty<ModelValidationResult>();
        }
    }
}
Important thing to note here is that when applying the [NameValidate] attribute on a field then we have to provide the values for the properties to. These are:
- 1. ErrorMessage – the error message in string format.
- 2. NotAllowed – a string array for names you like to prevent.
Now simply add the attribute to the name field like this:
[Required]
[Display(Name = "Job applicant name")]
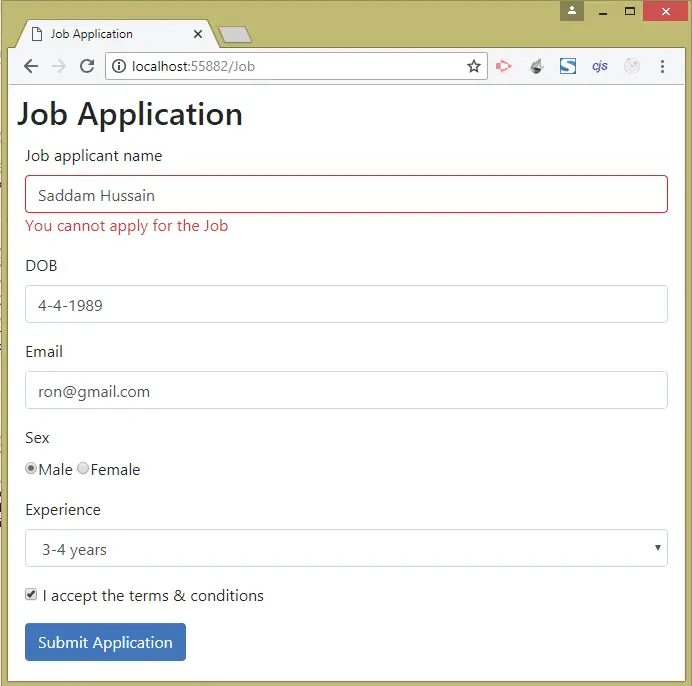
[NameValidate(NotAllowed = new string[] { "Osama Bin Laden", "Saddam Hussain", "Mohammed Gaddafi" }, ErrorMessage = "You cannot apply for the Job")]
public string Name { get; set; }
With this attribute applied, people like “Osama Bin Laden”, “Saddam Hussain”, “Mohammed Gaddafi” will not be able to apply for the job.
The image given below shown the validation error message when the name is Saddam Hussain:
Client-Side Validation
Till now the Model Validations which you have applied are all Server-Side Validations. This means when form is submitted the control values go to server where it is validated. The server then sends back the error messages which are shown on the View. This take a few milliseconds time to complete and are somewhat slow.
If we want instant validation results to shown on the browser then we have to use the Client-Side Validations. These type of validations happens on the browser itself and are instant as there is no round trip to the server. Note that they are also called as unobtrusive client-side validation and are done by jQuery with is a library of JavaScript.
In order to perform Client-Side Validations we add 3 files to your application, these are:
2. jQuery Validation
3. jQuery Validation Unobtrusive
Install client-side packages like the above 3 using LibMan. I have written a separate tutorial on using LibMan here.
Now reference these 3 files in the Index View of the Job Controller like shown below:
@model JobApplication
@{
    Layout = "_Layout";
    ViewData["Title"] = "Job Application";
}

@section scripts {
    <script src="~/lib/jquery/dist/jquery.min.js"></script>
    <script src="~/lib/jquery-validation/dist/jquery.validate.min.js"></script>
    <script src="~/lib/jquery-validation-unobtrusive/jquery.validate.unobtrusive.min.js"></script>
}

<style>
    .input-validation-error {
        border-color: red;
    }
</style>

<h2>Job Application</h2>

...
Now re-run your application and check how client-side validations give instant results without making a round trip to the server.
See below code:
//[Range(typeof(bool), "true", "true", ErrorMessage = "You must accept the Terms")]
public bool TermsAccepted { get; set; }
Also note that the Client-Side Validation will not work for your Custom Model Validation Attribute like the [CustomDate] and [NameValidate]. For these you have to create Custom Client-Side Validator. I have written a complete tutorial on this topic at here.
ASP.NET Core Remote Validation
Remote Validations are asynchronous validations, although look like Client-Side validations, but are done on the server by AJAX. The Remove Validations are performed in the background and the user doesn’t have to click the submit button since these validations run when the control loses cursor focus.
Let us apply a Remove Validation on the DOB property, so add a new action method called ValidDate on the Job controller. It’s code is given below:
public JsonResult ValidateDate(DateTime DOB)
{
    if (DOB > DateTime.Now)
        return Json("Date of Birth cannot be in the future");
    else if (DOB < new DateTime(1980, 1, 1))
        return Json("Date of Birth should not be before 1980");
    else
        return Json(true);
}
The code checks if the date is in the future or before the year 1980. In that case returns an error in JSON format. If date is proper then it returns true in Json.
Now comment out the [CustomDate] attribute on the JobApplication.cs and add the [Remote] attribute to it as shown below:
using System.ComponentModel.DataAnnotations;
using ModelBindingValidation.Infrastructure;
using Microsoft.AspNetCore.Mvc;

namespace ModelBindingValidation.Models
{
    public class JobApplication
    {
        [Required]
        [Display(Name = "Job applicant name")]
        [NameValidate(NotAllowed = new string[] { "Osama Bin Laden", "Saddam Hussain", "Mohammed Gaddafi" }, ErrorMessage = "You cannot apply for the Job")]
        public string Name { get; set; }

        //[CustomDate]
        [Remote("ValidateDate", "Job")]
        public DateTime DOB { get; set; }

        [Required(ErrorMessage = "Please select your sex")]
        public string Sex { get; set; }

        [Range(0, 5)]
        public string Experience { get; set; }

        [Range(typeof(bool), "true", "true", ErrorMessage = "You must accept the Terms")]
        public bool TermsAccepted { get; set; }

        [RegularExpression("^[a-zA-Z0-9_\\.-]+@([a-zA-Z0-9-]+\\.)+[a-zA-Z]{2,6}$", ErrorMessage = "E-mail is not valid")]
        public string Email { get; set; }
    }
}
In the Remote attribute we passed 2 parameters:
- The action method name
- The controller name
Now check its working by typing in the DOB field and notice the Remote validation will be called when we move the cursor away from the control.
The below video shows the working of the Remote Validation Error.
You can download the source code using the below link:
In this tutorial I explained you all about the Model Binding and Model Validation techniques. I hope you enjoyed learning them.
SHARE THIS ARTICLE
Related Tutorials:


ABOUT THE AUTHOR
I hope you enjoyed reading this tutorial. If it helped you then consider buying a cup of coffee for me. This will help me in writing more such good tutorials for the readers. Thank you.

HELLO EVERYONE
 Welcome to YogiHosting - A Programming Tutorial Website. It is used by millions of people around the world to learn and explore about ASP.NET Core, Blazor, jQuery, JavaScript, Docker, Kubernetes and other topics.
SUBSCRIBE TO NEWSLETTER
Enter your email address to subscribe to this blog and receive notifications of new posts by email.
Join 90K other subscribers