How to Implement Cookie Authentication in ASP.NET Core

Page Contents
Cookie Authentication in ASP.NET Core is used to implement our own Custom Authentication Logic without using ASP.NET Core Identity in any way.
ASP.NET Core Cookie Authentication Example
How do I use cookie authentication in .NET Core? There are 3 steps for using cookie authentication. First is to add authentication middleware with the AddAuthentication and AddCookie methods. Secondly, specify the app must use authentication & authorization. Finally apply the [Authorize] attribute on the controllers and actions that require the cookie authorization.
Configuration
First we need to configure the Cookie Authentication method on Program.cs class of the app. See the highlighted code lines below.
using Microsoft.AspNetCore.Authentication.Cookies;

var builder = WebApplication.CreateBuilder(args);

// Add services to the container.
builder.Services.AddControllersWithViews();

builder.Services.AddAuthentication(CookieAuthenticationDefaults.AuthenticationScheme)
            .AddCookie(options =>
            {
                options.LoginPath = "/Home/Login";

            });

var app = builder.Build();
...
Note: add the above code before the AddControllersWithViews() method.
In the above code we have passed the CookieAuthenticationDefaults.AuthenticationScheme to the AddAuthentication() method. It sets the default authentication scheme for the app.
Also notice that we have set the Login URL as the Login Action of the Home Controller:
options.LoginPath = "/Home/Login";It means, if any unauthenticated user tries to access secured URLs of the App then he will be automatically redirected to the /Home/Login URL (the login page). In this login page he has to enter his username and password in order to authenticate himself.
Second thing to do is to tell the app to use authentication and authorization. For this add the following 2 highlighted code line in the “Program.cs” class.
//...

app.UseRouting();

app.UseAuthentication();
app.UseAuthorization();

app.MapControllerRoute(
    name: "default",
    pattern: "{controller=Home}/{action=Index}/{id?}");

app.Run();
Authentication & Authorization
Now we will use the Cookie Authentication in the ASP.NET Core application. In this application first create 2 controllers which are described below:
In the Home Controller we will have the Login and Logout features. With Login feature, users can login themselves in the application (i.e. authenticate themselves to the application).
With the Logout feature users can perform their logout from the application.
The Secured Controller can only be accessed by users who are currently logged-in in the application. This controller will have the [Authorize] attribute which is a filter. I have covered filters from beginners to advanced level in my tutorial – Filters in ASP.NET Core – Beginner to Expert level.
Create a controller called SecuredController.cs. Add [Authorize] attribute to it. All actions inside this controller inherits the authorize attribute, so this means all action methods can only be accessed by Authenticated users.
using Microsoft.AspNetCore.Authorization;
using Microsoft.AspNetCore.Mvc;

namespace CA.Controllers
{
    [Authorize]
    public class SecuredController : Controller
    {
        public IActionResult Index()
        {
            return View();
        }
    }
}
Next, create it’s Index.cshtml razor view file inside Views ➤ Secured folder with the following code:
<form method="post" asp-controller="Home" asp-action="Logout">
    <button class="btn btn-lg btn-primary btn-block">Logout</button>
</form>
This view has a form with a button. When the button is clicked then the Logout Action of the Home controller is invoked. We come to the logout feature in a moment.
Cookie Authentication Login Feature
Add the Login Action method which has the following code. Here we are adding it to the Home Controller.
using CA.Models;
using Microsoft.AspNetCore.Authentication;
using Microsoft.AspNetCore.Authentication.Cookies;
using Microsoft.AspNetCore.Mvc;
using System.Diagnostics;
using System.Security.Claims;

namespace CA.Controllers
{
    public class HomeController : Controller
    {
        private readonly ILogger<HomeController> _logger;

        public HomeController(ILogger<HomeController> logger)
        {
            _logger = logger;
        }

        public IActionResult Index()
        {
            return View();
        }

        public IActionResult Login()
        {
            return View();
        }

        [HttpPost]
        public async Task<IActionResult> Login(string username, string password, string ReturnUrl)
        {
            if ((username == "Admin") && (password == "Admin"))
            {
                var claims = new List<Claim>
                {
                    new Claim(ClaimTypes.Name, username)
                };
                var claimsIdentity = new ClaimsIdentity(claims, "Login");

                await HttpContext.SignInAsync(CookieAuthenticationDefaults.AuthenticationScheme, new ClaimsPrincipal(claimsIdentity));
                return Redirect(ReturnUrl == null ? "/Secured" : ReturnUrl);
            }
            else
                return View();
        }
    }
}
Explanation: The Login Action takes username, password and the return URL in it’s parameter. First a check is done to find out if the Username and Passwords of the user are both Admin or not.
If both are Admin then only then the user is authenticated.
if ((username == "Admin") && (password == "Admin"))
{
//…
}
Next, to Authenticate the user, and create a cookie for holding his information, construct a ClaimsPrincipal so that the user information is serialized and stored in the cookie. This is done by first creating ClaimsIdentity.
var claims = new List<Claim>
{
    new Claim(ClaimTypes.Name, username)
};
var claimsIdentity = new ClaimsIdentity(claims, "Login");
Then we call the SignInAsync() method to sign-in the user. It takes 2 parameters which are:
- a) Scheme which is CookieAuthenticationDefaults.AuthenticationScheme.
- b) Claims Principal.
Check the below given code of SignInAsync() method:
await HttpContext.SignInAsync(CookieAuthenticationDefaults.AuthenticationScheme, new ClaimsPrincipal(claimsIdentity));After the user is signed in, he is redirected to the return URL (which is given in the parameter):
return Redirect(ReturnUrl == null ? "/Secured" : ReturnUrl);Now, create the Login Razor View called “Login.cshtml” inside the Views ➤ Home folder with the following code:
<h1 class="h3 mb-3 font-weight-normal">Please sign in</h1>
<form method="post">
    <label class="sr-only">Username</label>
    <input type="text" name="username" class="form-control" placeholder="Username">
    <label class="sr-only">Password</label>
    <input type="password" name="password" class="form-control" placeholder="Password">
    <button class="btn btn-lg btn-primary btn-block" type="submit">Sign in</button>
</form>
The View has a form that contains 2 input controls for letting the user to put and submit his username and password.
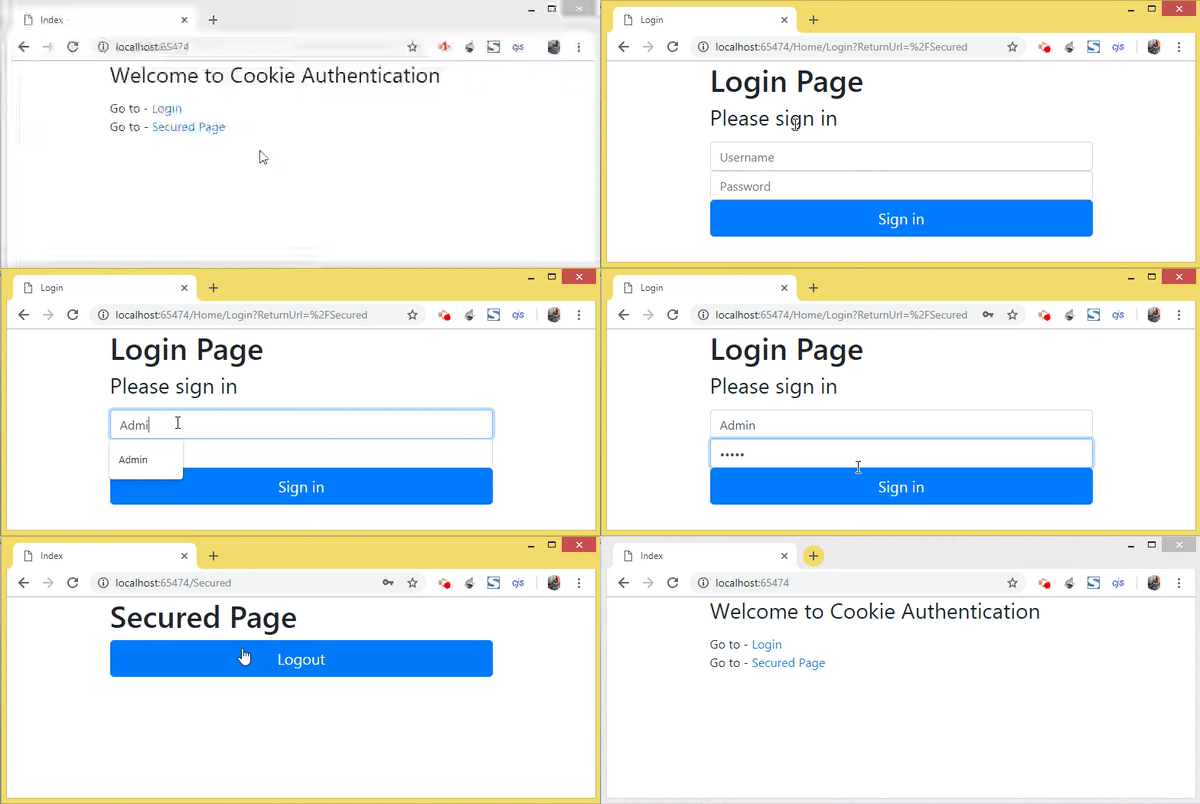
Run your application and visit the URL of the Secured Controller’s Index Action method (this URL is https://localhost:44339/Secured). Since we are not authenticated therefore we will be redirected to the Login Page.
See the below video which explains this feature:

Now enter Admin for both username and password fields in the Login page and click the button. This time we will be taken to the Secured Page because we are authenticated and authorized to visit this page.
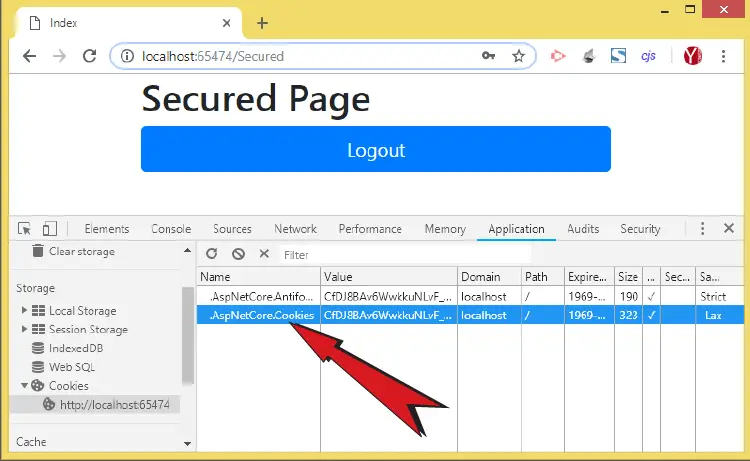
Note that as soon as the user is authenticated a Cookie by the name of .ASPNetCore.Cookies is created and stored in the browser. We can see this cookie inside the Application area of the browser’s ‘Developer Tools’, as shown by the below image:

Cookie Authentication Timeout
The expiry time of the Cookie can be set by using the ConfigureApplicationCookie method of IServiceCollection interface.
The below code added to the Program.cs sets the expiry time to 10 minutes in sliding expiry way.
builder.Services.AddAuthentication(CookieAuthenticationDefaults.AuthenticationScheme)
    .AddCookie(options =>
    {
        options.Cookie.Name = ".AspNetCore.Cookies";
        options.ExpireTimeSpan = TimeSpan.FromMinutes(10);
        options.SlidingExpiration = true;
    });
Cookie Authentication Return URL
The app remembers the Secured URL which a user opens in his browser at the time before he is authenticated. So what happens is that the app redirects the user to the login page and adds his requested url, the secured url which he tried to open in the browser previously, in the query string. Once the user successfully authenticates himself then the app reads the return url from the query string and redirects him to this url.
When we open the secured url on the browser then we are redicted to https://localhost:7053/Home/Login?ReturnUrl=%2FSecured. Notice the query string value which contains the return url – ?ReturnUrl=%2FSecured. When we do the successful login then app redirects us to this return url value.
Cookie Authentication Logout Feature
Next, add the Logout action method to the home controller that contains the following code:
[HttpPost]
public async Task<IActionResult> Logout()
{
    await HttpContext.SignOutAsync();
    return RedirectToAction("Index", "Home");
}
To perform the logout of the current user, just call the SignOutAsync() method. This method removes the Authentication Cookie from the browser.
Click the logout button after performing the login procedure. This will do the logout and at the same time the Cookie will be deleted from the browser (check the Application’s tab of the browser to comfirm this).
The link to download the full source code of this tutorial is given below:
The Cookie Authentication is a great way to quickly implement custom Authentication method in your website.


 Welcome to YogiHosting - A Programming Tutorial Website. It is used by millions of people around the world to learn and explore about ASP.NET Core, Blazor, jQuery, JavaScript, Docker, Kubernetes and other topics.
Great Steps but had one major typo that cause me a few hours to figure out.
instead of the lines in the Startup.cs file
app.UseAuthorization();
app.UseAuthorization();
You need it to be
app.UseAuthentication();
app.UseAuthorization();
Thank you Shawn. I have corrected the typo.
How can i check whether a user is authenticated on _layout.cshtml page becuase i want to show a link to authenticated users only
You can do it by creating View Component. Call this view component from layout page. In this view component you simply check if user is logged in or not and then show what you want to show.