Custom Tag Helper in ASP.NET Core

In the last tutorial we covered Built-In Tag Helpers in ASP.NET Core. Now we will learn to create Custom Tag Helper for transforming the html elements with C# codes. We will take a lot of examples so make sure to go through each of the sections on this tutorial.
This tutorial is a part of the series called Tag Helpers in ASP.NET Core. It contains 3 tutorials.
- 1. Introduction to Tag Helpers in ASP.NET Core
- 2. Built-In Tag Helpers in ASP.NET Core
- 3. Custom Tag Helper in ASP.NET Core
Page Contents
Creating a Custom Tag Helper
Start by creating a CustomTagHelpers folder inside the root folder of the application. Next, add a class called BackgroundColorTH.cs to this folder. The code for this class is given below:
using Microsoft.AspNetCore.Razor.TagHelpers;

namespace TagHelpers.CustomTagHelpers
{
    [HtmlTargetElement(Attributes = "background-color")]
    public class BackgroundColorTH : TagHelper
    {
        public string BackgroundColor { get; set; }

        public override void Process(TagHelperContext context, TagHelperOutput output)
        {
            output.Attributes.SetAttribute("class", $"btn btn-{BackgroundColor}");
        }
    }
}
The attribute – [HtmlTargetElement(Attributes = "background-color")] on the class tells that this Tag Helper applies to those html element that have the attribute background-color on them. Some examples are:
<a background-color="Red" href="/Home/Index">Go to home page</a>
<img src="/wwwroot/Images/Baloon.png" background-color="Orange">
The custom tag helper class derives from TagHelper base class. We have included a string property called BackgroundColor. The DOT NET runtime will transfer a value from razor view to this property.
DOT NET will inspect all the properties of the Custom Tag Helper class and transfer the values to these properties from the view if their names matches the attribute names applied on the HTML elements. DOT NET will also convert these values to the type of the property defined on the class. Example – when adding the attribute background-color="danger" to any HTML element. The BackgroundColor property value will be automatically assigned the value danger
There is a naming convention rule for attributes which is that the name of a attribute should be in html style like background-color. We cannot have the name starting with asp- or data-.
The Tag Helper also has a function Process which overrides the function of the base class. This function adds the CSS class attribute with value btn-btn-{BackgroundColor} to html elements having the background-color attribute.
Registering the Custom Tag Helper
The final part is registering your Custom Tag Helper in the _ViewImports.cshtml file by adding the following code to it:
@addTagHelper TagHelpers.CustomTagHelpers.*, TagHelpersThe first part TagHelpers.CustomTagHelpers.* specifies the namespace of the custom tag helper class followed by the wildcard character (*). It means all the files inside the TagHelpers.CustomTagHelpers namespace.
The second part specifies the assembly name which is the name of the project. Here the project name is TagHelpers and can be different in your case.
Using the Custom Tag Helper
Now we can see the working of the Custom Tag Helper we just created. So we go to the Create View of the Home Controller and replace the button with the following code:
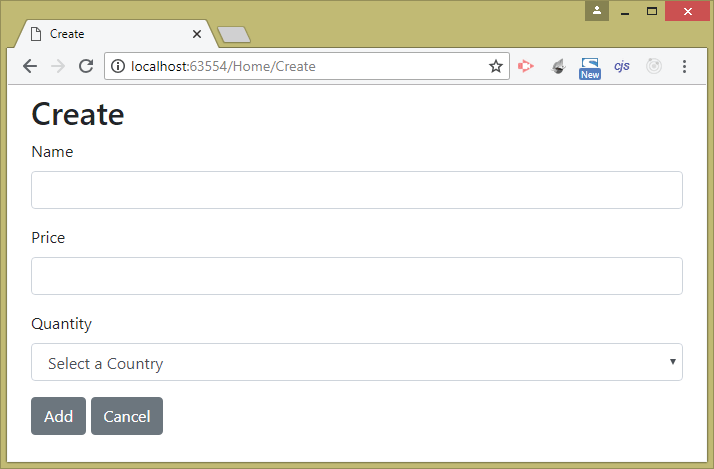
<button type="submit" background-color="danger">Add</button>Run your application and go to the https://localhost:7076/Home/Create URL. You will find the Red add button on the View, check the image below:
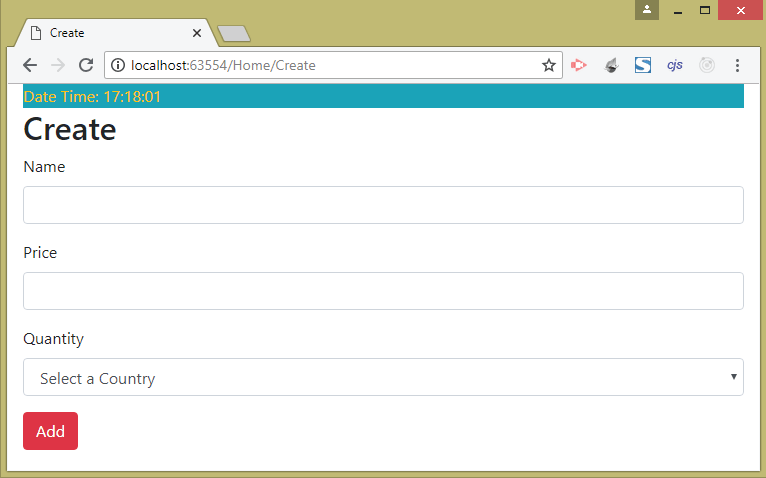
Check the HTML source code generated for the button, which is:
<button type="submit" class="btn btn-danger">Add</button>We can see the class="btn btn-danger" is added to this button. The btn-danger is a bootstrap class for giving red background color and so the button becomes red.
Why this happens? We added the attribute background-color="danger" on the button. So the Custom Tag Helper class BackgroundColor property automatically received the value of the attribute i.e. danger.
Next the Process function adds the CSS class btn btn-{property value} to the button which becomes btn btn-danger.
Understanding the Process Function Parameters
The Process function has 2 parameters which are of type:
- 1. TagHelperContext
- 2. TagHelperOutput
Tag Helpers receive information about the element which they are transforming through TagHelperContext class object. It is provided as the first parameter of the Process() function.
The properties of the TagHelperContext class are given below:
| Name | Description |
|---|---|
| AllAttributes | It contains a read-only dictionary of all the attributes applied to the element being transformed. |
| UniqueId | It contains a unique identifier of the element being transformed. |
| Items | It returns a dictionary that is used to coordinate between tag helpers, |
The TagHelperOutput class is provided as the 2nd parameter of the Process() function. This class object contains the HTML element to be transformed and the transformation is done by configuring it’s object.
TagHelperOutput class properties are.
| Name | Description |
|---|---|
| TagName | Get or Set the tag name for the output element. |
| Attributes | It returns a dictionary containing all the attributes of the output element. |
| Content | Used to set the contents of the output element. |
| PreElement | Used to insert Elements before the output element. |
| PostElement | Used to insert Elements after the output element. |
| PreContent | Used to insert contents into the output element before any existing content. |
| PostContent | Used to insert contents into the output element after any existing content. |
TagHelperOutput class methods.
| Name | Description |
|---|---|
| SupressOuput() | Used to exclude an element. |
Managing the Scope of a Tag Helper
We can manage the scope of a Tag Helper i.e. controlling to which element the tag helper applies. This is done using the [HtmlTargetElement()] attribute with describe it’s restrictions.
The properties of the HtmlTargetElement which you can apply are:
| Name | Description |
|---|---|
| Attributes | This property states that the tag helper should be applied to elements that have given set of attributes. More than one attribute can be supplied in comma separated manner. If an attribute name end with ‘*’, like background-color-* then it will match background-color-*, background-color-white, background-color-black, etc |
| ParentTag | This property states that the tag helper should be applied to elements which are contained inside an element of a given type. |
| TagStructure | This property states that the tag helper should be applied to elements having tag structure corresponds to a given value. This value is given from the TagStructure enumeration which defines ‘Unspecified’, ‘NormalOrSelfClosing’ and ‘WithoutEndTag’ |
Our Custom Tag Helper contains [HtmlTargetElement()] attribute. It tells that the tag helper can be applied to any HTML element that contains the background-color attribute.
[HtmlTargetElement(Attributes = "background-color")]
public class BackgroundColorTH: TagHelper
{
    ...
}
We can add many more restriction. In the below code the restriction added is – the tag helper applies to any button element that contains background-color attribute.
[HtmlTargetElement("button", Attributes = "background-color")]
public class BackgroundColorTH: TagHelper
{
    ...
}
Next we can add a condition that the tag helper applies to any button that contains background-color attribute and it should also be contained inside a parent of type form. This is done by adding “ParentTag” attribute.
[HtmlTargetElement("button", Attributes = "background-color", ParentTag = "form")]
public class BackgroundColorTH: TagHelper
{
    ...
}
Note : You can also apply more than one [HtmlTargetElement()] attribute to the tag helper. The below Tag Helper can be applied to both button and anchor tags that have background-color attribute.
[HtmlTargetElement("button", Attributes = "background-color")]
[HtmlTargetElement("a", Attributes = "background-color")]
public class BackgroundColorTH : TagHelper
{
    ...
}
Tag Helpers for Custom HTML Elements
We can also apply Tag Helpers to Custom HTML Elements and transform them to any HTML element.
For example say we add a custom HTML element on the view:
<aspbutton type="submit" background-color="danger" />It won’t be rendered on the browser because there is no such aspbutton tag in HTML.
However with Custom Tag Helper we can transform this custom HTML element to a HTML button. Let’s understand to do this.
Create AspButtonTH.cs class inside the CustomTagHelpers folder and add the following code to the class:
using Microsoft.AspNetCore.Razor.TagHelpers;

namespace TagHelpers.CustomTagHelpers
{
    [HtmlTargetElement("aspbutton")]
    public class AspButtonTH : TagHelper
    {
        public string Type { get; set; } = "Submit";
        public string BackgroundColor { get; set; } = "primary";

        public override void Process(TagHelperContext context, TagHelperOutput output)
        {
            output.TagName = "button";
            output.TagMode = TagMode.StartTagAndEndTag;
            output.Attributes.SetAttribute("class", $"btn btn-{BackgroundColor}");
            output.Attributes.SetAttribute("type", Type);
            output.Content.SetContent("Click to Add Record");
        }
    }
}
The attribute [HtmlTargetElement("aspbutton")] specifies that the custom tag helper will apply to aspbutton element.
We added 2 Properties to the AspButtonTH.cs class, these are – Type and BackgroundColor. These properties will receive values from the type and background-color attributes of the custom HTML element.
Inside the Process method we see-
- The TagName property is used to specify ASP.NET Core to make aspbutton a html button element. The TagMode property is used to specify that the element is written using start and end tags i.e.
<button></button> - We used the SetAttribute() method to add class attribute with bootstrap classes and type attribute value to the one provided in the attribute.
- Finally with the SetContent() method we added a content “Click to Add Record” to this button.
Now on your Views/Home/Create.cshtml, replace the button code with the below code of this custom html element.
<aspbutton type="submit" background-color="danger" />Run your application and visit https://localhost:7076/Home/Create where you will see the custom HTML element is rendered as a button. See the image below:
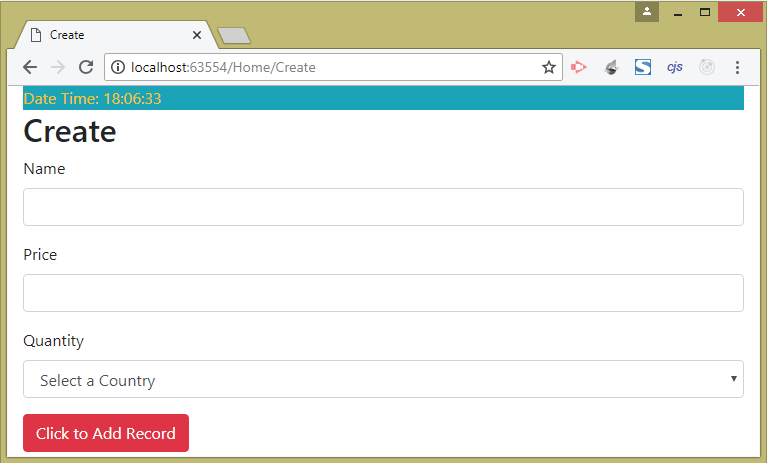
Check the HTML code created for this Custom element, which will be:
<button class="btn btn-danger" type="submit">Click to Add Record</button>
Appending and Prepending Elements with Tag Helper
The PreElement and PostElement properties of the TagHelperOutput class is used to add elements before and after the output element.
To help understand them, create a new file inside the CustomTagHelpers folder and name it PrePostElementTH.cs. Add the following code to it:
using Microsoft.AspNetCore.Mvc.Rendering;
using Microsoft.AspNetCore.Razor.TagHelpers;

namespace TagHelpers.CustomTagHelpers
{
    [HtmlTargetElement("div", Attributes = "pre-post")]
    public class PrePostElementTH : TagHelper
    {
        public bool AddHeader { get; set; } = true;
        public bool AddFooter { get; set; } = true;
        public string PrePost { get; set; }
        public override void Process(TagHelperContext context, TagHelperOutput output)
        {
            output.Attributes.SetAttribute("class", "m-1 p-1");
            TagBuilder title = new TagBuilder("h1");
            title.InnerHtml.Append(PrePost);

            TagBuilder container = new TagBuilder("div");
            container.Attributes["class"] = "bg-info m-1 p-1";
            container.InnerHtml.AppendHtml(title);

            if (AddHeader)
                output.PreElement.SetHtmlContent(container);
            if (AddFooter)
                output.PostElement.SetHtmlContent(container);
        }
    }
}
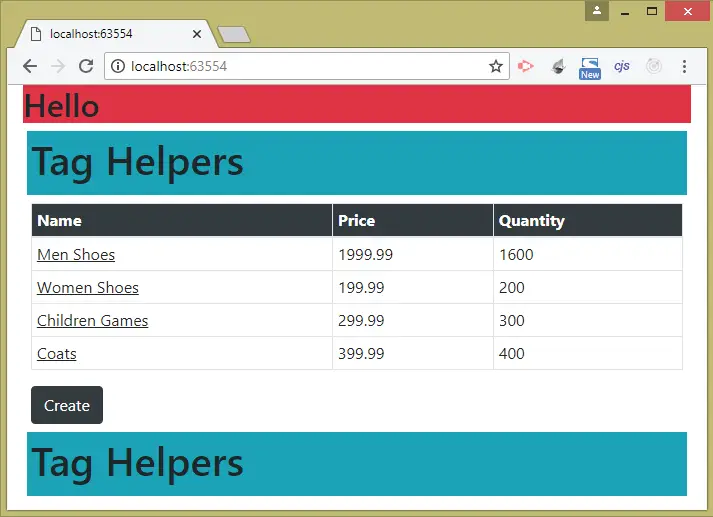
This Tag Helper applies to the div element that has the pre-post attribute. The tag helper uses the PreElement and PostElement properties to add a header and a footer element that surrounds the output element.
We have used the TagBuilder class of the namespace Microsoft.AspNetCore.Mvc.Rendering to create the HTML elements. The elements created by using TagBuilder class are:
- h1 – which is contained inside the div element.
- div – which contains the h1 element. The div element is also provided with the Bootstrap classes for styling purpose.
There are optional bool attributes called add-header and add-footer that are used for specifying whether to exclude the header or the footer, default is to include both header and footer.
The final step is to edit the _Layout.cshtml view by putting the @RenderBody directive inside a div with pre-post attribute. This will apply the custom tag helper. See the code below.
<div pre-post="Tag Helpers">
    @RenderBody()
</div>
Run your application to see the layout design is changed:
Check the HTML created for the transformed div element has a header and footer:
<div class="bg-info m-1 p-1"><h1>Tag Helpers</h1></div>
...
<div class="bg-info m-1 p-1"><h1>Tag Helpers</h1></div>
Appending and Prepending Contents with Tag Helper
There are 2 properties – PreContent and PostContent that are used to insert contents inside the output element.
- PreContent : Contents are inserted before all the already existing contents.
- PostContent : Contents are inserted after all the already existing contents.
Go to the CustomTagHelpers folder and add a new PrePostContentTH.cs file to it. Next add the following code to it:
using Microsoft.AspNetCore.Razor.TagHelpers;

namespace TagHelpers.CustomTagHelpers
{
    [HtmlTargetElement("td", Attributes = "underline")]
    public class PrePostContentTH : TagHelper
    {
        public override void Process(TagHelperContext context, TagHelperOutput output)
        {
            output.PreContent.SetHtmlContent("<u>");
            output.PostContent.SetHtmlContent("</u>");
        }
    }
}
This tag helper operates on td element that has underline attribute and it inserts u html element around it.
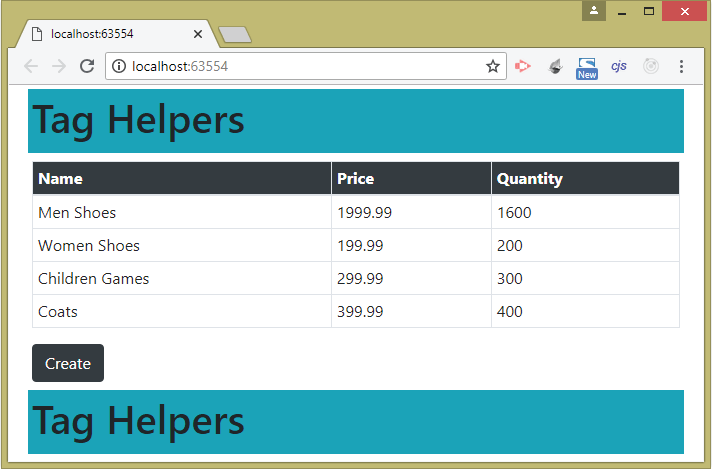
To test it add underline attribute to one of the table cells in the Index View:
...
<tbody>
    @foreach (var product in Model)
    {
        <tr>
            <td underline>@product.Name</td>
            <td>@product.Price</td>
            <td>@product.Quantity</td>
        </tr>
    }
</tbody>
...
Run your application and you will see the name column in the Index View is now underlined. This is shown in the image below:

Check the HTML formed for one of the name column. It will be:
...
<tbody>
    <tr>
        <td underline>
            <u>Men Shoes</u>
        </td>
    </tr>
</tbody>
...
TagHelperContext.Items Property to Coordinate between Tag Helpers
The TagHelperContext.Items property is used to coordinate between tag helpers that operate on elements and those that operate on their descendants. To demonstrate this thing, create a new class file called CoordinateTagHelpers.cs file inside the CustomTagHelpers folder and add the following code to it:
using Microsoft.AspNetCore.Razor.TagHelpers;

namespace TagHelpers.CustomTagHelpers
{
    [HtmlTargetElement("div", Attributes = "theme")]
    public class ParentThemeTH : TagHelper
    {
        public string Theme { get; set; }
        public override void Process(TagHelperContext context, TagHelperOutput output)
        {
            context.Items["theme"] = Theme;
        }
    }

    [HtmlTargetElement("button", ParentTag = "div")]
    [HtmlTargetElement("a", ParentTag = "div")]
    public class ChildThemeTH : TagHelper
    {
        public override void Process(TagHelperContext context, TagHelperOutput output)
        {
            if (context.Items.ContainsKey("theme"))
                output.Attributes.SetAttribute("class", $"btn btn-{context.Items["theme"]}");
        }
    }
}
There are 2 tag helpers defined in this class.
- 1. ParentThemeTH – Operates on div elements having theme attribute. It adds the value of the theme attribute to the Items dictionary so that it is available to the tag helpers that operate on elements that are contained inside this div element.
- 2. ChildThemeTH – Operates on buttons and anchor tag that are contained inside a div element. This tag helper gets the value of theme (stored by the ParentThemeTH) from the items dictionary. It then set the bootstrap CSS to the buttons and anchors.
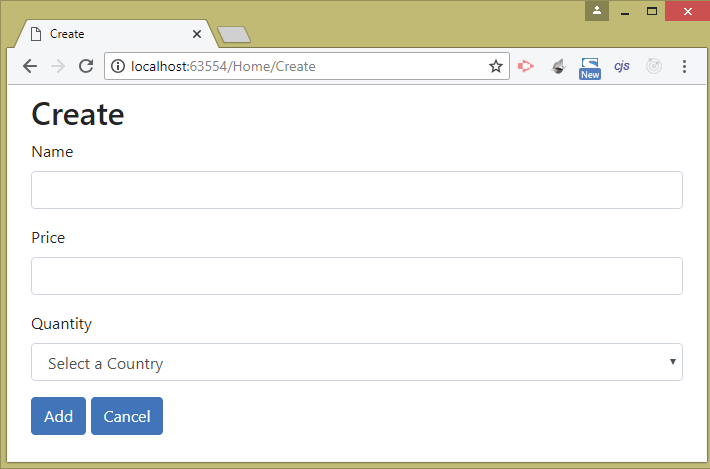
Now to test this functionality – replace the button on the Create View with the following code:
<div theme="primary">
    <button type="submit">Add</button>
    <a href="/Home/Index">Cancel</a>
</div>
Now go to the url – https://localhost:7076/Home/Create, you will see the button and anchor styled by the “Primary” theme (blue color). Since we passed theme attribute’s value to “primary”.
Replace the code by giving the theme attribute value as secondary value (Grey Color).
<div theme="secondary">
    <button type="submit">Add</button>
    <a href="/Home/Index">Cancel</a>
</div>
Now you will see this time button and anchor tags are given the secondary bootstrap class.
Getting View Context Data in Tag Helpers
Inside the tag helpers we can get the details of the view that is being rendered (i.e. the View Context Data). This View Context Data includes information about routing, ViewData, ViewBag, TempData, ModelState, current HTTP request, etc.
To get View Content Data add a property by name ViewContextData and decorate it with 2 attributes as shown below:
...
[ViewContext]
[HtmlAttributeNotBound]
public ViewContext ViewContextData { get; set; }
...
The ViewContext attribute denotes that the value of this property should be assigned the value of ViewContext object, when a new instance of the Tag Helper class is created.
The HtmlAttributeNotBound attribute tells to not assign a value to this property if there is a view-context attribute given on the HTML element.
Let us now create a tag helper that gets View Content data. So add a class called FormTH.cs inside the CustomTagHelpers folder. Then add the following code to it.
using Microsoft.AspNetCore.Mvc;
using Microsoft.AspNetCore.Mvc.Rendering;
using Microsoft.AspNetCore.Mvc.Routing;
using Microsoft.AspNetCore.Mvc.ViewFeatures;
using Microsoft.AspNetCore.Razor.TagHelpers;

namespace TagHelpers.CustomTagHelpers
{
    [HtmlTargetElement("form")]
    public class FormTH : TagHelper
    {
        private IUrlHelperFactory urlHelperFactory;
        public FormTH(IUrlHelperFactory factory)
        {
            urlHelperFactory = factory;
        }

        [ViewContext]
        [HtmlAttributeNotBound]
        public ViewContext ViewContextData { get; set; }

        public override void Process(TagHelperContext context, TagHelperOutput output)
        {
            IUrlHelper urlHelper = urlHelperFactory.GetUrlHelper(ViewContextData);
            output.Attributes.SetAttribute("action", urlHelper.Action(ViewContextData.RouteData.Values["action"].ToString(), ViewContextData.RouteData.Values["controller"].ToString()));
        }
    }
}
This tag helper targets all the form elements. But the main work which it does is – It creates the URL for the form’s action attribute based on the routing data.
Inside the Process method I get the IUrlHelper object from the urlHelperFactory.GetUrlHelper() method. The IUrlHelper class is used to build URL based on routing data.
The code which does this part is:
urlHelper.Action(ViewContextData.RouteData.Values["action"].ToString(), ViewContextData.RouteData.Values["controller"].ToString())Next, go to Create View and change the form tag to contain just method attribute like shown below.
<form method="post">
....
</form>
Now run your application and go to URL – https://localhost:7076/Home/Create, then check the forms HTML formed, which will be:
<form method="post" action="/Home/Create">
    ....
</form>
This clearly shows that my Tag helper has automatically added the action attribute with a perfect URL based on the routing system.
Suppressing the Output Element
The SupressOutput() method of the TagHelperOutput class prevents the output element from being included in the View.
Let us show this by making a new custom tag helper. This tag helper will show a div only for request to a given action method.
Go to the _Layout.cshtml file and include a new div before the @RenderBody() directive.
<div action-name="Index" class="bg-danger">
    <h2>Hello</h2>
</div>
Next create SuppressOutputTH.cs class inside the CustomTagHelpers folder and include the following code to it.
using Microsoft.AspNetCore.Mvc.Rendering;
using Microsoft.AspNetCore.Mvc.ViewFeatures;
using Microsoft.AspNetCore.Razor.TagHelpers;

namespace TagHelpers.CustomTagHelpers
{
    [HtmlTargetElement(Attributes = "action-name")]
    public class SuppressOutputTH : TagHelper
    {
        public string ActionName { get; set; }

        [ViewContext]
        [HtmlAttributeNotBound]
        public ViewContext ViewContext { get; set; }

        public override void Process(TagHelperContext context, TagHelperOutput output)
        {
            if (!ViewContext.RouteData.Values["action"].ToString().Equals(ActionName))
                output.SuppressOutput();
        }
    }
}
This tag helper uses the ViewContext to get the action value from the routing data. It then compares it with the value for the action-name attribute provided in the div. If they don’t match then the SuppressOutput() method is called.
Now run your application, you will see that the new div will only show on the Index view and not on Create view.
That is on ‘/Home/Index’ or ‘/’ URL the div will show:
While on ‘/Home/Create’ URL the div will be suppressed:
You can download the source code using the below link:
In this tutorial we covered all things about the Custom Tag Helpers. This is the new additions in ASP.NET Core and very powerful to create new and better ways to implement your logic using server side code.
SHARE THIS ARTICLE
Related Tutorials:


ABOUT THE AUTHOR
I hope you enjoyed reading this tutorial. If it helped you then consider buying a cup of coffee for me. This will help me in writing more such good tutorials for the readers. Thank you.

HELLO EVERYONE
 Welcome to YogiHosting - A Programming Tutorial Website. It is used by millions of people around the world to learn and explore about ASP.NET Core, Blazor, jQuery, JavaScript, Docker, Kubernetes and other topics.
SUBSCRIBE TO NEWSLETTER
Enter your email address to subscribe to this blog and receive notifications of new posts by email.
Join 90K other subscribers