First ASP.NET Core 10.0 MVC Application

In this ASP.NET Core Tutorial you will create your first application in Visual Studio 2022.
Page Contents
Create ASP.NET Core 8.0 app in Visual Studio 2022
Open Visual Studio 2022, then select Create a new project under the Get started section.

This will open Create a new project window. Now here select the template called ASP.NET Core Web App (Model-View-Controller), and then click the “Next” button.

What should I learn before learning ASP.NET Core
Before you start learning ASP.NET Core, you should have a basic knowledge of HTML CSS and C#. HTML and CSS are used in the Views which forms the UI component of ASP.NET Core MVC. C# is a programming language to create code logics like communicating with database, searching for a value in the data, and so on.
Is ASP.NET Core good for my Career? ASP.NET Core is currently in the top 3 – “most demanding programming technology”. It is a product of Microsoft who created .NET framework way back in 2002. More than twenty years have already passed, so it is a surety that this technology which remain popular for a very-very long time. Entry level ASP.NET Core developers are always in good demand, and get starting yearly salaries of around $50k in United States alone. In India the starting salaries are around Rupees 4 to 5 lakhs per annum.
Configure your new project in Visual Studio 2022
Next you will Configure your new project. So add the name of the project as FirstApp and select the location on your drive where you want this application to be created.

Click the Next button to continue. You will reach a Additional Information page where you have to select the framework and authentication.

Ensure that .NET 8.0 framework is selected and authentication is set to None. Option of Docker should also be un-checked.
Finally click the Create button to create your application.
You app will be created in a few seconds and is ready to be run. Select Start Debugging from the Debug menu (if it prompts you to enable debugging, just click the OK button). You can also start debugging by using a shortcut which is F5 key.
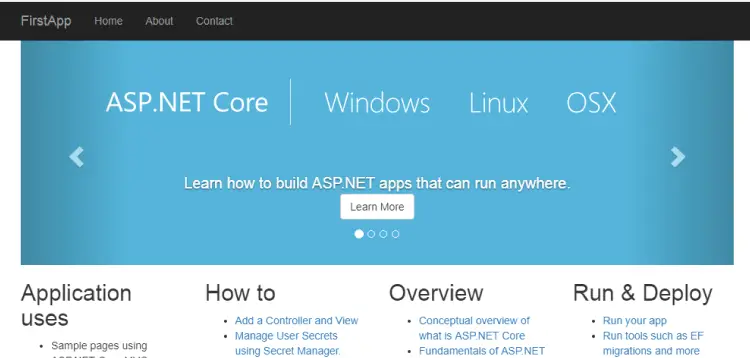
Visual Studio will build your application and open it on your default browser. It will look something like as shown on the below image.

MVC files and folders
Let us understand about these files and folders in your application.
- wwwroot – contains the static files like images, scripts, external frameworks and libraries like Bootstrap, jQuery.
- Controllers – This folder contains the controller files.
- Models – This folder contains the model files.
- Views – This folder contains the view files.
- appsettings.json – This file contains configuration settings of the application. You can use it to store database connection string, application variable values and other informations.
- program.cs – It is your application’s entry point which starts when you run your application. Here you create your application host, choose the web server, add services, authorization and authentications.
The above are just a brief description of these MVC files and folders. You will get complete understanding on these files as you carry on with their individual tutorials which are already available on this site.
Adding a Controller
As explained earlier ASP.NET Core Controller is a C#, VB or F# class, whose task is to handle all incoming HTTP requests. A Controller can have one or more action methods. Each action methods can be invoked from the web by some URLs. For example: If a controller named ‘Home’ has an action method named ‘Calculate’ then this action method can be invoked by opening the URL – /Home/Calculate on the browser.
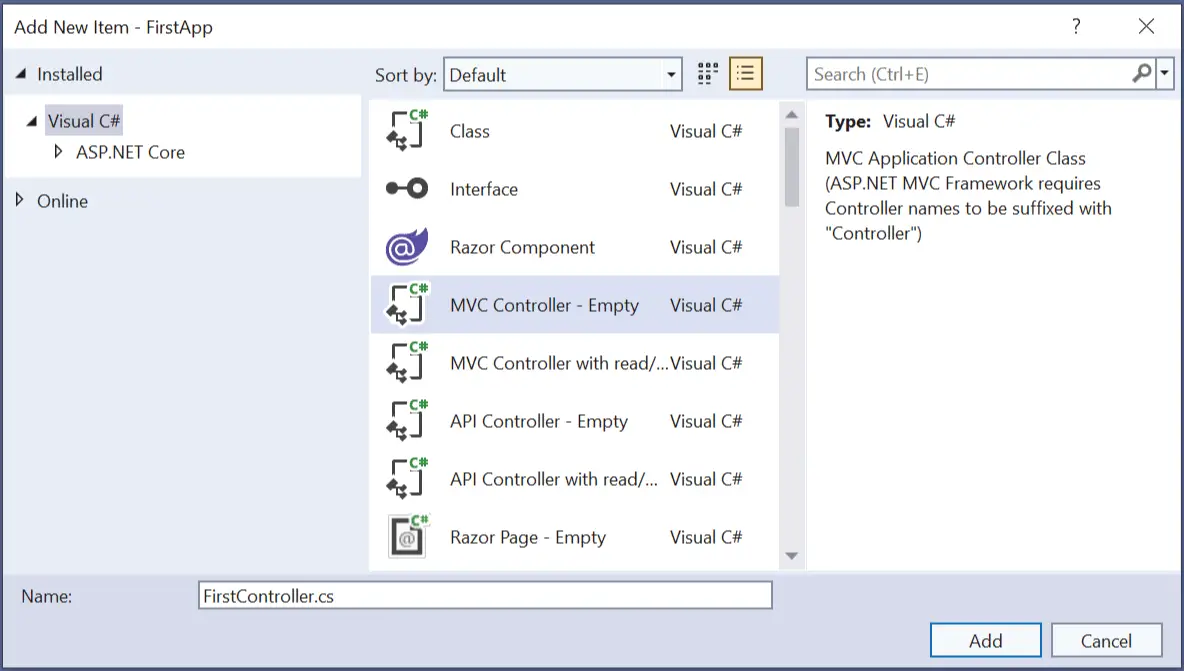
By default, the Visual Studio adds the ‘Home’ controller. Now you will add a new controller, so right click the Controllers folder on the Solutions Explorer. Then select Add ➤ Controller on the menu.

You will get a new dialog box, here select the first option saying – MVC Controller – Empty and click ‘Add’ button.

Next, another dialog box opens where you can give the name to the controller. Name this controller – FirstController.cs, and click the ‘Add’ button.
The new controller gets added to your Application and VS opens it up for editing. By default it will have the following code given below:
using Microsoft.AspNetCore.Mvc;

namespace FirstApp.Controllers
{
    public class FirstController : Controller
    {
        public IActionResult Index()
        {
            return View();
        }
    }
}
I have written the controllers code without using the namespace parenthesis. See the highlighted code line given below.
using Microsoft.AspNetCore.Mvc;

namespace FirstApp.Controllers;

public class FirstController : Controller
{
    public IActionResult Index()
    {
        return View();
    }
}
Action method returning String
The Controller, which I created earlier, has one action method which is named Index. I am going to change this method so that it returns a string.
So, change this action method to:
using Microsoft.AspNetCore.Mvc;
namespace FirstApp.Controllers;

public class FirstController : Controller
{
    public string Index()
    {
        return "Hello World";
    }
}
Now the action method returns a string – ‘Hello World’.
Let us invoke this action on the browser. Run the application by clicking Debug ➤ Start Debugging or press the F5 key. Visual Studio will open the browser showing the Home page.
Change the URL on the browser to – http://localhost:59009/First/Index and press enter. You will see – ‘Hello World’ on the browser as shown below.
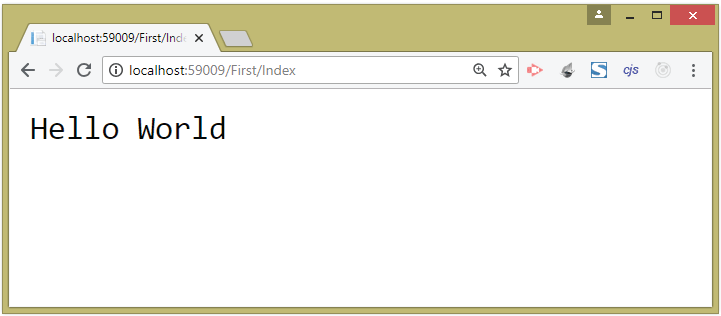
Here 59009 is the port of my application, in your case it will be different. So make sure you keep your application port in the browser url. The ‘Index’ action method is the default action method as set on the Program.cs, so you don’t have to explicitly specify it on the browser URL. The above action can simply be invoked by http://localhost:59009/First.
This action method returns a string therefore there is no need to create a View. In general, most of the time you will need action methods that return a ‘View’. So for these actions the return type should be specified as IActionResult
Action method returning View
Add a new action method to the controller and name it ‘Hello’. Note here we will have the return type of IActionResult as it is returning a View.
using Microsoft.AspNetCore.Mvc;

namespace FirstApp.Controllers;
public class FirstController : Controller
{
    public string Index()
    {
        return "Hello World";
    }

    public IActionResult Hello()
    {
        return View();
    }
}
Run your application (shortcut F5 key) and then go to the action method’s URL – http://localhost:59009/First/Hello.
You will see that the application is trying to find the view, as shown in the error message displayed below.

The error states:
InvalidOperationException: The view 'Hello' was not found. The following locations were searched:
/Views/First/Hello.cshtml
/Views/Shared/Hello.cshtml
This is a helpful message explaining the error occurred due to absence of the View file in our application.
ASP.NET Core MVC Razor Views are stored in the Views folder and organized into subfolders. Razor Views have .cshtml file extension. Views associated with the controller called ‘FirstController.cs’ are stored in Views/First folder. Views, not specific to a single controller, are stored inside the folder called Views/Shared. So you create get rid of this error by creating the ‘Hello’ View in either ‘Views/First’ or ‘Views/Shared’ folder.
But there is a catch, if you put ‘Hello’ View inside the Views/Shared folder, and another Controller, suppose AnotherController.cs also has an action method by the same name – ‘Hello’, and this action does not has it’s specific view (i.e. inside Views/Another folder). So, whenever the ‘Hello’ action of any controller (‘First’ or ‘Another’) is invoked then Views ➤ Shared ➤ Hello will be called by the ASP.NET Core runtime engine.
In short both the below URL will invoke the View – Views/Shared/Hello, provided we don’t have the specific views for the actions:
- /First/Hello
- /Another/Hello
Now let us create a specific view for the ‘Hello’ controller. Start by right clicking on the Views folder and select Add ➤ New Folder. Name this new folder First.
Next, right click on this ‘First’ folder and select Add ➤ New Item. Then on the dialog box that shows up, select Razor View – Empty.
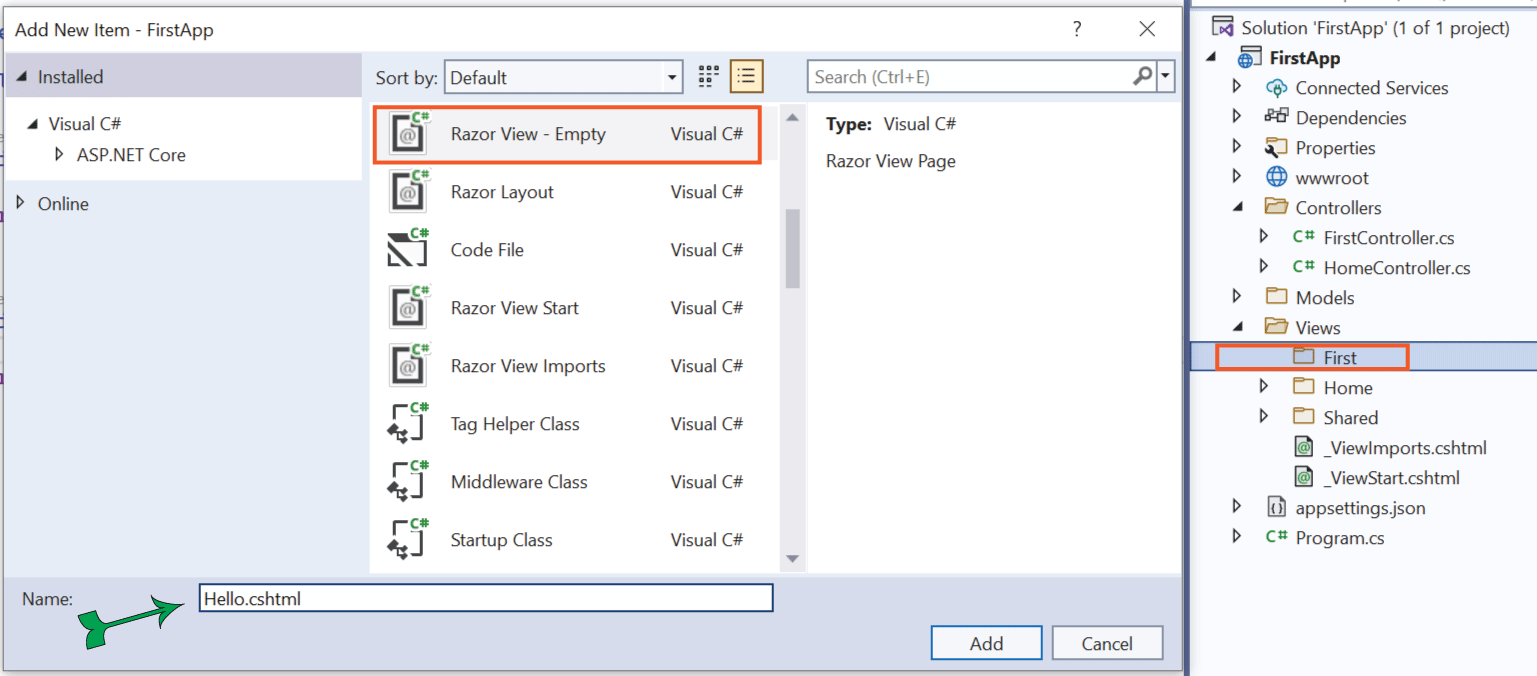
Name your view as Hello and finally click the ‘Add’ button to create this view. VS will create it and opens it for editing. Add the following code looks to this newly created View file:
@{
    ViewData["Title"] = "Hello";
}

<h2>Hello World</h2>
I did 2 things:
- Added ViewData variable “Title” with a string value “Hello”. This will be set as the page title.
- A H2 tag with Hello World which will be shown on the page.
Now run your application and go the URL – http://localhost:59009/First/Hello.
You will see the view rendered on the browser as shown below:
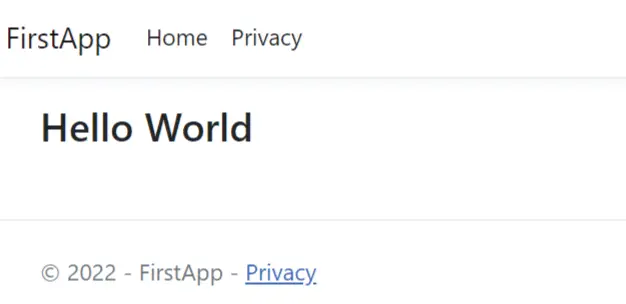
Notice 2 things, the page title on the browser is set as “Hello” and the page shows “Hello World” in h2 tag. You successfully created your first view and invoked it from the browser. Next you will see how to add dynamic data to the View.
Adding Dynamic Data to the View
Passing data from Controllers to Views are done in a number of ways. I will explain all these ways to you later on. For here, I will make use of ViewBag which is a dynamic object to assign any type of value.
Now change ‘Hello’ action method to include ‘ViewBag’ code that assigns a variable to a string “Hello World”. I have named the variable as ‘Message’ (it can be any name for the variable).
public IActionResult Hello()
{
    ViewBag.Message = "Hello World";
    return View();
}
The action stores the string on the ‘ViewBag’ variable called Message. Now you have to display this stored string on the View. So change the Hello.cshtml code to this:
@{
    ViewData["Title"] = "Hello";
}

<h2>@ViewBag.Message</h2>
The change is inside the h2 tag which now contains @ViewBag.Message. It simply displays the value of the ‘ViewBag’s Message’ passed from the Controller.
Re-run the application and go to the /First/Hello on the browser. You will get the same result like before but here you have made it dynamic.
Adding Model and transferring it’s data to the View
In this section I will add a Model to the application. Model, as we all know, is the building block of an MVC application. I will fill this Model from the Controller and then pass it to the View, where it will be displayed on the browser. Note that Models are nothing but C# classes.
I will add a simple class to the Models folder. So, right click the Models folder and select Add ➤ Class. Name the class as ‘Person.cs’. Add the below properties to it:
namespace FirstApp.Models;

public class Person
{
    public string Name { get; set; } = String.Empty;
    public int Age { get; set; }
    public string Location { get; set; } = String.Empty;
}
It is a simple class that contains 3 properties – Name, Age and Location. Now I will fill these 3 properties with values in the Controller.
Go to the ‘First’ Controller (FirstController.cs) and add a new action method by the name ‘Info’. The code of the Controller looks like this:
using FirstApp.Models;
using Microsoft.AspNetCore.Mvc;
namespace FirstApp.Controllers;

public class FirstController : Controller
{
    // Index Action

    // Hello Action

    public IActionResult Info()
    {
        Person person = new Person();
        person.Name = "John";
        person.Age = 18;
        person.Location = "United States";
        return View(person);
    }
}
In the Info Action Method I have created a new object for the Model class
Now Model is filled in the Controller and we have to show it’s data on the View. So create Info.cshtml razor view file inside the Views ➤ First folder.
Update the View by defining the Model type (which is the Person class), on the top like this:
@model Person

@{
    ViewData["Title"] = "Info";
}

<h2>Info</h2>
Note: It will receive the Model of type ‘Person’ so I have added ‘Person’ there.
Finally, to show the Model data, add the below code to the View:
@model Person
@{
ViewData["Title"] = "Info";
}
<h2>Info</h2>
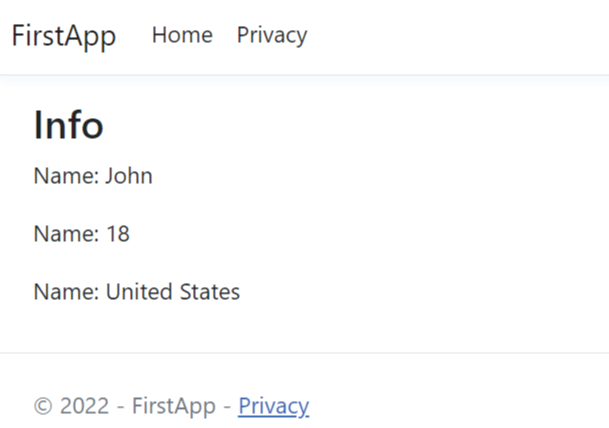
<p>Name: @Model.Name</p>
<p>Name: @Model.Age</p>
<p>Name: @Model.Location</p>
Run the application and navigate to /First/Info on the browser. Your Model data will be display like shown on the image below.
You should note that when you define the model type on the view, you use small ‘m’ like @model Person. When you have to show Model properties value then use capital ‘M’ like @Model.Name.
You can download the full codes of this tutorial from the below link:
Congratulations, you just created your first application in ASP.NET Core MVC. You have now understood the basic working of ASP.NET Core and can go on learning other areas of this framework.
SHARE THIS ARTICLE
Related Tutorials:


ABOUT THE AUTHOR
I hope you enjoyed reading this tutorial. If it helped you then consider buying a cup of coffee for me. This will help me in writing more such good tutorials for the readers. Thank you.

HELLO EVERYONE
 Welcome to YogiHosting - A Programming Tutorial Website. It is used by millions of people around the world to learn and explore about ASP.NET Core, Blazor, jQuery, JavaScript, Docker, Kubernetes and other topics.
SUBSCRIBE TO NEWSLETTER
Enter your email address to subscribe to this blog and receive notifications of new posts by email.
Join 90K other subscribers