How to do ADO.NET SqlTransaction with Try Catch Block

When performing an ADO.NET operation we can sometimes get some exception like:
- 1. Database connection error – due to wrong connection string.
- 2. Operation timeout error – due to some network error.
Page Contents
This tutorial is a part of ADO.NET series.
- 1. Learn ADO.NET by building CRUD Operations in ASP.NET Core
- 2. ADO.NET – Create Records in ASP.NET Core
- 3. ADO.NET – Read Records in ASP.NET Core
- 4. ADO.NET – Update Records in ASP.NET Core
- 5. ADO.NET – Delete Records in ASP.NET Core
- 6. How to do ADO.NET SqlTransaction with Try Catch Block
- 7. Learn to use ADO.NET SqlBulkCopy class with Example
SqlException & Try Catch Block
Databae related errors can be caught with Try Catch Block. These error are of type SqlException. We will update the Delete action method include the try catch block to catch SqlException type erros like shown below:
[HttpPost]
public IActionResult Delete(int id)
{
    string connectionString = Configuration["ConnectionStrings:DefaultConnection"];
    using (SqlConnection connection = new SqlConnection(connectionString))
    {
        string sql = $"Delete From Inventory Where Id='{id}'";
        using (SqlCommand command = new SqlCommand(sql, connection))
        {
            connection.Open();
            try
            {
                command.ExecuteNonQuery();
            }
            catch (SqlException ex)
            {
                ViewBag.Result = "Operation got error:" + ex.Message;
            }
            connection.Close();
        }
    }

    return RedirectToAction("Index");
}
We kept the ExecuteNonQuery() code inside the try block, so that if there happens to be any exception then it can be caught in the catch statement.
Inside the catch block we added the exception message to a ViewBag variable, and we show this message on the View.
ViewBag.Result = "Operation got error:" + ex.Message;Database Transaction with ADO.NET SqlTransaction
A Database Transaction is a set of operations that should either all succeed or all fail as a collective unit. Transactions are necessary to ensure that the data in the database is safe, valid and consistent.
ADO.NET SqlTransaction is used to rollback a transaction in case of any database error. This prevents any change committed to the database. The SqlTransaction class is used to implement the transaction logic.
A classic example involves transferring money in a bank from one account to another. Suppose there are 2 people named – Trump and Putin.
Putin transfers $100 from his bank account to Trump’s account. So in this transaction there are 2 operations:
- 1. $100 is deducted from Putin’s account.
- 2. $100 is added to Trump’s account.
Both of these operations should complete successfully in order for the transaction to be successful. Think? – it will be unwise if the money is deducted from 1st account but is not added to the 2nd account.
If any part of the transaction fails, the entire transaction is rolled back to the original state. On the other hand, if all steps succeed, the transaction is committed.
ADO.NET supports transaction from it’s SqlTransaction class located under the System.Data.SqlClient namespace.
The key members of the SqlTransaction class are:
- Commit() – the method commits the database transaction.
- Rollback() – this method rollbacks the transaction to the previous state.
Implementation of SqlTransaction
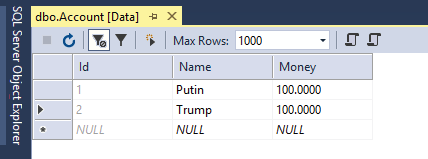
Let’s implement a small transaction by using the SqlTransaction class. In your database create a new table called Account which contains 3 columns:
- 1. ‘Id’ which is primary key and Identity.
- 2. ‘Name’ which contains the name of the person.
- 3. ‘Money’ which contains the total money the person has.
We can create this table by running the following below script on the New Query window of the database.
CREATE TABLE [dbo].[Account]
(
    [Id] INT NOT NULL PRIMARY KEY IDENTITY (1, 1),
    [Name] VARCHAR(50) NOT NULL,
    [Money] MONEY NOT NULL
)
The New Query window can be opened by right clicking the Company Database and select New Query.
Also add 2 records to this table, first one with name ‘Putin’ and money ‘100’, and for second put name as ‘Trump’ with money as ‘100’. See the below image:
Create a View called TransferMoney inside the Views ► Home folder with the following code:
@model string
@{
	ViewData["Title"] = "Transfer Money";
}

<h1>Transfer $100 from Putin to Trump</h1>
@if (Model != null)
{
	<h2 class="alert alert-danger">@Model</h2>
}
<form method="post">
	<div class="form-group">
		<label>Throw Excepton</label>
		<select name="throwEx" class="form-control">
			<option>false</option>
			<option>true</option>
		</select>
	</div>
	<div class="text-center panel-body">
		<button type="submit" class="btn btn-sm btn-primary">Transfer</button>
	</div>
</form>
The View has a model of type string and is will show the result of the transaction inside an h2 tag:
@if (Model != null)
{
    <h2 class="alert alert-danger">@Model</h2><div class="note">Action</div>
}
A select control is given inside the form which has its name as throwEx. Through this control we have the option to raise an error during the transaction (see the action method code to understand it). This is used to test the commitment and rollback of a database transaction done by ADO.NET.
<select name="throwEx" class="form-control">
    <option>false</option>
    <option>true</option>
</select>
Now to the Home Controller, add TransferMoney actions, the code is given below.
public IActionResult TransferMoney()
{
    return View();
}

[HttpPost]
public IActionResult TransferMoney(bool throwEx)
{
    string result = "";

    string connectionString = Configuration["ConnectionStrings:DefaultConnection"];
    using (SqlConnection connection = new SqlConnection(connectionString))
    {
        var cmdRemove = new SqlCommand($"Update Account Set Money=Money-100 Where Name='Putin'", connection);
        var cmdAdd = new SqlCommand($"Update Account Set Money=Money+100 Where Name='Trump'", connection);

        connection.Open();

        // We will get this from the connection object.
        SqlTransaction tx = null;
        try
        {
            tx = connection.BeginTransaction();

            // Enlist the commands into this transaction.
            cmdRemove.Transaction = tx;
            cmdAdd.Transaction = tx;

            // Execute the commands.
            cmdRemove.ExecuteNonQuery();
            cmdAdd.ExecuteNonQuery();

            // Simulate error.
            if (throwEx)
            {
                throw new Exception("Sorry! Database error! Transaction failed");
            }

            // Commit it!
            tx.Commit();

            result = "Success";
        }
        catch (Exception ex)
        {
            // Any error will roll back transaction. Using the new conditional access operator to check for null.
            tx?.Rollback();
            result = ex.Message;
        }
        finally
        {
            connection.Close();
        }
    }

    return View((object)result);
}
Explanation: Notice the action has the parameter – bool throwEx which will contain the value of the select control.
Since the transaction will have 2 operations therefore we created 2 SqlCommand objects –
- One which deletes $100 from Putin’s account:
var cmdRemove = new SqlCommand($"Update Account Set Money=Money-100 Where Name='Putin'", connection);2. Second which adds $100 to the Trump’s account:
var cmdAdd = new SqlCommand($"Update Account Set Money=Money+100 Where Name='Trump'", connection);Next, inside the try block we starts the database transaction by the code – connection.BeginTransaction() which gives an SqlTransaction object.
We also set this SqlTransaction object to the Transaction properties of the two SqlCommand objects defined earlier:
cmdRemove.Transaction = tx;
cmdAdd.Transaction = tx;
Now we execute both these 2 operations like:
cmdRemove.ExecuteNonQuery();
cmdAdd.ExecuteNonQuery();
And if both of them complete successfully then we commit the whole transaction like:
tx.Commit();
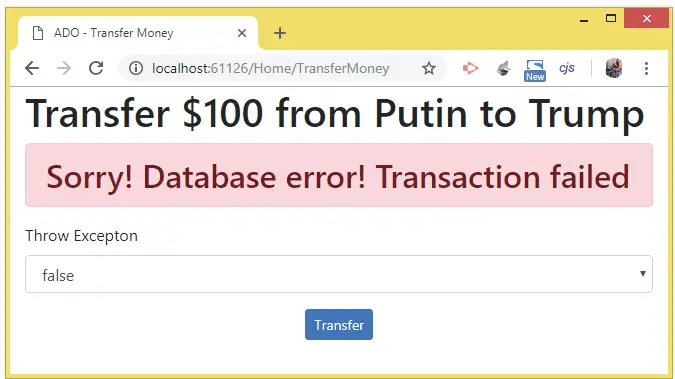
we check the value of the throwEx variable (which contains the HTML Select control’s value). If it is true then only we throw an exception:
if (throwEx)
{
    throw new Exception("Sorry! Database error! Transaction failed");
}
And if the exception happens then the catch block is called. Here we Rollback() the transaction, and set the model value to the exception message:
tx?.Rollback();
result = ex.Message;
Run your project and go to the URL – /Home/TransferMoney. Select true in the select control and press the button. You will see transaction failed message, as shown by the below image:
Now refresh the Account table and you will see the no money has transferred from Putin’s account to Trump’s. This happens because an exception was raised before the .Commit() method was called.
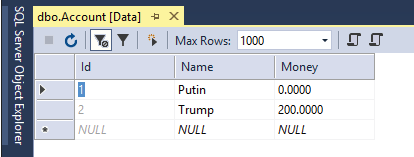
Now select false in the select control and press the button. This time you will see the Success message.
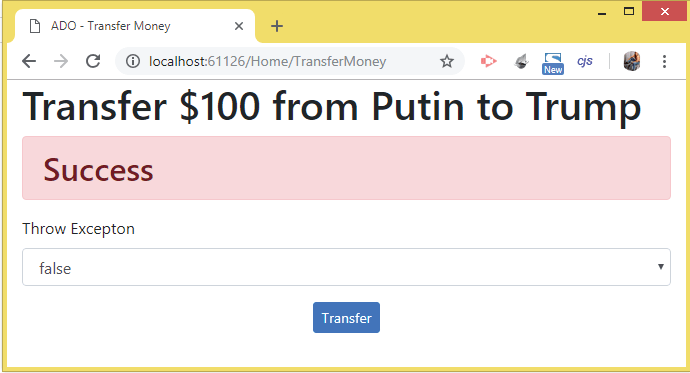
Now refresh the ‘Account’ table and you will notice the money has transferred from Putin’s account to that of Trump’s.
You can download the source code using the below link:
In this tutorial we learned to use the Try Catch feature to get rid of database errors when working with ADO.NET. I hope you liked it, please share this tutorial with your friends.
SHARE THIS ARTICLE
Related Tutorials:


ABOUT THE AUTHOR
I hope you enjoyed reading this tutorial. If it helped you then consider buying a cup of coffee for me. This will help me in writing more such good tutorials for the readers. Thank you.

HELLO EVERYONE
 Welcome to YogiHosting - A Programming Tutorial Website. It is used by millions of people around the world to learn and explore about ASP.NET Core, Blazor, jQuery, JavaScript, Docker, Kubernetes and other topics.
SUBSCRIBE TO NEWSLETTER
Enter your email address to subscribe to this blog and receive notifications of new posts by email.
Join 90K other subscribers