Dependency Injection in ASP.NET Core

What is Dependency Injection in ASP.NET Core? Dependency Injection (shortform “DI”) is an ASP.NET Core technique to achieve loosely coupling between objects so that the applications can be maintained in an easy manner. Here DOT NET runtime engine automatically injects objects of dependency classes mainly through the constructor of the Controllers. Thus making the job of the developer much easier.
Let us create a ASP.NET Core 6.0 app to demonstrate the working of Dependency Injection feature. I will give you the complete knowledge of this feature in this tutorial so make sure you read it fully on one go.
Page Contents
Dependency Injection Example Project
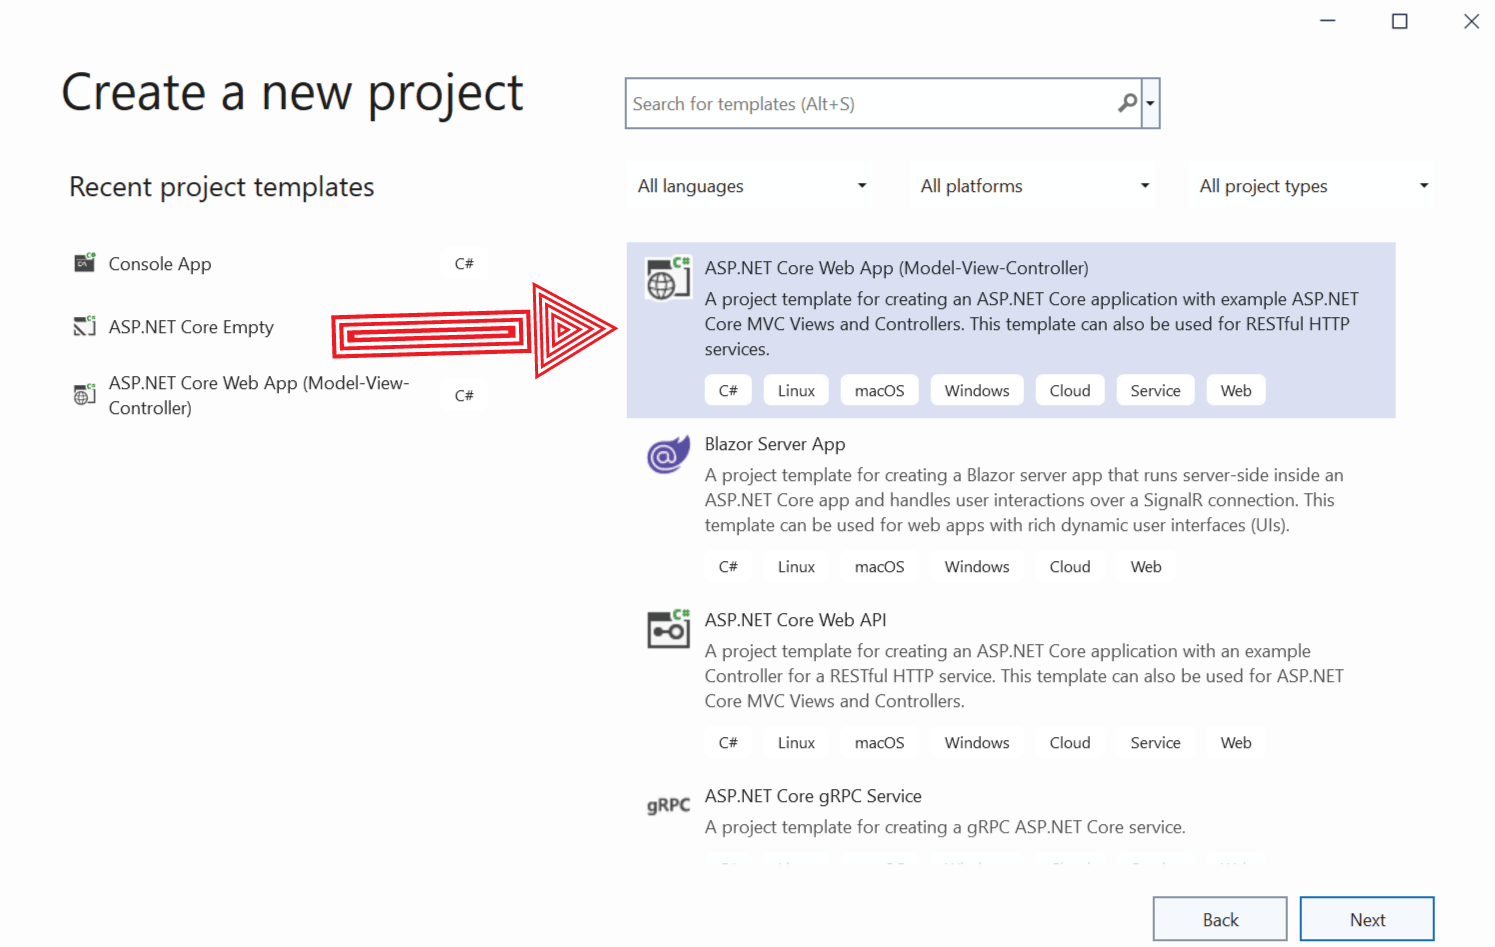
Open Visual Studio 2022 and create a new project by selecting the ASP.NET Core Web App (Model-View-Controller) template. Make sure to select .Net 6.0 framework.
 .
.
Repository
This app will need a temporary storage for storing some products. To keep things simple, we will be storing these products in an “In-Memory Repository” and not in the database. So first add Product.cs class inside the Models folder of your app. It’s code is given below.
namespace DependencyInjection.Models
{
    public class Product
    {
        public string Name { get; set; }
        public decimal Price { get; set; }
    }
}
Next, create an Interface inside the same Models folder and call it IRepository. This interface contains properties and methods to add, read and delete products to the repository. The code of this Interface is given below:
namespace DependencyInjection.Models
{
    public interface IRepository
    {
        IEnumerable<Product> Products { get; }

        Product this[string name] { get; }

        void AddProduct(Product product);

        void DeleteProduct(Product product);
    }
}
Now coming to the Repository. This “IRepository” interface we created earlier will now be inherited in another class called which will server as our Repository. Proceed by creating Repository.cs class inside the “Models” folder and add the following code to it:
namespace DependencyInjection.Models
{
    public class Repository : IRepository
    {
        private Dictionary<string, Product> products;
        public Repository()
        {
            products = new Dictionary<string, Product>();
            new List<Product> {
                new Product { Name = "Women Shoes", Price = 99M },
                new Product { Name = "Skirts", Price = 29.99M },
                new Product { Name = "Pants", Price = 40.5M }
            }.ForEach(p => AddProduct(p));
        }

        public IEnumerable<Product> Products => products.Values;
        public Product this[string name] => products[name];
        public void AddProduct(Product product) => products[product.Name] = product;
        public void DeleteProduct(Product product) => products.Remove(product.Name);
    }
}
Here we are storing 3 products data inside a Dictionary (see constructor of the class). The other code is self-explanatory and is simply implementing the properties and methods of the Interface. By doing so, it is creating methods and properties to read, add and delete products from the repository.
Controller & Views
Let us now update the HomeController.cs file to display our products on the View. So update of the “Index” action method as shown below.
using DependencyInjection.Models;
using Microsoft.AspNetCore.Mvc;
using System.Diagnostics;

namespace DependencyInjection.Controllers
{
    public class HomeController : Controller
    {
        public IActionResult Index()
        {
            return View(new Repository().Products);
        }
    }
}
You can see clearly that in the Index Action Method, I am creating a new object of the Repository class and calling it’s Products property (new Repository().Products). This property returns all the 3 products that are stored in the dictionary. I am finally returning these products to the View.
Now update the Index view which is inside the Views ➤ Home folder with codes shown below:
@if (ViewData.Count > 0)
{
	<table class="table table-bordered table-sm table-striped">
		@foreach (var kvp in ViewData)
		{
			<tr><td>@kvp.Key</td><td>@kvp.Value</td></tr>
		}
	</table>
}
<table class="table table-bordered table-sm table-striped">
	<thead>
		<tr><th>Name</th><th>Price</th></tr>
	</thead>
	<tbody>
		@if (Model == null)
		{
			<tr><td colspan="3" class="text-center">No Model Data</td></tr>
		}
		else
		{
			@foreach (var p in Model)
			{
				<tr>
					<td>@p.Name</td>
					<td>@string.Format("{0:C2}", p.Price)</td>
				</tr>
			}
		}
	</tbody>
</table>
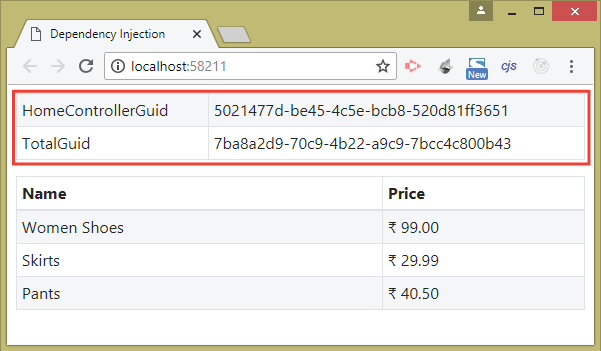
This View reads the products by looping through the ViewData object and displays all the products in tabular manner. Run your application and you will see all the 3 products as shown by the image given below:

Solving Tightly Coupling problem with DI
If you see the Controller’s code you will find it is Tightly Coupled to the Repository.cs class. The reason being that we are directly creating the object of Repository class using new keyword.
return View(new Repository().Products); 
Suppose after some time a need arises to change the repository to another class called NewRepository.cs. So we will have to change the Controller’s code like this:
public IActionResult Index()
{
    return View(new NewRepository().Products);
}
This is a problem of managing Tightly Coupled Components.
Why is tightly coupled code bad?
- It gives problems during the maintenance phase of the project. If one component changes then it will affect the other components also.
- There will be lots of problems when performing the Unit Testing of these components.
The Dependency Injection (DI) technique can solve these problems. The Controller class can be provided with the repository object automatically by ASP.NET Core and this will remove the tighlty coupling problem.
Let us see how to implement Dependency Injection in Controllers in the next section.
Implementing Dependency Injection in Controllers
How to implement Dependency Injection in ASP.NET Core? The quick answer is by registering a service whose work is to specify how ASP.NET Core DI should resolve the dependency. There are 2 steps to implement Dependency Injection in ASP.NET Core Controllers.
- Decouple the controller from the tiglht-coupled to loosely-coupled dependency.
- Specifty how this new depenency (loosely-coupled) should be resolved by ASP.NET Core runtime.
First we will create loosely-coupled dependency in the controller. For this we will implement an Interface and use this Interface (instead of the Repository class) in the Controller. Recall, I earlier created an interface called IRepository, now I will use this interface.
public interface IRepository
{
    IEnumerable<Product> Products { get; }

    Product this[string name] { get; }

    void AddProduct(Product product);

    void DeleteProduct(Product product);
}
The repository class is implementing this interface as shown below.
public class Repository : IRepository
{
...
}
Now update the Home Controller code so as to use this interface to create this dependency. See the changes that are provided in highlighted manner.
using DependencyInjection.Models;
using Microsoft.AspNetCore.Mvc;
using System.Diagnostics;

namespace DependencyInjection.Controllers
{
    public class HomeController : Controller
    {
        private IRepository repository;
        public HomeController(IRepository repo)
        {
            repository = repo;
        }

        public IActionResult Index()
        {
            return View(repository.Products);
        }
    }
}
We have now done the 2 things in the controller.
- Added a variable of the Interface type (i.e IRepository) in your controller.
- Added a constructor that has a parameter of this interface type. Inside the constructor we have set the value of the interface variable to the value of the constructor’s parameter.
With this we have added the loosely coupled dependency in the controller.
Now in your action method we can access the products using the Products property of the Interface.
return View(repository.Products);Finally we have to tell ASP.NET Core how it should resolve the dependency of IRepository interface. So go the Program.cs file of the app and register a new service for the DI to resolve automatically. The work of this service will be to resolve the dependency.
This is done by adding the code – builder.Services.AddTransient<IRepository, Repository>(). Check the below 2 highlighted code lines which you will have to add to the Program class of the app.
using DependencyInjection.Models;

var builder = WebApplication.CreateBuilder(args);

builder.Services.AddTransient<IRepository, Repository>();

// Add services to the container.
builder.Services.AddControllersWithViews();

var app = builder.Build();

// removed for brevity and clarity
If you are using ASP.NET Core 5.0 or earlier then there is also another file called Startup.cs. You will have to add the above code to this file. So go the Startup.cs and inside the ConfigureServices() method, add these code line as shown below:
public void ConfigureServices(IServiceCollection services)
{
    services.AddTransient<IRepository, Repository>();
    services.AddControllersWithViews();
}
Now you re-run your application, and you will see the products are displayed just like below, but here you used Dependency Injection to lightly-couple the Controller and the Repository class.
Suppose at a later time you need to show products from another repository say NewRepository.cs. Then you just need to change the AddTransient method to – builder.Services.AddTransient<IRepository, NewRepository>().
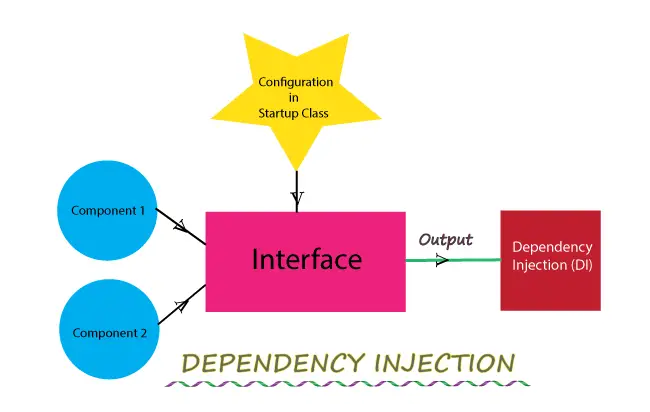
The below image illustrates the concept of Dependency Injection:
Congratulations you have successfully used Dependency Injection technique in your project. Let us now understand some other advanced topics of DI.
Dependency Injection for Single Type
If you have a simple class that does not implement an Interface then it is a Single Type. Let’s find how to use the Dependency Injection Technique in this case. Start by creating a new class called ProductSum.cs to the Models folder and add the below listed code to it:
namespace DependencyInjection.Models
{
    public class ProductSum
    {
        public IRepository Repository { get; set; }
        public ProductSum(IRepository repo)
        {
            Repository = repo;
        }

        public decimal Total => Repository.Products.Sum(p => p.Price);
    }
}
Note that this class does not implement any interface but has a dependency of IRepository specified in the constructor. It has a property called Total that returns a sum of all the products of the Repository class.
Now in your Home Controller, create a dependency for this ProductSum class in the Constructor, and set a ViewBag variable to contain the sum of all the products. This ViewBag variable’s value will be shown on the View.
The updated code for the Home controller is shown below:
using DependencyInjection.Models;
using Microsoft.AspNetCore.Mvc;
using System.Diagnostics;

namespace DependencyInjection.Controllers
{
    public class HomeController : Controller
    {
        private IRepository repository;
        private ProductSum productSum;
        public HomeController(IRepository repo, ProductSum psum)
        {
            repository = repo;
            productSum = psum;
        }

        public IActionResult Index()
        {
            ViewBag.Total = productSum.Total;
            return View(repository.Products);
        }
    }
}
Now configure the service provider telling how to resolve this new dependency. So add the code – builder.Services.AddTransient<ProductSum>() to the “Program.cs”.
using DependencyInjection.Models;

var builder = WebApplication.CreateBuilder(args);

// Add services to the container.
builder.Services.AddControllersWithViews();

builder.Services.AddTransient<IRepository, Repository>();
builder.Services.AddTransient<ProductSum>();

var app = builder.Build();

// removed for brevity and clarity
Note that there is no mapping between a service type and an implementation type in this situation. I have used the AddTransient() method with only one parameter. In this way I tell the service provider to initiate the ProductSum class to resolve a dependency on this type. This is Dependency Injection for Single Type.
Run your application and you will see the total price of all the products displayed on the top:

In ASP.NET Core 5.0 or earlier add the following code line – services.AddTransient<ProductSum>() in the ConfigureServices() method of “Startup.cs” class.
public void ConfigureServices(IServiceCollection services)
{
    services.AddTransient<IRepository, Repository>();
    services.AddTransient<ProductSum>();
    services.AddControllersWithViews();
}
Types of Dependency Injection in ASP.NET Core
The Services created by Dependency Injection have a lifetime which defines 2 things:
- When they will be created.
- How long they will remain in the memory before they are removed by the Garbage Collector.
Services can have 3 lifetimes:
- Transient – created each time they’re requested.
- Scoped – created once per client request (connection).
- Singleton – only the first time they are requested.
Dependency Injection Methods
There are 3 methods to register services in Transient, Scoped & Singleton manner.
1. AddTransient
The AddTransient method registers a service in Transient manner. So this means the service will be created whenever it is requested. This also means a new instance of the requested object is created every time it is resolved by DI.
You have already seen the AddTransient() Dependency Injection Method where a new object of Repository.cs class was created each time the IRepository interface was requested in the controller.
2. AddScoped
The services registered by AddScoped method are not always re-created like AddTransient method. Infact they are reused for the request arising from same client. This means if we would have used this method in place of AddTransient then the Repository.cs class object would be created only ones and would be shared on each subsequent request from the browser.
However if we request the app from the browser of another pc then (for this new client) a new service will be created and shared for each subsequent request.
3. AddSingleton
The AddSingleton method creates the service for the first request only. It is then reused for every subsequent request. Note that unlike AddScoped method here the services will be shared across every other client.
1. <service, implType>()This variation creates an instance of the implementation type for every dependency. In the above explained section called Implementing Dependency Injection (DI) I have already used this variation.
2. <service>()This variation is used to register a Single Type object. I have also covered this in the earlier section.
3. <service>(factoryFunc)This variation is used to register a factory function using lambda expression and we can also add our custom logic here. I will implement this variation in just a moment.
Example of Transient Service
As you already know by this time that Transient Services must be registered in the Program class by the “AddTransient” method. We have 2 transient services in our app which we crated earlier, these are Repository and ProductSum.
builder.Services.AddTransient<IRepository, Repository>();
builder.Services.AddTransient<ProductSum>();
The ProductSum.cs has a dependency for IRepository as specified in the constructor.
public class ProductSum
{
    public IRepository Repository { get; set; }
    public ProductSum(IRepository repo)
    {
        Repository = repo;
    }

    public decimal Total => Repository.Products.Sum(p => p.Price);
}
The home controller specfies dependency for both these services in the constructor.
public HomeController(IRepository repo, ProductSum psum)
{
}
Now overried the ToString() method in the Repository.cs class as shown below:
using System;
using System.Collections.Generic;
using System.Linq;
using System.Threading.Tasks;

namespace DependencyInjection.Models
{
    public class Repository : IRepository
    {
        // ...
        private string guid = System.Guid.NewGuid().ToString();
        public override string ToString()
        {
            return guid;
        }
    }
}
This overried will create a new GUID value will help to identify when and how the object of the Repository.cs class is created by the dependency injection.
Next go to the Home Controller and in it’s Index action you adds 2 ViewBag variables. First ViewBag variable will contain the GUID received from the Repository service while the Second ViewBag variable contains the GUID received from the ProductSum service.
The updated code is shown below:
using System;
using System.Collections.Generic;
using System.Linq;
using System.Threading.Tasks;
using DependencyInjection.Models;
using Microsoft.AspNetCore.Mvc;

namespace DependencyInjection.Controllers
{
    public class HomeController : Controller
    {
        // Removed for clarity

        public IActionResult Index()
        {
            // ViewBag.Total = productSum.Total;
            ViewBag.HomeControllerGuid = repository.ToString();
            ViewBag.TotalGuid = productSum.Repository.ToString();
            return View(repository.Products);
        }
    }
}
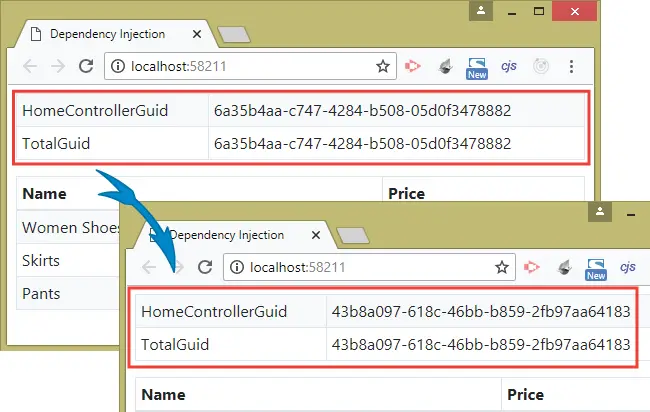
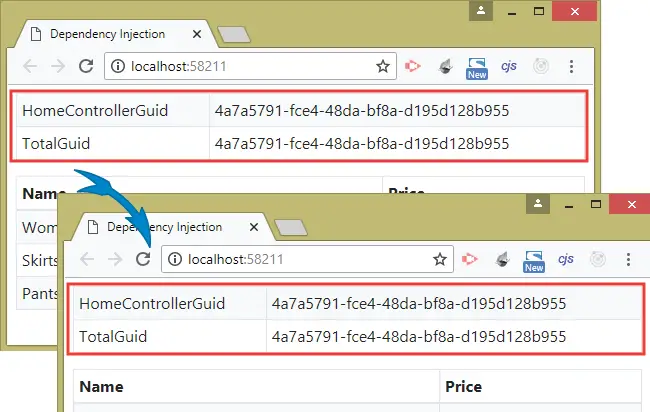
Now run your application and you will see the GUID values displayed on the top, see the below image.
Why 2 Guids are different? Because 2 objects of the Repository.cs class are created each time the Home Controller is called by the browser. The first object is created by the Repository service while the second object is created by the ProductSum service (recall ProductSum has a dependency for IRepository in the constructor).
The instances are not shared, had we used Scoped Service then only one object of the Repository class would be created and this object would be shared in the ProductSum service also. This we will see in the Scoped Service Example.
Example of Scoped Service
To understand Scoped services, change the registration process of the Repository service in the Program class by using AddScoped method.
builder.Services.AddScoped<IRepository, Repository>();Re-run your app and you will see the both GUIDS have the same value this time. This means the Service Provider has created only one object of the Repository class which is shared by the ProductSum service this time. This is the difference between Scoped vs Transient Services.
Reload the page by pressing F5 key and you will see new Guid is generated (because a new HTTP request is initiated by the browser). However both will be same.
The below image illustrates this thing with red markings:
Example of Singleton Service
Finlly let us see Singleton Services. So change the registration of the Repository service by using AddSingleton method.
builder.Services.AddSingleton<IRepository, Repository>();Re-run your application and you will see both the GUID values are same, refresh the page but you will notice the GUID values do not change at all.
See the image below which illustrates it:
The reason is that the Repository class object is created only on the first time and it is shared for each and every request. Even if there are multiple clients requesting Home Controller in their browsers then also only one object will be created and shared between them. All the clients will see the same Guids each and every time.
Dependency Chains
The meaning of Dependency Chains is – the Dependency itself has a dependency on another component i.e. each requested dependency in turn requests its own dependencies. For example if a Component ‘Alpha’ has a dependency on another Component called ‘Beta’, while Beta has a dependency on Component called ‘Gamma’. Then this becomes a Dependency Chain.
ASP.NET Core is very intelligent to resolve these Dependency Chains. Let me explain you with an example.
Add a class file called IStorage.cs to the Models folder and use it to define the interface shown below:
namespace DependencyInjection.Models
{
    public interface IStorage
    {
        IEnumerable<Product> Items { get; }
        Product this[string key] { get; set; }
        bool ContainsKey(string key);
        void RemoveItem(string key);
    }
}
Now inherit a new class called called Storage.cs from this interface. The code of this class is given below:
namespace DependencyInjection.Models
{
    public class Storage : IStorage
    {
        private Dictionary<string, Product> items = new Dictionary<string, Product>();
        public Product this[string key]
        {
            get { return items[key]; }
            set { items[key] = value; }
        }
        public IEnumerable<Product> Items => items.Values;
        public bool ContainsKey(string key) => items.ContainsKey(key);
        public void RemoveItem(string key) => items.Remove(key);
    }
}
The Storage class defines the behaviour of a simple storage mechanism for Product objects.
Now go to your previously created Repository.cs class and create a dependency on IStorage interface in the constructor. See the changes in highlighed color below:
namespace DependencyInjection.Models
{
    public class Repository : IRepository
    {
        private IStorage storage;
        public Repository(IStorage repo)
        {
            storage = repo;
            new List<Product> {
                new Product { Name = "Women Shoes", Price = 99M },
                new Product { Name = "Skirts", Price = 29.99M },
                new Product { Name = "Pants", Price = 40.5M }
            }.ForEach(p => AddProduct(p));
        }

        public IEnumerable<Product> Products => storage.Items;

        public Product this[string name] => storage[name];

        public void AddProduct(Product product) => storage[product.Name] = product;

        public void DeleteProduct(Product product) => storage.RemoveItem(product.Name);
    }
}
Now all the methods and properties will work with the IStorage object. With these changes you have created a Dependency Chain as:
- Home Controller Class depends upon IRepository object.
- IRepository object in turn depends upon IStorage object.
Now all I have to do is to tell the ASP.NET Core service provider how to resolve this Dependency Chain. So go to the Program.cs and add the code line (services.AddTransient<IStorage, Storage>()) as shown below.
using DependencyInjection.Models;

var builder = WebApplication.CreateBuilder(args);

// Add services to the container.
builder.Services.AddControllersWithViews();

builder.Services.AddTransient<IRepository, Repository>();
builder.Services.AddTransient<IStorage, Storage>();

var app = builder.Build();

// removed for brevity and clarity
For ASP.NET Core 5.0 or earlier, you will have to add the code line inside the Startup.cs class as shown below:
public void ConfigureServices(IServiceCollection services)
{
    services.AddTransient<IRepository, Repository>();
    services.AddTransient<IStorage, Storage>();
    services.AddControllersWithViews();
}
Re-run your application and you will see all your products displayed in the browser just like before. The only difference is that here you resolved the Dependency Chains.
Dependency Injection on Action Methods
Declaring dependency through a constructor of the Controller can be expensive because the dependency is resolved every time the Controller is created, and also because not all action methods need the service.
So we can also perform Dependency Injection on the Action methods. This will only make particular action method to initiate the service and hence creation on the needed object.
We will have to add the [FromServices] attribute on the action method to specify that it has a dependency for the service.
In the home controller change the Index Action method to include a parameter of ProductSum type and add [FromServices] attribute to it. Also remove the ProductSum attribute from the constructor of the controller.
The updated code is given below:
using System;
using System.Collections.Generic;
using System.Linq;
using System.Threading.Tasks;
using DependencyInjection.Models;
using Microsoft.AspNetCore.Mvc;

namespace DependencyInjection.Controllers
{
    public class HomeController : Controller
    {
        private IRepository repository;
        public HomeController(IRepository repo)
        {
            repository = repo;
        }

        public IActionResult Index([FromServices] ProductSum productSum)
        {
            // ViewBag.Total = productSum.Total;
            ViewBag.HomeControllerGuid = repository.ToString();
            ViewBag.TotalGuid = productSum.Repository.ToString();
            return View(repository.Products);
        }
    }
}
Now the ProductSum type will be resolved only when the Index Action Method is invoked and not when the Controller is invoked.
ASP.NET Core Dependency Injection Factory
This Factory Function variation is used to register a factory function that will be invoked to create implementation objects. So you can use it to create your own logic to tell the application when and how to resolve the dependencies.
Create a new class called ProductionRepository.cs inside the Models folder and add the following code to it:
namespace DependencyInjection.Models
{
    public class ProductionRepository : IRepository
    {
        private Dictionary<string, Product> products;

        public ProductionRepository()
        {
            products = new Dictionary<string, Product>();
            new List<Product> {
                new Product { Name = "Women Shoes", Price = 99M },
                new Product { Name = "Skirts", Price = 29.99M },
                new Product { Name = "Pants", Price = 40.5M }
            }.ForEach(p => AddProduct(p));
        }

        public IEnumerable<Product> Products => products.Values;
        public Product this[string name] => products[name];
        public void AddProduct(Product product) => products[product.Name] = product;
        public void DeleteProduct(Product product) => products.Remove(product.Name);
    }
}
Now on the Program.cs class we will register a testing service on development mode and a live service on production mode. We can do this through Func delegate and adding a lambda function to create this condition.
using DependencyInjection.Models;

var builder = WebApplication.CreateBuilder(args);

// Add services to the container.
builder.Services.AddControllersWithViews();

IWebHostEnvironment env = builder.Environment;

builder.Services.AddTransient<IRepository>(provider =>
{
    if (env.IsDevelopment())
    {
        var x = provider.GetService<Repository>();
        return x;
    }
    else
    {
        return new ProductionRepository();
    }
});
builder.Services.AddTransient<Repository>();

var app = builder.Build();

// Configure the HTTP request pipeline.
...
The code checks the environment variable’s value and based on it a respective service is registered. This is certainly a great feature of ASP.NET Core Dependency Injection.
Dependency Injection of JSON files
By using the Dependency Injection technique you can also inject values from a JSON file to a controller or View. Let me show how to perform this task.
Create a JSON file on the root of the project and name it mysettings.json. Then add the following content to this file:
{
    "Title": "Dependency Injection Tutorial",
    "Version": 3
}
Also create a class for this json file. So create a new class called MyJson.cs to the “Models” folder of your app.
public class MyJson
{
    public string Title { get; set; }
    public int Version { get; set; }
}
Next Configure the app to read the the JSON from the file to the class. So add the shown highlighted lines to your program class.
using DependencyInjection.Models;

var builder = WebApplication.CreateBuilder(args);

// Add services to the container.
builder.Services.AddControllersWithViews();

builder.Host.ConfigureAppConfiguration((hostingContext, config) =>
{
    config.AddJsonFile("mysettings.json",
                       optional: false, //file is not optional
                       reloadOnChange: true);
});
builder.Services.Configure<MyJson>(builder.Configuration);

var app = builder.Build();

// Configure the HTTP request pipeline.
...
You are now ready to read the values from this JSON file in any Controller or View. So create a controller and name it SettingsController.cs. In this controller add a contructor that takes IOptions<MyJson> type parameter. This parameter will be provided with the value from the JSON file by Dependency Injection technique. The code is given below:
using DependencyInjection.Models;
using Microsoft.AspNetCore.Mvc;
using Microsoft.Extensions.Options;

namespace DependencyInjection.Controllers
{
    public class SettingsController : Controller
    {
        private readonly MyJson _settings;
        public SettingsController(IOptions<MyJson> settingsOptions)
        {
            _settings = settingsOptions.Value;
        }

        public IActionResult Index()
        {
            ViewData["Title"] = _settings.Title;
            ViewData["Version"] = _settings.Version;
            return View();
        }
    }
}
The values read from the json are returned to the view in two ViewData variables.
So add Index view in the Views ➤ Settings folder and add the following code to it:
@if (ViewData.Count > 0)
{
	<table class="table table-bordered table-sm table-striped">
		@foreach (var kvp in ViewData)
		{
			<tr><td>@kvp.Key</td><td>@kvp.Value</td></tr>
		}
	</table>
}
Run your application and go to the URL of the SettingsController which in my case is – https://localhost:44301/Settings. You will see values from the JSON file being displayed by the view. See the below screenshot.

Dependency Injection in Views
ASP.NET Core supports Dependency Injection into Views using the @inject directive. I will give 2 examples to understand this thing.
Just like what I did in the above topic – Dependency Injection of JSON files. This time I will inject mysettings.json file values in the View directly.
Recall that I have already done the configuration part in the Program.cs in the earlier section
.Add a new action called Show to the SettingsController.
public IActionResult Show()
{
    return View();
}
Next add the view called Show.cshtml and add the following code to it.
@using Microsoft.Extensions.Options;
@using DependencyInjection.Models;
@inject IOptions<MyJson> settingsOptions

<table class="table table-bordered table-sm table-striped">
	<tr>
		<td>Title</td>
		<td>@settingsOptions.Value.Title</td>
	</tr>
	<tr>
		<td>Version</td>
		<td>@settingsOptions.Value.Version</td>
	</tr>
</table>
Note: JSON values are displayed by the given code.
@settingsOptions.Value.Title
@settingsOptions.Value.Version
Run your application and go to the URL – https://localhost:44301/Settings/Show. You will see the values displayed on the view (see below image).
The appsettings.json values can be injected directly into a view. It is a very simple procedure where all you have to do is use the inject directive and then show the values. This is shown in the below code.
@inject IConfiguration Configuration

<div>@Configuration["Logging:LogLevel:Default"]</div>
My appsettings.json file has the below given values which I will show on the View.
{
  "Logging": {
    "LogLevel": {
      "Default": "Information",
      "Microsoft": "Warning",
      "Microsoft.Hosting.Lifetime": "Information"
    }
  },
  "AllowedHosts": "*"
}
I will show the values for the nodes – Default, Microsoft & Microsoft.Hosting.Lifetime.
Head to the SettingsController and add an action called Detail.
public IActionResult Detail()
{
    return View();
}
Now add a View called Detail with the following code.
@inject IConfiguration Configuration

<table class="table table-bordered table-sm table-striped">
	<tr>
		<td>Default</td>
		<td>@Configuration["Logging:LogLevel:Default"]</td>
	</tr>
	<tr>
		<td>Microsoft</td>
		<td>@Configuration["Logging:LogLevel:Microsoft"]</td>
	</tr>
	<tr>
		<td>Microsoft.Hosting.Lifetime</td>
		<td>@Configuration["Logging:LogLevel:Microsoft.Hosting.Lifetime"]</td>
	</tr>
</table>
Test it by going to the URL – https://localhost:44301/Settings/Detail. You will see the appsettings.json values getting displayed as shown by the image below.

You can download the full codes of this tutorial from the below link:
In this tutorial I explained working with Dependency Injection feature which is a new addition in the ASP.NET Core MVC framework. I hope you find it useful.
SHARE THIS ARTICLE
Related Tutorials:


ABOUT THE AUTHOR
I hope you enjoyed reading this tutorial. If it helped you then consider buying a cup of coffee for me. This will help me in writing more such good tutorials for the readers. Thank you.

HELLO EVERYONE
 Welcome to YogiHosting - A Programming Tutorial Website. It is used by millions of people around the world to learn and explore about ASP.NET Core, Blazor, jQuery, JavaScript, Docker, Kubernetes and other topics.
SUBSCRIBE TO NEWSLETTER
Enter your email address to subscribe to this blog and receive notifications of new posts by email.
Join 90K other subscribers