How to use Globalization and localization in ASP.NET Core
Page Contents
This tutorial will look at the configurations required to prepare Multilingual website using Localisation & Globalization feature of ASP.NET Core. Here you will learn to create a multilingual site that will support 3 different cultures and languages, there are English, French and Spanish. The full source code for this site is available to download. Download link is given at the bottom of this tutorial.
Important Terms to understand:
Globalization is the process of designing sites that support different cultures. Globalization adds support for input, display, and output of a defined set of language scripts that relate to specific geographic areas.
Localization is the process of adapting a globalized site, which you have already processed for localizability, to a particular culture/locale.
Internationalization involves support for both Globalization and Localization.
This tutorial is a part of Globalization and Localization in ASP.NET Core. There are 3 tutorials to master it:
- 1. How to use Globalization and localization in ASP.NET Core
- 2. Globalization and Localization with Resource Files in ASP.NET Core
- 3. How to perform Localization with Portable Object (PO) files in an ASP.NET Core
Steps to make the website Multilingual
The starting point to globalization of a website is being able to determine the language or culture for each request made by the client browser. After that, a mechanism is required to select the content based on the client’s culture. You will get to know about each of them as you follow the below listed steps.
Step 1#: Configuring Globalization & Localization in the Program class
a. Add MVC View Localization Services to the Progra.cs class. This is done by the AddLocalization() method.
builder.Services.AddControllersWithViews()
       .AddViewLocalization(LanguageViewLocationExpanderFormat.Suffix);
b. You need to specify the languages or cultures that you plan to support in your application. So configure the RequestLocalizationOptions for the application by adding the below codes just after the AddLocalization() method.
builder.Services.Configure<RequestLocalizationOptions>(options =>
{
    var supportedCultures = new[]
    {
            new CultureInfo("en-US"),
            new CultureInfo("fr"),
            new CultureInfo("es")
        };
    options.DefaultRequestCulture = new RequestCulture(culture: "en-US", uiCulture: "en-US");
    options.SupportedCultures = supportedCultures;
    options.SupportedUICultures = supportedCultures;
});
The class called CultureInfo is very important, it provides culture-specific information, such as the language, sublanguage, country/region, calendar, and conventions associated with a particular culture.
I created an array that holds my 3 supported cultures which are ‘en-us’, ‘fr’ & ‘es’ (English, French, Spanish) and then setting the values of SupportedCultures and SupportedUICultures properties to this array. I also set my application’s default culture as ‘en-us’ through the DefaultRequestCulture property.
Note that when I use en-us for my culture I am setting the country and this is ‘US’ in my case. I can similarly set “en-GB” for Great Britain or “en-ZA” for South Africa and so on.
c. The current culture request which is made by the client browser is set in the localization Middleware. This middleware is enabled after the app.UseRouting(); code line.
var locOptions = app.Services.GetService<IOptions<RequestLocalizationOptions>>();
app.UseRequestLocalization(locOptions.Value);
The Localization Middleware make use of the component called RequestCultureProviders to determine the culture of the current request made by the client. There are 3 RequestCultureProviders and the first provider that can successfully determine the request culture is used. These 3 RequestCultureProviders are:
- QueryStringRequestCultureProvider – culture and ui-culture are passed in the query string.
- CookieRequestCultureProvider – culture is set in the ASP.NET Core culture cookie.
- AcceptLanguageHeaderRequestCultureProvider – which gets the culture from the browser’s language set by the user.
Note: In the latter part of the tutorial I will show how to use these 3 RequestCultureProviders. So make sure you go through every bit of this tutorial.
Step #2: Setting the Request Culture
Now it’s time to see how it all works. I will create a feature so that the users can select their culture from a drop down list control (i.e. html select control).
So add the following given code in your view:
@using Microsoft.AspNetCore.Builder
@using Microsoft.AspNetCore.Localization
@using Microsoft.Extensions.Options

@inject IOptions<RequestLocalizationOptions> LocOptions

@{
    var requestCulture = Context.Features.Get<IRequestCultureFeature>();
    var cultureItems = LocOptions.Value.SupportedUICultures
        .Select(c => new SelectListItem { Value = c.Name, Text = c.DisplayName })
        .ToList();
}

<form id="cultureForm" asp-action="Index">
    <label>Language:</label>
    <select onchange="SetCulture(this.value)"
asp-for="@requestCulture.RequestCulture.UICulture.Name" asp-items="cultureItems">
    </select>
</form>

<table class="table culture-table">
    <tr>
        <td>Culture</td>
        <td>
            @requestCulture.RequestCulture.Culture.Name
        </td>
    </tr>
    <tr>
        <td>UICulture</td>
        <td>
            @requestCulture.RequestCulture.UICulture.Name
        </td>
    </tr>
    <tr>
        <td>Date</td>
        <td>
            @DateTime.Now.ToLongDateString()
        </td>
    </tr>
    <tr>
        <td>Currency</td>
        <td>
            @(98765.00.ToString("c"))
        </td>
    </tr>
    <tr>
        <td>Number</td>
        <td>
            @(987.87m.ToString("F2"))
        </td>
    </tr>
</table>

<script>
    function SetCulture(selectedValue) {
        var culture = "/?culture=" + selectedValue + "&ui-culture=" + selectedValue;
        document.getElementById("cultureForm").action = culture;
        document.getElementById("cultureForm").submit();
    }
</script>
I first included the necessary namespaces and injected the IOptions
@using Microsoft.AspNetCore.Builder
@using Microsoft.AspNetCore.Localization
@using Microsoft.Extensions.Options

@inject IOptions<RequestLocalizationOptions> LocOptions
Next, I retrieve the requested culture by the client by using the code – Context.Features.Get
@{
    var requestCulture = Context.Features.Get<IRequestCultureFeature>();
    var cultureItems = LocOptions.Value.SupportedUICultures
        .Select(c => new SelectListItem { Value = c.Name, Text = c.DisplayName })
        .ToList();
}
Next, I create a form with id as ‘cultureForm’ and inside this form a select control (i.e. drop down list) is bind with the ‘cultureItems’ variable. The drop down will show all my supported cultures which are ‘en-us’, ‘fr’ & ‘es’.
<form id="cultureForm" asp-action="Index">
    <label>Language:</label>
    <select onchange="SetCulture(this.value)" asp-for="@requestCulture.RequestCulture.UICulture.Name" asp-items="cultureItems">
    </select>
</form>
Notice the onchange event of the select control, where I call a JavaScript method named ‘SetCulture’. In the JS code I add the selected value of the select control to the form’s action. I specifically pass this value in query string keys called culture & ui-culture. Finally I submit the form.
Note: Since I am using query string to tell the server what culture I am using therefore the QueryStringRequestCultureProvider will come into action.
<script>
    function SetCulture(selectedValue) {
        var culture = "/?culture=" + selectedValue + "&ui-culture=" + selectedValue;
        document.getElementById("cultureForm").action = culture;
        document.getElementById("cultureForm").submit();
    }
</script>
Next, I create an HTML table that displays various bits of data that will be shown differently based on the user’s culture for example date, numbers, etc.
<table class ="table culture-table">
    <tr>
        <td>Culture</td>
        <td>
            @requestCulture.RequestCulture.Culture.Name
        </td>
    </tr>
    <tr>
        <td>UICulture</td>
        <td>
            @requestCulture.RequestCulture.UICulture.Name
        </td>
    </tr>
    <tr>
        <td>Date</td>
        <td>
            @DateTime.Now.ToLongDateString()
        </td>
    </tr>
    <tr>
        <td>Currency</td>
        <td>
            @(98765.00.ToString("c"))
        </td>
    </tr>
    <tr>
        <td>Number</td>
        <td>
            @(987.87m.ToString("F2"))
        </td>
    </tr>
</table>
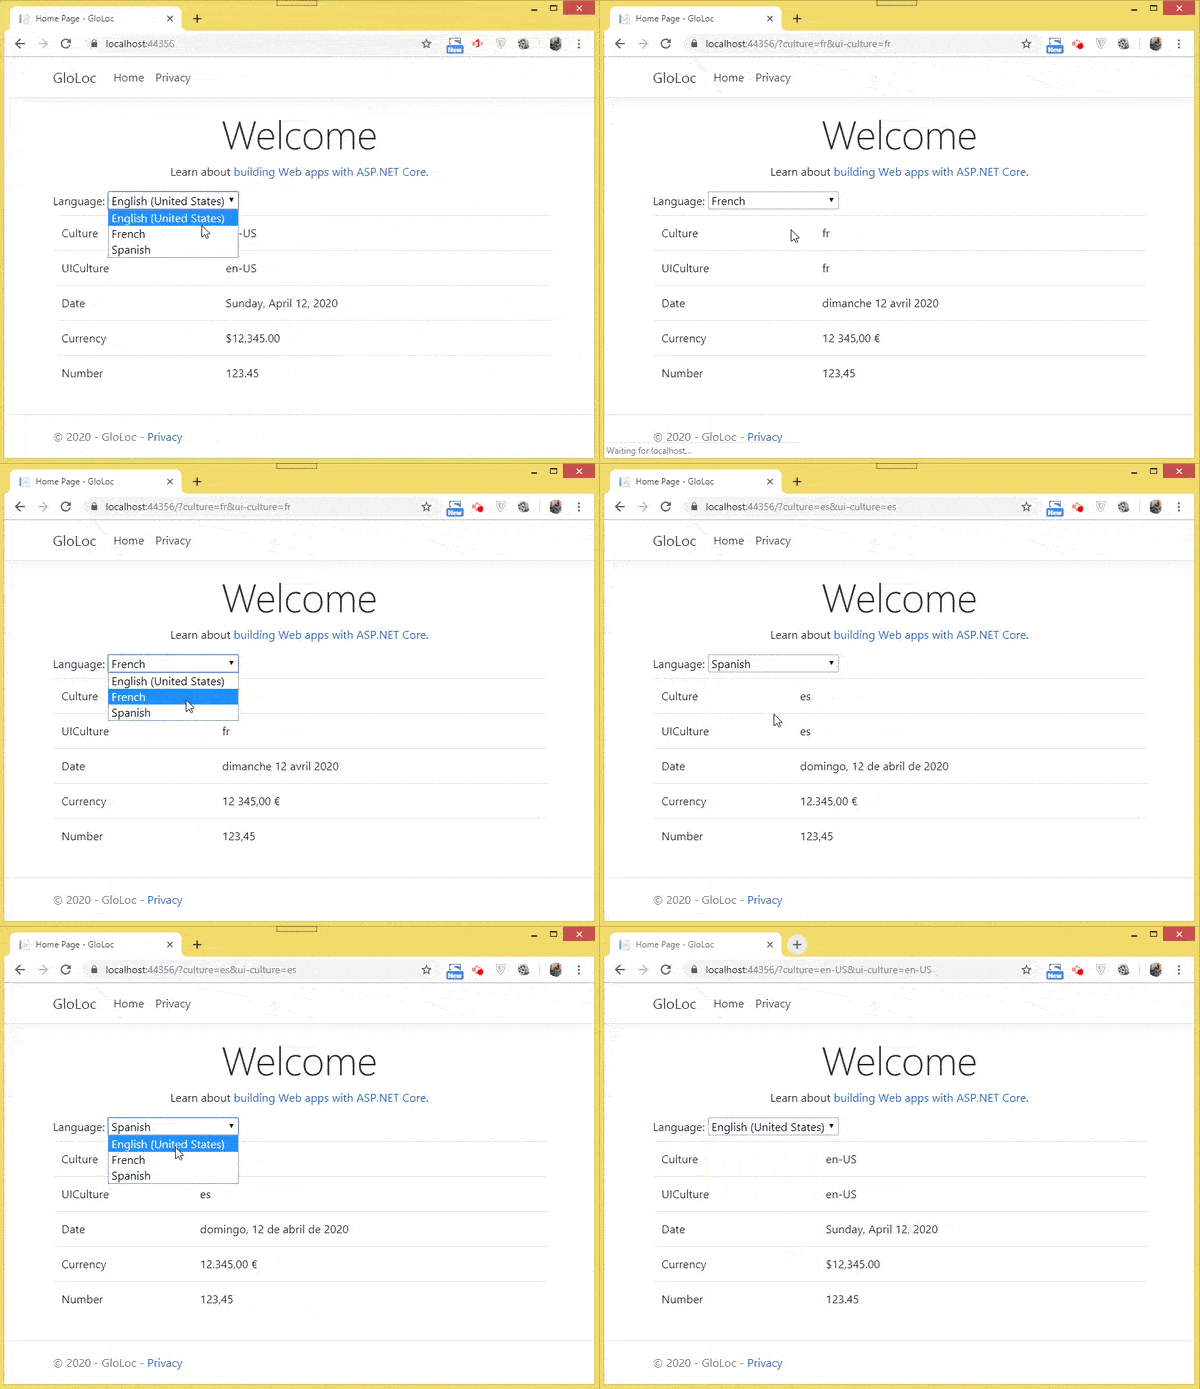
You can now run your application and you will see the Globalization Localization working as shown in the below video:
Understanding the RequestCultureProvider
When a client browser initiates a request to the server. There has to be a way to determine the culture which is set by the client. It is done by RequestCultureProviders and these are 3 in total. Note that the first provider that can successfully determine the client culture’s is used.
These 3 RequestCultureProviders are:
- 1. QueryStringRequestCultureProvider
- 2. CookieRequestCultureProvider
- 3. AcceptLanguageHeaderRequestCultureProvider
What is ‘QueryStringRequestCultureProvider’
The code you built above used the QueryStringRequestCultureProvider, this is because the query string was used to send the culture of the client. The query string keys called culture & ui-culture are use for this.
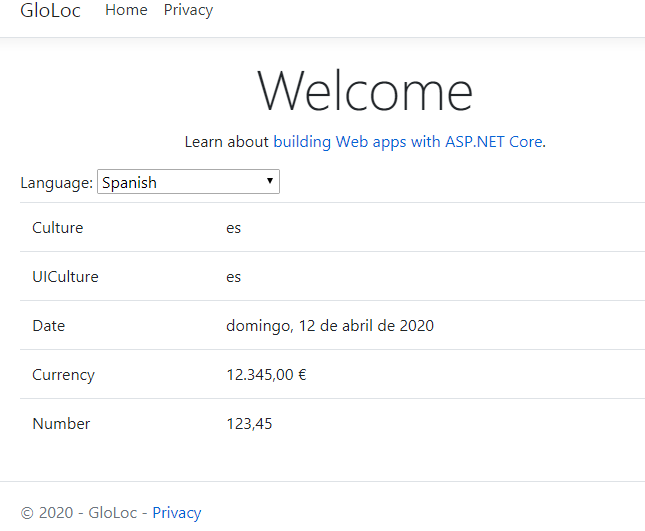
For example – when I add ?culture=es&ui-culture=es to the query string, I am basically telling the server that my culture is spanish. Similarly ?culture=fr&ui-culture=fr is for telling that my culture is French.
You can check this by running the application you built above and load this URL in your browser – https://localhost:44356/?culture=es&ui-culture=es, you will get the Spanish presentation of dates, currencies, numbers, etc. Check the below image which explains this:
What is ‘CookieRequestCultureProvider’
In this provider the culture is set in the ASP.NET Core culture cookie. The default cookie name is .AspNetCore.Culture.
Let us built a new action method which creates this cookie. So add the below actions to your controller.
public IActionResult Cookie()
{
    return View();
}

[HttpPost]
public IActionResult Cookie(string culture)
{
    Response.Cookies.Append(
        CookieRequestCultureProvider.DefaultCookieName,
        CookieRequestCultureProvider.MakeCookieValue(new RequestCulture(culture)),
        new CookieOptions { Expires = DateTimeOffset.UtcNow.AddMonths(1) }
    );

    return RedirectToAction("Cookie");
}
This action method has a string parameter called ‘culture’. This parameter will get the user’s selected culture value. The user will select his culture from a drop down control.
You can see that I used MakeCookieValue method to create this cookie. The CookieRequestCultureProvider DefaultCookieName returns the default cookie name used to track the user’s preferred culture information.
Next, create the view called Cookie.cshtml and add the below code to it:
@using Microsoft.AspNetCore.Builder
@using Microsoft.AspNetCore.Localization
@using Microsoft.Extensions.Options

@inject IOptions<RequestLocalizationOptions> LocOptions

@{
    var requestCulture = Context.Features.Get<IRequestCultureFeature>();
    var cultureItems = LocOptions.Value.SupportedUICultures
        .Select(c => new SelectListItem { Value = c.Name, Text = c.DisplayName })
        .ToList();
}

<form asp-action="Cookie" method="post">
    <label>Language:</label>
    <select name="culture" onchange="this.form.submit()" asp-for="@requestCulture.RequestCulture.UICulture.Name" asp-items="cultureItems">
    </select>
</form>

<table class ="table culture-table">
    <tr>
        <td>Culture</td>
        <td>
            @requestCulture.RequestCulture.Culture.Name
        </td>
    </tr>
    <tr>
        <td>UICulture</td>
        <td>
            @requestCulture.RequestCulture.UICulture.Name
        </td>
    </tr>
    <tr>
        <td>Date</td>
        <td>
            @DateTime.Now.ToLongDateString()
        </td>
    </tr>
    <tr>
        <td>Currency</td>
        <td>
            @(12345.00.ToString("c"))
        </td>
    </tr>
    <tr>
        <td>Number</td>
        <td>
            @(123.45m.ToString("F2"))
        </td>
    </tr>
</table>
The code is the same except for the form block which now points to the ‘Cookie’ action method on submission. The select control is filled with the supported cultures provided in the startup class and these are ‘en-us’, ‘fr’ & ‘es’ (English, French, Spanish).
On the onchange event the JavaScript code will submit the form.
<form asp-action="Cookie" method="post">
    <label>Language:</label>
    <select name="culture" onchange="this.form.submit()" asp-for="@requestCulture.RequestCulture.UICulture.Name" asp-items="cultureItems">
    </select>
</form>
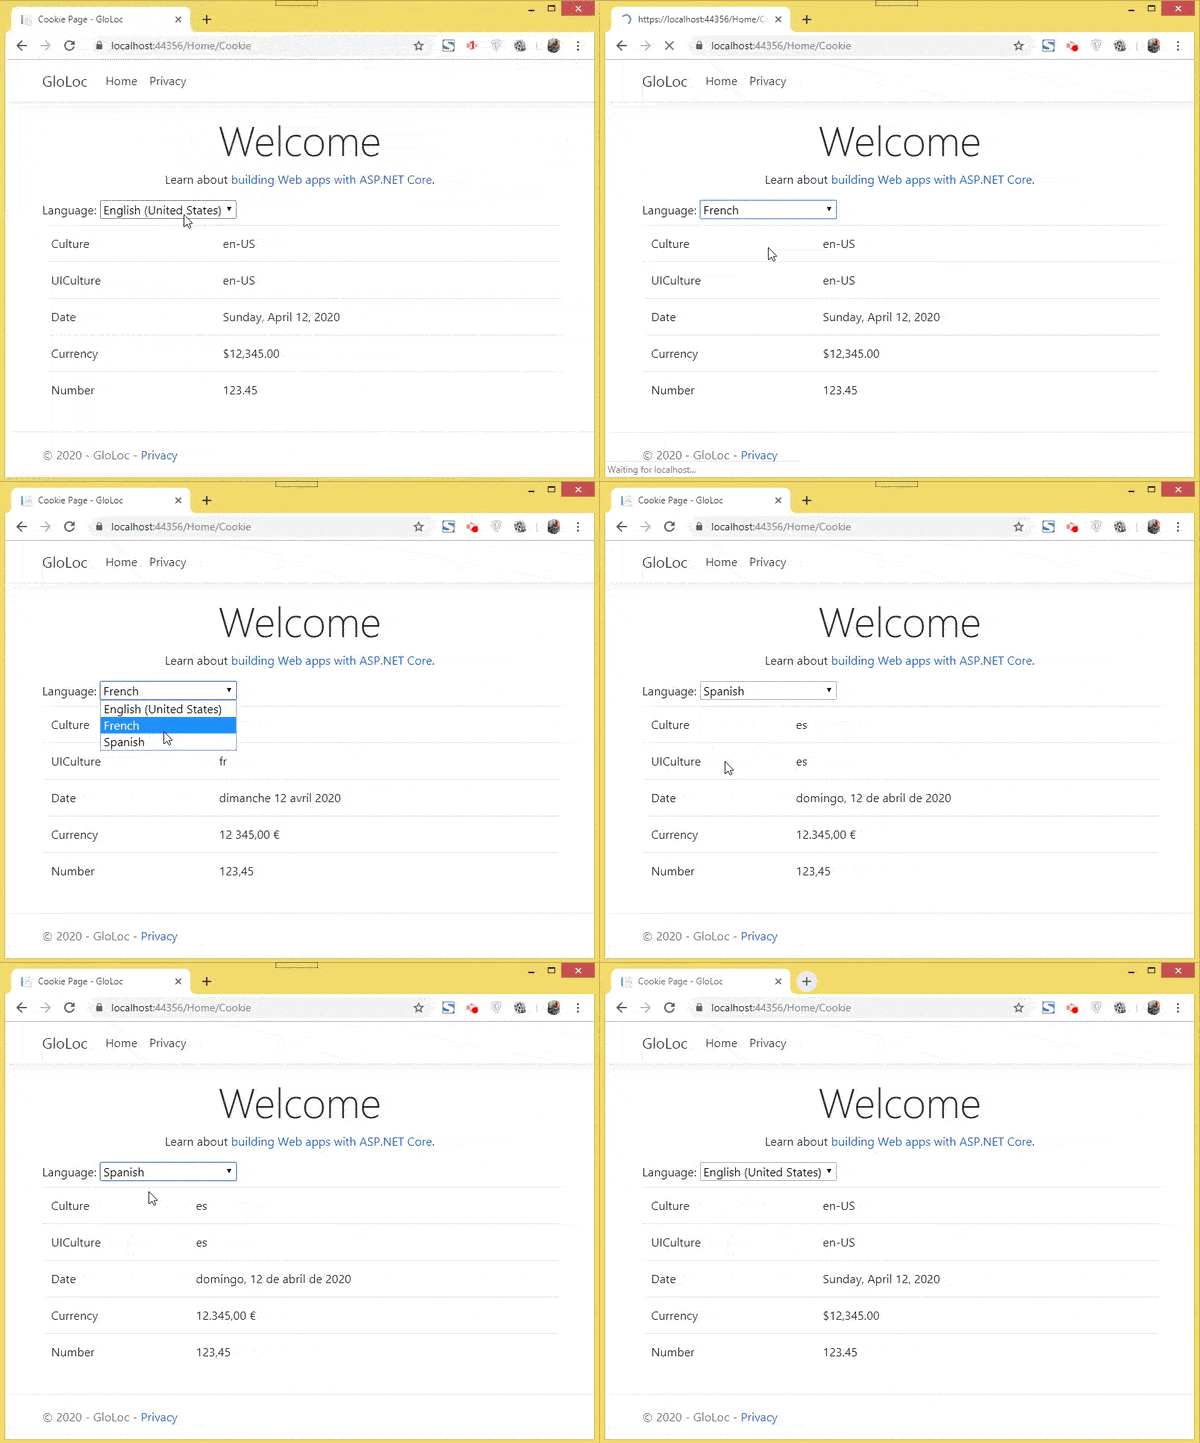
Now run your application and open the ‘Cookie’ view’s URL in your browser. You will see everything works the same except that the culture is now provided in the cookie and not on the query string. I have provided a small video shown below to show it’s working. Notice the URL in the browser is unchanged when the culture is selected.
Now open the ‘Developer Tools’ of your browser and go to the ‘Application’ tab. You can find this cookie in the ‘Cookies’ section.
What is ‘AcceptLanguageHeaderRequestCultureProvider’
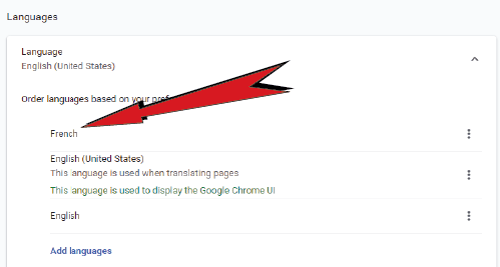
The AcceptLanguageHeaderRequestCultureProvider work is to grab the user’s culture from the browser’s language setting. In chrome you can add a new language by opening the url – chrome://settings/languages
Let us see how it works in chrome browser. First add French language and move it on the top as shown below:
Next, create a View called Browser.cshtml , and in it create an html table where current date, a currency and a number is shown:
<table class="table culture-table">
    <tr>
        <td>Date</td>
        <td>
            @DateTime.Now.ToLongDateString()
        </td>
    </tr>
    <tr>
        <td>Currency</td>
        <td>
            @(12345.00.ToString("c"))
        </td>
    </tr>
    <tr>
        <td>Number</td>
        <td>
            @(123.45m.ToString("F2"))
        </td>
    </tr>
</table>
Next, add the browser action in the controller:
public IActionResult Browser()
{
    return View();
}
Now before viewing this page just make sure to delete the .AspNetCore.Culture cookie from the Network tab of the ‘Developer tools’ of your browser. Otherwise the culture will be set based on the culture which is stored in it.
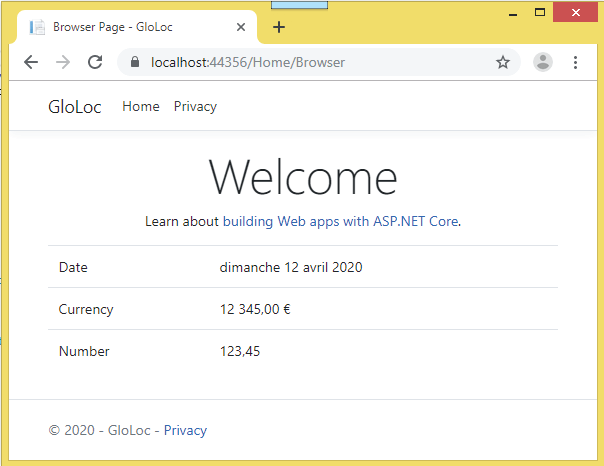
Now run your application and open the url of the ‘Browser’ action method which in my case is https://localhost:44356/Home/Browser. You will see the French values of the items displayed on the view, see below image:
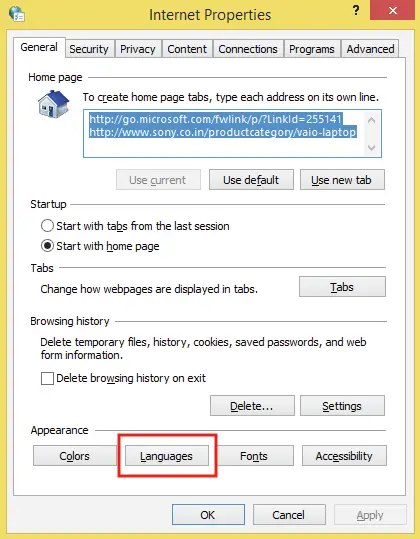
If you are using Edge browser then the language is set from the Internet Properties area given in the control panel of your operating system.
Writing a Custom Request Culture Provider
Suppose you want to create your own implementation of RequestCultureProvider then you create your own custom provider to do this task. Let us take 2 examples where you need to do this:
Many website add the culture in the last segment of there url. Like https://somewebsite.com/es for spanish version and https:// somewebsite.com/fr for french version. You can do this by creating a custom provider.
Custom providers are added to RequestLocalizationOptions like this:
options.AddInitialRequestCultureProvider(new CustomRequestCultureProvider(async context =>
{
//… write your implementation
}));
Let me now show you a custom provider that accepts the customer in the last segment of the URL. See this code of Program.cs class below.
builder.Services.Configure<RequestLocalizationOptions>(options =>
{
    var supportedCultures = new[]
    {
            new CultureInfo("en-US"),
            new CultureInfo("fr"),
            new CultureInfo("es")
        };
    options.DefaultRequestCulture = new RequestCulture(culture: "en-US", uiCulture: "en-US");
    options.SupportedCultures = supportedCultures;
    options.SupportedUICultures = supportedCultures;

    options.AddInitialRequestCultureProvider(new CustomRequestCultureProvider(async context =>
    {
        var currentCulture = "en";
        var segments = context.Request.Path.Value.Split(new char[] { '/' }, StringSplitOptions.RemoveEmptyEntries);

        if (segments.Length >= 2)
        {
            string lastSegment = segments[segments.Length - 1];
            currentCulture = lastSegment;
        }

        var requestCulture = new ProviderCultureResult(currentCulture);
        return await Task.FromResult(requestCulture);
    }));
});
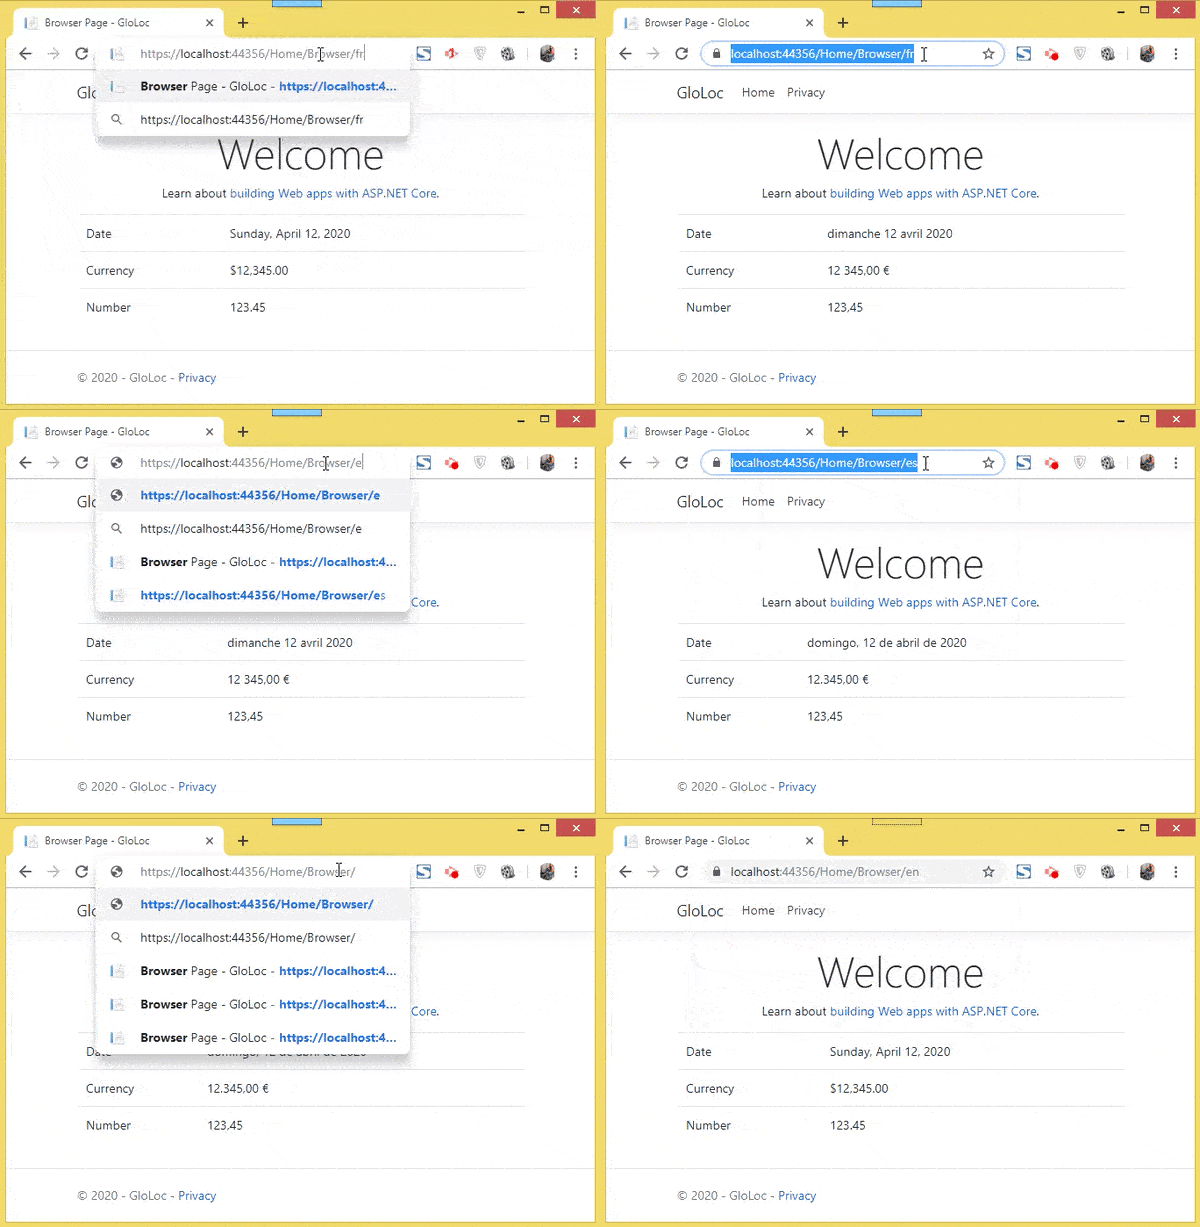
You can now see it working in the Browser view which you made previously. Open 3 url in your browser to notice the changes in cultures:
- 1. https://localhost:44356/Home/Browser/en which will show english version.
- 2. https://localhost:44356/Home/Browser/fr which will show french version.
- 3. https://localhost:44356/Home/Browser/es which will show spanish version.
I have illustrated this in the below video:
If you want users to store their language and culture in the databases then custom request culture provider is a perfect choice.
Let build this feature, so update the code by adding a new custom provider class to AddInitialRequestCultureProvider method as shown below
builder.Services.Configure<RequestLocalizationOptions>(options =>
{
    var supportedCultures = new[]
    {
        new CultureInfo("en-US"),
        new CultureInfo("fr"),
        new CultureInfo("es")
    };
    options.DefaultRequestCulture = new RequestCulture(culture: "en-US", uiCulture: "en-US");
    options.SupportedCultures = supportedCultures;
    options.SupportedUICultures = supportedCultures;
    options.AddInitialRequestCultureProvider(new MyCultureProvider());
});
Here the class named MyCultureProvider.cs is my custom class who will do the database fetching of the culture for the users. It can have any name of your choice.
Next, add this MyCultureProvider.cs on the Models folder of your application:
public class MyCultureProvider : RequestCultureProvider
{
    public override Task<ProviderCultureResult> DetermineProviderCultureResult(HttpContext httpContext)
    {
        var current_User = await user_Manager.GetUserAsync(HttpContext.User);
        string user_culture = TblUserName.Where(c => c.Id == current_User.Id).Select(c => c.Culture).FirstOrDefault();

        var requestCulture = new ProviderCultureResult(user_culture);

        return Task.FromResult(requestCulture);
    }
}
The code is pretty straight forward. The first 2 lines fetches the current logged in user’s culture from the database and set it to the ‘ProviderCultureResult’ class.
The database table called ‘TblUserName’ contains a column called ‘Culture’ where these cultures are stored.
You can download the full source codes from the below link:
This tutorial teaches the working of localisation and globalization in ASP.NET Core. It explains configuration of the cultures that you wish to support in your application, and how to pass that configuration to localisation middleware.
It shows how the culture for the current request works in terms of formatting content for display. It also shows how you can let your visitors to change the culture to suit their preference.
In the end I also showed you how to create custom providers based on your specific needs. I hope you liked this video so please share this tutorial with your friends. Also check out my other tutorials on ASP.NET Core.






 Welcome to YogiHosting - A Programming Tutorial Website. It is used by millions of people around the world to learn and explore about ASP.NET Core, Blazor, jQuery, JavaScript, Docker, Kubernetes and other topics.