How to manually Install Let’s Encrypt free SSL Certificate on any hosting

You can install free SSL on both cPanel & Plesk control panels.
This method works on every hosting like GoDaddy, HostGator, Linux, Windows, etc.
The best part?
You will get the SSL Certificate from Let’s Encrypt free of charge at the very same instance.
A lot of people ask me – Is SSL Free?. I tell them yes it is completely free provided you generate it with Let’s Encrypt. Let’s Encrypt is a open source SSL Certificate Authority (CA) that promises to provide Free SSL certificates in a standardized, API accessible and non-commercial way.
These SSL provides the following benefits:
- Trusted in 99.9% of all major browsers.
- Protect user data & gain trust.
- Improve Search Engine Ranking of your site.
- Prevents your website from hackers.
- 100% Free Forever.
How to Generate Let’s encrypt Free SSL Certificate
The process of generating SSL is quite easy. There is a good website called SSL For Free which interacts with Let’s Encrypt servers from APIs and create your certificate instantly.
Step 1: Head over to this website and enter your domain name in the text box and then click the Create Free SSL Certificate button.
Step 2: You will be taken to ZeroSSL Sign Up page to create your free account. Here enter your email address and password and click the Register button to create your account.

Step 3: You will now reach the ZeroSSL Certificate Setup page where you will see your domain already entered in the text box. So simply click the Next Step button.

Step 4: You will reach Validity step, select the “90-Day Certificate” option and click the Next Step button.

Step 5: In the CSR & Contact step make sure Auto-Generate CSR is enabled and click the Next Step button.

Step 6: In the Finalize Your Order step simply click the Next Step button as your’s Free Plan option is already selected.

Now you will be taken to the domain verification steps which are discussed below.
Domain Verification by ZeroSSL and Let’s Encrypt
ZeroSSL ensures that you are the rightful owner of your domain so it needs to verify this thing. There are 3 ways which you can choose to verify to both ZeroSSL and Let’s Encrypt that you are the owner of the domain for which the SSL Certificate is being created. These ways are:
- Email Verification
- DNS (CNAME) Verification
- HTTP File Upload Verification
Let us now discuss each of the one by one.
Email Verification
If you choose Email Verification then ZeroSSL will send you an email containing a verification key and a link to the verification page. You need to click this link and enter the verification key on it in order to verify your domain.
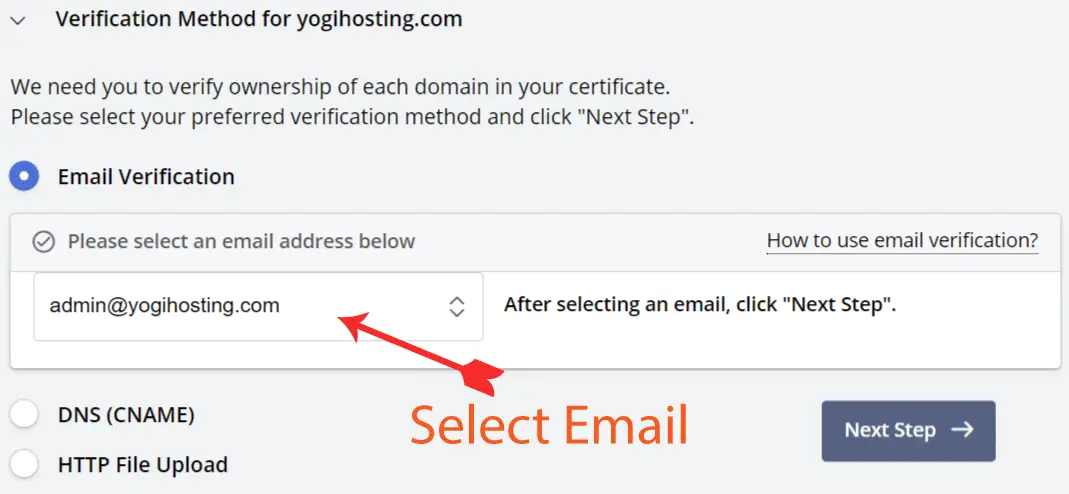
You can select any of the 5 email addresses of your domain. In my case these emails are:
- admin@yogihosting.com
- administrator@yogihosting.com
- hostmaster@yogihosting.com
- postmaster@yogihosting.com
- webmaster@yogihosting.com
The below screen shot is of the email which I received from ZeroSSL.

DNS (CNAME) Verification
If you choose the DNS (CNAME) Verification then you have to enter a new CNAME type record on the DOMAIN DNS. Check the below image where I have shown these values.

You need to go to your Domain Registrar’s website like godaddy, hostgator, siteground. Then on the DNS settings area, you can create a CNAME record. Note that DNS settings takes up to 48 hours’ time for propagation so this setting will probably make you to wait for sometime.
HTTP File Upload Verification
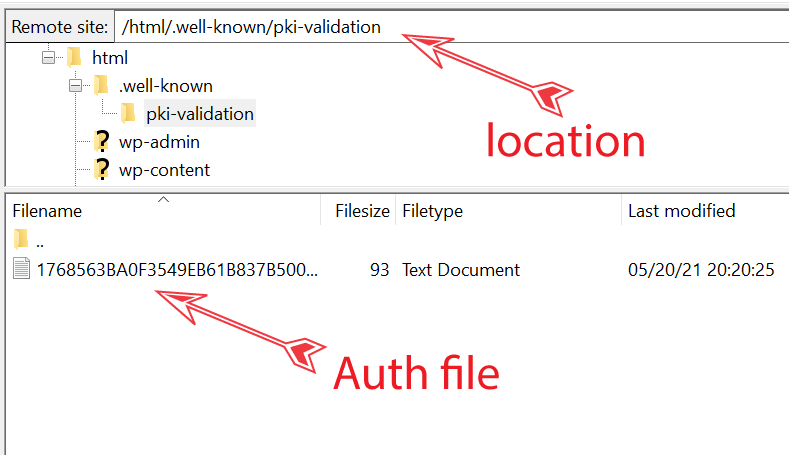
In HTTP File Upload Verification you will now be asked to download an Auth file and upload it to your website’s /.well-known/pki-validation/ folder. Check the below screenshot.

So, connect with your domain’s web hosting using FileZilla Client FTP software, create a new directory named “.well-known” inside the root directory of your website. Next, create another directory called “pki-validation” inside this “.well-known” directory. Now upload the Auth file, which you just downloaded, from your local pc to inside the “.well-known” directory of the web hosting.
In the below image I have uploaded this auth file to the location on my web hosting.
Click the Next Step button. Now you will see Verify Domain button so click on it and your domain will be verified.
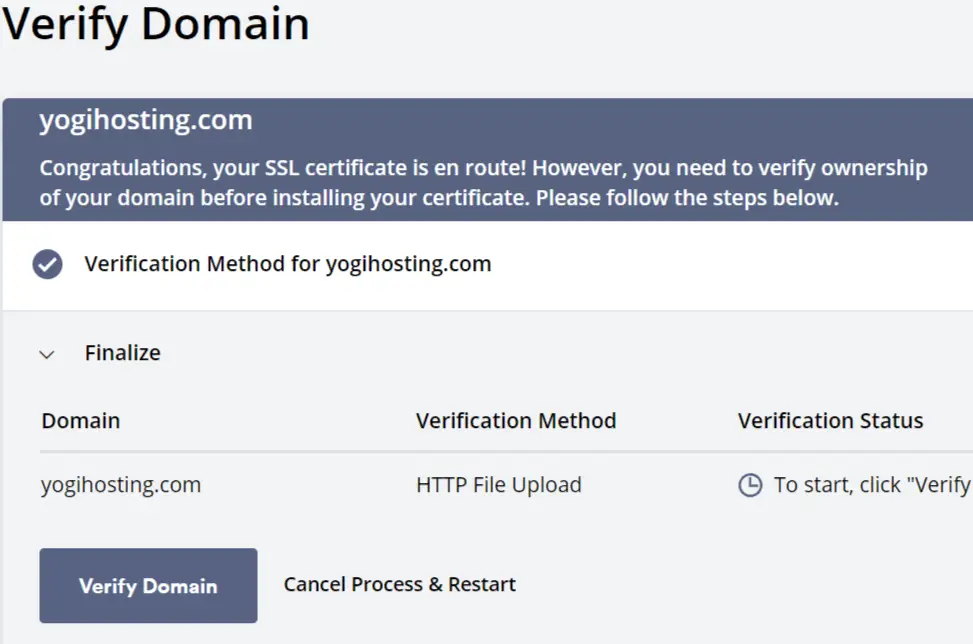
Upon successful verification you will be provided with the SSL in a zip file.

The zip file will contain 3 files so extract them to some folder on your drive. These files are:
- 1. Certificate
- 2. Private Key
- 3. CA Bundle
You can open these files on notepad and they will look like as shown by the below images.

Congrats! You have successfully created the SSL Certificate. Now I will tell how to install it on your cPanel or Plesk panel.
Installing SSL manually in cPanel
The cPanel is provided on Linux based hostings. So if your hosting is Linux based then open your cPanel (given in your hosting account). Inside the cPanel, click the SSL/TLS icon provided under the Security area. I have explained this in the below video: You will reach the SSL/TLS settings page. In this page, click on the option that says – Manage SSL sites.

Now you will taken to the Manage SSL page. Here you have to select the domain (to which this certificate will be installed), and paste the Certificate: (CRT), Private Key (KEY) and Certificate Authority Bundle: (CABUNDLE) which already are created in the before steps.
Check the below image where I have shown this thing:

Finally click the Install Certificate button.
The SSL Certificate will be installed in few seconds and you will now be able to open your website in https mode.
Redirecting all http requests to https from .htaccess
To force all web traffic to your domain to use HTTPS, you need to redirect them to https URLs of your site. You can do this by inserting the following lines of code in the .htaccess file given in your website’s root folder.
RewriteEngine On
RewriteCond %{HTTPS} off [OR]
RewriteCond %{HTTP_HOST} ^www. [NC]
RewriteCond %{HTTP_HOST} ^(?:www.)?(.+)$ [NC]
RewriteRule ^ https://%1%{REQUEST_URI} [L,NE,R=301]
Installing SSL manually in Plesk
The Plesk panel is provided on Windows based hostings. So if your hosting is windows based then open the Plesk (provided in your hosting account), then click the SSL/TLS certificates icon. See the below video:
You will reach the ‘SSL/TLS Certificates’ page. In this page click the Add SSL/TLS Certificate button.

You will not reach a new page where you can add your SSL Certificate.
Here, on the Certificate name field, give your certificate any name of your choice, and simply copy and paste the Certificate: (CRT), Private Key (KEY) and Certificate Authority Bundle: (CABUNDLE) which already are created in the above steps.
Finally click the ‘Upload Certificate’ button, check the below image which explain this:

Your SSL certificate will be added and you can see it as shown by the below image:

Now you have to apply this SSL Certificate to your domain. Do so, by going to Plesk, and click the Hosting Settings icon.
Next, under the ‘Security’ heading, check the below 2 options:
1. SSL/TLS support
2. Permanent SEO-safe 301 redirect from HTTP to HTTPS
And also select the Certificate name.
Finally, in the end click the ‘OK’ button.

The SSL Certificate will be installed and you will now be able to open your websites in ‘https’ mode.
Redirecting all requests from http to https by using web.config
Plesk panel already have this option called Permanent SEO-safe 301 redirect from HTTP to HTTPS, but you can also do it from the web.config file.The code to add to your web.config file is:
<system.webServer>
  <rewrite>
    <rules>
      <rule name="HTTPS force" enabled="true" stopProcessing="true">
        <match url="(.*)" />
          <conditions>
            <add input="{HTTPS}" pattern="^OFF$" />
          </conditions>
          <action type="Redirect" url="https://{HTTP_HOST}{REQUEST_URI}" redirectType="Permanent" />
      </rule>
    </rules>
  </rewrite>
</system.webServer>
I hope you like this tutorial on manual installing of Free SSL Certificate on your domain. If your friends every ask you the same question – Is SSL Free?. Then simply point them to this tutorial.
SHARE THIS ARTICLE
Related Tutorials:


ABOUT THE AUTHOR
I hope you enjoyed reading this tutorial. If it helped you then consider buying a cup of coffee for me. This will help me in writing more such good tutorials for the readers. Thank you.
Comments
Leave a Reply
Please Consider Donating us
We are helping millions of Beginners and Professionals to learn new programming technologies.
Please consider donating us:


HELLO EVERYONE
 Welcome to YogiHosting - A Programming Tutorial Website. It is used by millions of people around the world to learn and explore about ASP.NET Core, Blazor, jQuery, JavaScript, Docker, Kubernetes and other topics.
SUBSCRIBE TO NEWSLETTER
Enter your email address to subscribe to this blog and receive notifications of new posts by email.
Join 90K other subscribers
Hi there, i read your blog occasionally and i own a similar one and i was just wondering if you
get a lot of spam comments? If so how do you stop it, any plugin or anything you can advise? I get so much lately it’s driving me crazy so any support is very much appreciated.
I use Cloudflare to stop spams. I have written an article on it, check it – https://www.yogihosting.com/what-is-cloudflare-and-why-to-use-it-in-your-website/