What is CloudFlare and how it gives Speed and Security to your website ?

CloudFlare is a Content Delivery Network (CDN) that increases the loading speed time of your website. It also provides excellent security against attacks from hackers and viruses.
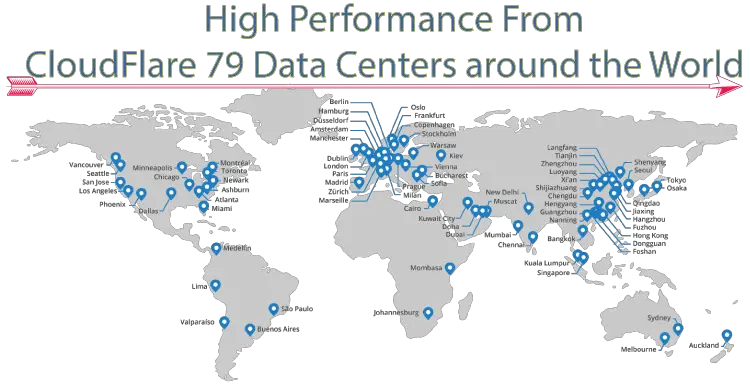
CloudFlare has 79 Data Centers distributed globally. These Data Centers store your website’s static contents like Images, Scripts & CSS. They provide your visitors, your website’s content, at high speed.
CloudFlare also acts as a protective shield and blocks hacking attacks made to your website.
Yes, this is because CloudFlare has 79 Servers unlike the single server of your Web Hosting. You will get much higher loading speed by using CloudFlare.
How Does CloudFlare Work ?
After activating CloudFlare in your website, it route your traffic through it’s Data Centers. That is, the traffic is scanned, and the Data Center nearest to the user (based on geographic location of the user) will serve them your website’s static contents.
This greatly increases the website’s loading speed and performance. CloudFlare also provides a number of excellent features which are very useful to your website.
Benefits of CloudFlare
There are a number of benefits of using CloudFlare –
1. High Performance
CloudFlare provides a big improvement to your website loading speed. A fast loading speed makes users to stay longer, and that adds to the SEO benefits. Just note down your website loading speed at present and compare it with the loading speed you get after activating CloudFlare, you will see upto 70% to 90% difference.
2. Protection against Attacks and Spam
CloudFlare protects your website against all type of attacks like DDoS (Denial of Service), Layer 3/4 attacks, DNS amplification attacks, etc. CloudFlare filters out most of the spam attacks too. This is good for your website’s health.

In your CloudFlare account you can choose between 3 types of security levels – Easy, Medium and High.
3. Save Server Bandwidth
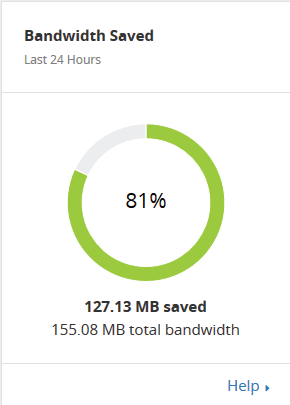
Websites get some useless traffic, due to Spam and bots, and this consumes unnecessary bandwidth. But with CloudFlare this useless traffic is filtered resulting in saving your bandwidth.
CloudFlare saves Millions of ‘GB’ every month for websites that uses it. This is incredible for people who are using a host that charges for bandwidth like Amazon Web Services (AWS) or Google.
4. Prevents Site from Crashing
CloudFlare’s large number of Data Centers does automatic load sharing. You don’t have to think about website high load as CloudFlare will prevent it from crashing during high traffic.
CloudFlare Setup in your Website
It is only a 5 minute procedure to activate CloudFlare in your website. The steps listed below will explain all this to you –
First create your free account in CloudFlare then click Add Site link to add your Website’s Domain Name.
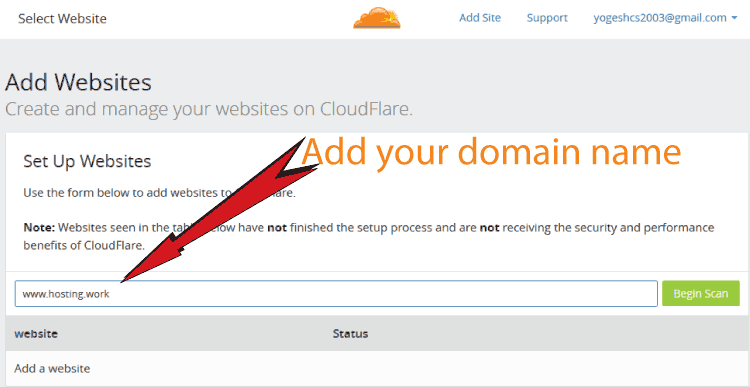

CloudFlare will Scan your domain and show it’s DNS Records. By Default CloudFlare will be applied to the A and CNAME Records but you can also apply CloudFlare on other DNS Records by clicking on the status icon given next to them.
Click Continue button at the bottom to proceed.

CloudFlare will ask you to select a plan – select Free Website Plan and click continue.

CloudFlare will provide new Nameservers (CloudFlare DNS), and ask you to change your previous Nameservers with these.

Changing Nameservers to CloudFlare DNS
To change your Domain Nameservers to CloudFlare DNS>, go to your Domain Registrar account (the website where you have registered your domain). Then go to Manage DNS area of the domain. Click on Change Nameservers button and add CloudFlare Nameservers.
Normally it takes under 1 hour for this Nameservers change to take effect. But sometimes you may have to wait for 48 hours (DNS propagation time).
Once CloudFlare DNS take effect, your website will be superfast and highly secured.

CloudFlare for WordPress
Like any website, CloudFlare can be easily setup in a WordPress website. First create your account in CloudFlare, add your website and then change the Nameservers to that of CloudFlare (as described in the above paragraph).
WordPress users can download and install CloudFlare Plugin, Click Here
CloudFlare Plugin provides 2 important things:
- When to click Spam button for a comment, this information is send to the CloudFlare which in turn updates its spammers list.
- CloudFlare spam fighting engines keeps on updating itself and thus provides better spam protection to your websites and also to other websites that uses it.
CloudFlare Plugin Settings
After activating the plugin go to Settings > CloudFlare in your dashboard. The plugin will ask you to enter the following information –
- CloudFlare Domain Name – The name of your domain (without http, https, www) eg. mydomain.com
- CloudFlare API Key – The API key given in your CloudFlare account My Setting area.
- CloudFlare API Email – Your registered email in CloudFlare.
- Development Mode – Choose Off.
- HTTPS Protocol Rewriting – Choose On.

Hope you liked CloudFlare, do share your valuable feedback and questions in the below comments section.
SHARE THIS ARTICLE
Related Tutorials:


ABOUT THE AUTHOR
I hope you enjoyed reading this tutorial. If it helped you then consider buying a cup of coffee for me. This will help me in writing more such good tutorials for the readers. Thank you.
Please Consider Donating us
We are helping millions of Beginners and Professionals to learn new programming technologies.
Please consider donating us:


HELLO EVERYONE
 Welcome to YogiHosting - A Programming Tutorial Website. It is used by millions of people around the world to learn and explore about ASP.NET Core, Blazor, jQuery, JavaScript, Docker, Kubernetes and other topics.
SUBSCRIBE TO NEWSLETTER
Enter your email address to subscribe to this blog and receive notifications of new posts by email.
Join 90K other subscribers