Create amazing Web Forms using Contact Form 7 Plugin in WordPress

Each website needs a Web Form to collect data filled by the user. The Web Forms can have any number of fields to be filled like text fields, radio button, checkboxes, drop downs and so on. When the user fills and submits this form, the information is send to the website admin with an automatic eamil.
Contact Form 7
Creating Web Forms in your WordPress website can be easily done through Contact Form 7 Plugin (also known as CF7 Plugin). It is used by over 1 million people in their WordPress websites.
- Create any type of Web Form and in unlimited quantity.
- Fast Form creation and easy to use
- Each created form can be shown in multiple pages or post using just a WordPress Shortcode.
- It is 100% free to use and there is no limit anywhere.
The plugin is free to use and can be downloaded from here.
Display Your First Web Form with CF7 Plugin
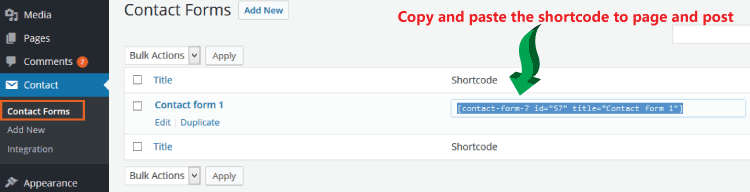
In Contact Forms area of your WordPress, all the forms are listed. The plugin comes with a premade first form called Contact form 1.
Copy it’s Shortcode and place it in any page or post. Visitors to your website can fill and submit the form, their submission data will be sent to your email address automatically.
Customize Contact Form 7
You may want to make forms having different fields like checkboxes, drop downs, text fields, email, telephones, etc. Luckily these are all provided in CF7. For the purpose of understanding let us make a Job application form with CF7.
Job Application Web Form with CF7
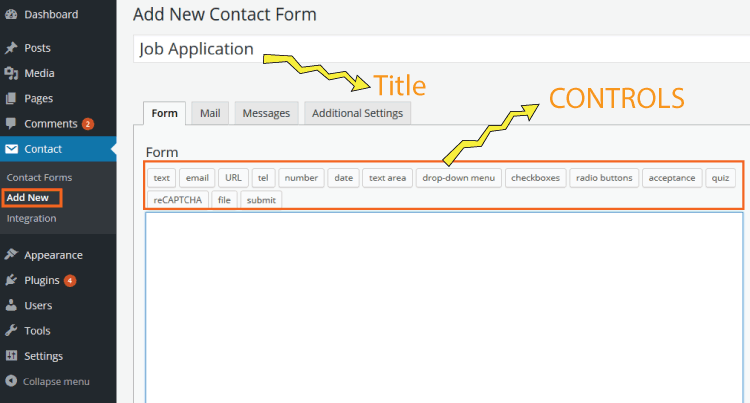
Start creating a new form from Contact > Add New area. Give the form title as Job Application.
Since I will be creating the form, from the beginning, therefore delete entire HTML which is given there in the big text area.
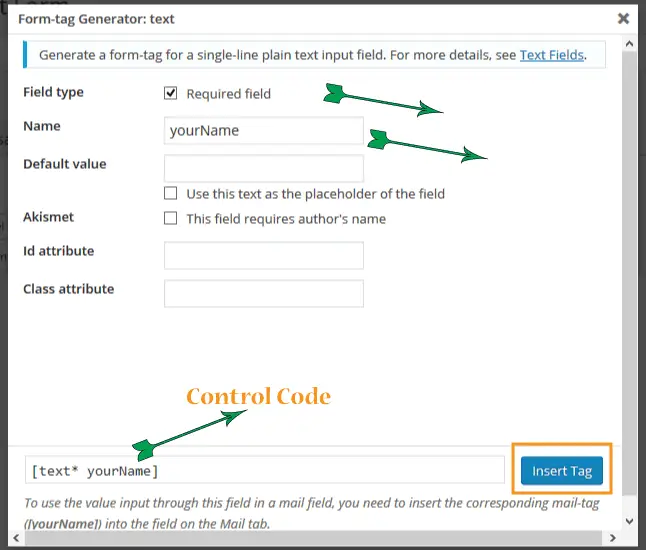
Click on text tag given at the top. In the window that opens – check the Required field checkbox and enter the name as yourName, then click Insert Tag> button. The control will be added to the form.
Note that there are also other properties which can be given to the tag like its default value, placeholder text, id and class attribute.
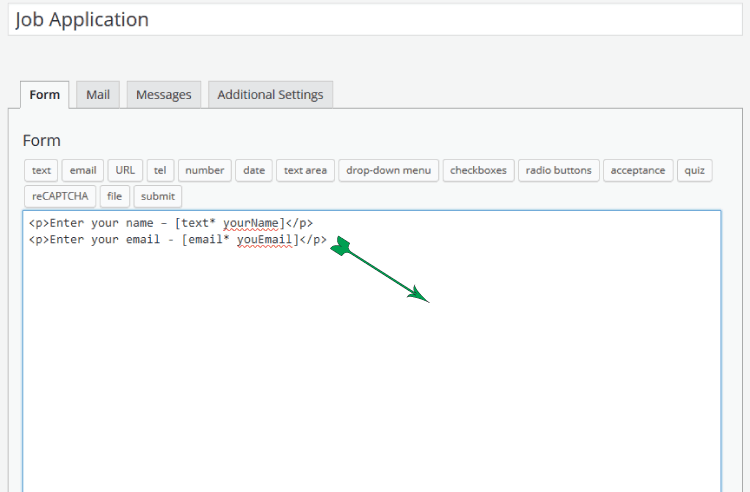
To make the form look in good design, I give a small text – Enter your name – , before the tag. This makes easy for people to know what they are required to enter in the form. Also put it inside a HTML Paragraph Tag (‘p’).
It will look like as shown below:
<p>Enter your name – [text* yourName]</p>

Click on the email tag and check the Required field checkbox control. Give it name as yourEmail and click the Insert Tag button.
Similarly as I did in point 1, give a text Enter your email – in front of it, and put it inside paragraph tag.
The tag formed for this is:
<p>Enter your email - [email* youEmail]</p>
Click on url tag, then check Required Field checkbox, and give it name as websiteDesigned.
Click Insert Tag button, then add text Website designed by you – in front of it, and put it inside paragraph tag.
The tag formed for this is:
<p>Website designed by you - [url* websiteDesigned]</p>
Click tel tag (which is for telephone). Give it name yourTelephone and make it required field. Click ‘Insert Tag’ button, then add text Your telephone – in front of it, and put it inside paragraph tag.
The tag formed is:
<p>Your telephone - [tel* yourtelephone]</p>
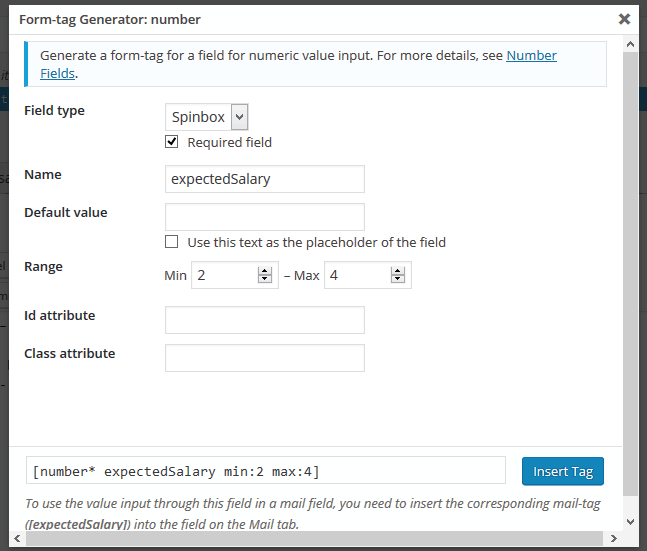
Click number tag (which will be used to take expected salary). It can have either two field type – Slider or Spinbox. Here I take Spinbox but you can take any.
Give it name expectedSalary and make it a required field.
To accept number only and from a given range, I will use range field. For range field put 2 for Min and 4 for Max.
Next click the Insert Tag button to add this to the form.
Like before, add text Expected salary in USD/month – in front of it, and put it inside paragraph tag.
The tag formed is:
<p>Expected salary in USD/month - [number* expectedSalary min:2 max:4]</p>
Click date tag to take the expected joining date. Make it a required field, and name it as expectedJoining.
Through range field will I will restrict it to take only date that lie in the min and max limits.
The date format should be in YYYY-MM-DD. You can use a relative date format (e.g., ‘today+5days’, ‘today-3weeks’) as well.
So put the date range as 2016-06-21 for Min and 2016-06-30 for Max. Click the Insert Tag button, then add text Expected joining date – in front of it and put it inside a paragraph tag.
The tag formed is:
<p>Expected joining date - [date* expectedJoining min:2016-06-21 max:2016-06-30]</p>
Click text area tag and make it a required field. Name it yourSkills and press the Insert Tag button.
Then add text Your skills – , in front of it, and put it inside paragraph tag.
The tag formed is:
<p>Your skills -[textarea* yourSkills]</p>
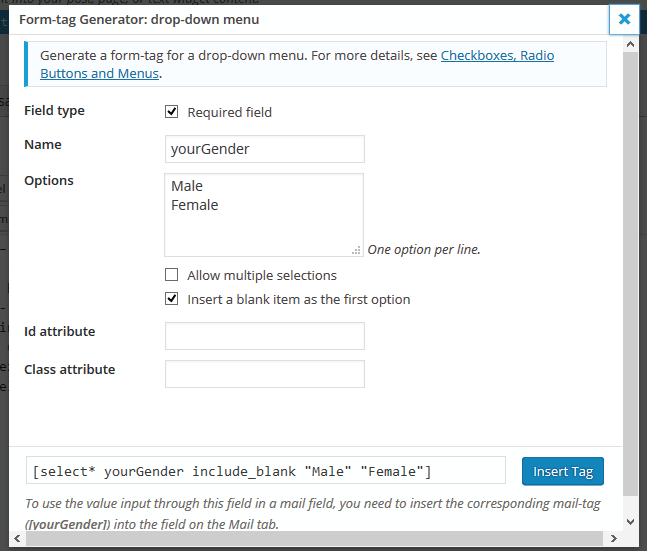
Now for drop-down menu, make it a required field and give it a name as yourGender. In the options field add ‘Male’ and ‘Female’ (one per line). Check the option Insert a blank item as the first option then click the Insert Tag button.
Add text Your gender – , in front of it, and put it inside paragraph tag.
The tag formed is:
<p>Your gender - [select* yourGender include_blank "Male" "Female"]</p>
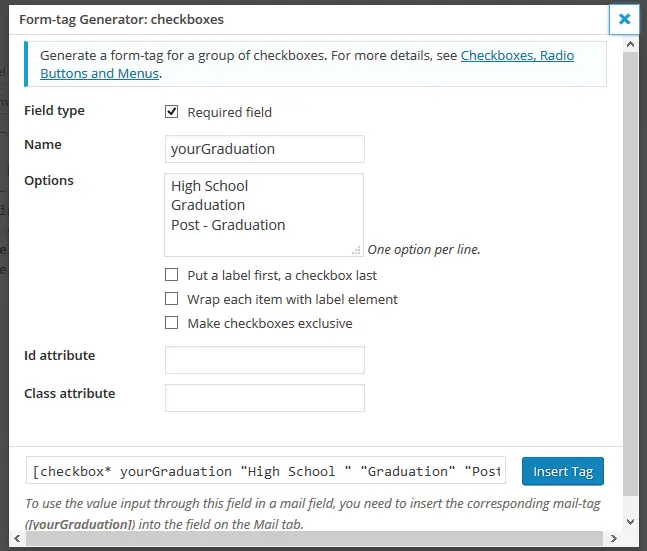
Click tag checkbox, it will use it to ask for the candidate’s education level. Make it a required field and name it yourEducation.
In Options, add these three – High School, Graduation, Post – Graduation (one per line).
Add it and style it just like I did for the previous tags.
The tag formed is:
<p>Your education - [checkbox* yourEducation "High School " "Graduation" "Post - Graduation"]</p>
Note that if I check the option Make checkboxes exclusive then only one checkbox option can be checked out of the three.
Click radio buttons tag, I will use to ask if the candidate is willing to relocate to New York City. There is no required field so only put a name called relocate. For the Options add – ‘Yes’ and ‘No’ one per line.
Add it and style it just like the previous tags. The tag formed is:
<p>Ready to relocate to New York City - [radio relocate default:1 "Yes " "No"]</p>
Click acceptance tag, give it name as acceptTerms. After adding and styling, you will get the tag like this –
<p>Accept our terms - [acceptance acceptTerms]</p>
Click quiz tag, which can test a small GK knowledge of the candidate. Name it ‘GK’, and in the Questions and answers add – President of USA ?|Obama.
Here President of USA ? is the question and Obama is the answer which the candidate has to type. They are separated by | character.
Add it and style it just like previous tags. The tag formed is:
<p>Answer our question - [quiz GK "President of USA ?|Obama"]</p>
Contact Form 7 comes with reCaptcha, which is very tough on spam and bots, reCaptcha is a google product and does not let any spammer or bot to fill and submit the form. So you are sure that all entries are valid and filled by real persons.
Contact Form 7 reCaptcha
You can integrate reCaptcha with Contact Form 7 plugin from the Contact > Integration area. Then click the Configure Keys button which will take you to a new page which ask you to enter Site Key and Secret Key.
Using reCaptcha you can prevent spam bots from submitting your form. The article on Contact Form 7 reCaptcha explains reCaptcha’s Integration in CF7.
If you have integrated reCaptcha, then you can use it in your form. Click reCaptcha tag and click the Insert Tag button. Simply put it inside the paragraph tag.
The tag formed:
<p>[recaptcha]</p>
Click file tag, make it required field and name it yourCV. This will be used to collect candidate’s CV. Press the Insert Tag button. The tag gets added to the form, put it inside paragraph tag for styling purpose.
The tag formed is:
<p>[file* yourCV]</p>
Now there comes the last tag, which is the submit tag. This will create a ‘Submit’ button through which the form can be submitted. In the label field put Submit Application. Click ‘Insert Tag’ button to add it to the form. Put it inside paragraph tag.
The tag formed is:
<p>[submit "Submit Application"]</p>
I have Completed our Form, here it’s complete code is –
<p>Enter your name – [text* yourName]</p>
<p>Enter your email - [email* youEmail]</p>
<p>Website designed by you  - [url* websiteDesigned]</p>
<p>Your telephone  - [tel* yourtelephone]</p>
<p>Expected salary in USD/month - [number* expectedSalary min:2 max:4]</p>
<p>Expected joining date - [date* expectedJoining min:2016-06-21 max:2016-06-30]</p>
<p>Your skills - [textarea* yourSkills]</p>
<p>Your gender - [select* yourGender include_blank "Male" "Female"]</p>
<p>Your education - [checkbox* yourEducation "High School " "Graduation" "Post - Graduation"]</p>
<p>Ready to relocate to New York City - [radio relocate default:1 "Yes " "No"]</p>
<p>Accept our terms - [acceptance acceptTerms]</p>
<p>Answer our question - [quiz GK "President of USA ?|Obama"]</p>
<p>[recaptcha]</p>
<p>[file* yourCV]</p>
<p>[submit "Submit Application"]</p>
Customize Contact Form 7 Email
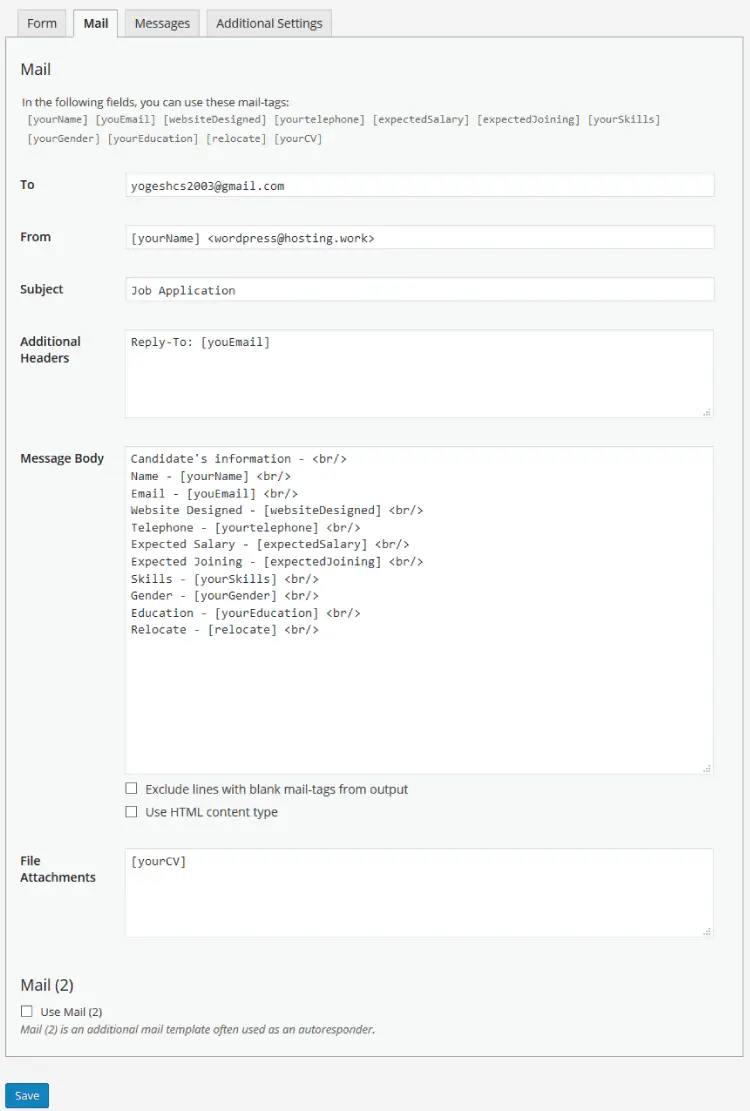
I have created the form, now we need to customize the mail which CF7 plugin will send. Click on the Mail tab where you will see all our created tags except – acceptance, quiz, reCaptcha and submit. This is because I cannot ask for candidate information from these 4 tags.
Now I explain how to customize the mail –
- To – For this field enter your email address. This is where the CF7 plugin will send the candidate’s information.
- From – This field will tell from which email, CF7 emails will be send. Put [yourName] <wordpress@hosting.work> in this field. You may remember [yourName] is the tag for candidate’s name.
- Subject – Put Job Application here, or anything you wish.
- Additional Headers – In this field put Reply-To: [youEmail]. It means if you reply to the mail it will be send to the candidate’s email.
- Message Body – In this field you can send the information of the candidate by putting the different tags. In order to make our email look nice, I used some text before each field that will tell what the given tag shows.
The Message body will look like –
Candidate's information - <br/>
Name - [yourName] <br/>
Email - [youEmail] <br/>
Website Designed - [websiteDesigned] <br/>
Telephone - [yourtelephone] <br/>
Expected Salary - [expectedSalary] <br/>
Expected Joining - [expectedJoining] <br/>
Skills - [yourSkills] <br/>
Gender - [yourGender] <br/>
Education - [yourEducation] <br/>
Relocate - [relocate] <br/>
File Attachments – In this field put [yourCV]. You may remember that [yourCV] is the tag for candidate’s CV.
In the end Click the Save button.
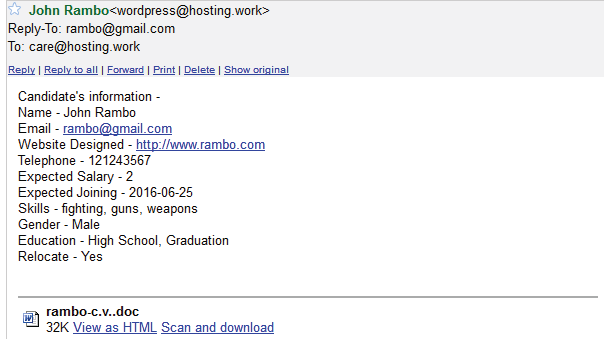
The below image shows how mail fields will look.
Showing the Contact Form 7 Form in a Page or Post
Our form is finally created and is ready to test. Simply copy its shortcode, which may look like:
[contact-form-7 id="67" title="Job Application"]
Simply copy and paste it in any page or post.
This is how our Web Form looks (shown below). You may notice that it does not look good in design, you can make its proper design using CSS and HTML by yourself.
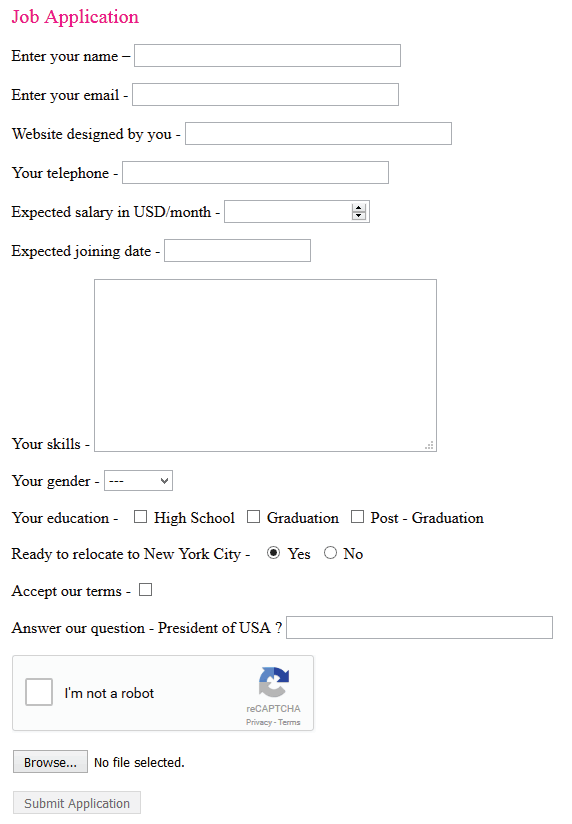
Now whenever a candidate fills and submits the form, all the information will be send to your email address.
This is how CF7 emails will look –
CF7 Forms can be styled easily using CSS. Take a look on Contact Form 7 Style Tutorial to learn about styling CF7 form.
Troubleshooting
CF7 sends instant email as soon as the form is submitted. If you are not receiving email for it, then please check your spam folder. Email delivery also gets delayed sometimes so kindly wait for 2 minutes for the email to arrive.
Contact Form 7 not sending Email
Sometimes CF7 is unable to send emails altogether, this may be due to restrictions from your hosting server or your mail box settings. To solve this you can make Contact Form 7 Plugin to use SMTP (Simple Mail Transfer Protocol) to send its email.
Below are the steps in putting SMTP to use –
- 1. Create a new email from your hosting account.
- 2. Install and activate WP Mail SMTP plugin in your website. Click here to download this plugin.
- 3. Go to Plugins > Installed Plugins, click on Settings under the plugin WP-Mail-SMTP.
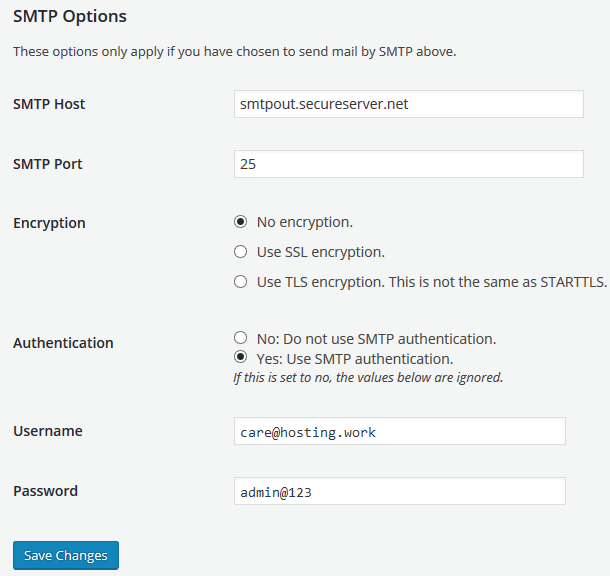
- 4. Advanced Email Options page will open, here for the fields given under SMTP Options, enter your email settings –
SMTP Host : enter your email SMTP Host name. You will get it from your hosting account.
SMTP Port : enter the port that will be used to send emails. You will also get the port no from your hosting account.
Authentication : select Yes: Use SMTP authentication.
Username: enter your full email address which you have created in step 1.
Password: enter your email password. - Click Save Changes button.
You can test to see if the SMTP is working by sending a test email from the Send a Test Email section. It will show you the result bool (true). Now your Contact Form 7 will send emails through SMTP.
Hope you like our tutorial. Please do share your comments / questions below.
SHARE THIS ARTICLE
Related Tutorials:


ABOUT THE AUTHOR
I hope you enjoyed reading this tutorial. If it helped you then consider buying a cup of coffee for me. This will help me in writing more such good tutorials for the readers. Thank you.
Please Consider Donating us
We are helping millions of Beginners and Professionals to learn new programming technologies.
Please consider donating us:


HELLO EVERYONE
 Welcome to YogiHosting - A Programming Tutorial Website. It is used by millions of people around the world to learn and explore about ASP.NET Core, Blazor, jQuery, JavaScript, Docker, Kubernetes and other topics.
SUBSCRIBE TO NEWSLETTER
Enter your email address to subscribe to this blog and receive notifications of new posts by email.
Join 90K other subscribers