How to use jQuery to update records from inside the GridView with no Page Postback and without using Update Panel

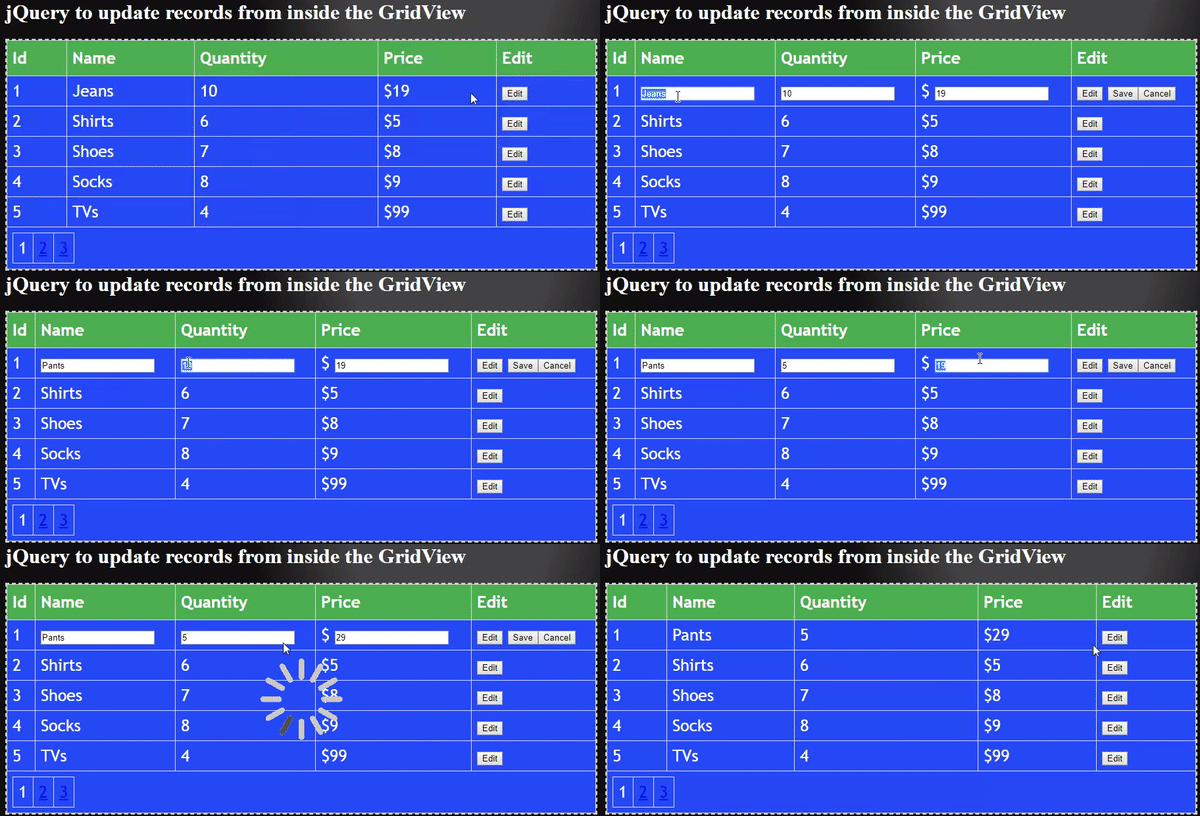
There is no need to use OnRowEditing & OnRowUpdating events of GridView when updating records from it as it can be easily done using jQuery. In this tutorial I will teach you how to use jQuery to do the update of records from inside the GridView itself so that there is No Page Postback.
The GridView code
The GridView shows the records of few products that have the following fields –
- 1. Id
- 2. Name
- 3. Quantity
- 4. Price
On the last column of this GridView there is an Edit Button through which the editing of records will be done by using jQuery.
The below video shows the working of this feature:

The GridView code is:
<asp:GridView ID="gridView" runat="server" AutoGenerateColumns="false">
    <Columns>
        <asp:BoundField DataField="Id" HeaderText="Id" />
        <asp:TemplateField HeaderText="Name">
            <ItemTemplate>
                <asp:Label ID="nameLabel" runat="server" Text='<%#Bind("Name") %>'></asp:Label>
            </ItemTemplate>
        </asp:TemplateField>
        <asp:TemplateField HeaderText="Quantity">
            <ItemTemplate>
                <asp:Label ID="TxtQuantity" runat="server" Text='<%# Bind("Quantity") %>'></asp:Label>
            </ItemTemplate>
        </asp:TemplateField>
        <asp:TemplateField HeaderText="Price">
            <ItemTemplate>
                $<asp:Label ID="TxtPrice" runat="server" Text='<%# Bind("Price") %>'></asp:Label>
            </ItemTemplate>
        </asp:TemplateField>
        <asp:TemplateField HeaderText="Edit" ItemStyle-CssClass="editColumn">
            <ItemTemplate>
                <asp:Button ID="editButton" runat="server" Text="Edit"></asp:Button>
            </ItemTemplate>
        </asp:TemplateField>
    </Columns>
</asp:GridView>
Notice the CSS class called editColumn is provided for the last column of the GridView i.e. ItemStyle-CssClass=”editColumn”. This is because I will make use of this CSS class in my jQuery code.
jQuery Code for updating GridView records
In your web page first reference the jQuery in the script tag and create the jQuery Document Ready method.
<script src="https://code.jquery.com/jquery-3.3.1.min.js"></script>
<script>
    $(function () {
    // write jQuery code from here
    });
</script>
Adding ‘Save’ and ‘Cancel’ buttons on the last column of the GridView
On the Edit Button’s click event, I will add 2 new buttons called ‘Save’ and ‘Cancel’ inside the last column of the GridView. This is explained by the below video:

The HTML of the last column of the GridView is:
<td class="editColumn">
    <input type="submit" name="gridView$ctl02$editButton" value="Edit" id="gridView_editButton_0">
</td>
After the 2 buttons are added, the HTML of the last column becomes:
<td class="editColumn">
    <input type="submit" name="gridView$ctl02$editButton" value="Edit" id="gridView_editButton_0">
    <button class="save">Save</button>
    <button class="cancel">Cancel</button>
</td>
Notice the Save button has the CSS class as save and the Cancel button has the CSS class as cancel.
So in order to add the ‘Save’ and ‘Cancel’ buttons on the last column of the GridView, add the below jQuery code inside the $(document).ready() method:
$("#<%=gridView.ClientID %> .editColumn input[type='submit']").click(function () {
    removeButtons();
    addButtons($(this));
    resetBack();

    var tds = $(this).parents("tr").find("td");
    $(tds).each(function (index, value) {
        var span = $(value).find("span");
        if (span.length > 0) {
            span.parent().append("<input class='added' type='text' value='" + span.text() + "'>");
            span.hide();
        }
    });
    return false;
});
function removeButtons() {
    $(".save").remove();
    $(".cancel").remove();
}

function addButtons(editButton) {
    $(editButton).parent().append("<button class='save'>Save</button><button class='cancel'>Cancel</button>")
}

function resetBack() {
    $(".added").remove();
    $("span:hidden").show();
}
Explanation: I have applied the click event for the Edit Button. Since this button is inside the column that has CSS class called editColumn, and is rendered as input[type=’submit’]. Therefore I applied it’s click event like this:
$("#<%=gridView.ClientID %> .editColumn input[type='submit']").click(function () {

//…

});
Next, inside this click event I called 3 functions which are described below:
- 1. removeButtons() – it removes all the ‘Save’ and ‘Cancel’ buttons from the GridView. The code of this function is:
function removeButtons() { $(".save").remove(); $(".cancel").remove(); } - 2. addButtons($(this)) – it adds the ‘Save’ and ‘Cancel’ buttons next to the ‘Edit’ button that is clicked. It’s code is:
function addButtons(editButton) {
    $(editButton).parent().append("<button class='save'>Save</button><button class='cancel'>Cancel</button>")
}
This function takes the clicked edit button as it’s parameter and from that it finds the parent td element of the clicked Edit Button (by using .parent() method).
Next it uses the .append() method for adding these 2 buttons on the td element.
- 3. resetBack() – it removes any Add Button from the GridView. It also un-hides all the span elements that are hidden. It’s code is:
function resetBack() {
    $(".added").remove();
    $("span:hidden").show();
}
To go into a bit deeper, the GridView creates ‘span’ elements to show the values of the 3 column – ‘Name’, ‘Quantity’ & ‘Price’. When you check any row’s HTML and you will see:
<tr>
    <td>2</td>
    <td>
        <span id="gridView_nameLabel_1">Shirts</span>
    </td>
    <td>
        <span id="gridView_TxtQuantity_1">6</span>
    </td>
    <td>
         $<span id="gridView_TxtPrice_1">5</span>
    </td><td class="editColumn">
        <input type="submit" name="gridView$ctl03$editButton" value="Edit" id="gridView_editButton_1">
    </td>
</tr>
When the Edit Button is clicked I am hiding these 3 span elements, and showing 3 input elements that contains the values of these 3 span elements for editing purpose (explained further in the below section). See the below image for understanding:

Next, I am hiding the 3 span elements that contain the column values of ‘Name’, ‘Quantity’ & ‘Price’.
I am also adding 3 input elements next to each of these span elements, and these input elements contains the same values like the corresponding ‘span’ elements. This is done so that the users can edit the column values. See the below image to understand it:

The code that does this work is:
var tds = $(this).parents("tr").find("td");
$(tds).each(function (index, value) {
    var span = $(value).find("span");
    if (span.length > 0) {
        span.parent().append("<input class='added' type='text' value='" + span.text() + "'>");
        span.hide();
    }
});
In the above code I am looping through each of the column’s td elements by using the jQuery Each method. I am then finding the span element inside each of these ‘tds’ and doing the 2 things:
1. Adding the input element that contains the span value.
span.parent().append("<input class='added' type='text' value='" + span.text() + "'>");2. Hiding the span element.
span.hide();
Adding click event of the ‘Save’ and ‘Cancel’ buttons
Next, I have to add the ‘Save’ and ‘Cancel’ buttons click events. So add the below code inside the $(document).ready() method:
$(".editColumn").on("click", "button", function () {
    if ($(this).text() == "Cancel") {
        removeButtons();
        resetBack();
    }
    else if ($(this).text() == "Save") {
        var newValues = $(this).parents("tr").find("td:nth-child(1)").text() + ",";

        var inputs = $(this).parents("tr").find("input[type='text']");
        $(inputs).each(function (index, value) {
            newValues += $(value).val() + ',';
        });

        saveButton = $(this);
        $.ajax({
            type: "POST",
            url: "index.aspx/updateproduct",
            contentType: "application/json; charset=utf-8",
            data: '{"productData":"' + newValues + '"}',
            dataType: "json",
            success: function (result, status, xhr) {
                if (result.d == "success") {
                    var inputs = $(saveButton).parents("tr").find("input[type='text']");
                    $(inputs).each(function (index, value) {
                        $(this).siblings("span").text($(value).val());
                    });
                    removeButtons();
                    resetBack();
                }
                else {
                    removeButtons();
                    resetBack();
                }
            },
            error: function (xhr, status, error) {
                removeButtons();
                resetBack();
                console.log("Result: " + status + " " + error + " " + xhr.status + " " + xhr.statusText)
            }
        });
    }
    return false;
});
Explanation: These 2 buttons are added dynamically from jQuery therefore I used the jQuery On method to creates their click events as:
$(".editColumn").on("click", "button", function () {

//…

});
I am finding out which button is clicked, through their text, from the jQuery Text method as:
if ($(this).text() == "Cancel") {

    //…

}
else if ($(this).text() == "Save") {

    //…
}
Inside the ‘Cancel’ button’s click, I am:
- 1. Removing the ‘Save’ and ‘Cancel’ buttons from the row.
- 2. Removing the added input elements from the 3 columns and un-hiding the span elements in the 3 columns.
The code which does this work is:
removeButtons();
resetBack();
Through the ‘Save’ button, the corresponding row’s record is updated on the database. For this I am using the jQuery AJAX method to call a C# function given in my .aspx.cs page.
To my C# function I will pass the updated values of the columns in comma separated string. I also add the ‘Id’ column value, of the corresponding row, at the first place in this comma separated string.
For example, if the first row is edited then the comma separated string would be:
1, Pants, 5, 10So I got the Id column’s value as:
var newValues = $(this).parents("tr").find("td:nth-child(1)").text() + ",";Then I added the 3 input element’s values to the variable called newValues as:
var inputs = $(this).parents("tr").find("input[type='text']");
$(inputs).each(function (index, value) {
    newValues += $(value).val() + ',';
});
Next, you will see that I stored the ‘Save’ button in a variable – saveButton = $(this);. This is because I will be using this variable Inside my .ajax() method code.
The .ajax() method calls the C# function called updateproduct and passes the new values along with the product id, to its parameter like:
data: '{"productData":"' + newValues + '"}'The C# function will either return string success or failed depending upon whether the updation of the records completed successfully or not.
So inside the success callback method of the .ajax() method I have applied the if condition as:
if (result.d == "success") {
    var inputs = $(saveButton).parents("tr").find("input[type='text']");
    $(inputs).each(function (index, value) {
        $(this).siblings("span").text($(value).val());
    });
    removeButtons();
    resetBack();
}
else {
    removeButtons();
    resetBack();
}
If I received the success string from the C# method, then I am looping through all the input elements of the row and setting their values on the corresponding span element. This will tell the users that the update method is completed successfully.
Next I am removing the input element and the 2 added buttons by calling these 2 methods:
removeButtons();
resetBack();
In case the string received is not ‘success then I am simply calling the below 2 method to tell users that the operation has failed:
removeButtons();
resetBack();
In case of some error during the .ajax() method call I am logging the message on the console window:
error: function (xhr, status, error) {
    removeButtons();
    resetBack();
    console.log("Result: " + status + " " + error + " " + xhr.status + " " + xhr.statusText)
}
C# method which is called by jQuery AJAX code
Now in your .aspx.cs page add the UpdateProduct() function:
[WebMethod]
public static string UpdateProduct(string productData)
{
    // Do the editing of the row.
    return "success";
}
Notice that this function is provided with the [WebMethod] attribute. In this function you can do the updation of the records on the database by using ADO.NET or Entity Framework Core.
To test the ‘update’ feature, add the following code to your C# page:
using System;
using System.Data;
using System.Linq;
using System.Web;
using System.Web.Services;
using System.Web.UI.WebControls;

public partial class aspnet_gridview_update_jquery_index : System.Web.UI.Page
{
    protected void Page_Load(object sender, EventArgs e)
    {
        if (!IsPostBack)
            BindGridView();
    }

    [WebMethod]
    public static string UpdateProduct(string productData)
    {
        System.Threading.Thread.Sleep(2000);
        CreateDataTable(productData);
        return "success";
    }

    public static void CreateDataTable(string productData = "")
    {
        DataTable dataTable = (DataTable)HttpContext.Current.Session["DataTable"];

        if (dataTable == null)
        {
            dataTable = new DataTable();
            DataColumn[] dataColumn = new DataColumn[]
            {
                new DataColumn("Id"),
                new DataColumn("Name"),
                new DataColumn("Quantity"),
                new DataColumn("Price")
            };

            dataTable.Columns.AddRange(dataColumn);
            dataTable.Rows.Add(new object[] { 1, "Pants", 5, 10 });
            dataTable.Rows.Add(new object[] { 2, "Shirts", 6, 5 });
            dataTable.Rows.Add(new object[] { 3, "Shoes", 7, 8 });
            dataTable.Rows.Add(new object[] { 4, "Socks", 8, 9 });
            dataTable.Rows.Add(new object[] { 5, "TVs", 4, 99 });
            dataTable.Rows.Add(new object[] { 6, "CDs", 5, 2 });
            dataTable.Rows.Add(new object[] { 7, "Keyboards", 8, 3 });
            dataTable.Rows.Add(new object[] { 8, "Mouses", 3, 5 });
            dataTable.Rows.Add(new object[] { 9, "Laptops", 6, 199 });
            dataTable.Rows.Add(new object[] { 10, "Desktops", 7, 299 });
            dataTable.Rows.Add(new object[] { 11, "Speakers", 6, 19 });
            dataTable.Rows.Add(new object[] { 12, "Bulbs", 18, 55 });
            dataTable.Rows.Add(new object[] { 13, "Playstations", 88, 44 });

            HttpContext.Current.Session["DataTable"] = dataTable;
        }
        else
        {
            if (productData != "")
            {
                dataTable.AsEnumerable().Where(a => Convert.ToInt32(a["Id"]) == Convert.ToInt32(productData.Split(',')[0])).ToList().ForEach(a => { a["Name"] = productData.Split(',')[1]; a["Quantity"] = productData.Split(',')[2]; a["Price"] = productData.Split(',')[3]; });
                HttpContext.Current.Session["DataTable"] = dataTable;
            }
        }
    }
}
Notice that I am using DataTable object to store some dummy products data which will be updated by jQuery AJAX method. This ‘DataTable’ is stored on a session variable and the GridView is binded with this Session variable.
Also note that I am using LINQ to update the product data on the DataTable variable like.
dataTable.AsEnumerable().Where(a => Convert.ToInt32(a["Id"]) == Convert.ToInt32(productData.Split(',')[0])).ToList().ForEach(a => { a["Name"] = productData.Split(',')[1]; a["Quantity"] = productData.Split(',')[2]; a["Price"] = productData.Split(',')[3]; });You can now download the full codes from the below link:


 Welcome to YogiHosting - A Programming Tutorial Website. It is used by millions of people around the world to learn and explore about ASP.NET Core, Blazor, jQuery, JavaScript, Docker, Kubernetes and other topics.