Please Consider Donating us
We are helping millions of Beginners and Professionals to learn new programming technologies.
Please consider donating us:


Learn with Codes – CRUD Operations in Entity Framework and ASP.NET MVC

CRUD Operations are the basic thing when performing database operations. You can insert a record then read, edit or delete it from the database. If you want to learn how to use Entity Framework for database operations in ASP.NET MVC website then this tutorial is going to help you a lot. So let’s start with it.
Create Database Table and Stored Procedures
The database table where the information will be inserted is the Student table.
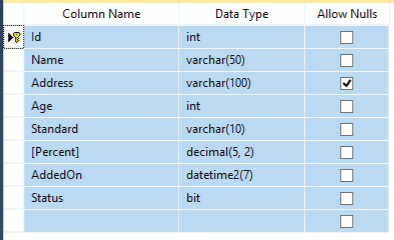
Create this table in your database by executing the below Create Table Query:
CREATE TABLE [dbo].[Student]
(
    Id int IDENTITY(1,1) NOT NULL PRIMARY KEY,
    Name varchar(50) NOT NULL,
    Address varchar(100) NULL,
    Age int NOT NULL,
    Standard varchar(10) NOT NULL,
    [Percent] decimal(5, 2) NOT NULL,
    AddedOn datetime NOT NULL DEFAULT GETDATE(),
    Status bit NOT NULL
)
To do the CRUD Operations, I will use SQL Stored Procedures (SP). These SP’s are given below:
Execute this Insert Stored Procedure (SP) to your database:
CREATE PROCEDURE [dbo].[sp_InsertStudent]
    @Name       VARCHAR(50),
    @Address        VARCHAR(100),
    @Age        INT,
    @Standard     VARCHAR(10),
    @Percent        DECIMAL(5,2),
    @Status       BIT,
    @Result     VARCHAR(50) OUTPUT,
    @CreatedId    INT OUTPUT
AS
BEGIN
    INSERT INTO Student(Name,Address,Age,Standard,[Percent],Status) VALUES (@Name,@Address,@Age,@Standard,@Percent,@Status)
    SET @Result='Insert Successful'
    SET @CreatedId=@@IDENTITY
END
Execute the Update Stored Procedure to your database.
CREATE PROCEDURE [dbo].[sp_UpdateStudent]
    @Id     INT,
    @Name       VARCHAR(50),
    @Address        VARCHAR(100),
    @Age        INT,
    @Standard     VARCHAR(10),
    @Percent        DECIMAL(5,2),
    @Status       BIT,
    @Result     VARCHAR(50) OUTPUT
AS
BEGIN
    UPDATE Student SET Name=@Name,Address=@Address,Age=@Age,Standard=@Standard,[Percent]=@Percent,Status=@Status WHERE Id=@Id
    SET @Result='Update Successful'
END
The procedure will take a Student’s id and fetch it’s record.
CREATE PROCEDURE [dbo].[sp_GetStudentById]
    @Id           INT
AS
BEGIN
    SELECT * FROM Student WHERE id=@Id
END
This procedure will show the records by pages, and it makes use of Custom Paging technique. It will take ‘Page Number’ and ‘Page Size’ as parameters.
CREATE PROCEDURE [dbo].[sp_GetStudent]
    @PageNo       INT,
    @PageSize       INT
AS
BEGIN
    DECLARE @qry  NVARCHAR(1000);
    SET @qry='SELECT * FROM (SELECT ROW_NUMBER() OVER (ORDER BY AddedON DESC) AS ''RowNum'',* FROM Student WHERE 1=1) a WHERE a.RowNum BETWEEN ('+CAST(@pageNo AS NVARCHAR(5))+'-1)*'+CAST(@pageSize AS NVARCHAR(5))+'+1 AND ('+CAST(@pageNo AS NVARCHAR(5))+'*'+CAST(@pageSize AS NVARCHAR(5))+')'
    EXEC Sp_executesql @qry
END
Custom Paging will make websites lighter and faster. You can learn how to do custom paging through my article – Custom Paging Stored Procedure.
The Student Id is passed and the procedure will delete the corresponding student from the table.
CREATE PROCEDURE [dbo].[sp_DeleteStudent]
    @Id     INT,
    @Result     VARCHAR(50) OUTPUT
AS
BEGIN
    DELETE FROM Student WHERE id=@Id
    SET @Result='Delete Successful'
END
In your application, first create a Student Model. Right click on Models folder in Visual Studio’s solution explorer, then select Add > Class. Name this class as Student.cs.
The first thing to do in this class is to add a reference for DataAnnotations, so that Server Side Validations of the controls in the View can be applied.
using System.ComponentModel.DataAnnotations;Next, add all the Student properties to it. These properties will help in the Validation process, and enables me to show error messages whenever a user tries to submit the Student form without filling the entire required fields (or he fills invalid entries).
This is how the class will look after adding these properties:
public class Student
{
    public int id { get; set; }

    [Required]
    public string name { get; set; }

    public string address { get; set; }

    [Required]
    public int age { get; set; }

    [Required]
    public string standard { get; set; }

    [Required]
    [RegularExpression(@"^\d+\.\d{0,2}$", ErrorMessage = "Invalid should be like 79.76")]
    public decimal percent { get; set; }

    [DataType(DataType.DateTime)]
    public DateTime addedOn { get; set; }

    [Required]
    public bool status { get; set; }
}
I have provided all the properties (except id and addedOn) the [Required] attribute. This is because users are required to fill them before the form can be submitted.
The id field in database table is auto generated and addedOn gets the default value from SQL’s getdate() function. So they don’t need the [Required] attribute.
The percent property has attribute of [RegularExpression(@”^\d+\.\d{0,2}$”, ErrorMessage = “Invalid should be like 79.76”)]. This allows only proper percentage values which should be up to 2 places of decimal.
The examples of valid percentage are “79.32”, “12.32”, “100.00”, etc.
The addedOn property has the attribute of [DataType(DataType.DateTime)] so that only valid date and time based entries are accepted.
The first thing is to create an Empty Controller where CRUD Operations will be performed. Name it as CrudOperationsController.
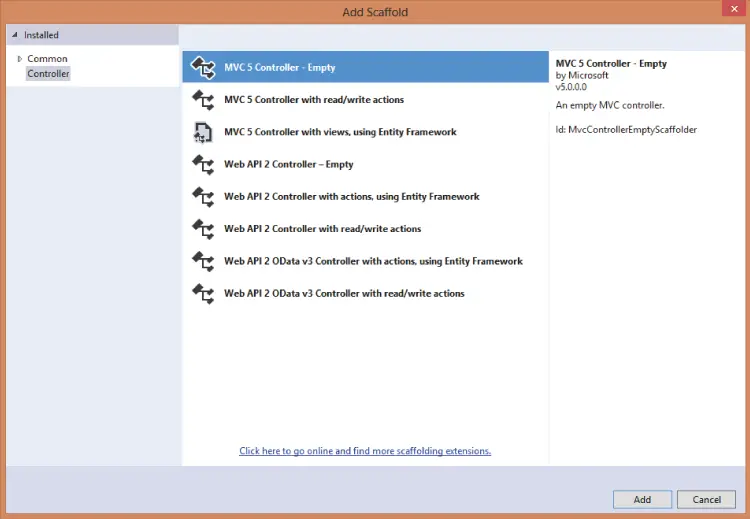
In this Controller I will perform each of the CRUD Operations using Entity Framework:
- a. Create/insert a Record.
- b. Read all the Records and showing them in a table format that has pagination links.
- c. Update the Records by clicking the edit icon shown next to the records in the table.
- d. Delete the Records by clicking the cross icon shown on the right to the records in the table.
Create/Insert Record Functionality
I will create a Student Form which allows users to fill and submit it. On submitting, the information is inserted into the database. This is done through Entity Framework and the Insert SP.
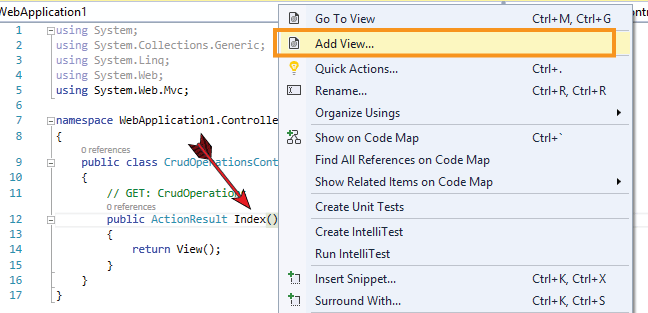
First I need to create a View where I will create the Student form. So Open the CrudOperationsController and right click on the Index action, then select Add View.
You will get Add View window. In this window give the View a name as Index and check the option that says Use a layout page:. Next click the Add button.
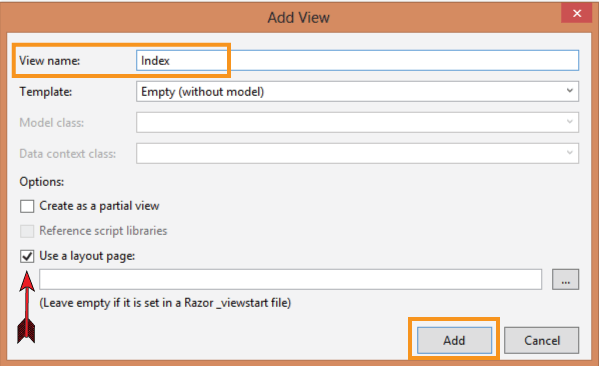
The Insert View is created and opened by Visual Studio.
@model demo.MVC.Models.Student
<style>
    #viewContent h4, #viewContent h5 {
        margin: 10px 0;
    }

    #viewContent h4 {
        color: #0184e3;
    }

    #viewContent h5, .insertLink a {
        color: #00e8ff;
    }

    #viewContent .insertLink {
        text-align: center;
    }

    #viewContent .studentFormDiv label {
        display: block;
        margin: 0;
        text-transform: capitalize;
    }

    #viewContent .studentFormDiv span {
        display: block;
        color: red;
    }

    #viewContent .studentFormDiv > form > div > div {
        padding-top: 25px;
    }

    #viewContent table {
        width: 100%;
    }

    #viewContent .studentDiv {
        padding-top: 25px;
    }

        #viewContent .studentDiv table thead {
            background-color: #0f40e0;
        }

        #viewContent .studentDiv table tbody {
            background-color: #ff6a00;
        }

    .pagingDiv {
        background: #f2f2f2;
    }

        .pagingDiv > a {
            display: inline-block;
            padding: 0px 9px;
            margin-right: 4px;
            border-radius: 3px;
            border: solid 1px #c0c0c0;
            background: #e9e9e9;
            box-shadow: inset 0px 1px 0px rgba(255,255,255, .8), 0px 1px 3px rgba(0,0,0, .1);
            font-size: .875em;
            font-weight: bold;
            text-decoration: none;
            color: #717171;
            text-shadow: 0px 1px 0px rgba(255,255,255, 1);
        }

            .pagingDiv > a:hover {
                background: #fefefe;
                background: -webkit-gradient(linear, 0% 0%, 0% 100%, from(#FEFEFE), to(#f0f0f0));
                background: -moz-linear-gradient(0% 0% 270deg,#FEFEFE, #f0f0f0);
            }

            .pagingDiv > a.active {
                border: none;
                background: #616161;
                box-shadow: inset 0px 0px 8px rgba(0,0,0, .5), 0px 1px 0px rgba(255,255,255, .8);
                color: #f0f0f0;
                text-shadow: 0px 0px 3px rgba(0,0,0, .5);
            }
</style>
<h4>@ViewBag.Operation</h4>
<h5>@TempData["Result"]</h5>

<div class="studentFormDiv">
    @using (Html.BeginForm())
    {
        <table>
     <tr>
         <td>
             @Html.LabelFor(model => model.name)
             @Html.EditorFor(model => model.name)
             @Html.ValidationMessageFor(model => model.name)
         </td>
         <td>
             @Html.LabelFor(model => model.age)
             @Html.EditorFor(model => model.age)
             @Html.ValidationMessageFor(model => model.age)
         </td>
     </tr>
     <tr>
         <td>
             @Html.LabelFor(model => model.standard)
             @Html.EditorFor(model => model.standard)
             @Html.ValidationMessageFor(model => model.standard)
         </td>
         <td>
             @Html.LabelFor(model => model.percent)
             @Html.EditorFor(model => model.percent)
             @Html.ValidationMessageFor(model => model.percent)
         </td>
     </tr>
     <tr>
         <td>
             @Html.LabelFor(model => model.address)
             @Html.EditorFor(model => model.address)
             @Html.ValidationMessageFor(model => model.address)
         </td>
         <td>
             @Html.LabelFor(model => model.status)
             @Html.DropDownListFor(model => model.status, new List<SelectListItem> { new SelectListItem { Text = "Select", Value = "Select" }, new SelectListItem { Text = "Active", Value = "True" }, new SelectListItem { Text = "InActive", Value = "False" } })
             @Html.ValidationMessageFor(model => model.status)
         </td>
     </tr>
     <tr><td><button id="submitButton" type="submit">Submit</button></td></tr>
 </table>
    }
</div>
Explanation
- The ViewBag.Operation variable contains either the string – Update Student or Insert Student, and is passed on from the Controller. It is shown inside the h4 tag and tells the user the current operation of the View.
- Similarly the View shows the result of the operation (either the operation completes successfully or not), through the TempData[“Result”] and is also passed from the controller.
I created a html form element using using (Html.BeginForm()) then inside this form element I created –
- The labels for the model properties by using Html.LabelFor(model => model.propertyName).
- The textboxes using @Html.EditorFor(model => model.propertyName).
- The span elements for each property with @Html.ValidationMessageFor(model => model.propertyName). These spans will show the validation error messages.
- A button that will submit the form
The form is created now. Next, add the codes in the controller so that the form can perform the inserts operation.
Since I will be using Entity Framework (EF), to do the inserts, updates, deletes and reads, therefore I have to install ‘EF’ and create an EDMX file.
The EDMX file will map the database structure on the application, and help me to do my database operations.
Once your EDMX file is ready you can continue this article below.
Open the controller and add the namespace – using System.Data.Entity.Core.Objects; then add the below code:
[HttpPost]
public ActionResult Index(Models.Student student, int? id)
{
    if (ModelState.IsValid)
    {
        using (var context = new Entities())
        {
            ObjectParameter result = new ObjectParameter("result", typeof(String));
            ObjectParameter createdId = new ObjectParameter("createdId", typeof(String));
            if (id == null)
                context.sp_InsertStudent(student.name, student.address, student.age, student.standard, student.percent, student.status, result, createdId);
            else
                context.sp_UpdateStudent(id, student.name, student.address, student.age, student.standard, student.percent, student.status, result);

            TempData["Result"] = createdId.Value == null ? result.Value : result.Value + " New Student Id is " + createdId.Value;
        }
    }
    ViewBag.Operation = id == null ? "Add Student" : "Update Student";
    BindStudent(0);
    return View();
}
Explanation
- I named my EDMX file as Entitites during creation. So inside the ModelState.IsValid, I created it’s object to do the database operation with Entity Framework.
- The Index POST Action method will be called on the button click event. I passed on ‘id’ and ‘Student Model’ as the parameters.
- Two objects (result, createdId) of type ObjectParameter are created. When the insert or update stored procedures are executed by EF, they will receive the output parameters value.
- The conditional if statement checks the id parameter and then performs either the insert or update of a student i.e. If it is null it does insert else it does update.
- The Stored Procedure’s output parameter called Result’s value is stored in TempData. The view shows this value to the user.
- ViewBag.Operation stores “Add Student or Update Student” depending upon the value of ‘id’. The view shows this ViewBag’s value below the TempData’s value.
- The BindStudent(0) method is called and it’s work is to Read all the Students record and show them in a Grid format. The Grid is created using an HTML Table element only. I will discuss this function in details later.
At this point if you want to test the insert functionality, you need to update the Default Route in the RouteConfig.cs file. Change the default routes controller to CrudOperations and action to Index.
It will look like:
routes.MapRoute(
    name: "Default",
    url: "{controller}/{action}/{id}",
    defaults: new { controller = "CrudOperations", action = "Index", id = UrlParameter.Optional }
);
Comment out the BindStudent(0); line and run the application.
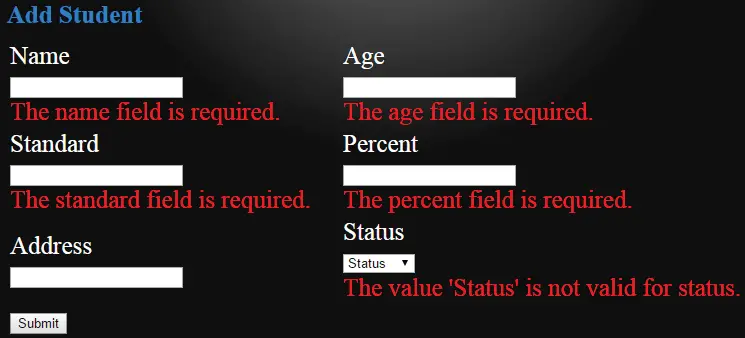
In the form press the submit button without filling the form. You will see the Validation messages for every required field.
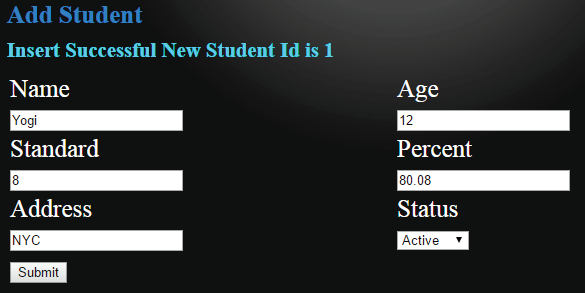
Now fill the form and press the submit button. The record will be created and you will see the success message called Insert Successful New Student Id is 1.
Update Record Functionality
Let us create the update functionality in such a manner that the same Student form also does the update of the student records. So first add the Index Action to the CrudOperationsController.
public ActionResult Index(int? id, int? page)
{
    BindStudent(Convert.ToInt32(page));
    Models.Student mStudent = new Models.Student();
    if (id != null)
    {
        using (var context = new Entities())
        {
            var result = context.sp_GetStudentById(id);
            var targetList = result.Select(x => new Models.Student() { id = x.Id, name = x.Name, address = x.Address, age = x.Age, standard = x.Standard, percent = x.Percent, addedOn = x.AddedOn, status = x.Status }).ToList();
            mStudent = targetList.ToList().FirstOrDefault();
            ViewBag.Operation = "Update Student";
            return View(mStudent);
        }
    }
    else
        ViewBag.Operation = "Insert Student";
        return View();
}
Explanation
I added the Index Action of type HTTP GET. As you remember I already have the Index Action of type HTTP POST which is called on the button click event.
The work of this Index Action (HTTP GET type) is to fetch the Student Record whose id is received by the id parameter.
This method also receives the page parameter which gets the page number to bind the student grid. The page parameter also help in creating the paging links for the grid.
In the Index Action of type HTTP GET:
- I am passing the id and page parameters.
- Then the BindStudent() function is called by passing the current page number.
- The object of the Student modal class is created and the student record is fetched by executing the GetStudentById stored procedure.
- I used If statement to check whether value of ‘id’ is null or not. If it is not null then only the record is fetched.
- I then filled the student record in the Student Model Class which is returned to the View. The View will then bind the form with it.
- The value in ViewBag.Operation variable is filled based on whether the ‘id’ value is null or not
If you change the value of student in the form and press the button then the Index Action of type HTTP POST will be called, and it will update the values in the table.
I have already discussed the functionality of Index HTTP POST Action method in the Insert Record Functionality above.
To test this Update Record Functionality, comment out the line where BindStudent() function is called. Do this for both the Index Actions (GET AND POST types) and then run the application.
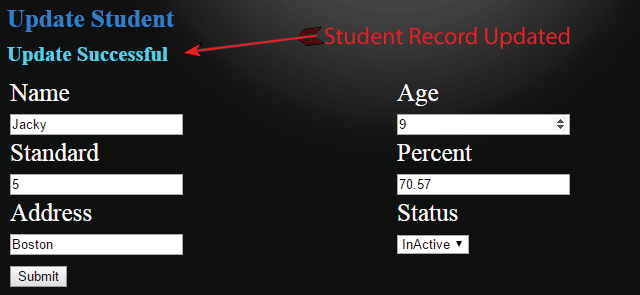
When the web page opens in the browser add this string after the URL – /CrudOperations/Index/1, and press enter. You will see the first record is read and displayed in the form.

You can also update the student record by changing the values in the form and pressing the submit button. You will see the Update Successful message.
Read Records Functionality
I will create a Grid that will display all Students record. The grid will also have paging to move from one page of the grid to another.
The Grid Will be created by the BindStudent() function.
Now add the BindStundent() function to the controller:
public void BindStudent(int page)
{
    using (var context = new Entities())
    {
        int pageSize = 4;
        int pageNo = page == 0 ? 1 : page;

        PagingInfo pagingInfo = new PagingInfo();
        pagingInfo.CurrentPage = pageNo;
        pagingInfo.TotalItems = context.Students.Count();
        pagingInfo.ItemsPerPage = pageSize;
        ViewBag.Paging = pagingInfo;

        List<Models.Student> mStudentList = new List<Models.Student>();
        var result = context.sp_GetStudent(pageNo, pageSize);
        var targetList = result.Select(x => new Models.Student() { id = x.Id, name = x.Name, address = x.Address, age = x.Age, standard = x.Standard, percent = x.Percent, addedOn = x.AddedOn, status = x.Status }).ToList();
        mStudentList = targetList.ToList();
        ViewBag.StudentList = mStudentList;
    }
}
Explanation
This function takes the current page number as parameter.
- It creates the object of PagingInfo class. This class helps in building the paging links under the bottom of the Grid. This class object is provided with the current page number, total students in the database table and page size.
- I am setting the page size as 4 so this Grid shows 4 records per page.
- The EF method called context.Students.Count() provides the total number of Student in the database table.
- Once the PagingInfo objects is provided with all the inputs, I am storing it in ViewBag.Paging variable. The View will access this variable to create the paging links.
- Next I am executing the SP named sp_GetStudent that will get all the student records of the current page. These records are put in the List of Student Modal Class type.
- The List of student Modal Class type is stored in the ViewBag.StudentList variable so that the View can create the Grid from it.
Add a new folder in your solution and name it Class. Add a new Class in this folder and name it PagingInfo.cs. Now put the following code inside it:
public class PagingInfo
{
    public int TotalItems { get; set; }
    public int ItemsPerPage { get; set; }
    public int CurrentPage { get; set; }
    public int TotalPages
    {
        get
        {
            return (int)Math.Ceiling((decimal)TotalItems /
                ItemsPerPage);
        }
    }
}
As already discussed – this class will create the paging links.
Create another class inside the ‘class folder’ and name it PagingHelper.cs. This is a static class that is a helper method of PagingInfo class.
I will call the PagingHelper class from the View which in turn will call the PagingInfo class, and use it to create the paging links. These paging links will be shown below the Grid.
public static class PagingHelper
{
    public static MvcHtmlString PageLinks(this HtmlHelper html, PagingInfo pagingInfo, Func<int, string> pageUrl)
    {
        StringBuilder result = new StringBuilder();
        string anchorInnerHtml = "";
        for (int i = 1; i <= pagingInfo.TotalPages; i++)
        {
            TagBuilder tag = new TagBuilder("a");
            anchorInnerHtml = AnchorInnerHtml(i, pagingInfo);

            if (anchorInnerHtml == "..")
                tag.MergeAttribute("href", "#");
            else
                tag.MergeAttribute("href", pageUrl(i));
            tag.InnerHtml = anchorInnerHtml;
            if (i == pagingInfo.CurrentPage)
            {
                tag.AddCssClass("active");
            }
            tag.AddCssClass("paging");
            if (anchorInnerHtml != "")
                result.Append(tag.ToString());
        }
        return MvcHtmlString.Create(result.ToString());
    }

    public static string AnchorInnerHtml(int i, PagingInfo pagingInfo)
    {
        string anchorInnerHtml = "";
        if (pagingInfo.TotalPages <= 10)
            anchorInnerHtml = i.ToString();
        else
        {
            if (pagingInfo.CurrentPage <= 5)
            {
                if ((i <= 8) || (i == pagingInfo.TotalPages))
                    anchorInnerHtml = i.ToString();
                else if (i == pagingInfo.TotalPages - 1)
                    anchorInnerHtml = "..";
            }
            else if ((pagingInfo.CurrentPage > 5) && (pagingInfo.TotalPages - pagingInfo.CurrentPage >= 5))
            {
                if ((i == 1) || (i == pagingInfo.TotalPages) || ((pagingInfo.CurrentPage - i >= -3) && (pagingInfo.CurrentPage - i <= 3)))
                    anchorInnerHtml = i.ToString();
                else if ((i == pagingInfo.CurrentPage - 4) || (i == pagingInfo.CurrentPage + 4))
                    anchorInnerHtml = "..";
            }
            else if (pagingInfo.TotalPages - pagingInfo.CurrentPage < 5)
            {
                if ((i == 1) || (pagingInfo.TotalPages - i <= 7))
                    anchorInnerHtml = i.ToString();
                else if (pagingInfo.TotalPages - i == 8)
                    anchorInnerHtml = "..";
            }
        }
        return anchorInnerHtml;
    }
}
Go to the view and add the below code after the end of studentFormDiv.
@{
    List<demo.MVC.Models.Student> mStudentList = new List<demo.MVC.Models.Student>();
    mStudentList = ViewBag.StudentList;

    if (mStudentList.Count > 0)
    {
        <div class="studentDiv">
            <table>
                <thead>
                    <tr>
                        <td>Id</td>
                        <td>Name</td>
                        <td>Address</td>
                        <td>Age</td>
                        <td>Standard</td>
                        <td>Percent</td>
                        <td>Added On</td>
                        <td>Status</td>
                        <td>Edit</td>
                        <td>Delete</td>
                    </tr>
                </thead>
                <tbody>
                    @foreach (demo.MVC.Models.Student student in ViewBag.StudentList)
                    {
                        <tr>
                            <td>@student.id</td>
                            <td>@student.name</td>
                            <td>@student.address</td>
                            <td>@student.age</td>
                            <td>@student.standard</td>
                            <td>@student.percent</td>
                            <td>@student.addedOn</td>
                            <td>@student.status</td>
                            <td><a href="@Url.Action("Index","CrudOperations",new { id=student.id })"><img src="~/Content/Image/edit-icon.png" /></a></td>
                            <td>
                                @using (Html.BeginForm("Delete", "CrudOperations", new { id = student.id }))
                                {
                                    <input type="image" src="~/Content/Image/delete-icon.png" />
                                }
                            </td>
                        </tr>
                    }
                </tbody>
                <tfoot>
                    <tr>
                        <td colspan="10">
                            <div class="pagingDiv">
                                @Html.PageLinks((PagingInfo)ViewBag.Paging, x => Url.Action("Index", "CrudOperations", new { page = x }))
                            </div>
                        </td>
                    </tr>
                </tfoot>
            </table>
        </div>
    }
}
Explanation
In the View I am storing the value of ViewBag.StudentList in mStudentList (which is the list of Student Modal Class).The mStudentList object contains all the Student Records in the particular page number.
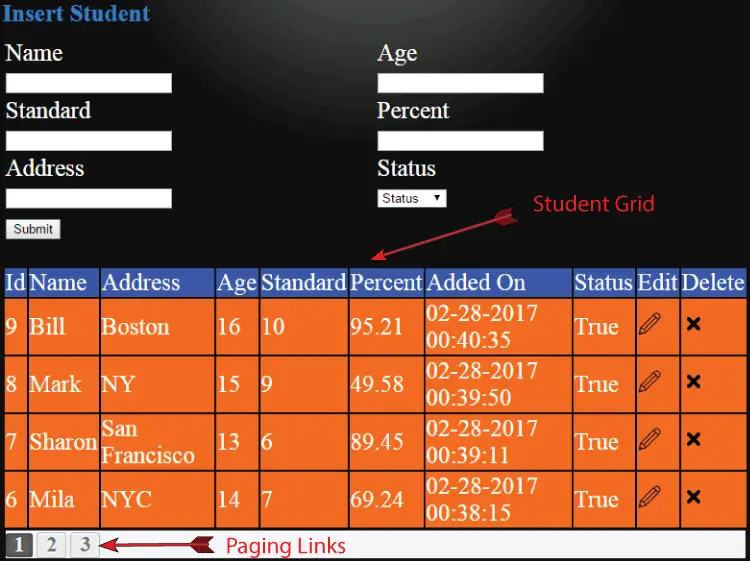
I am looping though each of these records (using foreach loop) and creating rows of the HTML table – thus forming the Student Grid.
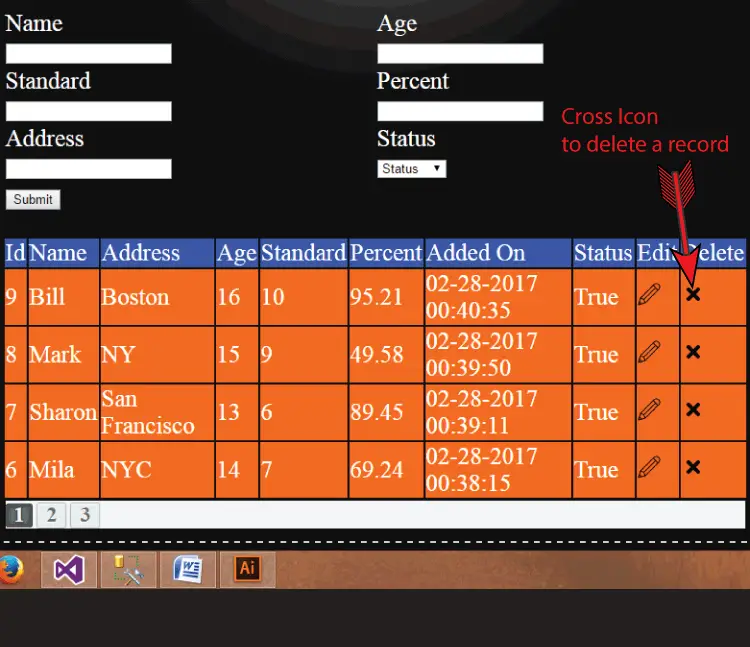
In the last 2 columns of each row, an Edit icon and a Cross icon is show.
The URL of the anchor, that contains the edit icon, is formed by Url.Action(“Index”,”CrudOperations”,new { id=student.id }).
Check the default route which will work here and it will form the URL’s like:
- http://localhost:64253/CrudOperations/Index/1
- http://localhost:64253/CrudOperations/Index/2
So clicking on the edit icon, will bind the form with the Student information. Thus making my edit functionality to work.
To show the Cross icon I am creating a form that contains Image type input control. The Cross icon is set for input control’s src attribute.
Clicking on the cross icon will take the user to the Delete Action (discussed later).
On the footer of the HTML table (student grid), I am calling the PageLinks() function of the PagingHelper class by:
Html.PageLinks((PagingInfo)ViewBag.Paging, x => Url.Action("Index", "CrudOperations", new { page = x }))Thus It will form the paging links for the grid.
I want the paging links like:
- http://localhost:64253/1
- http://localhost:64253/2
For this, add the below route to the RouteConfig.cs file
routes.MapRoute("Paging", "{page}", new { controller = "CrudOperations", action = "Index", id = UrlParameter.Optional, page = UrlParameter.Optional });Now run the application you will see the Student records in a grid that and the pagination links working too.
Now if you click the edit icon (pencil icon) then you can update that particular record.

Delete Record Functionality
Add the Delete Action in the controller. It gets the Student’s id in it’s parameter and executes the Delete Stored Procedure through EF.
The output parameter of the SP is stored in the TempData[“Result”] variable. The View shows the value of this variable.
[HttpPost]
public ActionResult Delete(int id)
{
    using (var context = new Entities())
    {
        ObjectParameter result = new ObjectParameter("result", typeof(String));
        context.sp_DeleteStudent(id, result);
        TempData["Result"] = result.Value;
    }
    return RedirectToRoute("Index");
}
After the execution of stored procedure, the user is redirected to the ‘Index’ View.
The View will show the Delete Successful message to the user.
Click the cross icon in the student grid to delete any record.
Conclusion
This way we can do Crud Operations in Entity Framework. You are now ready to create other types of features with EF in your ASP.NET MVC website.
I hope you love this tutorial. Kindly share it with your friends in facebook, twitter and google plus so that it reaches millions of developers like us. Check the download link below:
1. Server Side Validation in ASP.NET Core
2. Client Side Validation in ASP.NET Core
SHARE THIS ARTICLE
Related Tutorials:


ABOUT THE AUTHOR
I hope you enjoyed reading this tutorial. If it helped you then consider buying a cup of coffee for me. This will help me in writing more such good tutorials for the readers. Thank you.
HELLO EVERYONE
 Welcome to YogiHosting - A Programming Tutorial Website. It is used by millions of people around the world to learn and explore about ASP.NET Core, Blazor, jQuery, JavaScript, Docker, Kubernetes and other topics.
SUBSCRIBE TO NEWSLETTER
Enter your email address to subscribe to this blog and receive notifications of new posts by email.
Join 90K other subscribers