Please Consider Donating us
We are helping millions of Beginners and Professionals to learn new programming technologies.
Please consider donating us:


How to perform CRUD Operations in Entity Framework and ASP.NET Web Forms

CRUD – Create Read Update Delete are the first step to learn in database programming. Entity Framework helps you can do the CRUD Operations easily in ASP.NET Web Forms. The Entity Framework (EF) makes coding simpler and faster.
In this tutorial I will teach you how to use Entity Framework (EF), I will create a Student Form which will create Student Entries (Records) in the database. Below this form I will put a GridView control, to read all the records and show them to the user.
The GridView will also help in Updating and Deleting these Student Records through the Edit and Delete icons that are provides in each of it’s rows.
Database Table and Stored Procedures
The CRUD Operations will be done in the Student table.
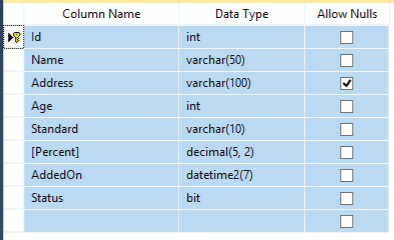
The Student table is:
CREATE TABLE [dbo].[Student]
(
    Id int IDENTITY(1,1) NOT NULL PRIMARY KEY,
    Name varchar(50) NOT NULL,
    Address varchar(100) NULL,
    Age int NOT NULL,
    Standard varchar(10) NOT NULL,
    [Percent] decimal(5, 2) NOT NULL,
    AddedOn datetime NOT NULL DEFAULT GETDATE(),
    Status bit NOT NULL
)
I will use SQL Stored Procedures to perform the CRUD Operations. These Stored Procedures are:
CREATE PROCEDURE [dbo].[sp_InsertStudent]
    @Name       VARCHAR(50),
    @Address        VARCHAR(100),
    @Age        INT,
    @Standard     VARCHAR(10),
    @Percent        DECIMAL(5,2),
    @Status       BIT,
    @Result     VARCHAR(50) OUTPUT,
    @CreatedId    INT OUTPUT
AS
BEGIN
    INSERT INTO Student(Name,Address,Age,Standard,[Percent],Status) VALUES (@Name,@Address,@Age,@Standard,@Percent,@Status)
    SET @Result='Insert Successful'
    SET @CreatedId=@@IDENTITY
END
Read Student by Id:
CREATE PROCEDURE [dbo].[sp_GetStudentById]
    @Id           INT
AS
BEGIN
    SELECT * FROM Student WHERE id=@Id
END
Read all the Students by a Particular Page number (for GridView Binding):
CREATE PROCEDURE [dbo].[sp_GetStudent]
    @PageNo       INT,
    @PageSize       INT
AS
BEGIN
    DECLARE @qry  NVARCHAR(1000);
    SET @qry='SELECT * FROM (SELECT ROW_NUMBER() OVER (ORDER BY AddedON DESC) AS ''RowNum'',* FROM Student WHERE 1=1) a WHERE a.RowNum BETWEEN ('+CAST(@pageNo AS NVARCHAR(5))+'-1)*'+CAST(@pageSize AS NVARCHAR(5))+'+1 AND ('+CAST(@pageNo AS NVARCHAR(5))+'*'+CAST(@pageSize AS NVARCHAR(5))+')'
    EXEC Sp_executesql @qry
END
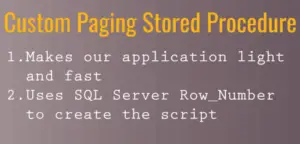
The above SP is a Custom Paging Stored Procedure that will make the websites lighter and faster.
I used this procedure for binding GridView, making it super-fast and much lighter in weight. You can also read the tutorial – GridView Custom Paging if you want to get more knowledge on this topic.
CREATE PROCEDURE [dbo].[sp_UpdateStudent]
    @Id         INT,
    @Name       VARCHAR(50),
    @Address    VARCHAR(100),
    @Age        INT,
    @Standard   VARCHAR(10),
    @Percent    DECIMAL(5,2),
    @Status     BIT,
    @Result     VARCHAR(50) OUTPUT
AS
BEGIN
    UPDATE Student SET Name=@Name,Address=@Address,Age=@Age,Standard=@Standard,[Percent]=@Percent,Status=@Status WHERE Id=@Id
    SET @Result='Update Successful'
END
CREATE PROCEDURE [dbo].[sp_DeleteStudent]
    @Id         INT,
    @Result     VARCHAR(50) OUTPUT
AS
BEGIN
    DELETE FROM Student WHERE id=@Id
    SET @Result='Delete Successful'
END
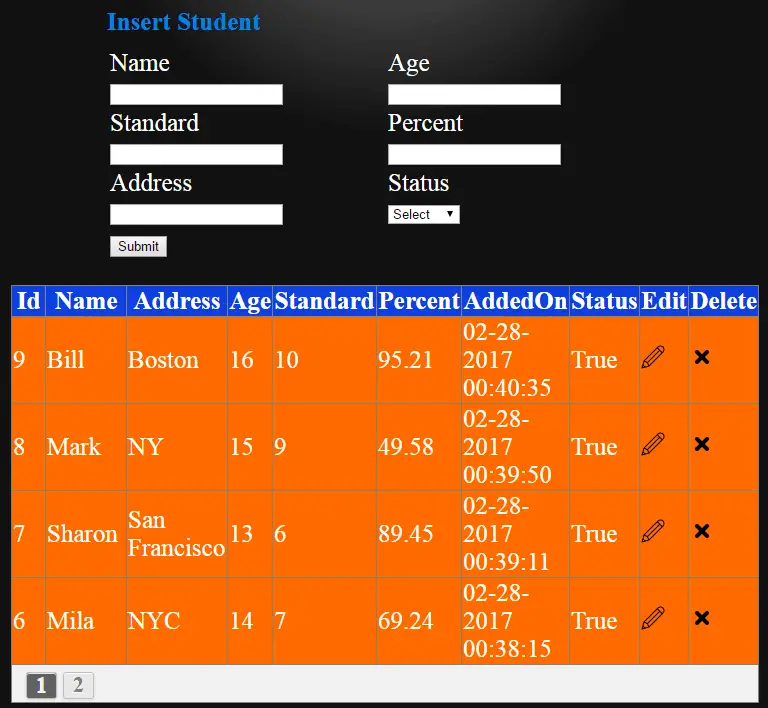
In this tutorial I will perform all CRUD operations from the same Web Form.
This is how my Web Form will look:
First add a new Web Form in your ASP.NET website and name it index.aspx. Next, add the below code inside it:
<div class="container">
    <div id="content">
        <div class="insertLink"><a href="index.aspx">Insert Student</a></div>
        <h4 id="operationH4" runat="server"></h4>
        <h5 id="resultH5" runat="server"></h5>
        <div class="studentFormDiv">
            <table>
                <tbody>
                    <tr>
                        <td>
                            <label>Name</label>
                            <asp:TextBox ID="nameTextBox" runat="server"></asp:TextBox>
                            <span id="nameSpan"></span>
                        </td>
                        <td>
                            <label>Age</label>
                            <asp:TextBox ID="ageTextBox" runat="server"></asp:TextBox>
                            <span id="ageSpan"></span>
                        </td>
                    </tr>
                    <tr>
                        <td>
                            <label>Standard</label>
                            <asp:TextBox ID="standardTextBox" runat="server"></asp:TextBox>
                            <span id="standardSpan"></span>
                        </td>
                        <td>
                            <label>Percent</label>
                            <asp:TextBox ID="percentTextBox" runat="server"></asp:TextBox>
                            <span id="percentSpan"></span>
                        </td>
                    </tr>
                    <tr>
                        <td>
                            <label>Address</label>
                            <asp:TextBox ID="addressTextBox" runat="server"></asp:TextBox>
                            <span id="addressSpan"></span>
                        </td>
                        <td>
                            <label>Status</label>
                            <asp:DropDownList ID="statusDropDownList" runat="server">
                                <asp:ListItem Value="Select" Text="Select"></asp:ListItem>
                                <asp:ListItem Value="True" Text="Active"></asp:ListItem>
                                <asp:ListItem Value="False" Text="InActive"></asp:ListItem>
                            </asp:DropDownList>
                            <span id="statusSpan"></span>
                        </td>
                    </tr>
                    <tr>
                        <td>
                            <asp:Button ID="submitButton" runat="server" Text="Submit" OnClick="submitButton_Click" />
                        </td>
                    </tr>
                </tbody>
            </table>
        </div>

        <asp:GridView ID="gridView" CssClass="studentDiv" runat="server" AllowCustomPaging="true" AllowPaging="true" OnPageIndexChanging="gridView_PageIndexChanging" PagerStyle-CssClass="pagingDiv" AutoGenerateColumns="false" OnRowCommand="gridView_RowCommand" OnRowEditing="gridView_RowEditing" OnRowDeleting="gridView_RowDeleting">
            <Columns>
                <asp:BoundField DataField="Id" HeaderText="Id" />
                <asp:BoundField DataField="Name" HeaderText="Name" />
                <asp:BoundField DataField="Address" HeaderText="Address" />
                <asp:BoundField DataField="Age" HeaderText="Age" />
                <asp:BoundField DataField="Standard" HeaderText="Standard" />
                <asp:BoundField DataField="Percent" HeaderText="Percent" />
                <asp:BoundField DataField="AddedOn" HeaderText="AddedOn" />
                <asp:TemplateField HeaderText="Status">
                    <ItemTemplate>
                        <%#Eval("Status") %>
                    </ItemTemplate>
                </asp:TemplateField>
                <asp:TemplateField HeaderText="Edit">
                    <ItemTemplate>
                        <asp:ImageButton ID="editImageButton" runat="server" CommandName="edit" CommandArgument='<%#Eval("Id") %>' ImageUrl="Image/edit-icon.png" />
                    </ItemTemplate>
                </asp:TemplateField>
                <asp:TemplateField HeaderText="Delete">
                    <ItemTemplate>
                        <asp:ImageButton ID="deleteImageButton" runat="server" CommandName="delete" CommandArgument='<%#Eval("Id") %>' ImageUrl="Image/delete-icon.png" />
                    </ItemTemplate>
                </asp:TemplateField>
            </Columns>
        </asp:GridView>
    </div>
</div>
Explanation
I created a Student Form using an HTML table. Through this form the student records will be created and updated. Below this form I have placed a GridView that will read these records from the database table and show them to the user.
Add the CSS to style the Page – probably inside the head section of the web form. This CSS will make the form look great:
<style>
    body {
        background: #111 no-repeat;
        background-image: -webkit-gradient(radial, 50% 0, 150, 50% 0, 300, from(#444), to(#111));
    }

    h1, h2 {
        text-align: center;
        color: #FFF;
    }

        h2 a {
            color: #0184e3;
            text-decoration: none;
        }

    .container {
        width: 960px;
        margin: auto;
        color: #FFF;
        font-size: 25px;
    }

        .container h3 {
            text-decoration: underline;
            text-align: center;
        }

        .container h4, .container h5 {
            margin: 10px 0;
            padding-left: 190px;
        }

        .container h4 {
            color: #0184e3;
        }

        .container h5, .container a {
            color: #00e8ff;
        }

        .container .insertLink {
            text-align: center;
        }

        .container .studentFormDiv label {
            display: block;
            margin: 0;
            text-transform: capitalize;
        }

        .container .studentFormDiv span {
            display: block;
            color: red;
        }

        .container .studentFormDiv > form > div > div {
            padding-top: 25px;
        }

        .container table {
            width: 80%;
            padding-left: 190px;
            color: #FFF;
            font-size: 25px;
        }

            .container table td {
                width: 50%;
            }

        .container .studentDiv {
            margin: 25px auto 0 auto;
        }

            .container .studentDiv > tbody > tr:nth-child(1) {
                background-color: #0f40e0;
            }

            .container .studentDiv > tbody > tr:not(:nth-child(1)) {
                background-color: #ff6a00;
            }

            .container .studentDiv > tbody > tr.pagingDiv {
                background-color: #f2f2f2;
            }

                .container .studentDiv > tbody > tr.pagingDiv table {
                    padding-left: 10px;
                    width: 35%;
                }

                    .container .studentDiv > tbody > tr.pagingDiv table td {
                        display: inline;
                    }

    #content {
        border: dashed 2px #CCC;
        padding: 10px;
    }

    .pagingDiv a, .pagingDiv span {
        display: inline-block;
        padding: 0px 9px;
        margin-right: 4px;
        border-radius: 3px;
        border: solid 1px #c0c0c0;
        background: #e9e9e9;
        box-shadow: inset 0px 1px 0px rgba(255,255,255, .8), 0px 1px 3px rgba(0,0,0, .1);
        font-size: .875em;
        font-weight: bold;
        text-decoration: none;
        color: #717171;
        text-shadow: 0px 1px 0px rgba(255,255,255, 1);
    }

        .pagingDiv a:hover {
            background: #fefefe;
            background: -webkit-gradient(linear, 0% 0%, 0% 100%, from(#FEFEFE), to(#f0f0f0));
            background: -moz-linear-gradient(0% 0% 270deg,#FEFEFE, #f0f0f0);
        }

        .pagingDiv a.active {
            border: none;
            background: #616161;
            box-shadow: inset 0px 0px 8px rgba(0,0,0, .5), 0px 1px 0px rgba(255,255,255, .8);
            color: #f0f0f0;
            text-shadow: 0px 0px 3px rgba(0,0,0, .5);
        }

    .pagingDiv span {
        color: #f0f0f0;
        background: #616161;
    }
</style>
Also add the code to perform the jQuery validation of the form. Add the just before the ending body tag, see below:
<script src="https://ajax.googleapis.com/ajax/libs/jquery/3.1.0/jquery.min.js"></script>
<script>
    $(document).ready(function () {
        $("#submitButton").click(function (e) {
            var returnValidate = Validate();
            if (returnValidate) {
                return tru
            }
            return false;
        });

        function Validate() {
            var errorCounter = 0;
            $("#nameSpan").text("");
            $("#ageSpan").text("");
            $("#standardSpan").text("");
            $("#percentSpan").text("");
            $("#statusSpan").text("");

            if ($("#nameTextBox").val() == "") {
                $("#nameSpan").text("Please enter name");
                errorCounter++;
            }

            if ($("#ageTextBox").val() == "") {
                $("#ageSpan").text("Please enter age");
                errorCounter++;
            }
            else if (!(isPositiveInteger($("#ageTextBox").val()))) {
                $("#ageSpan").text("Age should be in +ve integers");
                errorCounter++;
            }

            if ($("#standardTextBox").val() == "") {
                $("#standardSpan").text("Please enter standard");
                errorCounter++;
            }

            if ($("#percentTextBox").val() == "") {
                $("#percentSpan").text("Please enter percent");
                errorCounter++;
            }
            else if (!(isPercent($("#percentTextBox").val()))) {
                $("#percentSpan").text("Percent should be upto 2 places of decimals like 76.82");
                errorCounter++;
            }

            if ($("#statusDropDownList").val() == "Select") {
                $("#statusSpan").text("Please select status");
                errorCounter++;
            }

            if (errorCounter == 0) {
                return true;
            }
            else {
                return false;
            }
        }

        function isPositiveInteger(n) {
            return (n.match(/^\d*$/));
        }

        function isPercent(n) {
            return (n.match(/^(0(?!\.00)|[1-9]\d{0,6})\.\d{2}$/));
        }
    });
</script>
The jQuery validation will make sure that the form accepts only valid student entries and then inserts them in the database table.
I will be performing CRUD Operations through Entity Framework therefore you should add the Entity Framework in your website. Next, create an EDMX file for it.
I have written a tutorial on this topic too – check Entity Framework – How to Create an EDMX file in Visual Studio to find out how to create an EDMX file.
Create/Insert Student Functionality
The Click Event of the button given in the form will Create the Student Record. So add the button click event code to the index.aspx.cs page.
protected void submitButton_Click(object sender, EventArgs e)
{
    using (var context = new Entities())
    {
        ObjectParameter result = new ObjectParameter("result", typeof(String));
        ObjectParameter createdId = new ObjectParameter("createdId", typeof(String));
        if (Request.QueryString["id"] == null)
            context.sp_InsertStudent(nameTextBox.Text, addressTextBox.Text, Convert.ToInt32(ageTextBox.Text), standardTextBox.Text, Convert.ToDecimal(percentTextBox.Text), Convert.ToBoolean(statusDropDownList.SelectedItem.Value), result, createdId);
        else
            context.sp_UpdateStudent(Convert.ToInt32(Request.QueryString["id"]), nameTextBox.Text, addressTextBox.Text, Convert.ToInt32(ageTextBox.Text), standardTextBox.Text, Convert.ToDecimal(percentTextBox.Text), Convert.ToBoolean(statusDropDownList.SelectedItem.Value), result);
        resultH5.InnerText = createdId.Value == null ? result.Value.ToString() : result.Value + " New Student Id is " + createdId.Value;
    }
    operationH4.InnerText = Request.QueryString["id"] == null ? "Add Student" : "Update Student";
    BindStudent(0);
}
using System.Data.Entity.Core.Objects;
Explanation
- The button click event will perform the insert of the Student record in the database. I am using EF for Creating the Records in the database. You can also see that the same button is performing the Updates of the Records.
- The if condition does this trick. I am checking the query string value for id. If it is null then I perform ‘Insert’ else I perform ‘Update’. I will discuss the Update feature on the next paragraph.
- The BindStudent(0); function binds the GridView. The 0 value passed to it is telling to fetch the records for the first page of the GridView. I will discuss more about it on the Read Student Functionality later on.
Update Student Functionality
The button click event of the form performs both the Insert and update of the Student records. For doing the update I am passing the student id to the query string value.
So in the Page Load event I will have to bind the form with that Student’s record (whose id is passed in the query string).
To do this, add the below code to the Page Load event:
protected void Page_Load(object sender, EventArgs e)
{
    if (!Page.IsPostBack)
    {
        BindStudent(0);
        string id = Request.QueryString["id"];
        if (id != null)
        {
            operationH4.InnerText = "Update Student";
            BindStudentById(id);
        }
        else
            operationH4.InnerText = "Insert Student";
    }
}
Explanation
All the above operations are done on the IsPostBack block. First the GridView is bind to the first page records through BindStudent(0);.
Next I check if the query string has an id, if yes, I am calling the BindStudentById(id) function. The work of this function is to bind the form with the Student whose id is passed in the query string.
Add the BindStudentById() function to your index.asp.cs:
public void BindStudentById(string id)
{
    using (var context = new Entities())
    {
        var result = context.sp_GetStudentById(Convert.ToInt32(id));
        sp_GetStudentById_Result student = new sp_GetStudentById_Result();
        student = result.ToList().FirstOrDefault();
        nameTextBox.Text = student.Name;
        ageTextBox.Text = Convert.ToString(student.Age);
        standardTextBox.Text = student.Standard;
        percentTextBox.Text = Convert.ToString(student.Percent);
        addressTextBox.Text = student.Address;
        statusDropDownList.ClearSelection();
                                            statusDropDownList.Items.FindByValue(Convert.ToString(student.Status)).Selected = true;

        operationH4.InnerText = "Update Student";
    }
}
Through the GridView I am giving the option to edit a Student Record. This is done by providing a Template Field which contains an Image Button. This button shows an edit icon (pencil icon) against every student record shown by the GridView.
On clicking the pencil icon the row command event fires and the page is redirected, passing on the student id record in the query string.
In this way the Update Record functionality will work.
Now add the GridView RowCommand like shown below:
protected void gridView_RowCommand(object sender, GridViewCommandEventArgs e)
{
    if (e.CommandName == "edit")
        Response.Redirect("index.aspx?id=" + Convert.ToString(e.CommandArgument));
}
Read Student Functionality
All Student records must be shown in the GridView that also has paging links. This is all possible through the BindStudent() function. The function code is given below:
public void BindStudent(int page)
{
    using (var context = new Entities())
    {
        int pageSize = 4;
        int pageNo = page == 0 ? 1 : page;

        gridView.PageSize = pageSize;
        var result = context.sp_GetStudent(pageNo, pageSize);

        gridView.VirtualItemCount = context.Students.Count();
        gridView.DataSource = result;
        gridView.DataBind();
    }
}
Explanation
The BindStudent() function takes the page number in it’s parameter and binds that page records to the GridView. I am setting the GridView page size as 4 and then calling the GetStudent Stored Procedure. This will provide me all the Students Records that comes in that page number.
Note – I am also implementing custom paging in the GridView.
For the GridView paging links to work properly, add the PageIndexChanging event to it:
protected void gridView_PageIndexChanging(object sender, GridViewPageEventArgs e)
{
    gridView.PageIndex = e.NewPageIndex;
    BindStudent(e.NewPageIndex + 1);
}
Delete Student Functionality
For deleting a record through GridView, I am using another Template field that shows a delete icon (cross icon). On clicking it, the GridView’s RowCommand event will fire.
I already added the GridView RowCommand event on the Update Record functionality, so update the RowCommand event code by adding the below new lines to it.
else if (e.CommandName == "delete")
{
    using (var context = new Entities())
    {
        ObjectParameter result = new ObjectParameter("result", typeof(String));
        context.sp_DeleteStudent(Convert.ToInt32(e.CommandArgument), result);
        resultH5.InnerText = Convert.ToString(result.Value);
    }
    BindStudent(0);
}
This completes the delete functionality also.
Although I am not using Row Editing and Row Deleting event of GridView but for proper functioning just add these empty events like below:
protected void gridView_RowEditing(object sender, GridViewEditEventArgs e)
{
}

protected void gridView_RowDeleting(object sender, GridViewDeleteEventArgs e)
{
}
Download link:
In this way we can perform CRUD Operations in ASP.NET Web Forms. If you liked this tutorial please share with your friends in Facebook, Twitter, Pinterest, Google Plus and Reddit.
Further Reading –
SHARE THIS ARTICLE
Related Tutorials:


ABOUT THE AUTHOR
I hope you enjoyed reading this tutorial. If it helped you then consider buying a cup of coffee for me. This will help me in writing more such good tutorials for the readers. Thank you.
HELLO EVERYONE
 Welcome to YogiHosting - A Programming Tutorial Website. It is used by millions of people around the world to learn and explore about ASP.NET Core, Blazor, jQuery, JavaScript, Docker, Kubernetes and other topics.
SUBSCRIBE TO NEWSLETTER
Enter your email address to subscribe to this blog and receive notifications of new posts by email.
Join 90K other subscribers