jQuery Validation of Email, Number. Dropdown, Checkbox & Radio Button

jQuery is the most popular JavaScript Library which is not only light-weight, super fast and all browser compatible, but also excellent in creating animations, AJAX calls and html/CSS/DOM manipulation. It is necessary that all web developers should have a good knowledge of jQuery so that they can use it to create a good client side features in their web applications.
- Form Validation on the client side. This makes application faster and easy to use. Client side form validation also helps in reducing the unnecessary server load.
- DOM Manipulation is very easy with jQuery. You can select html elements in the DOM (Document Object Model) by their ids, CSS classes, parent and children. Then you can edit their properties with just 2 to 3 lines of code.
- Event handling is made easy by jQuery, to capture the click, focus, hover and other events of buttons, images, div, etc. It is also very easy to call server side codes with jQuery AJAX method.
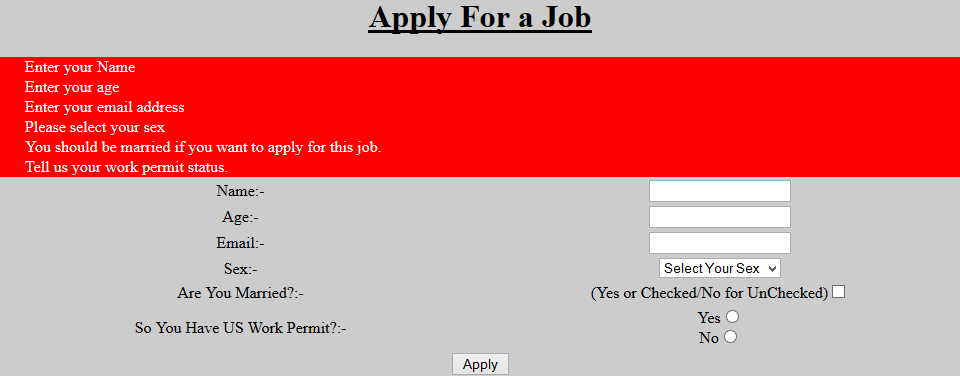
In this tutorial you will learn jQuery Form Validation with proper code examples. The form here is a job application, where a user can fill and submit his application online. The validations that are applied on the form will help the user to submit his information in proper manner – like proper age, proper email, etc.
Form Controls which will be Validatated with jQuery
This form has six fields having different controls for each of them –
- 1. Name – input of type ‘text’
- 2. Age – input of type ‘text’
- 3. Email – input of type ‘text’
- 4. Sex – ‘Select’ control
- 5. Are You Married? – input of type ‘checkbox’
- 6. You Have US Work Permit? – input of type ‘radio’
Besides these, there is a div which will show validation error messages and an input control of type submit, which when clicked will submit the user’s information to the server.
Creating the Form and adding jQuery Validations to it
1. Add Controls and CSS in the web page
<div id="content">
    <h1>Apply For a Job</h1>
    <div id="errorDiv"></div>
    <table>
        <tr>
            <td>Name:-</td>
            <td><input type="text" id="nameInput"/></td>
        </tr>
        <tr>
            <td>Age:-</td>
            <td>input type="text" id="ageInput"/></td>
        </tr>
        <tr>
            <td>Email:-</td>
            <td><input type="text" id="emailInput" /></td>
        </tr>
        <tr>
            <td>Sex:-</td>
            <td>
                <select id="sexSelect">
                    <option value="Select">Select Your Sex</option>
                    <option value="M">Male</option>
                    <option value="F">Female</option>
                </select>
            </td>
        </tr>
        <tr>
            <td>Are You Married?:-</td>
            <td>(Yes or Checked/No for UnChecked)<input type="checkbox" title="Yes" id="marriedCheckBox"/>
            </td>
        </tr>
        <tr>
            <td>You Have US Work Permit?:-</td>
            <td>Yes<input type="radio" id="workPermitYesRadio" name="workPermitYesRadio" value="Yes"/><br />
                No<input type="radio" id="workPermitNoRadio" name="workPermitYesRadio" value="No" />
            </td>
        </tr>
        <tr>
            <td colspan="2"><input type="submit" id="submitButton" value="Apply"/></td>
        </tr>
    </table>
</div>
#content {
    margin: 0 auto;
    width: 960px;
    background-color: #cccccc;
}

    #content h1 {
        text-align: center;
        text-decoration: underline;
    }

table {
    width: 100%;
}

    table tr td {
        width: 40%;
        text-align: center;
    }

#errorDiv {
    background-color: red;
    color: #FFFFFF;
    padding-left:25px;
}
jQuery Form Validation
2. Add the link to jQuery
<script type="text/javascript" src="JS/jquery-3.2.1.js"></script>
Put this link just before the body end tag (</body>). Here I have placed the jQuery file inside the ‘JS’ folder. You can download jQuery file from http://jquery.com/download/.
I advise you to use the most stable version which is currently the 3.2.1 version.
3. Adding jQuery Event Handling
Add the below lines just after where you have put jQuery link on step 2.
<script type="text/javascript">
    $(document).ready(function () {
         $("#submitButton").click(function (e) {
            ValidateAll();
            return false;
        });
    });
</script>
4. Add jQuery validation Functions
Just after jQuery event handling code, add the below code which contains the validation function.
<script type="text/javascript" lang="javascript">
    function EmailValidate() {
        var numericExpression = /^w.+@[a-zA-Z_-]+?.[a-zA-Z]{2,3}$/;
        var elem = $("#emailInput").val();
        if (elem.match(numericExpression))
            return true;
        else
            return false;
    }

    function ValidateAll() {
        var errorCounter = 0;
        var errorMessage = "";
        //Name
        if ($("#nameInput").val() == '') {
            errorMessage += " Enter your Name<br/>";
            errorCounter++;
        }
        //End

        //Age
        if ($("#ageInput").val() == '') {
            errorMessage += " Enter your age<br/>";
            errorCounter++;
        }
        else if (!$.isNumeric($("#ageInput").val()))
        {
            errorMessage += " Invalid age-should be numeric<br/>";
            errorCounter++;
        }
        //End

        //Email
        if ($("#emailInput").val() == '') {
            errorMessage += " Enter your email address<br/>";
            errorCounter++;
        }
        else if (!(EmailValidate())) {
            errorMessage += " Invalid email address<br/>";
            errorCounter++;
        }
        //End

        //Sex
        if ($("#sexSelect").val() == 'Select') {
            errorMessage += " Please select your sex<br/>";
            errorCounter++;
        }
        //End

        //Married
        if (!($('#marriedCheckBox').prop('checked')))
        {
            errorMessage += " You should be married if you want to apply for this job.<br/>";
            errorCounter++;
        }
        //End

        //Work Permit
        if ((!($('#workPermitYesRadio').prop('checked'))) && (!($('#workPermitNoRadio').prop('checked')))) {
            errorMessage += " Tell us your work permit status.<br/>";
            errorCounter++;
        }
        else if (!($('#workPermitYesRadio').prop('checked'))) {
            errorMessage += " You should have US work permit if you want to apply for this job.<br/>";
            errorCounter++;
        }
        //End

        $("#errorDiv").html(errorMessage);
        if (errorCounter == 0) {
            alert('Thank you, your job application has been submitted successfully. We will contact you soon.')
            return true;
        }
        else
        {
            return false;
        }
    }
</script>
Our page is now ready for validation. Here I have attached the click event on the submit button, which then calls the ValidateAll() function.
This function checks if all the values of the controls are in proper format or not. If user tries to put improper values, he is shown an error message.
Only when he puts all his information properly then the form is submitted. This time the code returns true and the form is posted to the server.
You can capture the form’s submitted information on the server side by using server side technology like ASP.NET Core, php, python, java, etc. You can also store the submitted information in the database.
jQuery Validate Email
To Validate an email, I will match the email with this regular expression /^w.+@[a-zA-Z_-]+?.[a-zA-Z]{2,3}$/. If the match return true then the email format is correct.
Below is the function which does this work-
function EmailValidate() {
    var numericExpression = /^w.+@[a-zA-Z_-]+?.[a-zA-Z]{2,3}$/;
    var elem = $("#emailInput").val();
    if (elem.match(numericExpression))
        return true;
    else
        return false;
}
To check email value in the textbox by using the above function, I used the below code:
if ($("#emailInput").val() == '') {
    errorMessage += " Enter your email address<br/>";
    errorCounter++;
}
else if (!(EmailValidate())) {
    errorMessage += " Invalid email address<br/>";
    errorCounter++;
}
jQuery Validate Number
To check if the value in a textbox is a number, I have used isNumeric function. So the code to validate number in jQuery is:
if ($("#ageInput").val() == '') {
    errorMessage += " Enter your age<br/>";
    errorCounter++;
}
else if (!$.isNumeric($("#ageInput").val()))
{
    errorMessage += " Invalid age-should be numeric<br/>";
    errorCounter++;
}
jQuery Validation of Select Control
If the select control’s value is Select then the validation fails.
So the validation function becomes –
if ($("#sexSelect").val() == 'Select') {
    errorMessage += " Please select your sex<br/>";
    errorCounter++;
}
jQuery Validate Checkbox
To Validate Checkbox I have used the prop method of jQuery.
The code to validate checkbox is –
if (!($('#marriedCheckBox').prop('checked')))
{
    errorMessage += " You should be married if you want to apply for this job.<br/>";
    errorCounter++;
}
jQuery Validate Radio Button
Just like checkbox, I have used the prop method to validate radio button.
The code is –
if ((!($('#workPermitYesRadio').prop('checked'))) && (!($('#workPermitNoRadio').prop('checked')))) {
    errorMessage += " Tell us your work permit status.<br/>";
    errorCounter++;
}
else if (!($('#workPermitYesRadio').prop('checked'))) {
    errorMessage += " You should have US work permit if you want to apply for this job.<br/>";
    errorCounter++;
}
The download link of this tutorial is below:
$("#nameInput").val()– gets the value of the control having id as nameInput.- $(“#workPermitYesRadio”).prop(“checked”))) – finds if the control (with id workPermitYesRadio) is checked or not.
- $(“#errorDiv”).html(errorMessage) – shows the error message inside the div with id as errorDiv.
Conclusion
This jQuery Validation Tutorial explains how to validate different controls on the client side i.e. on the browser. You can easily enhance this feature based on your requirements.
If you have any query please enter it in the comment section below. I will answer your queries as soon as possible.
SHARE THIS ARTICLE
Related Tutorials:


ABOUT THE AUTHOR
I hope you enjoyed reading this tutorial. If it helped you then consider buying a cup of coffee for me. This will help me in writing more such good tutorials for the readers. Thank you.

HELLO EVERYONE
 Welcome to YogiHosting - A Programming Tutorial Website. It is used by millions of people around the world to learn and explore about ASP.NET Core, Blazor, jQuery, JavaScript, Docker, Kubernetes and other topics.
SUBSCRIBE TO NEWSLETTER
Enter your email address to subscribe to this blog and receive notifications of new posts by email.
Join 90K other subscribers