Tutorial on doing Backup and Restore of WordPress Website with Images

A website owner worst nightmare is when his website fails to load,due to been hacked or just fallen into pieces. Therefore it becomes very important for them to know how to take backup of their website, and restore it when there is a need to do so. In this tutorial I will explain how to do Backup and Restore of your WordPress website.
WordPress Backup Procedure
A WordPress website backup is split into 2 things –
- 1. First is the Database where the website information is stored. This contains every post, pages, products, links, etc your website has.
- 2. Second is the Files which are kept in the 3 folders named ‘plugins’, ‘themes’ and ‘uploads’. These are kept inside the wp-content directory (‘wp-content’ directory is in the root of your folder of your website).
Let’s discuss them one by one.
1. WordPress Database Backup Procedure
The procedure of database backup is different for both Windows and Linux hosting. Below I have mentioned how to do it for both of them.
a. WordPress Database Backup in Plesk Panel
First, log in to your hosting account. If your hosting is based on Windows OS, then you will reach Plesk Panel. Now follow the steps given below –
1. Click Backup Manager in the top right corner.

2. Next, under More Actions tab click Database Backup Repository.

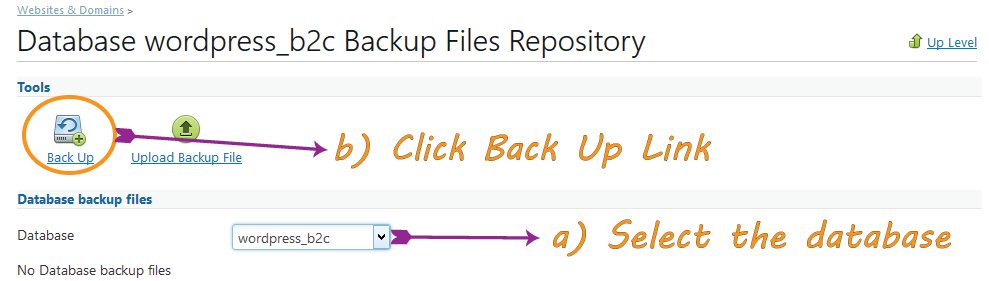
3. You will be taken to a new page where you need to select the database from the database drop down control. Then click the Back Up icon at the top.
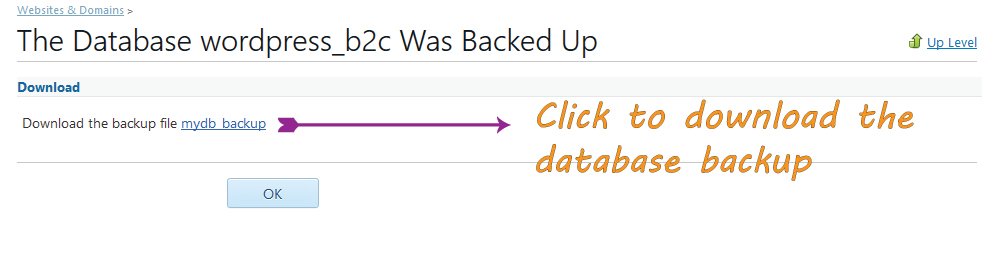
4. A new page opens where you enter the name of the database backup file, and then click OK button to save it.

5. Now you get a message to download the database backup file. Just click the database backup file, which you have just created, to download it to your local PC.
b. WordPress Database Backup in cPanel
If your hosting is based on Linux OS, then after you have logged in to your hosting account you will be taken to cPanel. Here go to the backups page by clicking the Backups icon.

Under heading Download a MySQL Database Backup, you click the database to start it’s download.

If you have more than one database in your Plesk or cPanel and you are unsure which database your WordPress website is using. Then you can open wp-config.php file, which is located in the website root directory, in FileZilla and see the below line –
define('DB_NAME', 'i604309_wp2');The second parameter in the define function is the database name of your website. In my case it is ‘i604309_wp2’.
2. Procedure of WordPress Files Backup
Here I will show you how to make the backup of the files contained in the folders plugins, themes and uploads. You will need to create FTP account from your cPanel or Plesk Panel.
Then connect to your website in FTP protocol. You can use FileZilla to connect to your website using FTP protocol.
Then Follow the below procedures:
- 1. Create a new folder in your PC hard disk drive.
- 2. Navigate to this newly created folder on the left side of FileZilla.
- 3. On the right side of FileZilla, select the three folders ‘plugins’, ‘themes’ and ‘uploads’. Drag and drop them on the left side of FileZilla. This will copy them in your local PC.
- 4. Go to the root folder of your website, on the right side of FileZilla, and locate wp-config.php file. Drag and drop it on to the left. You will need this file during database restore section.

Now you have the WordPress Database and file backup in your PC so you can go ahead and Restore your WordPress Website from this Backup if there is a need.
Restore Backup
First reinstall WordPress in your domain from your cPanel or Plesk panel. You will find WordPress given under the ‘Application’ area. Note that reinstalling WordPress will remove all previous files and will also create a new database for it.
It will also create a new wp-config.php which now has new database settings. But I need it to contain the old database settings therefore update the following entries in the new wp-config.php file and make them same as that in the previous file (which you took the backup of):
define('DB_NAME', 'WpCommon');
define('DB_USER', 'root');
define('DB_PASSWORD', '');
define('DB_HOST', 'localhost');
You can get the previous database information from the wp-config.php file which I have backed up previously. Alternately you can just replace the new wp-config.php file with version from the backup.
Now follow the following steps –
1. Procedure of WordPress Database Restore
Since now I am using the old database so open the database in phpMyAdmin.
In Plesk panel, to open the database in phpMyAdmin, click Databases icon then, in the page that opens click, ‘WebAdmin’ against the database that is used by the WordPress.
In cPanel you will find phpMyAdmin under the heading Databases. Click phpMyAdmin to open the database.

Now follow the steps –
- 1. In the phpMyAdmin click the database name given on the left side.
- 2. The page which opens will show all tables, click Check All to select all the tables.
- 3. In the dropdown menu called With Selected:, select ‘Drop’.
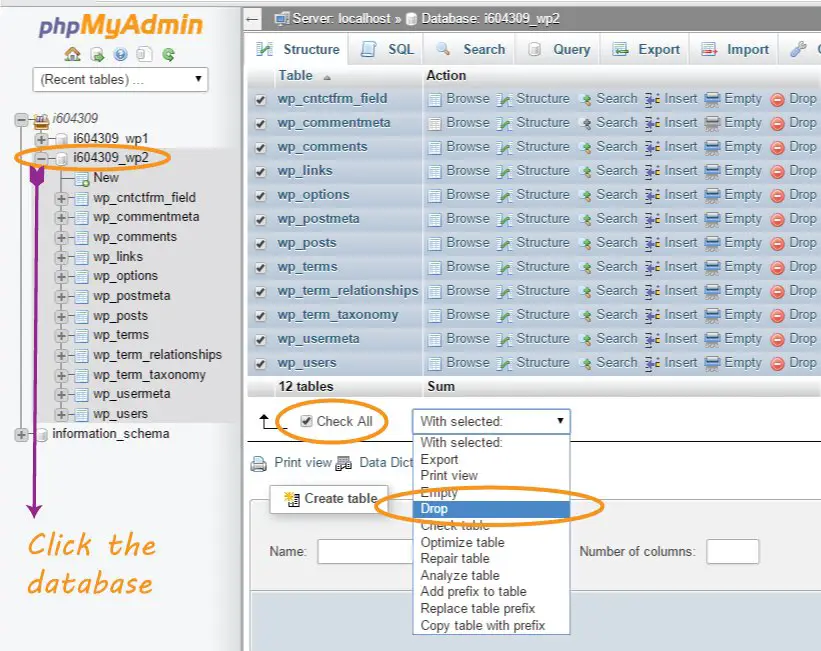
- 4. You will get a message asking whether you are sure to execute the query. Click ‘Yes’ button to drop all the tables. After the query executes you will have an empty database.

- 5. Now begin with the main part which is to restore the database. So click the Import link at the top. Click ‘Choose File’ or ‘Browse’ given against Browse your computer:. Navigate to your ‘database backup file’ (that you saved in your PC during WordPress database backup section). Leave all the other options as it is. Click the Go button which will restore the database backup to the backed up state.

You will soon see the success message.

2. Procedure of WordPress Files Restore
You may remember that I backed up the 3 folders – ‘plugins’, ‘themes’ and ‘uploads’ in my local PC hard drive. Now move them from our local PC to our WordPress website location. So connect to your website in FTP protocol using FileZilla.
On the left side of FileZilla, go to the location of these 3 folders.
On the right side navigate inside the wp-content folder. Now select the 3 folders on the left and drag and drop them on the right.
Keep in mind that you drop them below the last folder on the right and not over any of the folders there. If it asks to replace then select yes. It will take some time before all files are uploaded.
That finishes our WordPress file restoring part.

In this way you can do Backup and Restore of your WordPress Website. Just keep in mind to take at least one backup every 15 days so that in case of any problem you have the proper backup with you. Hope you have got all your answers in this tutorial, feel free to comment if you want more info.
SHARE THIS ARTICLE
Related Tutorials:


ABOUT THE AUTHOR
I hope you enjoyed reading this tutorial. If it helped you then consider buying a cup of coffee for me. This will help me in writing more such good tutorials for the readers. Thank you.
Please Consider Donating us
We are helping millions of Beginners and Professionals to learn new programming technologies.
Please consider donating us:


HELLO EVERYONE
 Welcome to YogiHosting - A Programming Tutorial Website. It is used by millions of people around the world to learn and explore about ASP.NET Core, Blazor, jQuery, JavaScript, Docker, Kubernetes and other topics.
SUBSCRIBE TO NEWSLETTER
Enter your email address to subscribe to this blog and receive notifications of new posts by email.
Join 90K other subscribers