Please Consider Donating us
We are helping millions of Beginners and Professionals to learn new programming technologies.
Please consider donating us:


Entity Framework – How to Create an EDMX file in Visual Studio

Microsoft has created Entity Framework (short form EF) for helping developers to automate database related operations in C#, VB, C++ and other dot net based programming languages. Due to EF, developers are not needed to do the lengthy ADO.NET programming as EF takes all it’s care.
- 1. Less database related codes.
- 2. Fast development of projects.
- 3. Better transaction.
- 4. Testing improvements.
Here in this tutorial I will help you to get stated with Entity Framework.
Install Entity Framework (EF) via Nuget
You can install Entity Framework through Nuget in Visual Studio. This procedure is same for all versions of Visual Studio.
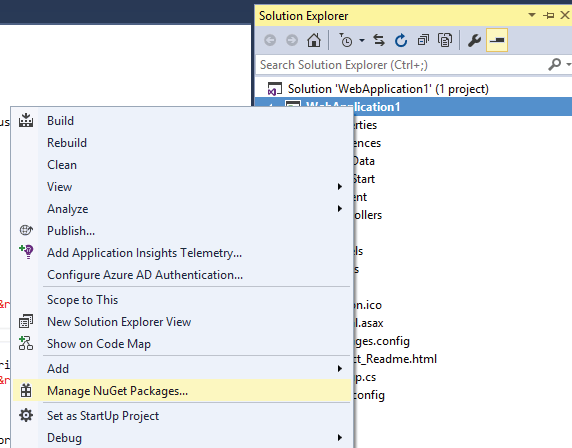
First, right click on your Project in Solution Explorer and select Manage Nuget Packages.
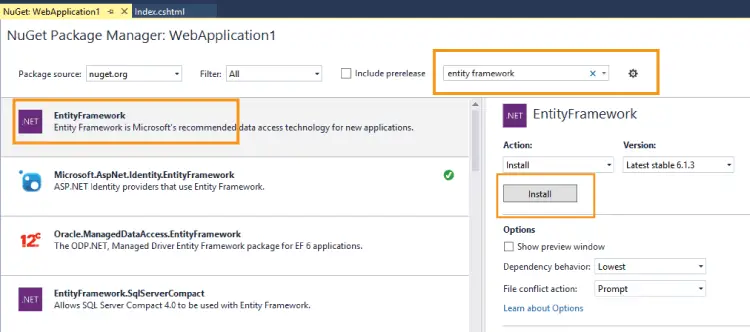
This will open NuGet Package Manager window. Here in the search box enter Entity Framework.
When EF shows up, select it and press the install button.
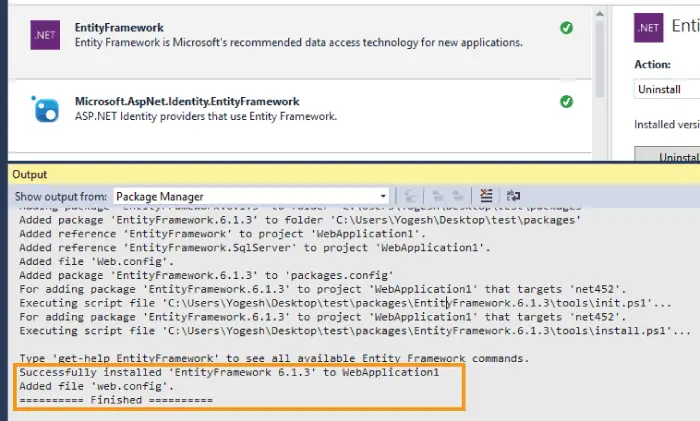
Next, click I Agree button on the License Acceptance window. This will start the installation of EF.

It takes less than a minute to complete, and you will soon see Successfully installed message in the Output window.
Restore Database in SQL Server
To illustrate this tutorial I will take the help of Northwind Database which you can download it from here.
The download file is in a .zip format. Extract the Northwind.bak from it.
Next, Restore it to your SQL Server.
Steps to Restore Northwind.bak file in SQL Server –
- 1. Open Microsoft SQL Server Management Studio.
- 2. Right Click the Databases node and then select Restore Database.

- 3. In the Restore Database window, select the Device option and click the “…” button given on its right side.

- 4. The Select backup devices window opens up. In this window, select File as Backup media type, and click the “Add” button.

- 5. The Locate Backup File window opens. Now locate and select the Northwind.bak file and click “OK” button.

- 6. You will find the Select backup devices window (step 4) now contains the location of Northwind.bak. So click the “OK” button.

- 7. Similarly, the Restore Database window of step 3 now contains the location of “Northwind.bak” and is ready to be restored. So click the “OK” button.

- 8. The restore procedure will proceed and within a few seconds and you will receive the message saying Database ‘Northwind’ restored successfully.

This completes the Northwind Database restore procedure and you are now ready to use this database.
Create EDMX file
An EDMX (Entity Data Model XML) file is an XML file describing the relationship between different models of the Entity Framework. It also provides the graphical representation of these relationships. The EDMX file is the most important part of the Entity Framework through which we do different operations like insert, delete, update and read.
I am now ready to create the EDMX file for the Northwind Database in my Visual Studio.
Follow the steps as listed below.
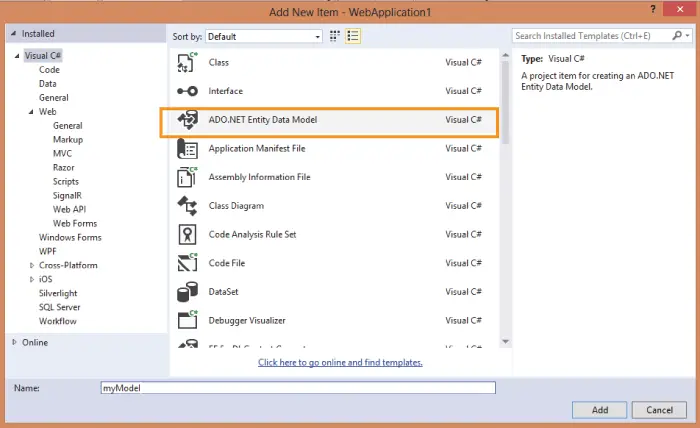
1. Add ADO.NET Entity Data Model
Right Click on the project and go to Add > New Item. Select Add ADO.NET Entity Data Model and click the “Add” button.
2. Entity Data Modal Wizard
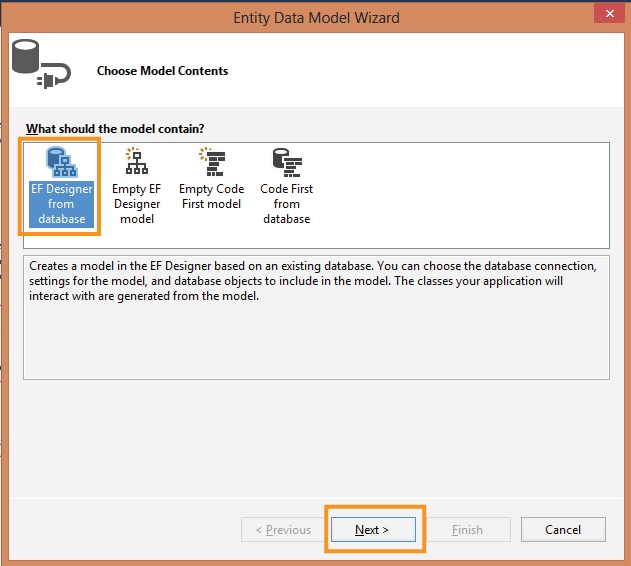
Here Visual Studio will ask you to select an option from a number of steps starting with Choose Model Contents.
You will get the Choose Model Contents window and Visual Studio will ask you What should the modal contain?. So select the option saying EF Designer from database and click the next button.
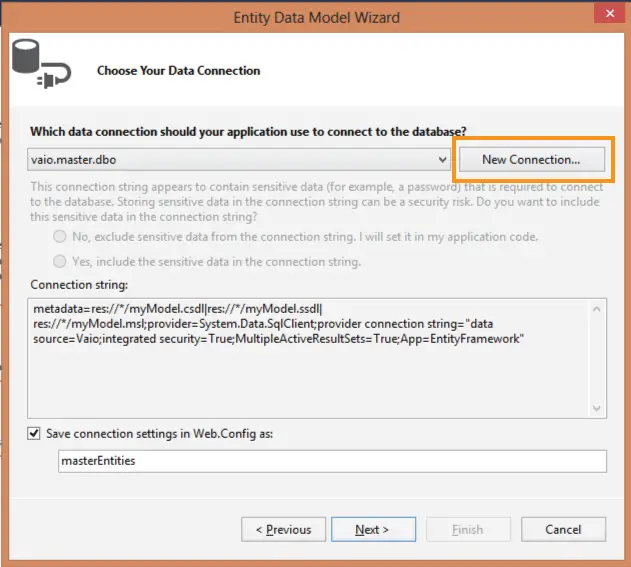
Here click the New Connection button to open the Connection Properties window.
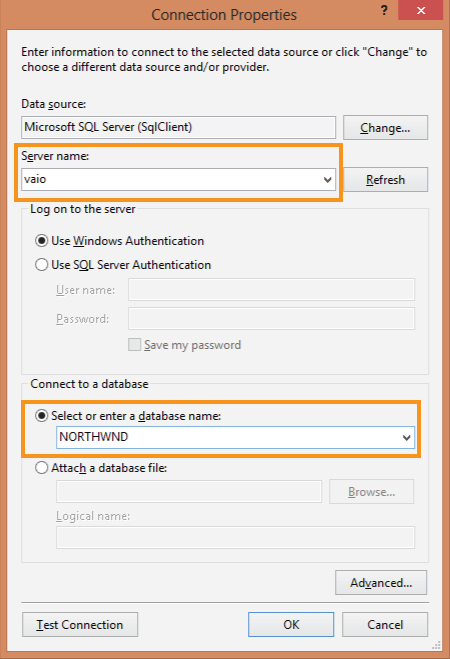
Enter the name of the server in the text box and select NORTHWND in Connect to a database. Next click the “OK” button.
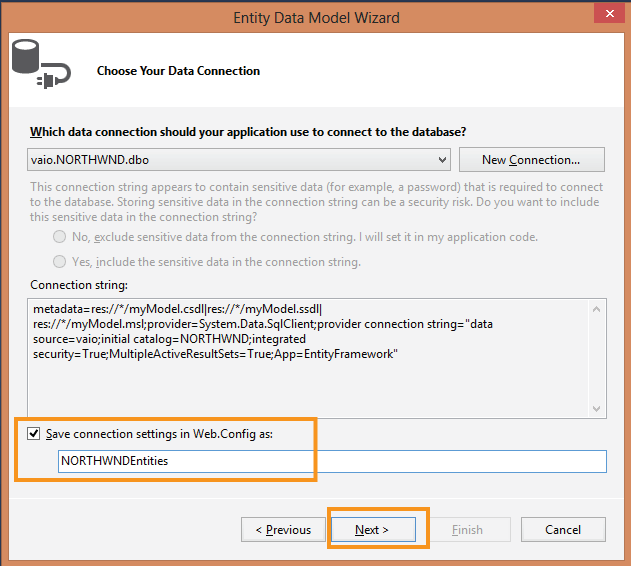
The Connection Properties window will close and you will once again reach the Choose Your Data Connection window. This window will now have the settings you set in the Connection Properties window.
So check the option that says Save connection settings in Web.Config as and click the next button.
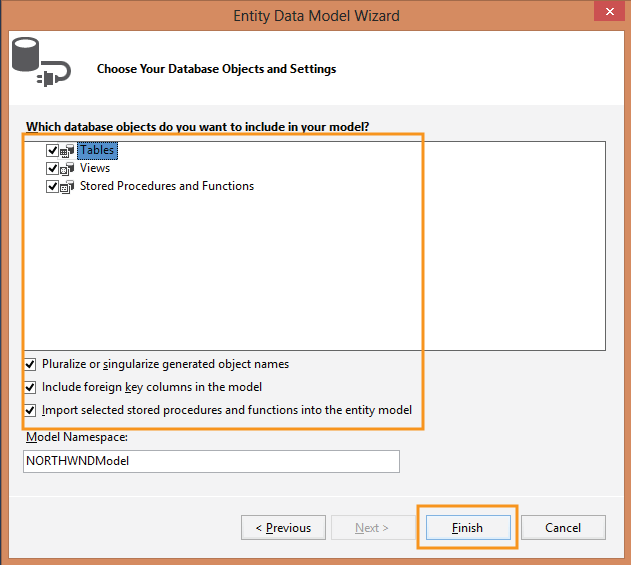
3. Choose Your Database Objects and Settings
Here Visual Studio will ask you to select Which database objects do you want to include in your model?. So select all three – ‘Tables’, ‘Views’, ‘Stored Procedures and Functions’.
- Pluralize or singularize generated object names
- Include foreign key columns in the model
- Import selected stored procedures and functions into the entity model
Finally at last, click the Finish button.
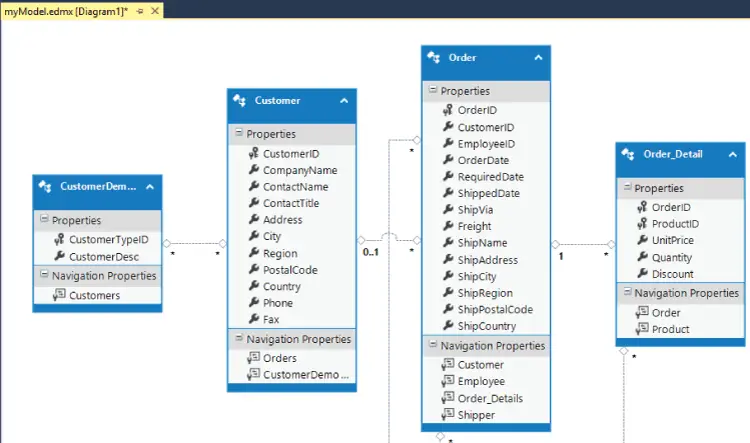
This completes the creation of EDMX file. The EDMX file for Northwind database will open up in the Visual Studio.
SHARE THIS ARTICLE
Related Tutorials:


ABOUT THE AUTHOR
I hope you enjoyed reading this tutorial. If it helped you then consider buying a cup of coffee for me. This will help me in writing more such good tutorials for the readers. Thank you.
HELLO EVERYONE
 Welcome to YogiHosting - A Programming Tutorial Website. It is used by millions of people around the world to learn and explore about ASP.NET Core, Blazor, jQuery, JavaScript, Docker, Kubernetes and other topics.
SUBSCRIBE TO NEWSLETTER
Enter your email address to subscribe to this blog and receive notifications of new posts by email.
Join 90K other subscribers