Creating First Application in Blazor from scratch

We will be creationg our First ASP.NET Core Blazor app in Visual Studio from absolute beginning. We will create an ASP.NET Core app from Empty stage and configure it to use Blazor. Note that the Visual Studio has a Blazor Template option which automatically configures a new project for Blazor. We have to introduce all the files structures of Blazor and their workings to you, therefore we will be creating this application from ASP.NET Core Empty template and will be using the latest .NET 7.0 Version. You are going to love this approach since you will learn about every necessary ASP.NET Core Blazor components and their workings, so be with this tutorial till the end.
Page Contents
Create a new Blazor Application
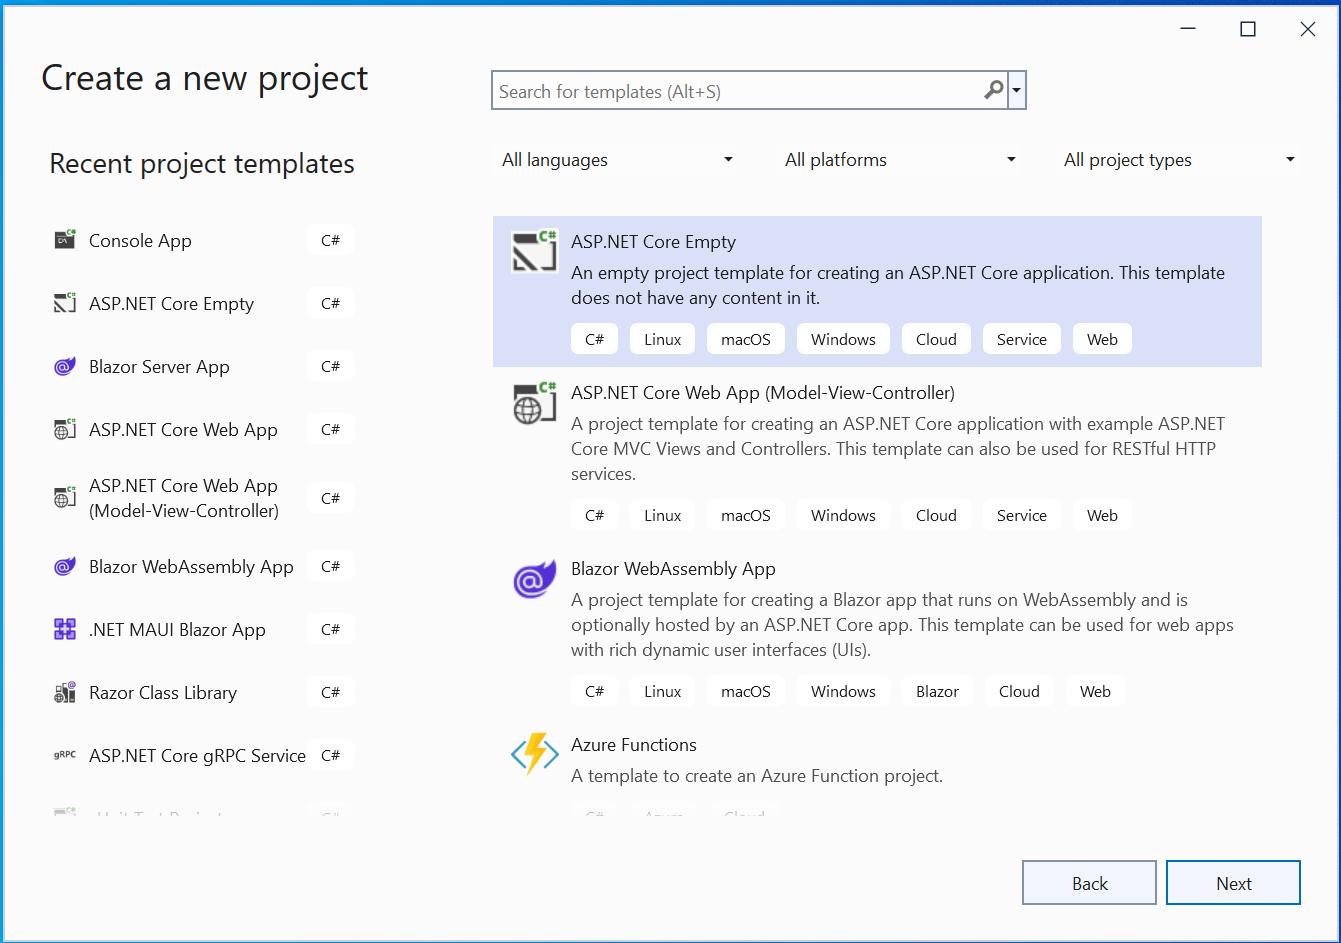
In Visual Studio create a new Project and select the template called ASP.NET Core Empty like shown by the below image. This template does not have any content.
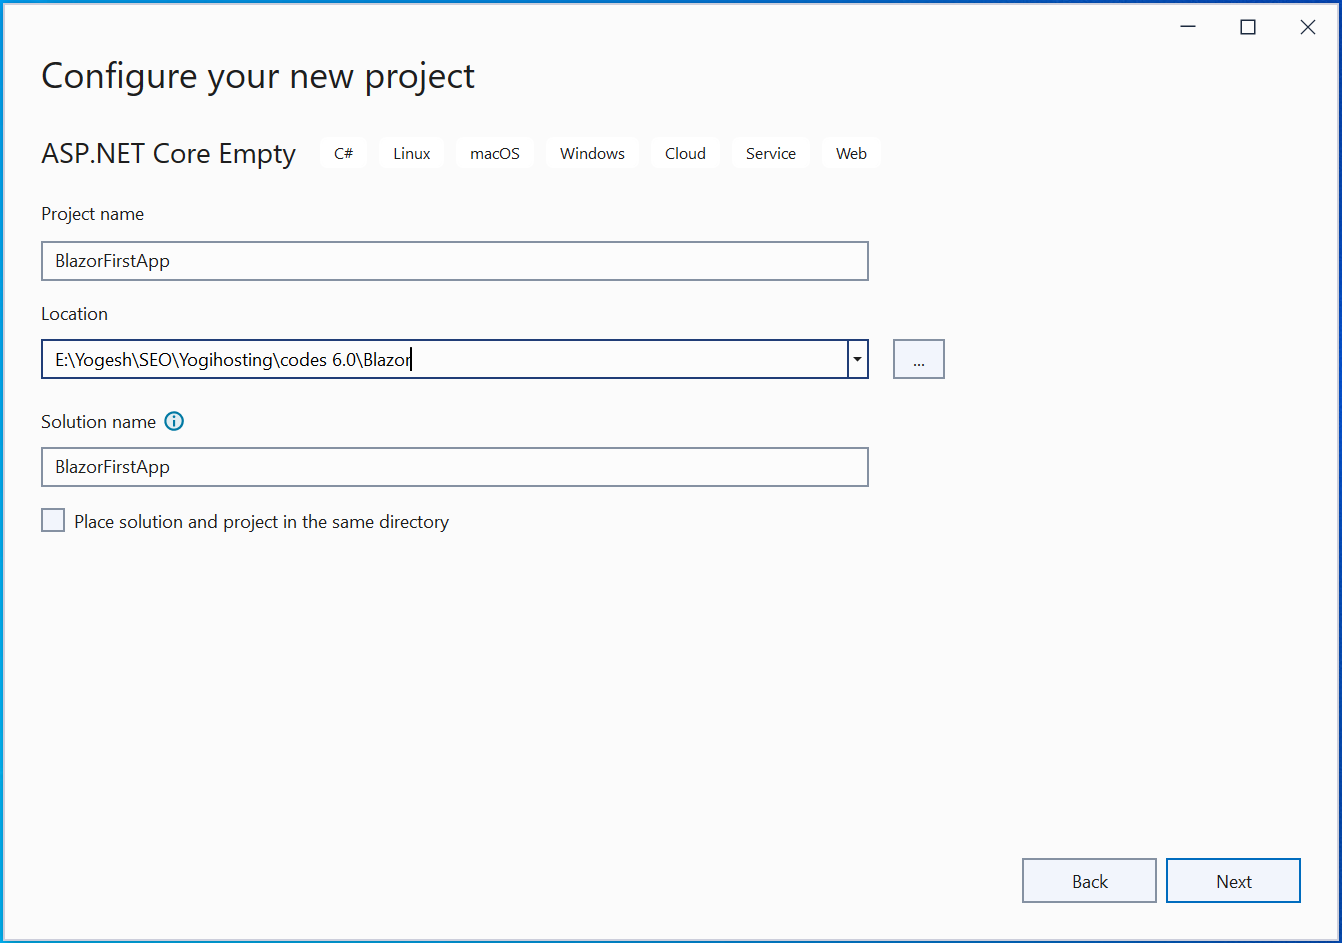
In the next window which says – Configure your new project, give the project name as BlazorFirstApp and select the location in the disk for the project files. Then click the Next button. See below image:
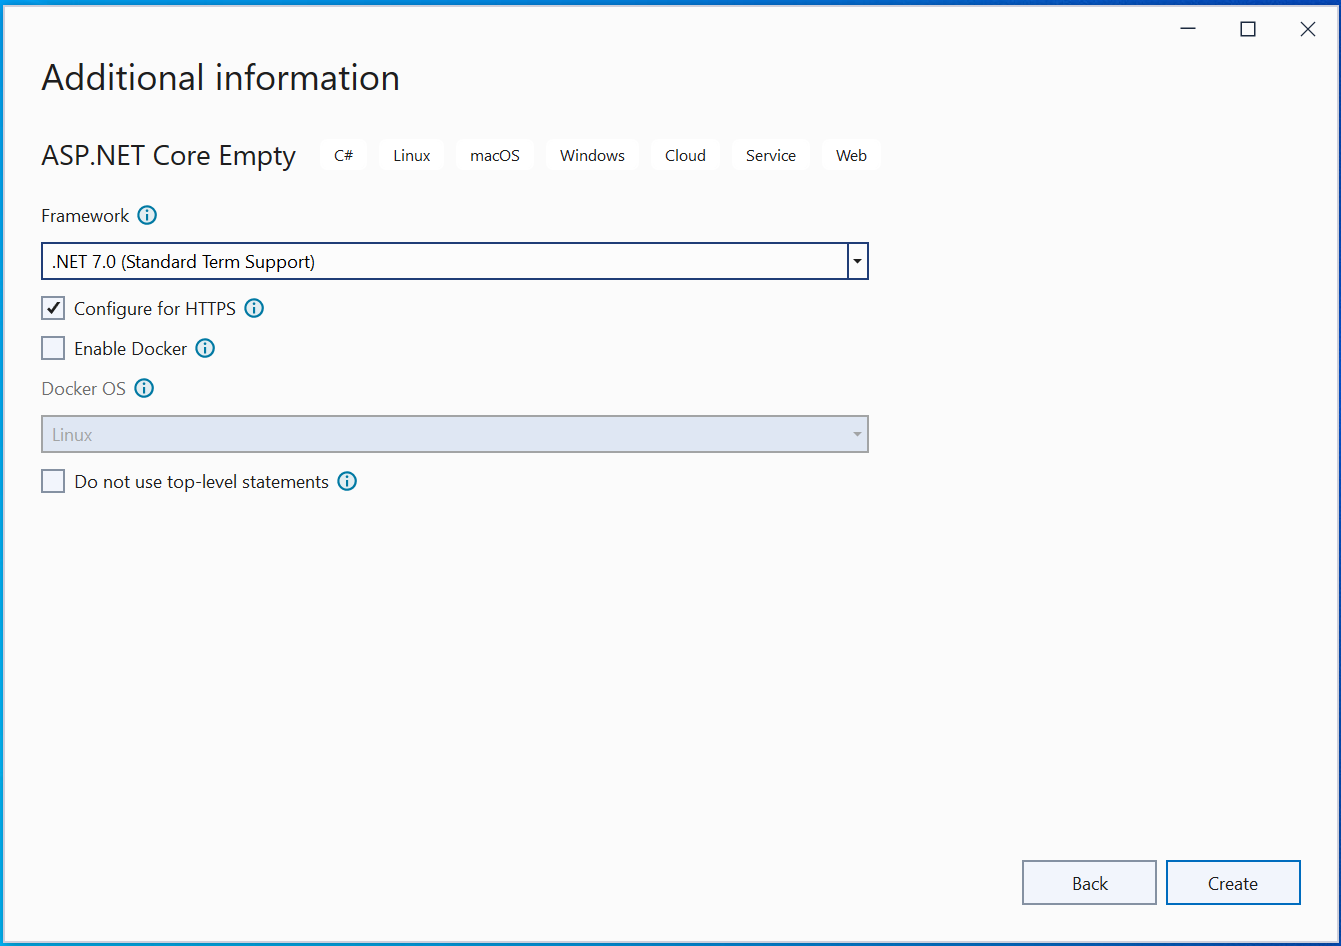
Next, you will get the Additional information window. Here you select the following DOT NET version to use. You can see that I have selected the DOT NET 7.0 version.
Finally click the Create button. The project will be created in a few seconds time and you are ready to use and unleash the power of the Blazor technology.
See the below image:
ASP.NET Core Blazor Configuration
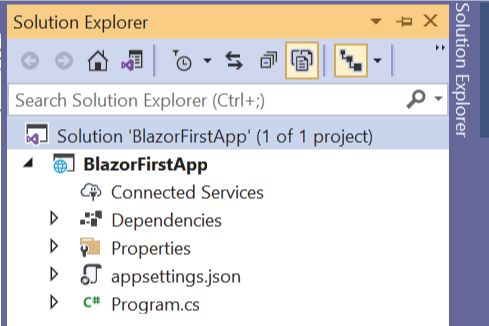
The ASP.NET Core app is already created and if you see the Solution Explorer window you will notice there are only a few files. Check the screenshot given below.
Now we will add Blazor Configurations on this ASP.NET Core app. To be more specific we will be doing “Blazor Server” configuration to the app.
So the first Configuration step is to add the services and middleware to the Program.cs class which is available on the root of the app. Start by adding support for Razor Pages in the app since Blazor needs Razor Pages to work. The code which you have to add is given below.
builder.Services.AddRazorPages();Next, add Server-Side Blazor services to the service collection. The code to add is given below.
builder.Services.AddServerSideBlazor();Finally we have to integrates Blazor with ASP.NET Core Endpoint Routing. This will let SignalR which is the part of ASP.NET Core that handles the persistent HTTP request to work properly. The code for this is:
app.MapBlazorHub();I have shown all these ASP.NET Core Blazor Configurations in highlighted manner below. The other codes are ASP.NET Core configurations needed for the app.
var builder = WebApplication.CreateBuilder(args);

builder.Services.AddRazorPages();
builder.Services.AddServerSideBlazor();

var app = builder.Build();

if (!app.Environment.IsDevelopment())
{
    app.UseExceptionHandler("/Error");
    app.UseHsts();
}

app.UseHttpsRedirection();
app.UseStaticFiles();
app.UseRouting();

app.MapBlazorHub();

app.Run();
We have successfully performed Blazor Configurations to the ASP.NET Core app. Next, we will cover Blazor individual files like razor components, router, layouts, etc.
Razor Components
Blazor apps are built using components called Razor Components. These components are implemented in Razor Component files and these files have a .razor extension. In razor component you write your Blazor codes. They typically contains:
- A mixture of HTML and C# and uses the familiar Razor syntaxes.
- C# codes defined inside the @code block.
Blazor has many in-built Razor Components, some common ones are _Imports.razor, _App.razor, LayoutView.razor, MainLayout.razor, NavLink.razor, NavMenu.razor, Router.razor are some of the common ones. We can also build our own razor components to perform specific tasks.
Blazor Imports File – “_Imports.razor”
Blazor Imports File let you to import commonly used namespaces at one place so that you don’t have to import them separately on each Razor component that needs them.
Right click on the project name in the Solution Explorer and select Add ➤ New Item. You will see an Add New Item window opens up and it contains a lot of different files that can be selected. Here select Razor Component and name it as _Imports.razor. Click the Add button to create this file in the application’s root folder.
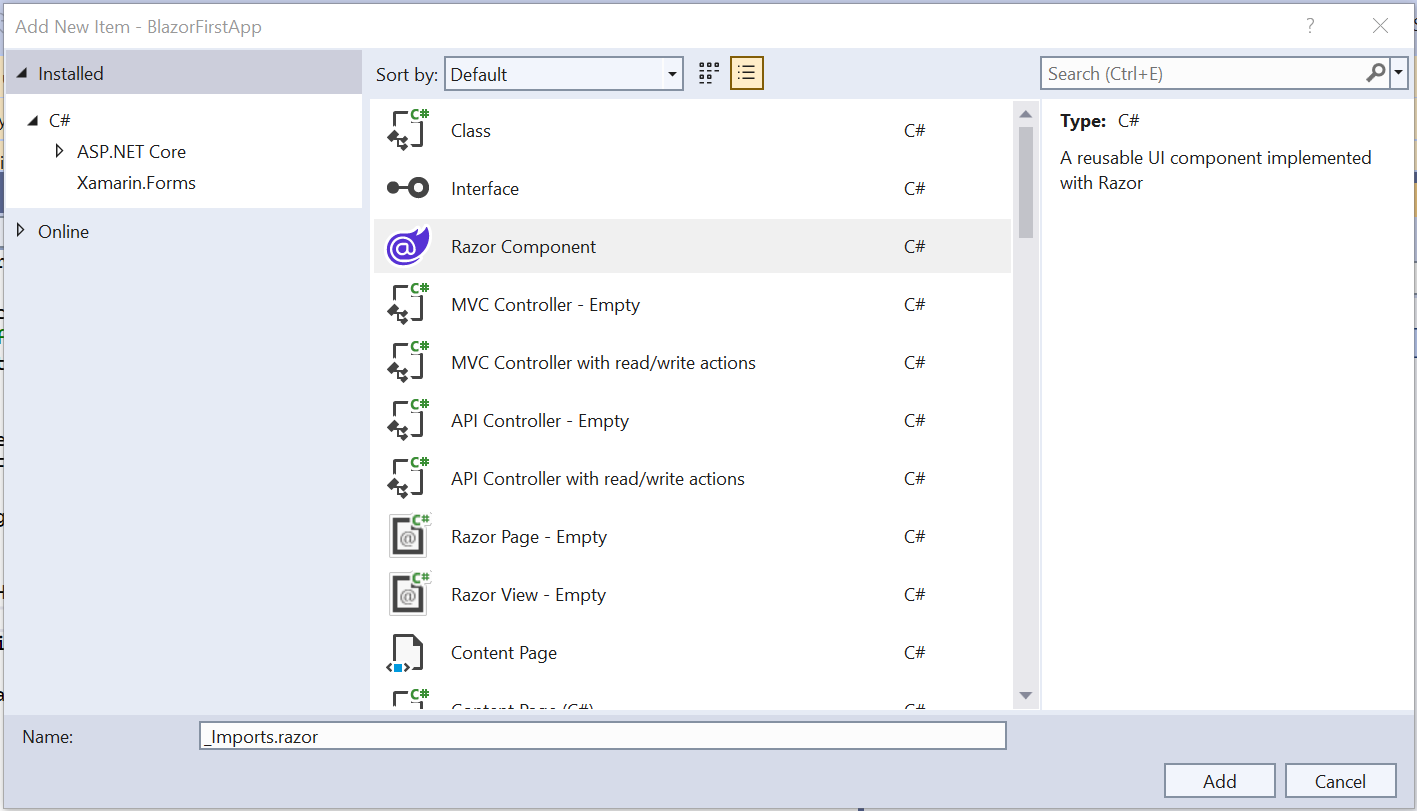
Once the Blazor Imports file is created remove all the default codes and only add the following 3 codes lines to it:
@using Microsoft.AspNetCore.Components.Web
@using Microsoft.AspNetCore.Components.Routing
@using BlazorFirstApp.Shared
In the first line we imported Components.Web namespace which contains a lot of necessary blazor in-built componets.
The second line is importing the Routing feature and is used for rendering and mapping routes to components. This is needed so that the urls are mapped to different razor components.
The third line imports the contents of Shared folder. The Shared folder is kept inside the root folder of the APP and it contains the files that are frequently shared among different razor components. These are navigations, stylesheets, layouts and so on. I will be explaining more about “Shared” folder in the latter half of this tutorial.
Some points to remember:
- 1. You can add a file called _Imports.razor to every folder of the application. The .NET will include the directives specified in the Blazor Imports File for all of the Razor templates that lie in the same folder or any of it’s subfolders.
- 2. You can also specify layouts in the Blazor Imports file for razor component. For example – @layout MyLayout ensures that all of the components use MyLayout.
Blazor Router component – “App.razor”
Blazor uses ASP.NET Core Routing system for selecting component based on URLs. So Blazor applications responds to changes in the URL by displaying different Razor Components. To get started, add a new Razor Component on the application’s root folder and call it App.razor. Add the following given codes to it:
<Router AppAssembly="@typeof(App).Assembly">
    <Found Context="routeData">
        <RouteView RouteData="@routeData" DefaultLayout="@typeof(MainLayout)" />
        <FocusOnNavigate RouteData="@routeData" Selector="h1" />
    </Found>
    <NotFound>
        <PageTitle>Not found</PageTitle>
        <LayoutView Layout="@typeof(MainLayout)">
            <p role="alert">Sorry, there's nothing at this address.</p>
        </LayoutView>
    </NotFound>
</Router>
Check the below image which shows the location of App.razor file:
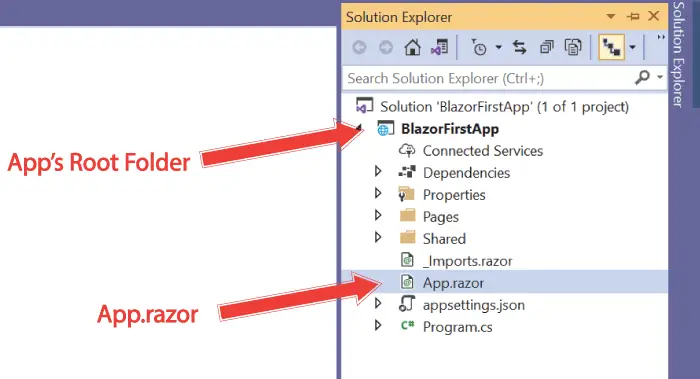
Let me explain you all about the above code in details. First, we need to specify the name of the .NET AppAssembly to use which in most cases is the current assembly:
<Router AppAssembly="@typeof(App).Assembly">Next, defining the “Found” and “NotFound” sections. In the Found section provide the contents to display when the match to the requested route (i.e. URL) is found. Similarly, in the NotFound section provide the contents to display when no match is found for the requested route.
I have defined the “Found” section as shown below:
<Found Context="routeData">
    <RouteView RouteData="@routeData" DefaultLayout="@typeof(MainLayout)" />
    <FocusOnNavigate RouteData="@routeData" Selector="h1" />
</Found>
The context property is set to routeData – Context="routeData". Inside it there is RouteView section which receive the route data (set as RouteData="@routeData") and default layout which is set as DefaultLayout="@typeof(MainLayout)". We will cover default layout in the coming section.
The FocusOnNavigate sets the UI focus to the top level h1 element when the navigating takes place from one page to another.
The RouteView populates the matching component’s contents inside the layout (UI). I have defined this layout to be MainLayout in this case. Layout basically contains the common areas of the app like the header and footer of the website. These common areas can be shown from a layout file instead of defining them again and again in different component of the Blazor app. This approach greatly reduces code redundancy.
Coming to the “NotFound” section which is given as:
<NotFound>
    <PageTitle>Not found</PageTitle>
    <LayoutView Layout="@typeof(MainLayout)">
        <p role="alert">Sorry, there's nothing at this address.</p>
    </LayoutView>
</NotFound>
It sets page title to Not found and calls the MainLayout and shows a sorry message to the user. This case arises when no match for the routes is found.
Endpoint Routing integration in Blazor
Blazor works with ASP.NET Core Endpoint Routing. Recall that in the above section we have already integrated it by adding the code – app.MapBlazorHub() inside the Program.cs class. It allows app to call any Razor component from inside the ASP.NET Core Controller’s views or Razor pages.
In a standalone Blazor app (like in our case), we have to use a Fallback Route which will call a Razor page by the name of _Host.cshtml. The fallback route has a very low priority in route matching and so this route is initiated when other routes didn’t match.
Because of this we can now also add ASP.NET Core MVC areas and razor pages in our Blazor app and they will not interfere with the ASP.NET Core Blazor components.
So go forward and add the code line – app.MapFallbackToPage("/_Host") in the “Program.cs” class just after we added the app.MapBlazorHub() method. See the highlighted code of program.cs below.
var builder = WebApplication.CreateBuilder(args);

builder.Services.AddRazorPages();
builder.Services.AddServerSideBlazor();

var app = builder.Build();

if (!app.Environment.IsDevelopment())
{
    app.UseExceptionHandler("/Error");
    app.UseHsts();
}

app.UseHttpsRedirection();
app.UseStaticFiles();
app.UseRouting();

app.MapBlazorHub();

app.MapFallbackToPage("/_Host");

app.Run();
Next, create a new Razor View called _Host.cshtml inside the Pages folder of your app. Add the following code to it:
@page "/"
@namespace BlazorFirstApp.Pages
@using Microsoft.AspNetCore.Components.Web
@addTagHelper *, Microsoft.AspNetCore.Mvc.TagHelpers

<!DOCTYPE html>
<html lang="en">
<head>
    <meta charset="utf-8" />
    <meta name="viewport" content="width=device-width, initial-scale=1.0" />
    <title>Blazor First App</title>
    <base href="~/" />
    <component type="typeof(HeadOutlet)" render-mode="ServerPrerendered" />
</head>
<body>
    <component type="typeof(App)" render-mode="ServerPrerendered" />

    <script src="_framework/blazor.server.js"></script>
</body>
</html>
Explanation of Codes : The code is an HTML Page with razor mark-up. It forms the top level of an HTML page markup. Notice the DOCTYPE, html, head and body tags present in the code.
Inside the head section we call HeadOutlet component of Microsoft.AspNetCore.Components.Web namespace which renders content provided by PageTitle and HeadContent components.
<component type="typeof(HeadOutlet)" render-mode="ServerPrerendered" />In short it will help to set the page titles, metas, etc on the html head section for different razor components.
Next, inside the body, we calls Blazor Router component which is defined by the App.razor as shown below:
<component type="typeof(App)" render-mode="ServerPrerendered" />I have already explained App.razor component’s working in the above section. In short, the respective layouts will be called here.
The render-mode attribute sets the RenderMode Enum’s value to ServerPrerendered. It tells to render the component into static HTML and includes a marker for a Blazor server-side application. The HTML content of the component is sent again over the persistent HTTP connection.
Other things to note here are:
@page "/"specifies the URL of this component.@addTagHelper *, Microsoft.AspNetCore.Mvc.TagHelpersimports the tag helper in the component. You can check my tutorial called Introduction to Tag Helpers in ASP.NET Core to know more about this topic.- The
basehtml tag specifies the base URL, which is root url, for all relative URLs on the app. - The script element specifies the name of the JavaScript file that establishes the SignalR connection with the server. Note that you “don’t” have to add this JavaScript file to the project as it will be done automatically by Blazor.
<script src="_framework/blazor.server.js"></script>
Blazor Layouts
You must have noticed that in a website or an app, the header and footer elements remain same through the app. The things which are kept on the header and footer elements are logos, copyright text, navigation menu, etc and these never change.
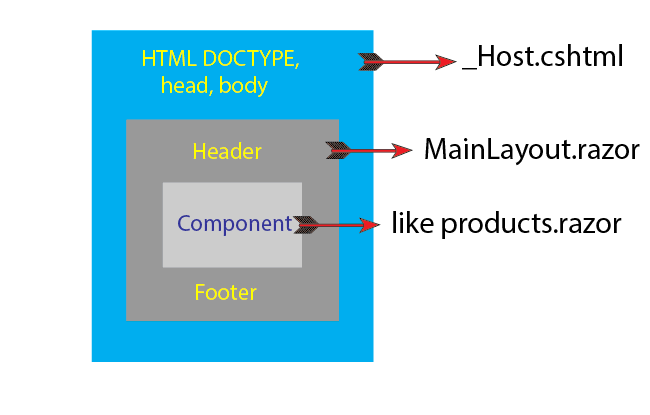
The best approach while designing apps is that we keep the header and footer elements in a common sharable file called layout and all the component of the Blazor app should call these layout files and show up these common areas (header & footer) on their respective places. Check the below given illustration which explains this concept.
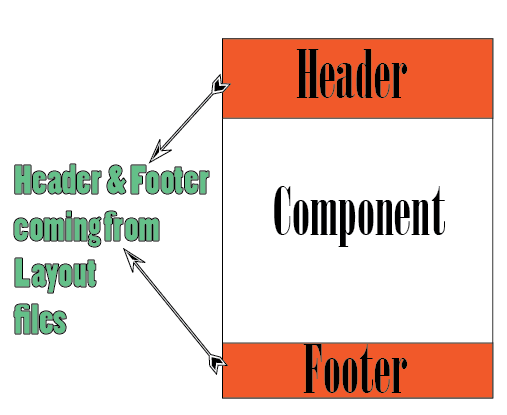
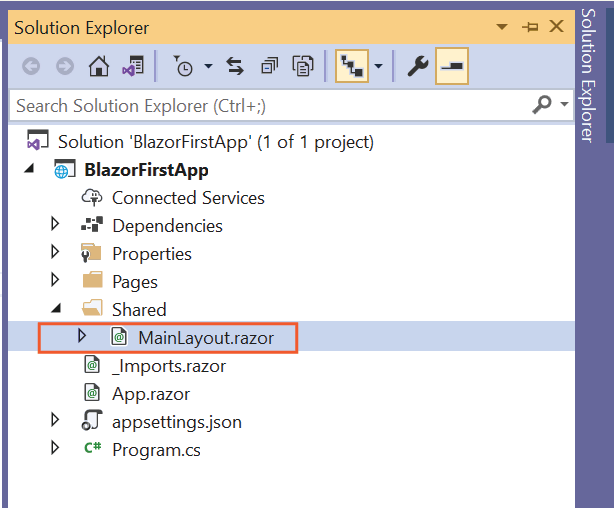
Since the layout file/files are shared with other components therefore they are kept inside the Shared folder. The Shared folder is kept on the root folder of the APP. If you haven’t created it till now so first create it by right clicking the name of the app in solution explorer, and selecting Add ➤ New Folder. Then name this folder as “Shared”.
Next, inside this Shared folder, create a new razor component called MainLayout.razor, and add the below code to it:
@inherits LayoutComponentBase

<header>
    <nav>
        <a href="/">Home</a>
        <a href="about">About</a>
        <a href="contact">Contact</a>
    </nav>
</header>

@Body

<footer>
    All Rights Reserved
</footer>
Check the below image which shows this newly created layout file’s location inside the shared folder.
<Found Context="routeData">
    <RouteView RouteData="@routeData" DefaultLayout="@typeof(MainLayout)" />
    <FocusOnNavigate RouteData="@routeData" Selector="h1" />
</Found>
Since I goanna keep my header and footer in this file therefore, notice the header and footer html tags. I have kept a navigation menu in the header while the footer shows just a simple copyright message.
The important thing to note is that the layout must inherit from the LayoutComponentBase which is done by the code – @inherits LayoutComponentBase.
The Razor syntax @Body specifies the location in the layout where the component’s content is rendered. Note that I have put the @Body between the header and the footer. Basically, this means – when a component is rendered on the browser then:
- First the Fallback Route which is _Host.cshtml is called. Note that it forms the top level html tags of the html page like DOCTYPE, head, body, etc.
- Next from the _Host.cshtml, the Blazor Router component which is App.razor is called. This in turn will call the default layout called MainLayout.razor. The default layout will form the header and footer sections of the html page.
- Inside the header & footer sections the razor component’s code will show.
I have illustrated this in the below image.
And this way the layout will do it’s work properly in the app.
Create a new Razor Component
I have already done all the Blazor Configurations and the app is ready to be added with new Razor Components (remember Blazor Components are made in razor component files).
So, let us start by adding a new simple Razor Component which shows a hello message.
Right click on the Pages folder and create a new razor component file and name it Index.razor. Add the following code to this file:
@page "/"
<PageTitle>Hello Blazor</PageTitle>

<h1>Hello</h1>
<p>Welcome to your new app.</p>
The first line uses @page directives for declaring the URLs for which this Razor Component will be displayed. I have declared the URL as “/” so it’s route in my case becomes https://localhost:44366/, the port may be different in your case.
In the second line we added PageTitle blazor component to set the page title for this page as “Hello Blazor”. Recall we have “HeadOutlet” component on the _Host.cshtml.
<component type="typeof(HeadOutlet)" render-mode="ServerPrerendered" />So what ever PageTitle component sets is ultimated addded as html title for the page by the HeadOutlet component.
Now run your project and you will see the component get’s displayed, check below image:
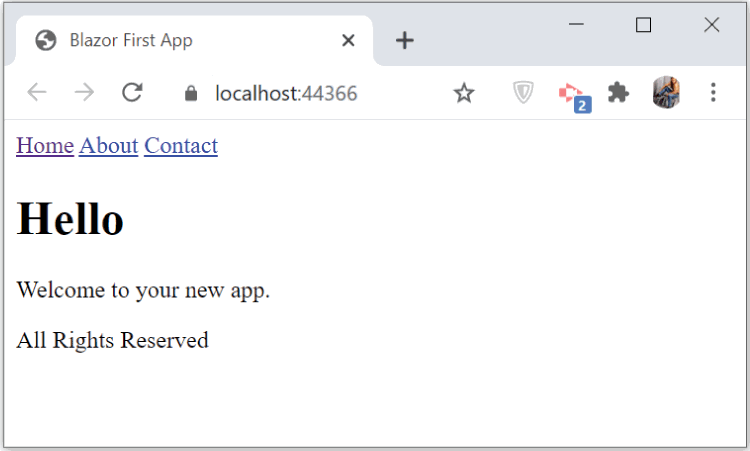
Notice it also shows the header and footer sections which it gets from the layout file.
More than one route can be defined for a component. Like, see the below code where I have defined 3 routes for this component.
@page "/"
@page "/Welcome"
@page "/Hello/Jack"

<PageTitle>Hello Blazor</PageTitle>

<h1>Hello</h1>
<p>Welcome to your new app.</p>
So now this component can be opened with 3 routes which are:
https://localhost:44366/
https://localhost:44366/Welcome
https://localhost:44366/Hello/Jack
Integrating Bootstrap in Blazor App
The component which I made has a very basic design. I can modernize it by integrating Bootstrap framework into the Blazor App and update the design of the component by using Bootstrap CSS.
If you have come across the term Bootstrap for the first time then I recommend you to have a reading of this introductory article – What is Bootstrap and Why you should use it in Web Development.
You can Install Bootstrap framework from LibMan inside the wwwroot/lib/bootstrap folder.
Right click the project on solution explorer and select Add ➤ Client-Side Library. A new window opens where you have to add “Bootstrap” on the “Library” text box. It will show options, select “Boostrap”. In the Target Location add wwwroot/lib/bootstrap/ and click the install button. Check the below image.
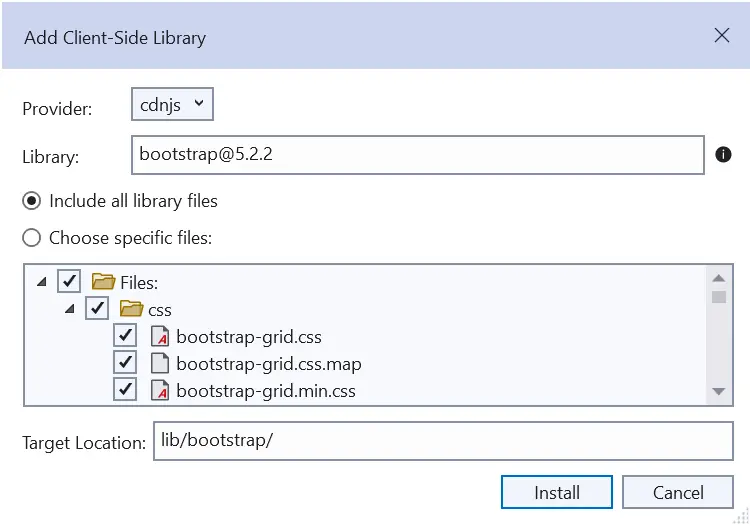
Boostrap will be downloaded and installed on the Blazor app in a few seconds time.
Now you can start using Bootstrap in you App. So, open the _Host.cshtml file and add a link to Bootstrap CSS in the head section.
<link href="~/lib/bootstrap/css/bootstrap.min.css" rel="stylesheet" />Now put the component tag inside a div having CSS class called m-1 p-1.
<div class="m-1 p-1">
...
</div>
Check the below highlighted code for these changes:
@page "/"
@namespace BlazorFirstApp.Pages
@using Microsoft.AspNetCore.Components.Web
@addTagHelper *, Microsoft.AspNetCore.Mvc.TagHelpers

<!DOCTYPE html>
<html lang="en">
<head>
	<meta charset="utf-8" />
	<meta name="viewport" content="width=device-width, initial-scale=1.0" />
	<title>Blazor First App</title>
	<base href="~/" />
	<component type="typeof(HeadOutlet)" render-mode="ServerPrerendered" />
	<link href="~/lib/bootstrap/css/bootstrap.min.css" rel="stylesheet" />
</head>
<body>
	<div class="m-1 p-1">
		<component type="typeof(App)" render-mode="ServerPrerendered" />
	</div>
	<script src="_framework/blazor.server.js"></script>
</body>
</html>
Next, edit the MainLayout.razor file to include the Bootstrap CSS like shown by the highlighted code below:
@inherits LayoutComponentBase

<header class="bg-dark text-white">
    <nav class="text-center">
        <a href="/">Home</a>
        <a href="about">About</a>
        <a href="contact">Contact</a>
    </nav>
</header>

<div class="p-4">
    @Body
</div>

<footer class="bg-success">
    All Rights Reserved
</footer>
Next, update the Index.razor code as shown below:
@page "/"

<PageTitle>Hello Blazor</PageTitle>

<h1 class="bg-info text-white">Hello</h1>

<p>Welcome to your new app.</p>
Now run your project and you will see new Bootstrap implemented design of the index page which is shown by the below given image:
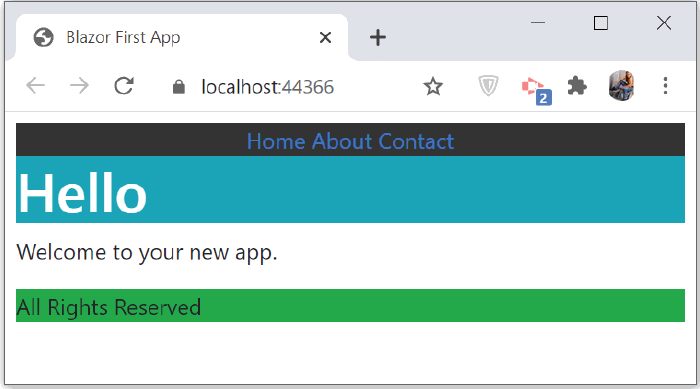
Now let us create a feature that will work as shown by the below video:
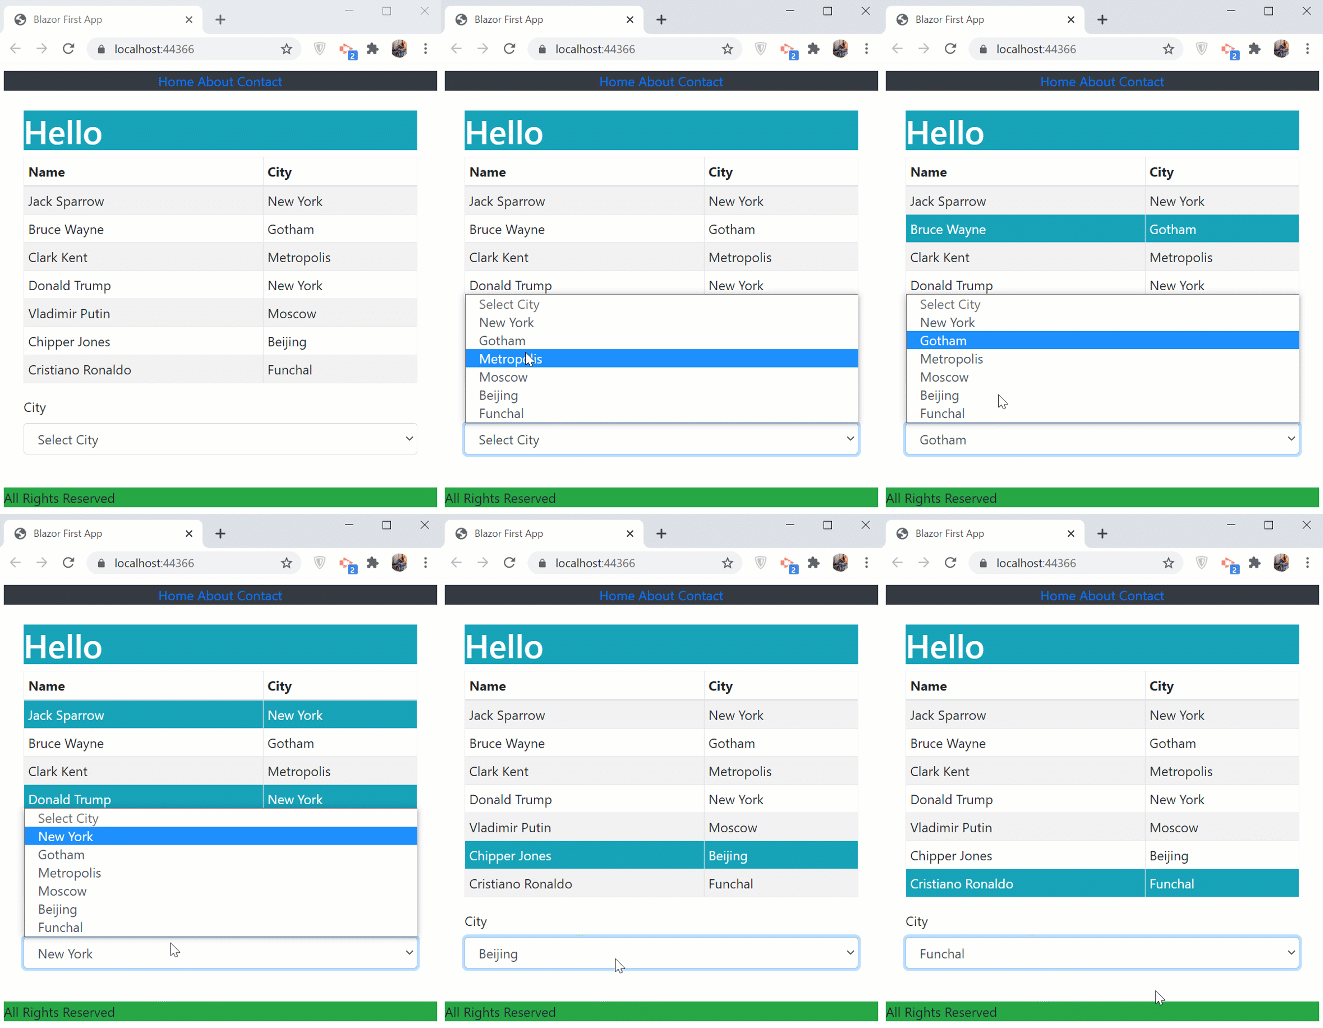
In this feature I am showing a list of people and their cities in a html table. There is a select control, given at the bottom, so that user can select the city and then all the people who are in the selected city are highlighted.
Next add the below given code in the Index.razor file.
@page "/"
<PageTitle>Hello Blazor</PageTitle>

<h1 class="bg-info text-white">Hello</h1>

<table class="table table-sm table-bordered table-striped ">
    <thead>
        <tr>
            <th>Name</th>
            <th>City</th>
        </tr>
    </thead>
    <tbody>
        @foreach (People p in peopleList)
        {
            <tr class="@GetCSS(p.City)">
                <td>@p.Name</td>
                <td>@p.City</td>
            </tr>
        }
    </tbody>
</table>
<div class="form-group">
    <label for="city">City</label>
    <select name="city" class="form-control" @bind="SelectedCity">
        <option disabled selected>Select City</option>
        @foreach (string city in Cities)
        {
            <option value="@city" selected="@(city == SelectedCity)">
                @city
            </option>
        }
    </select>
</div>

@code {
    public class People
    {
        public string Name { get; set; }
        public string City { get; set; }
    }

    public IEnumerable<People> peopleList => new List<People> {
                new People { Name = "Jack Sparrow", City = "New York" },
                new People { Name = "Bruce Wayne", City = "Gotham" },
                new People { Name = "Clark Kent", City = "Metropolis" },
                new People { Name = "Donald Trump", City = "New York" },
                new People { Name = "Vladimir Putin", City = "Moscow" },
                new People { Name = "Chipper Jones", City = "Beijing" },
                new People { Name = "Cristiano Ronaldo", City = "Funchal" }
            };

    public IEnumerable<string> Cities => peopleList.Select(l => l.City).Distinct();

    public string SelectedCity { get; set; }
    public string GetCSS(string city) => SelectedCity == city ? "bg-info text-white" : "";
}
Working details : The list of people are shown by html table. I have used foreach loop for looping through this list of people. Not to mention these are kept by a C# variable called by the name – “peopleList”.
…
<tbody>
    @foreach (People p in peopleList)
    {
        <tr class="@GetCSS(p.City)">
            <td>@p.Name</td>
            <td>@p.City</td>
        </tr>
    }
</tbody>
…
The tr tag calls a C# function by the name of GetCSS() and passes to it the city of the current person that is being undergoing binding. This C# function then checks if the city of the person is same as that stored in the variable called SelectedCity, and in that case the Bootstrap classes bg-info text-white are applied to the tr tag and so it is highlighted.
The SelectedCity variable’s value is updated everytime the city is changed on the select control.
The select control has been applied with the attribute named @bind which provides the data binding with the variable SelectedCity.
<select name="city" class="form-control" @bind="SelectedCity">So that when a new value of the city is selected on the select control then html table undergoes binding once again. Next the GetCSS() function is called which shown the respective rows in highlighted manner.
Run the app and check how it works.
NavLink in-built component for Navigation
NavLink is an in-built Blazor Component and is used for creating anchor tags for navigation. The NavLink component has added advantage over normal anchor tag as it toggles an “active” CSS class based on whether it’s href matches the current URL in the browser. With this, you can assign a color to this active class and app users will know which URL they are currently in.
For example, by adding the following NavLink Component on a Razor Component:
<NavLink href="/City">City</NavLink>The following anchor tag is formed:
<a href="https://localhost:44366/City">City</a>If the user visits the City URL then NavLink performs the match and this anchor tag will be applied with an active CSS class, i.e. it becomes:
<a class="active" href="https://localhost:44366/City">City</a>You can provide some color (like red) to this css and user will see a red color link when he/she is on the same page which the link’s href targets.
.active {
    color: red;
}
You can assign Match attribute to the NavLink to change the URL match procedure. There can be 2 values to it:
- NavLinkMatch.All: The NavLink is active when the entire current URL matches. Ex –
Match="NavLinkMatch.All". Take for example in case of –<NavLink href="/City" Match="NavLinkMatch.All">City</NavLink>, the https://localhost:44366/City will be matched while https://localhost:44366/City/NYC & https://localhost:44366/Moscow will not be matched. - NavLinkMatch.Prefix: It is the default value. Here the NavLink is active when any prefix of the current URL is matched. Ex –
Match="NavLinkMatch.Prefix". Example for<NavLink href="/City" Match="NavLinkMatch.Prefix">City</NavLink>, the https://localhost:44366/City & https://localhost:44366/City/NYC will be matched while https://localhost:44366/Moscow will not be matched.
Left Navigation using NavLink
Let us create a left navigation bar feature by using NavLink component. So create a new Razor Component called MyNav.razor inside the Shared folder of the app. Add the following code to it:
<style>
    .active {
        color: red;
    }
</style>

<div class="p-3 mb-2 bg-warning text-dark">
    <h3 class="bg-info text-white">Links</h3>
    <ul class="nav flex-column">
        <li class="nav-item px-3">
            <NavLink href="/" Match="NavLinkMatch.All">
                Index
            </NavLink>
        </li>
        <li class="nav-item px-3">
            <NavLink href="/City">
                City
            </NavLink>
        </li>
        <li class="nav-item px-3">
            <NavLink href="/Country">
                Country
            </NavLink>
        </li>
        <li class="nav-item px-3">
            <NavLink href="/Continent">
                Continent
            </NavLink>
        </li>
    </ul>
</div>
The component has 4 li tags that contains NavLink component. So, it will have 4 anchor tags that will link to Index, City, Country and Continent components. For the first NavLink, there is Match="NavLinkMatch.All", this will match the URL without any component i.e. https://localhost:44366. The other NavLinks do not have a Match attribute so the default one – NavLinkMatch.Prefix will automatically be used. I have also added red color for the “active” css under the style element.
Now call this MyNav.razor component from the default layout of the app which is MainLayout.razor by using the code – <MyNav />. Align it to the left so that it looks like a left navigation. The left alignment will be done using Bootstrap CSS.
Below I have marked the updated code of the MainLayout.razor that is calling the MyNav.razor and aligning it to the left side.
@inherits LayoutComponentBase

<header class="bg-dark text-white">
    <nav class="text-center">
        <a href="/">Home</a>
        <a href="about">About</a>
        <a href="contact">Contact</a>
    </nav>
</header>

<div class="container-fluid">
    <div class="row">
        <div class="col-sm-3">
            <MyNav />
        </div>
        <div class="col-sm-9">
            @Body
        </div>
    </div>
</div>

<footer class="bg-success">
    All Rights Reserved
</footer>
Next add the Razor Component called City, Continent and Counter to the Pages folder. They don’t perform any task except displaying their name under h1 tag.
@page "/City"

<h1 class="bg-info text-white">Washington DC</h1>

@code {

}@page "/Country"
<h1 class="bg-info text-white">USA</h1>
@code {
}@page "/Continent"
<h1 class="bg-info text-white">North America</h1>
@code {
}Now run the app and check it’s working. The below video shows how it works, notice the color of the links becomes red when I am clicking on them.
ActiveClass="otherone".NavigationManager class
When you have to create navigation links programmatically i.e. in Blazor events, properties or inside C# code block then use the Blazor NavigationManager class. The NavigationManager class provides programmatic access to navigation and is provided as a service from Dependency Injection feature. It is received by Razor Components using the [Inject] attribute.
The below code provides an object of NavigationManager class to the NM variable using dependency injection.
[Inject]
public NavigationManager NM { get; set; }
Next, I can add a button that on clicking navigates the user to another URL. Check the code below:
<button class="btn btn-primary" @onclick="NavigateUser">Country</button>

public void NavigateUser() => NM.NavigateTo("/Country");
Now let us use the NavigationManager class and create a button inside the MyNav.razor component. When this button is clicked the user is navigated to country component. Check the highlighted code below which shows the necessary changes done to the MyNav.razor component.
<style>
    .active {
        color: red;
    }
</style>

<div class="p-3 mb-2 bg-warning text-dark">
    <h3 class="bg-info text-white">Links</h3>
    <ul class="nav flex-column">
        <li class="nav-item px-3">
            <NavLink href="/" Match="NavLinkMatch.All">
                Index
            </NavLink>
        </li>
        <li class="nav-item px-3">
            <NavLink href="/City">
                City
            </NavLink>
        </li>
        <li class="nav-item px-3">
            <NavLink href="/Country">
                Country
            </NavLink>
        </li>
        <li class="nav-item px-3">
            <NavLink href="/Continent">
                Continent
            </NavLink>
        </li>
    </ul>

    <button class="btn btn-primary" @onclick="NavigateUser">Country</button>
</div>

@code{

    [Inject]
    public NavigationManager NM { get; set; }

    public void NavigateUser() => NM.NavigateTo("/Country");

}
This is how it looks:
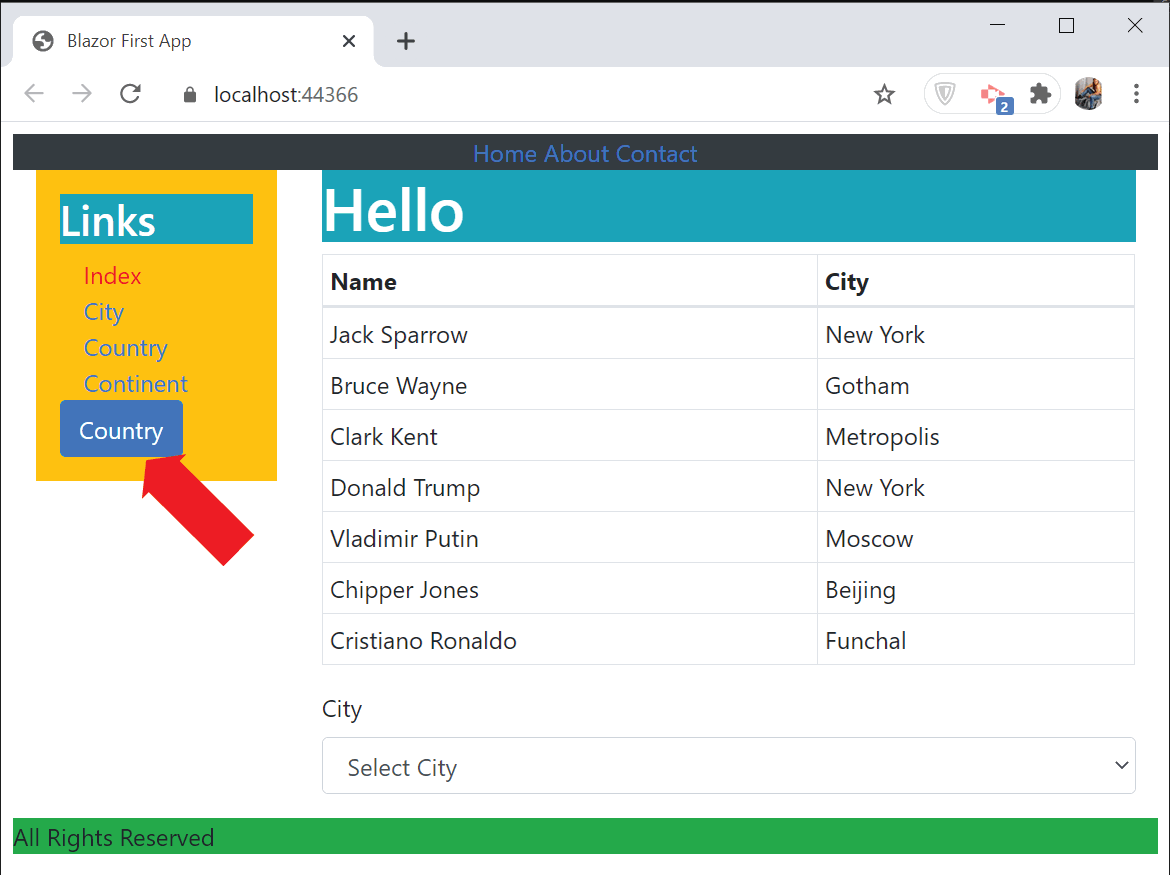
Rerun the app and click the country button which will select the country link.
Some useful NavigationManager Members are listed in the below table:
| Name | Description |
|---|---|
| Uri | This property returns the current URL. |
| LocationChanged | This is an event which is fired when the location changes. |
| NavigateTo() | This method navigates to a specific URL. It can accept 2 parameters – first is the navigate URL while the second is a bool type parameter. When you pass true then browser will be forced to load a new page. Otherwise false is the default value where navigation Is performed without sending a new HTTP request. |
| ToAbsoluteUri | This method Converts a relative URI into an absolute URI. |
| ToBaseRelativePath | This method returns a relative URL of the URL that is passed to it. |
You can download this app by clicking the below link:
Congratulations you have successfully created your first Blazor app and I hope you must have understood how razor components work and how you can create really interesting Blazor Features with very little C# codes.





 Welcome to YogiHosting - A Programming Tutorial Website. It is used by millions of people around the world to learn and explore about ASP.NET Core, Blazor, jQuery, JavaScript, Docker, Kubernetes and other topics.
I cannot Add > New Item > Razor Component to the Solution Explorer. I only have Type: General Items and C# category is not available.
This is having gone to Tools > Import and Export and added Visual C# and restarted Visual Studio.
Visual Studio is up to date at v16.8.3.
Hello Peter,
You will need to add ASP.NET Core packages. Download Visual Studio installer and then run it. It will show what packages you had and what you are missing. Add the ASp.NET Core ones, this will probably solve your problem.
Thank you.
I am following along your article and when I get to the first part where the bootstrap stuff is added and I change the styles of the pages, the styles are now found. I get:
bootstrap.min.css:1 Failed to load resource: the server responded with a status of 404 (Not Found)
I am also getting:
blazor.server.js:1 Failed to load resource: the server responded with a status of 404 (Not Found)
I have verified the files did come down from libman process. I have gone through this twice with the same result.
Any ideas?
Hello Joel,
The Bootstrap will be added to wwwroot folder of your app. If Libman is not adding the Bootstrap to your app then try closing Visual Studio and restarting your PC, and then try again once more. This will certainily solve your problem.
Moreover you can simply download Bootstrap package from Boostrap site and paste that package to your “wwwroot” folder manually.
Thank you.