How to use Razor Components in Blazor

Blazor App is created with components and these components are built in Razor Components File. Razor components files can be created in Visual Studio and have a .razor extension. Note that the term Blazor Component is same as Razor Component.
Page Contents
- How to use Razor Components in Blazor
- Advanced Razor Components features in Blazor
- Razor Components Lifecycle Methods of Blazor
What are Razor Components
In Razor Component we create our programming logic which can be of any type like a form which can be filled and submitted by the user, database operation, email sending code, maths logic or anything else. We make this logic using HTML markup and C# codes. The HTML codes forms the UI of the component and can communicate with C# codes. The C# codes are kept inside the @code{…} block.
Let us see a simple example of a razor component called Welcome.razor. It’s code is given below:
<h1>@headingText</h1>

@code {
    private string headingText = "Welcome to Blazor!";
}
In the first line there is an h1 heading tag which has a @headingText inside it. The term @ is called directive and headingText is the variable name defined inside the @code block. This code means you are accessing the value of the “headingText” and showing it’s value inside the HTML h1 tag.
When you run this component in the browser it will display the text Welcome to Blazor! inside the h1 tag.
When an app is compiled, the razor component file is converted into a partial class. The name of this generated class is the same as the name of the razor component file.
It is not necessary to keep all the C# codes in the @code block. You can also keep all the C# codes in a code-behind file. For example for a razor component Count.razor all the C# codes can be placed in a separate file called Count.razor.cs with a partial class.
@page "/count"
<h1>Count</h1>
<p>Counter : @cc</p>

<button class="btn btn-primary" @onclick="Increment">Click me</button>
namespace MyBlazorApp.Pages
{
    public partial class Counter
    {
        private int cc = 0;

        void Increment()
        {
            cc++;
        }
    }
}
How Blazor renders Razor Components
Blazor keeps a track of the component on the server. When the component is initially rendered, the component’s render tree is formed by Blazor on the server. Now when this render tree is modified, due to events done by the user on the browser like button click, form submission, etc, then a new render tree is formed. Blazor then compares the new render tree against the previous one and applies any modifications to the browser’s Document Object Model (DOM).
In simple terms, Blazor sends the changes to the browser using SignalR and user sees these changes instantly. Remember only the changes are sent to the browser and not the whole render tree. This is a very light weight process and this makes Blazor extremely fast.
Components that produce webpages usually reside in the Pages folder. The Pages folder lies just inside the root of the app. Non-page components are frequently placed in the Shared folder. The Shared folder also resides on the root folder of the app.
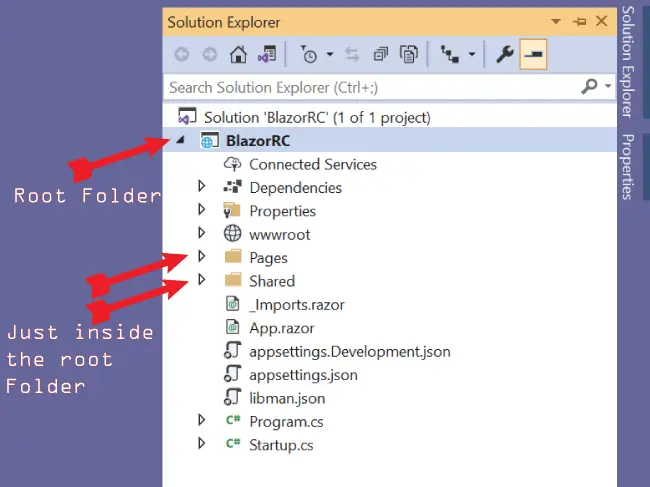
Parent-Child relationship – Calling Razor Components from another Razor Components
Two or more Razor Components can be combined together to form more complex features. A parent-child relationship between components is a perfect example of this scenario.
So, create a new Razor Component called SelectCity.razor inside the “Pages” folder of your project. In this component I will add a HTML select element what will show 3 cities to the user. It’s full code is given below.
<div class="form-group p-2">
    <label for="city">City</label>
    <select name="city" class="form-control">
        <option disabled selected>Select City</option>
        @foreach (string city in Cities)
        {
            <option value="@city">
                @city
            </option>
        }
    </select>
</div>

@code {
    public string[] Cities = new string[] { "Washington DC", "New Delhi", "Mumbai" };
}
You can clearly see that I am binding Cities Property values, defined in the @Code block, to the select element by using the for each loop:
@foreach (string city in Cities)
{
    <option value="@city">
        @city
    </option>
}
Now, I will call this component from another razor component. So, create a new razor component called City.razor. It’s code is given below:
@page "/City"

<h3 class="bg-info text-white">Select Your City</h3>

<SelectCity/>
I simply called the “SelectCity” component by it’s name as <SelectCity/>.
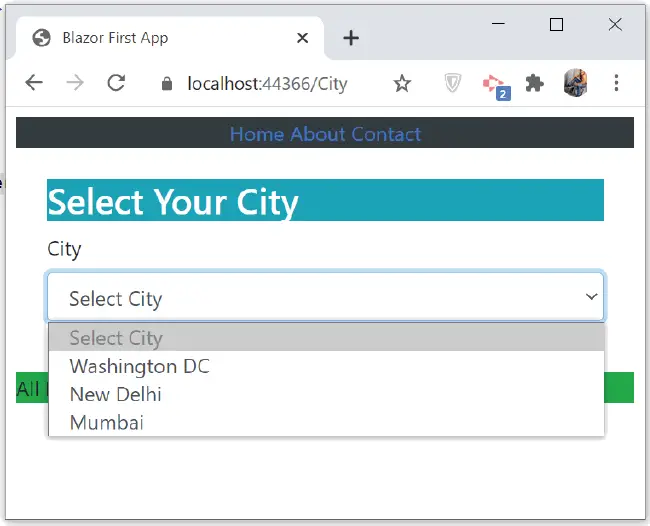
Now run your project and open the URL of the City component which happens to be – https://localhost:44366/City. You will see the select control from the SelectCity.razor also showing up after the contents of the City.razor component. Check the below screenshot.
Note that when calling a component, you will have to import the called component’s namespace when it does not reside in the same folder as the caller component. Here I did not have to do this as both of my Razor Components resided in the same folder and hence have same namespaces.
Importing the namespaces is done by using keyword as shown below.
@using BlazorRC.PagesHere BlazorRC is the name of the app, and BlazorRC.Pages means to import the pages namespace. You can also add the import namespace code in the Blazor Imports File – “_Imports.razor”, and this will import the namespace for all of the app and not just a single component.
Calling Components from Razor Pages or MVC views
A Razor Component can be called from a Razor Page or an MVC View by using the Component Tag Helper. Let us create a razor page and call SelectCity.razor from it.
Start by creating a razor page inside the Pages folder of your app and name it Index.cshtml. Here import the tag helpers:
@addTagHelper *, Microsoft.AspNetCore.Mvc.TagHelpersThen use the Component Tag Helper to call the razor component file.
<component type="typeof(BlazorRC.Pages.SelectCity)" render-mode="Server" />Here “BlazorRC” is the name of my app and “Pages” is the folder where the razor component resides.
After the Component Tag Helper, add blazor.server.js script tag.
<script src="_framework/blazor.server.js"></script>The full code of the razor page is given below:
@page "/Hello"
@model BlazorRC.Pages.IndexModel

@addTagHelper *, Microsoft.AspNetCore.Mvc.TagHelpers
<h3 class="bg-info text-white">Select Your City</h3>
<component type="typeof(BlazorRC.Pages.SelectCity)" render-mode="Server" />

<script src="_framework/blazor.server.js"></script>
Now run your app and open the url – https://localhost:44366/Hello. You will see the “SelectCity” component getting displayed in the razor pages.
Component Parameters – Transferring values from Parent to Child component
You can pass additional data to the Razor Component by using Parameter attributes on public properties. In the City.razor component change the call to SelectCity.razor component to include 2 attributes called MyCity="Mumbai" and MyBackground="bg-warning".
The updated code of the City.razor component is shown in highlighted manner below:
@page "/City"

<h3 class="bg-info text-white">Select Your City</h3>
<SelectCity MyCity="Mumbai" MyBackground="bg-warning"/>
Here I am passing 2 values – “Mumbai” and “text-warning” which will be received on the SelectCity razor component through Component Parameter.
Next, in the SelectCity.razor component, add 2 properties with the same name as these attributes (MyCity & MyBackground) and also provide them with [Parameter] attribute. This will let them to receive the 2 values- “MyCity” and “MyBackground” send from City.razor through Component Parameter. The code is given below:
[Parameter]
public string MyCity { get; set; }

[Parameter]
public string MyBackground { get; set; }
Next, update the SelectCity.razor code that will use these values to show the city to be automatically selected on the select control when the component loads. I will also style the top most div with the CSS that is send to the MyBackground property. The updated code of the SelectCity.razor is shown in highlighted way.
<div class="form-group p-2 @MyBackground">
    <label for="city">City</label>
    <select name="city" class="form-control">
        <option disabled selected>Select City</option>
        @foreach (string city in Cities)
        {
            <option value="@city" selected="@(city == MyCity)">
                @city
            </option>
        }
    </select>
</div>

@code {
    public string[] Cities = new string[] { "Washington DC", "New Delhi", "Mumbai" };

    [Parameter]
    public string MyCity { get; set; }

    [Parameter]
    public string MyBackground { get; set; }
}
Notice I have applied the CSS value to the div element given on the top as:
<div class="form-group p-2 @MyBackground">So, it will be applied with the value bg-warning. Also notice how I have changed the select option so that the value of the city is automatically selected. When the value of the City becomes equal to MyCity then selected get’s bool value of “true” and the option gets selected.
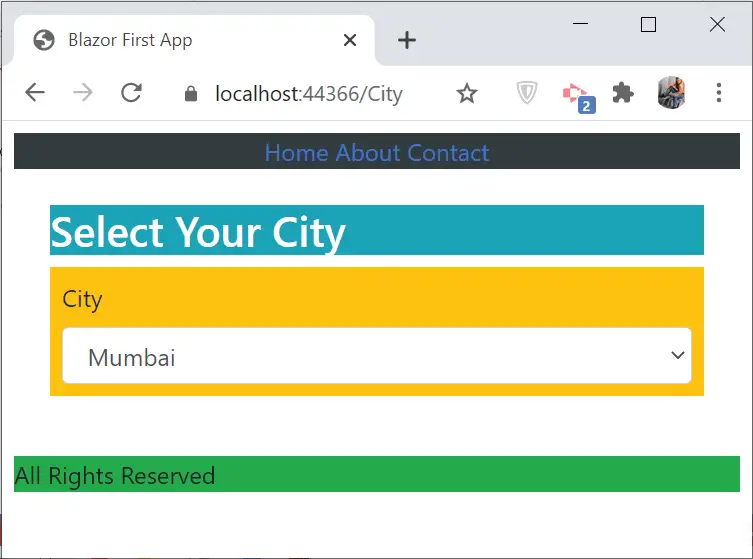
<option value="@city" selected="@(city == MyCity)">Now run the application and go to the URL – https://localhost:44366/City. You will see yellow background due to bg-warning CSS class applied to the div. Also notice “Mumbai” city is automatically selected in the select control. See the below image:
When you want to send values to Component Parameters through Razor pages or MVC views than you need to add “param-” before the attribute name. See the below code of the razor page called Index.cshtml which is kept inside the Pages folder of your app, and it is calling SelectCity.razor component and passing value through “param-MyCity” * “param-MyBackground” attributes.
<component type="typeof(BlazorRC.Pages.SelectCity)" render-mode="Server" param-MyCity="@("Mumbai")" param-MyBackground="@("bg-warning")" />Transfer bulk values with “CaptureUnmatchedValues” property
A single property can receive multiple values that have not been matched by other properties. Let us understand how to do it.
Define a property on the SelectCity.razor component, call it as InputAttributes and apply [Parameter] attribute on it. Also set the CaptureUnmatchedValues property set to true. It’s code becomes:
[Parameter(CaptureUnmatchedValues = true)]
public Dictionary<string, object> InputAttributes { get; set; }
The CaptureUnmatchedValues property on [Parameter] allows the parameter to match all attributes that don’t match any other parameter.
Next apply this property’s value on the select element as @attributes=”InputAttributes”.
The updated code of the SelectCity.razor component becomes:
<div class="form-group p-2 @MyBackground">
    <label for="city">City</label>
    <select name="city" class="form-control" @attributes="InputAttributes">
        <option disabled selected>Select City</option>
        @foreach (string city in Cities)
        {
            <option value="@city" selected="@(city == MyCity)">
                @city
            </option>
        }
    </select>
</div>

@code {
    public string[] Cities = new string[] { "Washington DC", "New Delhi", "Mumbai" };

    [Parameter]
    public string MyCity { get; set; }

    [Parameter]
    public string MyBackground { get; set; }

    [Parameter(CaptureUnmatchedValues = true)]
    public Dictionary<string, object> InputAttributes { get; set; }
}
Now go to the City.razor and pass three attributes to the SelectCity component. These attributes are autofocus, required and tabindex. The updated code of the City.razor component is given below.
@page "/City"

<h3 class="bg-info text-white">Select Your City</h3>

<SelectCity MyCity="Mumbai" MyBackground="bg-warning" autofocus="true" required="true" tabinded="1"/>
Now run the application and go to the URL – https://localhost:44366/City. Here inspect the HTML formed of the select control in the page source. You will notice these 3 attributes are applied to the select element. The HTML formed is shown below:
<select name="city" class="form-control" autofocus="true" required="true" tabinded="1">
    <option disabled="" selected="">Select City</option>
    <option value="Washington DC">Washington DC</option>
    <option value="New Delhi">New Delhi</option>
    <option value="Mumbai" selected="">Mumbai</option>
</select>
Blazor Route Parameters
A Route Parameter is provided in the URL by wrapping it inside braces. It is specified in the Razor Component @page directive. Example:
@page "/Tech/{Framework?}"Here Framework is the Route Parameter. You can get the value of the route parameter by specifying a property by the same name as the route parameter and having [Parameter] attribute over it. Here in this case, it will be:
[Parameter]
public string Framework { get; set; }
So, if the URL initiated in the browser is /Hello/Blazor then the value which the ‘Framework’ property receives is ‘Blazor’.
If the url is /Hello/cSharp then the value of the “Framework” property is ‘cSharp’.
Let us create an example to understand it. So, create a new razor component called Tech.razor with the following code:
@page "/Tech/{Framework?}"

<h1>Technology is @Framework!</h1>

@code {
    [Parameter]
    public string Framework { get; set; }
}
Check the below 2 image which shows route parameter value changes based on 2 different urls.
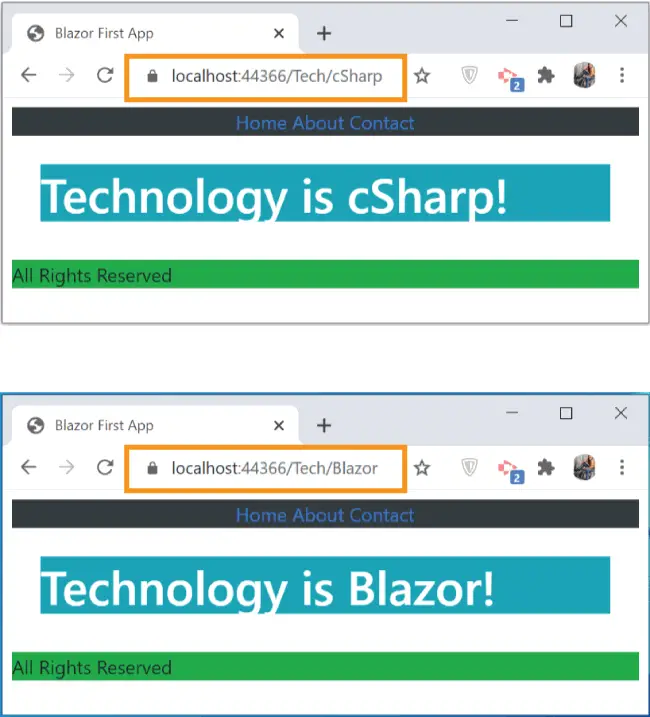
Note that the “?” mark will enable null values to be accepted for Framework route parameter so the URLs – https://localhost:44366/Tech and https://localhost:44366/Tech/Blazor are both accepted for the razor component.
You can have more than 1 route parameters. Take for example the below razor component has 2 route parameters – ‘Company’ and ‘Framework’. In this case when you request the url – https://localhost:44366/Tech/Microsoft/Blazor then you will see the text – ‘Technology is Blazor by Microsoft’ inside the h1 heading.
@page "/Tech/{Company}/{Framework?}"

<h1 class="bg-info text-white">Technology is @Framework by @Company</h1>

@code {
    [Parameter]
    public string Framework { get; set; }

    [Parameter]
    public string Company { get; set; }
}
Route Constraints
To enforce type match on a route parameter you can use Route Contraints. Take for example, in the Tech.razor component, I can enforce the “Framework” route parameter to be of Int type. To do this I just need to update the route parameter to – {framework:int}. I also need to change the “Framework” property in C# code to int type.
The updated code is given below:
@page "/Tech/{Company}/{Framework:int}"

<h1 class="bg-info text-white">Technology is @Framework by @Company</h1>

@code {
    [Parameter]
    public int Framework { get; set; }

    [Parameter]
    public string Company { get; set; }
}
So now the URL to the razor component will need an int value for the “Framework” route parameter. Such example are:
https://localhost:44366/Tech/Microsoft/10
https://localhost:44366/Tech/Google/3
https://localhost:44366/Tech/Apple/99
etc
It won’t be matching string values for the route parameter framework. So url – https://localhost:44366/Tech/Microsoft/Blazor will not call the “Tech.razor” anymore.
Some example of Route Constraints:
| Constraint | Example | Comments |
|---|---|---|
| bool | {active:bool} | active value should be either true or false. |
| datetime | {cur:datetime} | cur value should be in date time format. Examples – 2021-10-31, 2022-11-20 4:32am |
| decimal | {price:decimal} | Example – 100.33 |
| float | {sum:float} | Example – 61.984 |
| int | {id:int} | Example of id – 1000 |
| long | {average:long} | Example of average – 98957875748697 |
Catch-all route parameters
You can also catch all route parameters with just a single C# property. To do so apply * in front of route parameter. Ex – @page "/Catch/{*AllCatch}". So now any number of route parameters will be caught by the “AllCatch” route parameter.
Create a new razor component called Catch.razor inside of Page folder of the app. Add the following code to it:
@page "/Catch/{*AllCatch}"

<h1 class="bg-info text-white">@AllCatch</h1>

@code {
    [Parameter]
    public string AllCatch { get; set; }
}
So this will accept URL like:
https://localhost:44366/Catch/apple
https://localhost:44366/Catch/apple/10
https://localhost:44366/Catch/Jack/Honey/33
https://localhost:44366/Catch/Summer/Of/69
...
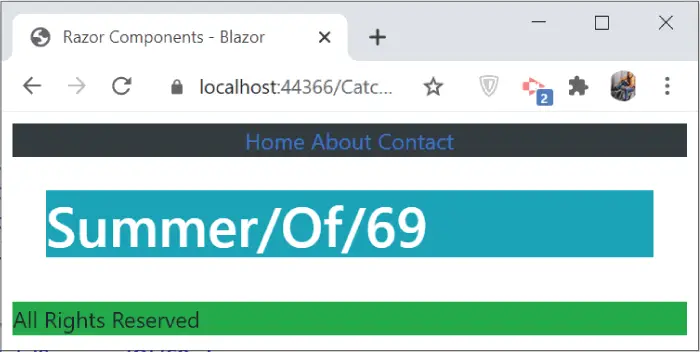
Check the below screenshot in which I opened the URL containing 3 route parameter – https://localhost:44366/Catch/Summer/Of/69.
“ChildContent” Property
We can pass a value to a razor component by ChildContent property. This property should be of RenderFragment type and must be named ChildContent by convention.
The value to the ChildContent is provided inside the name tag of the razor component during its call. Now change City.razor component and provide the value to the ChildContent by putting text “Commercial capital of India” inside the name of the SelectCity component. This is shown in highlighted manner below.
@page "/City"

<h3 class="bg-info text-white">Select Your City</h3>
<SelectCity MyCity="Mumbai" MyBackground="bg-warning">
    Commercial capital of India
</SelectCity>
Now add the “ChildContent” parameter to the SelectCity.razor component and show it’s value after the select element. I have shown these codes lines in highlighted manner below.
<div class="form-group p-2 @MyBackground">
    <label for="city">City</label>
    <select name="city" class="form-control">
        <option disabled selected>Select City</option>
        @foreach (string city in Cities)
        {
            <option value="@city" selected="@(city == MyCity)">
                @city
            </option>
        }
    </select>
    <div class="panel-body">@ChildContent</div>
</div>

@code {
    public string[] Cities = new string[] { "Washington DC", "New Delhi", "Mumbai" };

    [Parameter]
    public string MyCity { get; set; }

    [Parameter]
    public string MyBackground { get; set; }

    [Parameter]
    public RenderFragment ChildContent { get; set; }
}
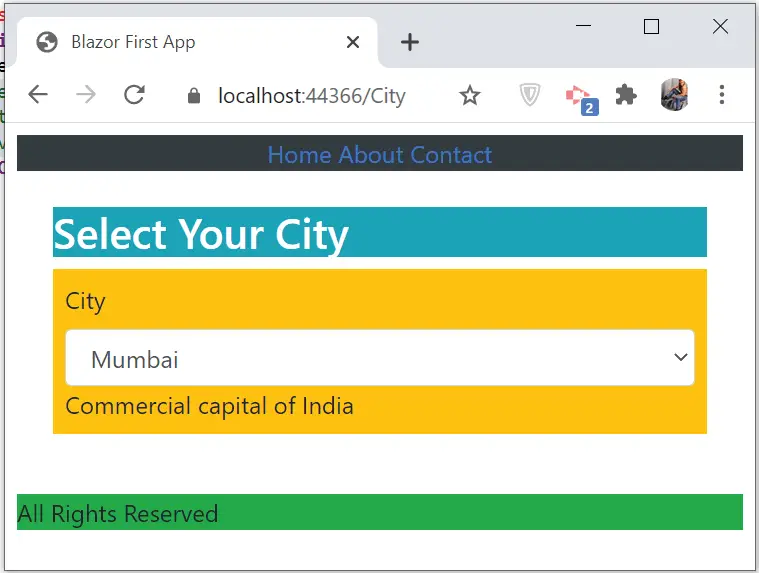
When you open the City.razor component’s url in the browser, you will see the value of ChildContent displayed after the city “select” element. Check the below screenshot showing Commercial capital of India after the city select tag.
RenderFragment – Transferring multiple values through “ChildContent” Property
Multiple values can be transferred with the help of ChildContent property. All you have to do is to create nodes containing values inside them. Add these nodes inside the name of the razor component (where it is called). Let’s update the code of the City.razor component and add 3 nodes inside the name of “SelectCity” razor component.
You can have any names for these nodes, here I have named them as ‘Description’, ‘Weather’ and ‘Elevation’. I have shown them in highlighted way below:
@page "/City"

<h3 class="bg-info text-white">Select Your City</h3>
<SelectCity MyCity="Mumbai" MyBackground="bg-warning">
    <Description><label>Commercial capital of India</label></Description>
    <Weather>Moderate and Humid</Weather>
    <Elevation>14 m</Elevation>
</SelectCity>
Now go to the SelectCity.razor file and add 3 properties of type RenderFragment and having the same name as these nodes. A render fragment represents a segment of UI to render. Here they are the UI contained by the Description, Weather & Elevation nodes.
These properties will automatically receive the values of the respective nodes. Check the updated code shown in highlighted way below.
<div class="form-group p-2 @MyBackground">
    <label for="city">City</label>
    <select name="city" class="form-control">
        <option disabled selected>Select City</option>
        @foreach (string city in Cities)
        {
            <option value="@city" selected="@(city == MyCity)">
                @city
            </option>
        }
    </select>
    <div class="panel-body">@Description</div>
    <div class="panel-body">@Weather</div>
    <div class="panel-body">@Elevation</div>
</div>

@code {
    public string[] Cities = new string[] { "Washington DC", "New Delhi", "Mumbai" };

    [Parameter]
    public string MyCity { get; set; }

    [Parameter]
    public string MyBackground { get; set; }

    [Parameter]
    public RenderFragment Description { get; set; }

    [Parameter]
    public RenderFragment Weather { get; set; }

    [Parameter]
    public RenderFragment Elevation { get; set; }
}
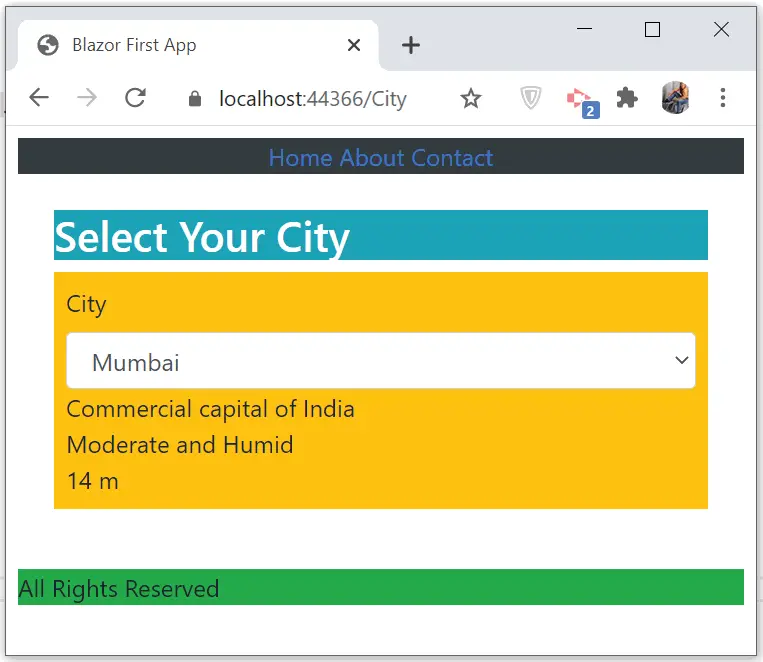
Run your app and go the url – https://localhost:44366/City and see these 3 values are displayed (below select tag) as shown by the below image:
Transferring values from Child Razor Component to Parent Razor Component
Let us now see how to transfer values from Child Razor Component to Parent Razor Component in Blazor. In this case, the child component called SelectCity.razor has no way to tell it’s parent component which is City.razor, about what city selection a user has made in the select element.
I will create this feature by creating a custom event in the child component (SelectCity.razor) for which the parent component (City.razor) can register a handler method. This custom event is defined by adding a property whose type is EventCallback<T>. Here “T” defines the value to be returned from child to parent component. In my case it is a “string”.
Define the custom event in SelectCity.razor component as shown below. I have named this event as “myCustomEvent”.
[Parameter]
public EventCallback<string> myCustomEvent { get; set; }
Next, invoke this custom event (“myCustomEvent”), when a user makes a city selection in the select element. Add onchange event to the select element and add its handler.
<select name="city" class="form-control" @onchange="HandleSelect">
…
</select>

Parameter]
public EventCallback<string> myCustomEvent { get; set; }

public async Task HandleSelect(ChangeEventArgs e)
{
    string SelectedValue = e.Value as string;
    await myCustomEvent.InvokeAsync(SelectedValue);
}
The myCustomEvent.InvokeAsync method is invoking the custom event and passes the selected value of the city to it. The selected city value is in the SelectedValue variable.
In the parent component (City.razor), I need to get this value that is send from the custom event of “SelectCity.razor”. So, add myCustomEvent attribute and assign a handler “HandleCustom”.
The HandleCustom handler method will be called by the child component, that is from “myCustomEvent.InvokeAsync” method given on the SelectCity.razor. The parameter “newValue” will get the selected city’s value.
Inside a label, I am showing the city value which is send by the child component.
The code is given below.
<SelectCity myCustomEvent="@HandleCustom"/>
<label>@SelectedCity</label>

@code{
    public string SelectedCity;
    public void HandleCustom(string newValue)
    {
        SelectedCity = newValue;
    }
}
I am now giving you the full updated code that needs to be added to the City.razor and SelectCity.razor components. Check the highlighted code lines.
<div class="form-group p-2 @MyBackground">
    <label for="city">City</label>
    <select name="city" class="form-control" @attributes="InputAttributes" @onchange="HandleSelect">
        <option disabled selected>Select City</option>
        @foreach (string city in Cities)
        {
            <option value="@city" selected="@(city == MyCity)">
                @city
            </option>
        }
    </select>
</div>

@code {
    public string[] Cities = new string[] { "Washington DC", "New Delhi", "Mumbai" };

    [Parameter]
    public string MyCity { get; set; }

    [Parameter]
    public string MyBackground { get; set; }

    [Parameter(CaptureUnmatchedValues = true)]
    public Dictionary<string, object> InputAttributes { get; set; }

    [Parameter]
    public EventCallback<string> myCustomEvent { get; set; }

    public async Task HandleSelect(ChangeEventArgs e)
    {
        string SelectedValue = e.Value as string;
        await myCustomEvent.InvokeAsync(SelectedValue);
    }
}
@page "/City"

<h3 class="bg-info text-white">Select Your City</h3>
<SelectCity MyCity="Mumbai" MyBackground="bg-warning" autofocus="true" required="true" tabinded="1" myCustomEvent="@HandleCustom"/>
<label>@SelectedCity</label>

@code{
    public string SelectedCity;
    public void HandleCustom(string newValue)
    {
        SelectedCity = newValue;
    }
}
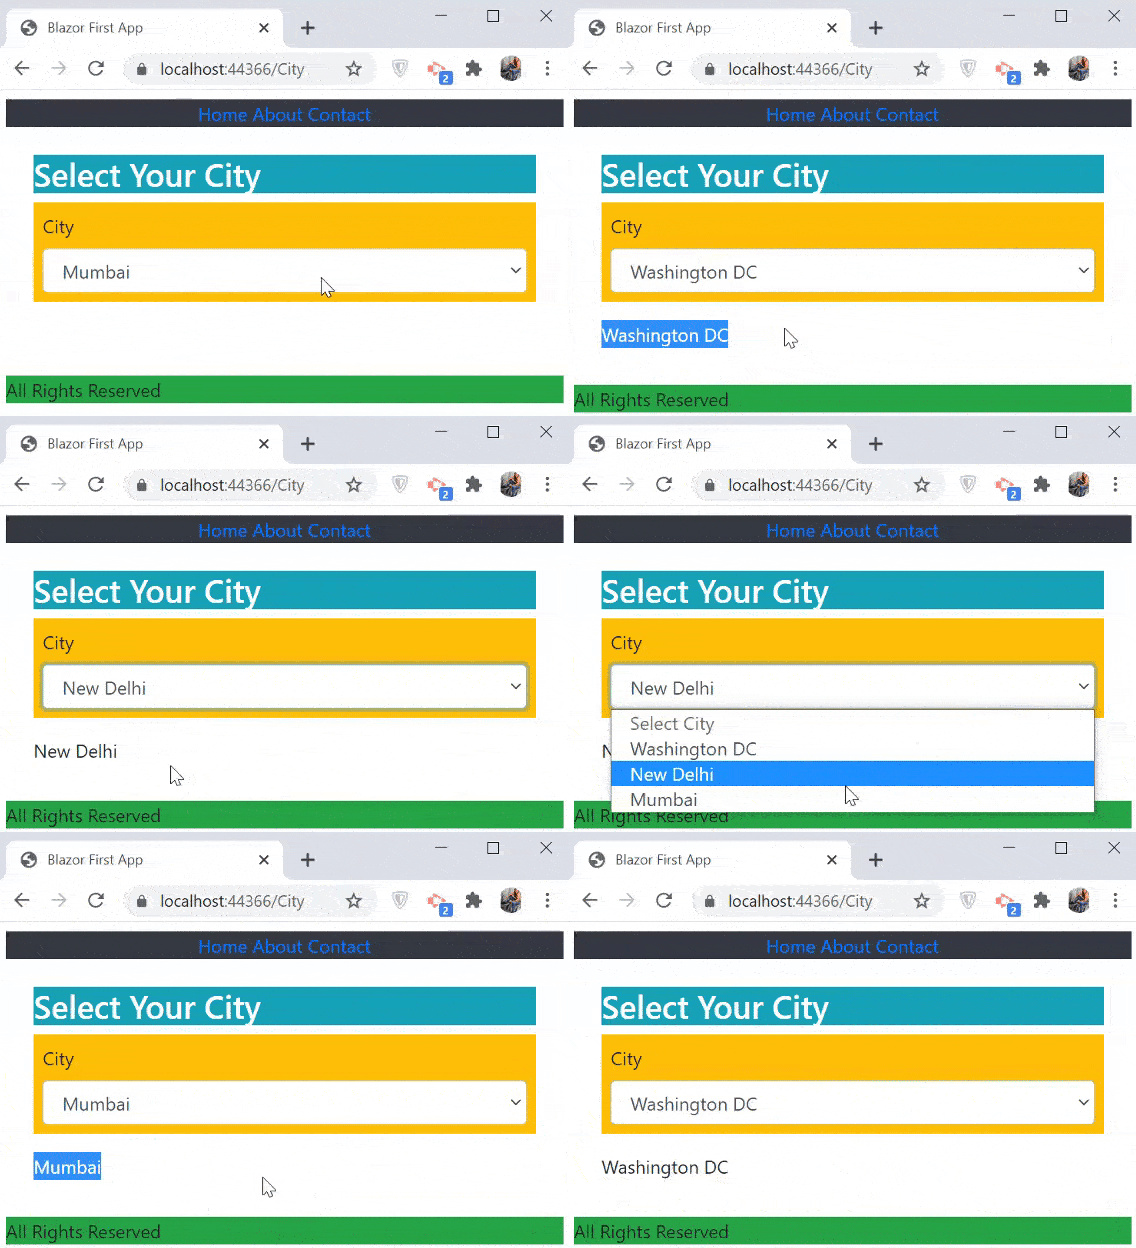
In the below video I am showing the working of this feature.
You can download the source codes:
In this tutorial I covered a lot about Razor Component and creating different features with them. You will surely got a lot of information and should use it to create great Blazor features. Kindly share this tutorial if you feel it is written in a good and informative way.



 Welcome to YogiHosting - A Programming Tutorial Website. It is used by millions of people around the world to learn and explore about ASP.NET Core, Blazor, jQuery, JavaScript, Docker, Kubernetes and other topics.