Advanced Razor Components features in Blazor

In this tutorial we will cover Razor Components in advanced manner and build the foundation for concepts of Custom Binding, Template Components, Generic Template Components & Cascading Parameters. Let’s understand each of them one by one with lots of examples.
Page Contents
- How to use Razor Components in Blazor
- Advanced Razor Components features in Blazor
- Razor Components Lifecycle Methods of Blazor
Chained Bind – Binding between Parent & Child components
Chained Bind is a custom two-way Data Binding between Parent and Child Razor Components. Here, a binding of a child razor component’s property is done with a property of the parent razor component. In Chain Bind, multiple levels of binding occur simultaneously. Here –
- Values flow down the hierarchy i.e. from parent to child.
- Change notifications flow up the hierarchy i.e. from child to parent.
Let us understand Chain Bind with an an example. In Blazor app, create 2 razor components inside the Pages folder. Name these components as –
- Parent.razor
- Child.razor
@page "/Parent"

<Child @bind-MyPhrase="wwe" />

@code {
    private string wwe = "Bill Goldberg is stronger than Brock Lesnar";
}
We provided @bind-MyPhrase attribute for the Child component. This will bind the MyPhrase component property in the child component with the value of string variable wwe.
Note : Component parameters permit binding of properties and fields of a parent component with @bind-{PROPERTY OR FIELD} syntax. This way we will be able to transfer the text from parent to child component.
<h3 class="bg-info text-white">@MyPhrase</h3>

@code {
    [Parameter]
    public string MyPhrase { get; set; }

    [Parameter]
    public EventCallback<string> MyPhraseChanged { get; set; }
}
The property called MyPhrase is a Component Parameter that will receive the value of text Bill Goldberg is stronger than Brock Lesnar which is transferred from the parent component called Parent.razor.
In the child component called Child.razor, we also have to define a callback method of type EventCallback<TValue>, and its name should be the same as the component parameter name, followed by the “Changed” suffix. So, by this convention, we have to name it as MyPhraseChanged. The TValue should be the type of Component Parameter which in our case is “string”.
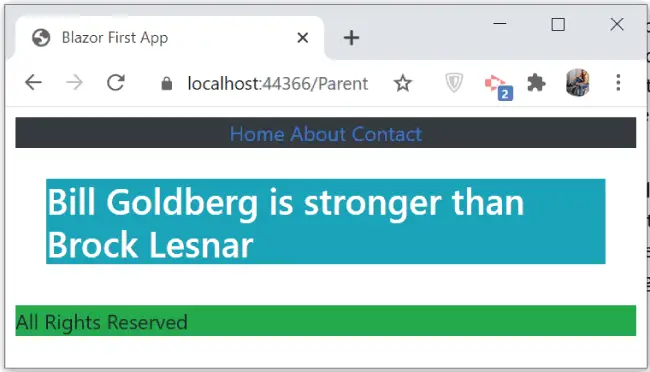
Now 2-Way data binding is completed between parent and child components. First let us see how parent sends the text to the child. Run your app and go to the url – https://localhost:44366/Parent. You will see the text that is send by the parent i.e. “Bill Goldberg is stronger than Brock Lesnar”. Check below image to confirm.
Now we will show how the data binding works from child component back to parent component. So, in the child component called Child.razor, we add a button which will invoke the callback method called MyPhraseChanged on it’s click event. The button and it’s click event codes are shown in highlighted manner below:
<h3 class="bg-info text-white">@MyPhrase</h3>

<button class="btn btn-warning" @onclick="UpdatePhrase">Update Phrase</button>

@code {
    [Parameter]
    public string MyPhrase { get; set; }

    [Parameter]
    public EventCallback<string> MyPhraseChanged { get; set; }

    private async Task UpdatePhrase()
    {
        await MyPhraseChanged.InvokeAsync("Brock Lesnar is stronger than Bill Goldberg");
    }
}
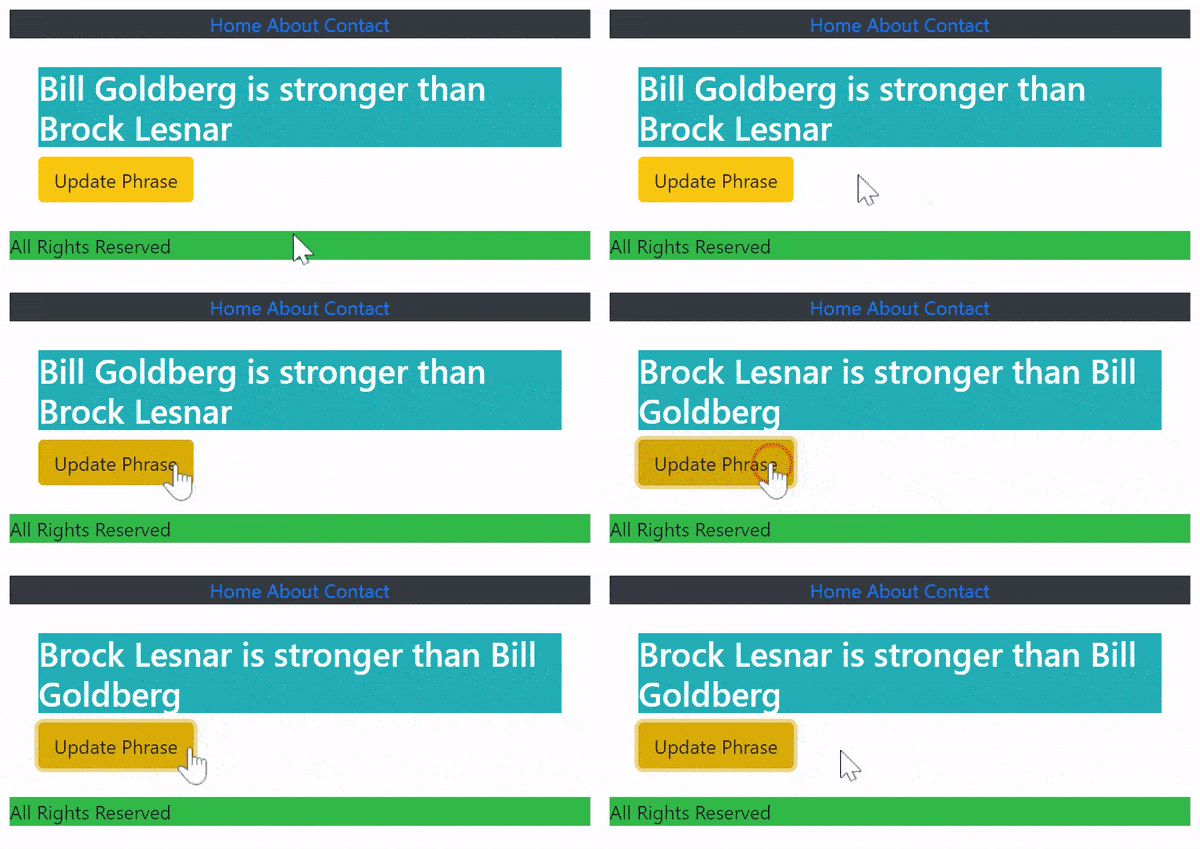
On the button click, the new text Brock Lesnar is stronger than Bill Goldberg is transferred to the parent razor component. The “wwe” property defined on the parent will receive this updated value, and we will see the text gets updated to Brock Lesnar is stronger than Bill Goldberg on the browser.
In the below video we have demonstrated this feature.
Blazor Template Components – “Code Reusability”
Blazor Template Component is used to customize the user interface (UI) by the use of templates which supports reusable codes. You will love the way they work so stay tuned and feel their complete power.
In order to make a razor component as Template Component, we should define in them one or more properties of type RenderFragment or RenderFragment<TValue>. These properties should have [Parameter] attribute. See below code where we have defined 2 such properties.
[Parameter]
public RenderFragment P1 { get; set; }

[Parameter]
public RenderFragment<TValue> P2 { get; set; }
The @typeparam directive is defined on the top of the Template component and it defines the type parameter i.e. TValue of P2 property.
Let us create a razor component called TableTemplate.razor inside the Pages folder of the app. Next, add the following code to it:
@typeparam RowType

<table class="table table-sm table-bordered table-striped">
    @if (Header != null)
    {
        <thead>@Header</thead>
    }
    <tbody>
        @foreach (RowType item in RowData)
        {
            <tr>@RowTemplate(item)</tr>
        }
    </tbody>
</table>

@code {
    [Parameter]
    public RenderFragment Header { get; set; }

    [Parameter]
    public RenderFragment<RowType> RowTemplate { get; set; }

    [Parameter]
    public IEnumerable<RowType> RowData { get; set; }
}
There are 2 properties of type RenderFragment & RenderFragment<T> (“Header”, “RowTemplate”) which makes this razor component as a Template Components.
We have defined @typeparam RowType on top of this component. Blazor will define it on runtime that is when this component is called from another component, like from a parent component. Say for example, it can be defined as a Dog class type, Cat class type, Person class type, Student class type etc by Blazor at runtime.
The property called RowData is a Component parameter and it’s value will also be provided by the parent component. We have defined it as IEnumerable<RowType> so we can loop through it’s individual values and create a HTML table to show the values. This is exactly what we did in the foreach loop.
@foreach (RowType item in RowData)
{
    <tr>@RowTemplate(item)</tr>
}
The most important thing is the razor expression – @RowTemplate(item). It tells to apply the UI template, which is passed to the RowTemplate, to the current value of the RowData (i.e. item variable). Being on the foreach loop it applies to all the values contained in the RowData property.
I hope it started making sense to you. I will next describe the parent component which will provide all these values, and then the working of every part would become totally clear to you.
So, create a new Razor Component called ExampleT.razor and defined it’s code as given below:
@page "/ExampleT"

<TableTemplate RowType="Person" RowData="persons">
    <Header>
        <tr><th>Name</th><th>City</th></tr>
    </Header>
    <RowTemplate Context="p">
        <td>@p.Name</td>
        <td>@p.City</td>
    </RowTemplate>
</TableTemplate>

@code {
    private List<Person> persons = new List<Person>{
        new Person { Name = "Jack", City = "New York" },
        new Person { Name = "Sarah", City = "Boston" },
        new Person { Name = "Chan", City = "Hong Kong" }
    };

    private class Person
    {
        public string Name { get; set; }
        public string City { get; set; }
    }
}
In this razor component I defined a Person class and a “persons” variable of type Lis<Person>. I have added 3 persons having name and city to this variable. Next, see it is called the TableTemplate.razor and provided it with 2 attributes:
- 1. RowData attribute with the value of “persons” variable. The IEnumerable<RowType> RowData property, defined in the TableTemplate.razor, will receive it’s value.
- 2. RowType attribute as “Person” class type. This will specify the @typeparam RowType, defined in the TableTemplate, that RowType will be a Person type.
Next, there are “header” and “RowTemplate” nodes which provides the UI content to the 2 properties which are:
[Parameter]
public RenderFragment Header { get; set; }

[Parameter]
public RenderFragment<RowType> RowTemplate { get; set; }
So, “Header” property will receive the value inside the Header node which is:
<tr><th>Name</th><th>City</th></tr>It does nothing special except for showing it inside thead element:
<thead>@Header</thead>While the “RowTemplate” property will receive the value inside the RowTemplate node. The RowTemplate nodes value will be repeated for every value contained by the property “RowData” so table rows will be formed for each of the 3 persons.
So, what is Context attribute? Lets understand. The RenderFragmen<RowType> RowTemplate property is called for every value of the RowData variable contained by “item” variable – @RowTemplate(item).
With the Context attribute, I am specifying the “item” value only – like here Context="p", p is just a variable and we can name it anything like a, b, aa, abc, etc.
Now see the RowTemplate node’s code:
<RowTemplate Context="p">
    <td>@p.Name</td>
    <td>@p.City</td>
</RowTemplate>
With the variable “p”, I can go to individual values of the person class like “Name” and “City” and get the values for every person.
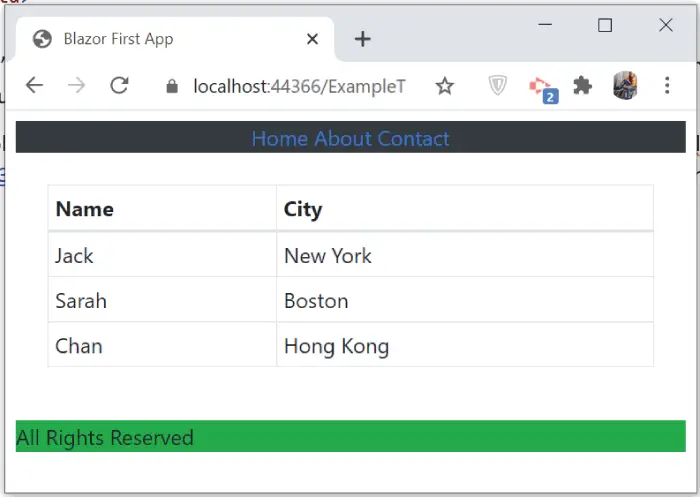
So, in this way all of the HTML table is formed. You can now run the app and go to the url – https://localhost:44366/ExampleT, where you will see all the 3 persons in html table format. See below image:
Reusability by Template Components
Let us see the code reusability provided by Template Components. So, create a new razor component and name it Dogs.razor. Add the following code to it:
@page "/Dogs"

<TableTemplate RowType="Dog" RowData="dogs">
    <Header>
        <tr><th>Name</th><th>City</th></tr>
    </Header>
    <RowTemplate Context="p">
        <td>@p.Breed</td>
        <td>@p.Origin</td>
    </RowTemplate>
</TableTemplate>

@code {
    private List<Dog> dogs = new List<Dog>{
        new Dog { Breed = "German Shepherd", Origin = "Germany" },
        new Dog { Breed = "Bulldog ", Origin = "United Kingdom" },
        new Dog { Breed = "Rottweiler", Origin = "Germany" }
    };

    private class Dog
    {
        public string Breed { get; set; }
        public string Origin { get; set; }
    }
}
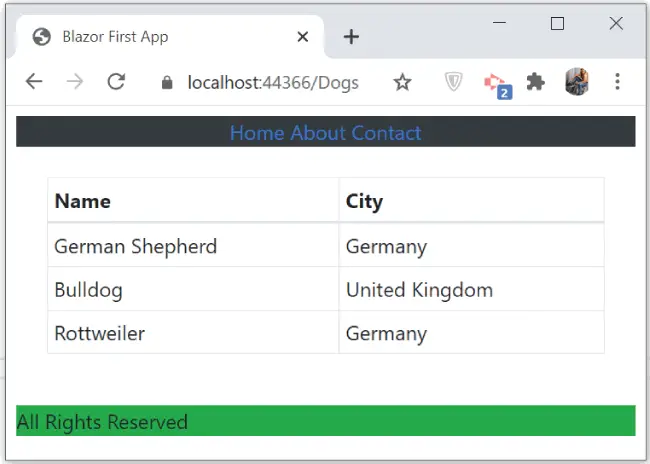
In this razor component I am providing Dogs breed data to the TableTemplate.razor. You can see I did not do even a single code line change in the TableTemplate and everything works very fine. This is a great example of reusability of code.
Run the app go to the url – https://localhost:44366/Dogs to see all the dog displayed in html table. See below image:
Cascading Values and Parameters
Blazor provides a convenient way for transferring data from parent to child components in hierarchy by the use of Cascading Values and Parameters. Suppose there are 3 Razor components – One.razor, Two.razor & Three.razor. One.razor is the parent of Two.razor. While Two.razor is the parent of Three.razor.
Now suppose One.razor has to send some value to the other 2 razor components. One way to do it is through Component Parameters, here each component in the chain receive the data and passes it on to the next one. But this approach is error-prone and requires every component to participate in the process.
Let us send some data from One.razor to other components using Component Parameter. The data which I am transferring is a text called “Hello” which is contained by a variable ‘MyMessage’, and it is defined in the One.razor component.
The codes of these components are given below.
@page "/One"

<div class="p-5 bg-success">
    <Two MyMessage="@MyMessage"></Two>
</div>

@code {
    public string MyMessage = "Hello";
}
<div class="p-5 bg-secondary">
    <h3 class="text-white">@MyMessage</h3>
    <Three MyMessage="@MyMessage"></Three>
</div>

@code {
    [Parameter]
    public string MyMessage { get; set; }
}
<div class="p-5 bg-warning">
    <h3 class="text-white">@MyMessage</h3>
</div>

@code {
    [Parameter]
    public string MyMessage { get; set; }
}
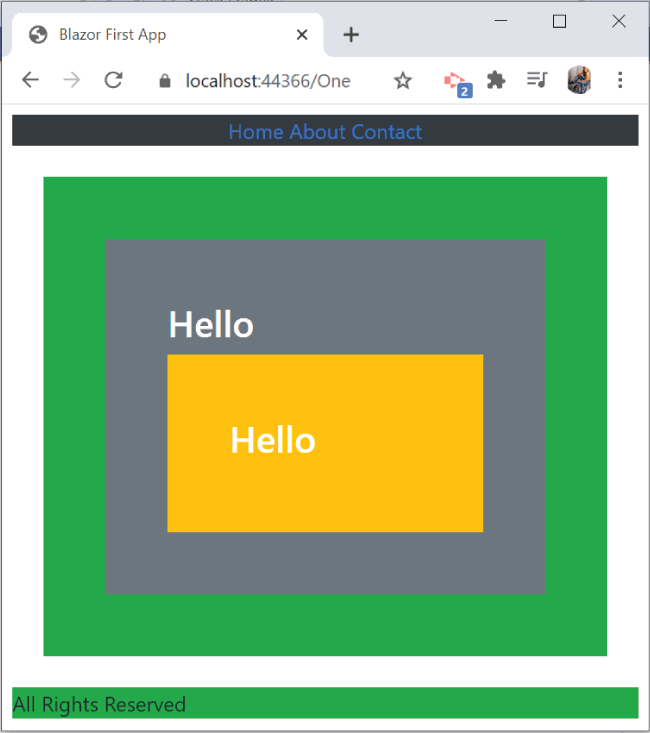
Through Bootstrap classes the first component is given background color of green, the second one is given grey background color and the last one a yellow color. This makes them visually clear.
Run your app and go to the URL – https://localhost:44366/One and you can see there are 2 Hello text displayed. First in “Two.razor” and other in “Three.razor”.
Although the work is done but there is a nicer approach to do this by Cascading Values and Parameters.
Blazor comes with a built-in razor component called CascadingValue. This component has an attribute called Value which can be provided with a data that needs to be transferred.
You will need to wrap a child component inside it and every successive component in the nesting tree will be able to get the transferred data. I will call the Two.razor inside the CascadingValue component and that will do the trick. The necessary changes to be made to One.razor is shown in the below code.
@page "/One"

<div class="p-5 bg-success">
    <CascadingValue Value="@MyMessage">
        <Two></Two>
    </CascadingValue>
</div>

@code {
    public string MyMessage = "Hello";
}
The Hello value is now available to both of the nested razor components. Accessing this value is done by Cascading Parameters which will be defined in the Two.razor and Three.razor.
Cascading Parameters have the attribute [CascadingParameter] and their type should be same like the type of the value that is transferred. In my case they will be of string type. So update the Two.razor code as shown below:
<div class="p-5 bg-secondary">
    <h3 class="text-white">@TransferredValue</h3>
    <Three></Three>
</div>

@code {
    [CascadingParameter]
    public string TransferredValue { get; set; }
}
Similarly update the Three.razor code as given below:
<div class="p-5 bg-warning">
    <h3 class="text-white">@TransferredValue</h3>
</div>

@code {
    [CascadingParameter]
    public string TransferredValue { get; set; }
}
This is a much cleaner approach and also easy to implement.
Multiple Cascading Parameters
To transfer multiple values, nest multiple CascadingValue components and provide a unique Name string to each of the CascadingValue components. In the below code I am transferring 2 values from “One.razor”:
@page "/One"

<div class="p-5 bg-success">
    <CascadingValue Name="Cascade1" Value="@MyMessage">
        <CascadingValue Name="Cascade2" Value="@MyNumber">
            <Two></Two>
        </CascadingValue>
    </CascadingValue>
</div>

@code {
    public string MyMessage = "Hello";
    public int MyNumber = 99;
}
In the descendant components (i.e. here Two.razor and Three.razor), the cascading parameters receive their values by the providing “Name” in the [CascadingParameter] attribute. So, the code of Two.razor becomes:
<div class="p-5 bg-secondary">
    <h3 class="text-white">@T1</h3>
    <h3 class="text-white">@T2</h3>
    <Three></Three>
</div>

@code {
    [CascadingParameter(Name ="Cascade1")]
    public string T1 { get; set; }

    [CascadingParameter(Name = "Cascade2")]
    public int T2 { get; set; }
}
Similarly, the code of Three.razor becomes:
<div class="p-5 bg-warning">
    <h3 class="text-white">@T1</h3>
    <h3 class="text-white">@T2</h3>
</div>

@code {
    [CascadingParameter(Name = "Cascade1")]
    public string T1 { get; set; }

    [CascadingParameter(Name = "Cascade2")]
    public int T2 { get; set; }
}
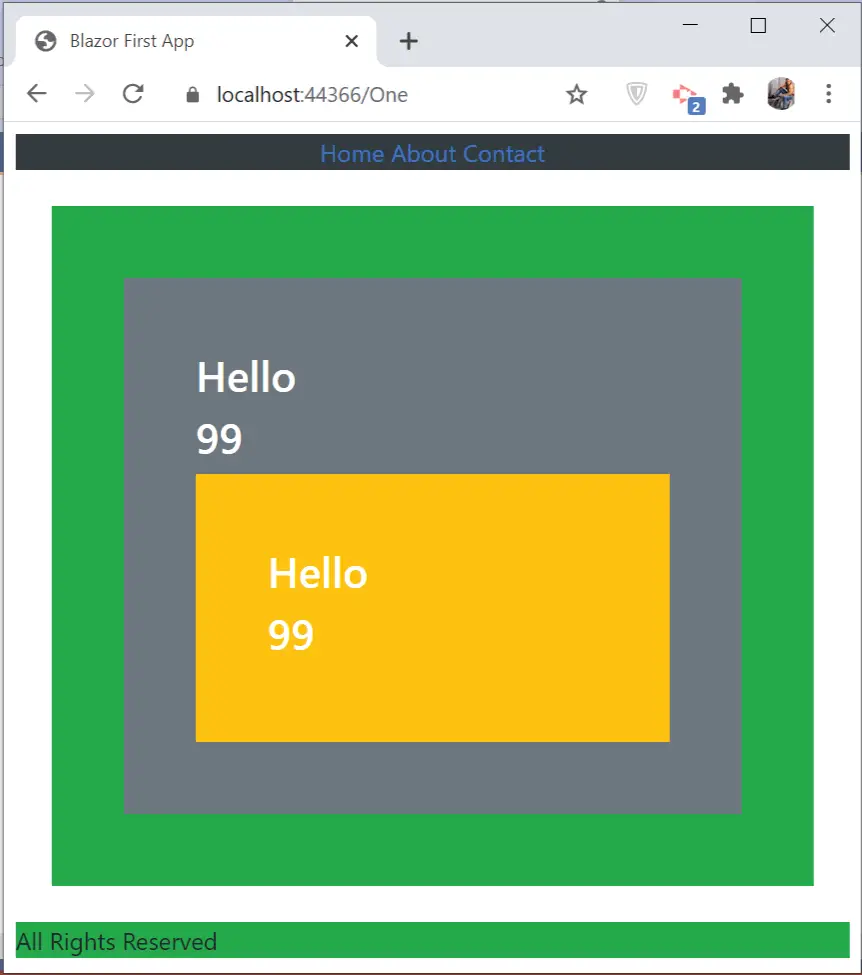
Run the app and you will see what is shown by the below image:
Handling Errors in Blazor
In this section I will explain how to handle different types of Errors in Blazor so that users can receive proper error messages if something goes wrong. Errors can be defined by 2 types, which are:
- 1. Connection Errors
- 2. Application Errors
Connection Errors
Blazor relies on a persistent HTTP Connection between Browser and Server. If this connection gets broken down then it automatically displays a modal error message called Attempting to reconnect to the server: 1 of 8, and prevents the user from interacting with components.
So, first create a new Razor Component called ExampleE.razor inside the Pages folder with the following code:
@page "/ExampleE"

<h1 class="bg-info text-white">Blazor Errors</h1>

@code {

}
Now run the app and a new browser window will open where the default app URL gets opened. In this window navigate to the URL – https://localhost:44366/ExampleE, and you can see the newly created razor component gets displayed.
Now in order to break the connection, open a new browser window, and in it open this same URL. Next, stop the app by clicking the stop button in Visual Studio. Visual Studio will close the browser window that was opened by it when you initially ran the app.
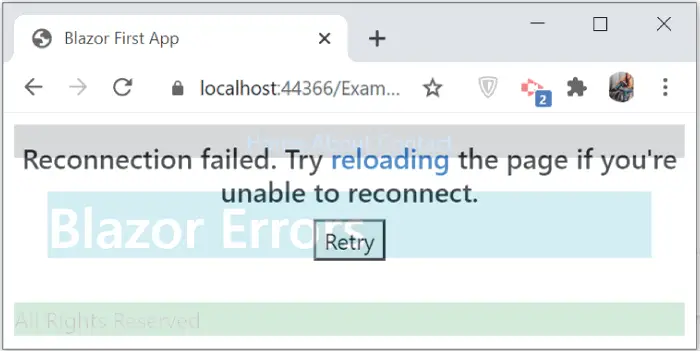
The browser window you opened the second time will remain open and Blazor will show connection error message – Attempting to reconnect to the server: 1 of 8. After making attempts to reconnect it fails and displayed another message Reconnection failed. Try reloading the page if you’re unable to reconnect.. See the below screenshot of this error message.
Now I will show you how to customize this error message by using Bootstrap CSS to a very friendly look. I will also add a few buttons to further interact with the browser.
In the ExampleE.razor add the following highlighted code of the style and div elements which are given below:
@page "/ExampleE"

<style>
    #components-reconnect-modal {
        position: fixed;
        top: 0;
        right: 0;
        bottom: 0;
        left: 0;
        z-index: 100;
        opacity: 0.8;
    }

    .components-reconnect-hide, .components-reconnect-show > .failed, .components-reconnect-show > .rejected, .components-reconnect-failed> .reconnect, .components-reconnect-failed > .rejected, .components-reconnect-rejected > .reconnect, .components-reconnect-rejected > .failed {
        display: none;
    }

    .components-reconnect-show, .components-reconnect-show > .reconnect, .components-reconnect-failed > .failed, .components-reconnect-rejected> .rejected {
        display: block;
    }
</style>

<div id="components-reconnect-modal" class="h3 bg-danger text-white text-center my-1 p-1 components-reconnect-hide">
    Blazor Connection Lost
    <div class="reconnect">
        Trying to reconnect...
    </div>
    <div class="failed">
        Reconnection Failed.
        <button class="btn btn-light" onclick="window.Blazor.reconnect()">
            Reconnect
        </button>
    </div>
    <div class="rejected">
        Reconnection Rejected.
        <button class="btn btn-light" onclick="location.reload()">
            Reload
        </button>
    </div>
</div>

<h1 class="bg-info text-white">Blazor Errors</h1>

@code {

}
Explanation : Whenever there is an connection break then Blazor will locate an element having id components-reconnect-modal.
<div id="components-reconnect-modal" class="h3 bg-danger text-white text-center my-1 p-1 components-reconnect-hide">Inside this element, Blazor adds one of the four Connection Error CSS classes given by the below table.
| Name | Description |
|---|---|
| componentsreconnect-show | This class is added when Blazor is attempting a reconnection to the server. |
| componentsreconnect-hide | This class is added if the connection is re-established. |
| componentsreconnect-failed | This class is added if the reconnection fails. |
| componentsreconnect-rejected | This class is added if the connection is re-established but user’s connection state is lost. Possible when server is restarted. |
Based on these CSS I have added 4 div elements under the main div:
<div class="reconnect">
    Trying to reconnect...
</div>
<div class="failed">
    Reconnection Failed.
    <button class="btn btn-light" onclick="window.Blazor.reconnect()">
        Reconnect
    </button>
</div>
<div class="rejected">
    Reconnection Rejected.
    <button class="btn btn-light" onclick="location.reload()">
        Reload
    </button>
</div>
I have also provided 2 buttons (Reconnect and Reload) for dealing with cases when the reconnection fails and when reconnection gets rejected. The Reconnect button calls JavaScript method window.Blazor.reconnect() when it is clicked and this will try reconnecting to the server.
While the Reload button calls another JavaScript method location.reload() when clicked. This will reload the whole page.
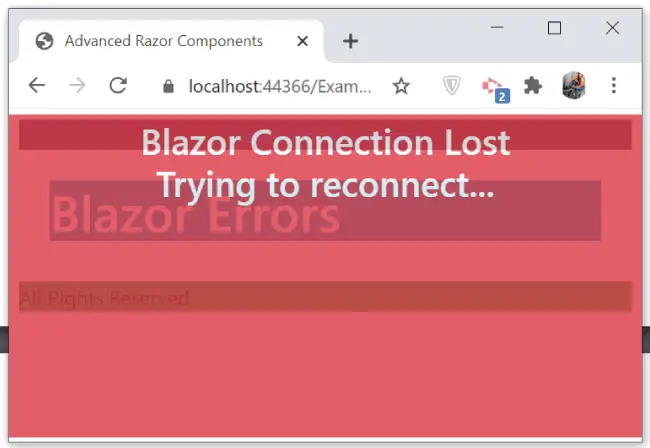
Run the app and open the URL- https://localhost:44366/ExampleE in a new window. Now stop the app in VS and you will see the message “Blazor Connection Lost Trying to reconnect…” on the browser. Check below screenshot.
After a few seconds, you will see the message that indicates that reconnection has failed with a Reconnect button. Check the below screenshot.
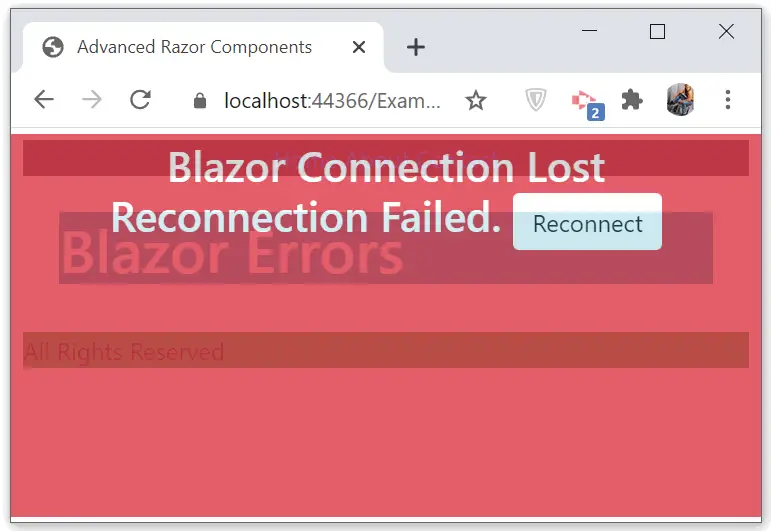
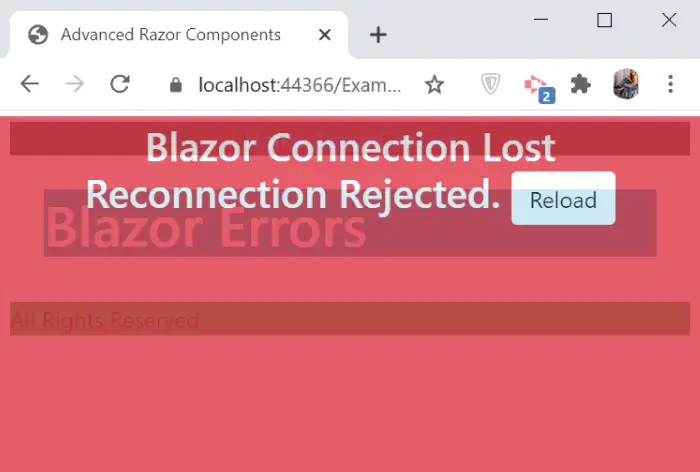
To see the reconnection rejected status. Do the same procedure, which we did earlier, till you get “Blazor Connection Lost Trying to reconnect…”. Then start the app in Visual Studio, do this before you see “reconnection has failed” message.
After a few second the same window will show “Blazor Connection Lost Reconnection Rejected.” With a Reload button. Check the below screenshot:
Application Errors
When an application error happens then Blazor looks for an element whose id is blazor-error-ui and sets its CSS display property to block. Note a reload is needed after an application error else the app would become unresponsive.
So, add a button which will cause an application error. Also add a div with Id blazor-error-ui as shown below:
@page "/ExampleE"

<style>
    #components-reconnect-modal {
        position: fixed;
        top: 0;
        right: 0;
        bottom: 0;
        left: 0;
        z-index: 100;
        opacity: 0.8;
    }

    .components-reconnect-hide, .components-reconnect-show > .failed, .components-reconnect-show > .rejected, .components-reconnect-failed> .reconnect, .components-reconnect-failed > .rejected, .components-reconnect-rejected > .reconnect, .components-reconnect-rejected > .failed {
        display: none;
    }

    .components-reconnect-show, .components-reconnect-show > .reconnect, .components-reconnect-failed > .failed, .components-reconnect-rejected> .rejected {
        display: block;
    }
</style>

<div id="components-reconnect-modal" class="h3 bg-danger text-white text-center my-1 p-1 components-reconnect-hide">
    Blazor Connection Lost
    <div class="reconnect">
        Trying to reconnect...
    </div>
    <div class="failed">
        Reconnection Failed.
        <button class="btn btn-light" onclick="window.Blazor.reconnect()">
            Reconnect
        </button>
    </div>
    <div class="rejected">
        Reconnection Rejected.
        <button class="btn btn-light" onclick="location.reload()">
            Reload
        </button>
    </div>
</div>

<div id="blazor-error-ui" class="text-center bg-warning text-white p-1" style="display:none">
    An error has occurred. Kindly Reload.
    <button class="btn btn-sm btn-primary" onclick="location.reload()">
        Reload
    </button>
</div>

<h1 class="bg-info text-white">Blazor Errors</h1>

<button class="btn btn-danger" @onclick="@(() => throw new Exception())">
    Error
</button>

@code {

}
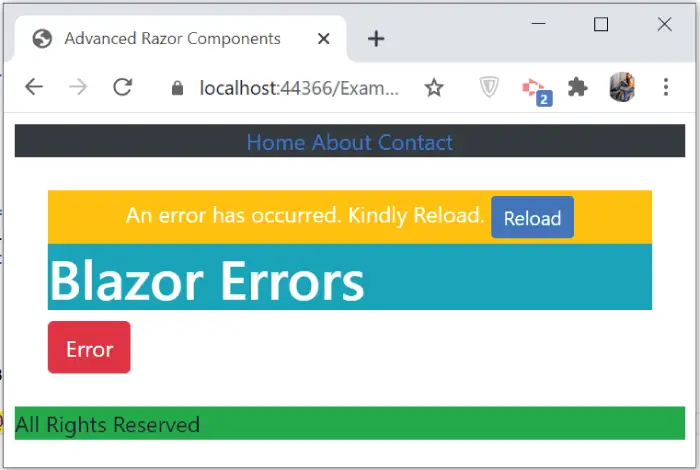
Now run the app and go to the URL – https://localhost:44366/ExampleE. Click the error button to throw an exception. You will see an error message in yellow background with a reload button. Check the below screenshot.
You can download the source codes:
In this Blazor Tutorial we covered some very advanced topics on razor components. We tried to explain them with easy language and hope you understood how they all work. Use these topics to create better Blazor App.




 Welcome to YogiHosting - A Programming Tutorial Website. It is used by millions of people around the world to learn and explore about ASP.NET Core, Blazor, jQuery, JavaScript, Docker, Kubernetes and other topics.