CRUD Operations in Blazor with Entity Framework Core

In this tutorial we will perform Blazor CRUD Operations using Entity Framework Core. Kindly note that on my previous tutorial on Blazor forms and validation we did the project configuration for Entity Framework Core. We will continue to add this CRUD feature to that project, so make sure to read the previous tutorial also.
Page Contents
We have a Student.cs entity defined as:
using System.ComponentModel.DataAnnotations;

namespace BlazorForms.Models
{
    public class Student
    {
        public int Id { get; set; }

        [Required]
        [StringLength(50)]
        public string Name { get; set; }

        [Range(8, 15)]
        public int Age { get; set; }

        public DateTime DOB { get; set; }

        [Range(5, 10)]
        public int Standard { get; set; }

        [Required]
        public string Sex { get; set; }

        [RegularExpression("^[a-zA-Z0-9_\\.-]+@([a-zA-Z0-9-]+\\.)+[a-zA-Z]{2,6}$", ErrorMessage = "E-mail is not valid")]
        public string Email { get; set; }

        [Range(typeof(bool), "true", "true", ErrorMessage = "You must accept the Terms")]
        public bool Terms { get; set; }

        [Range(1, int.MaxValue, ErrorMessage = "Please Select School")]
        public int SchoolId { get; set; }
        public School School_R { get; set; }

        [Range(1, int.MaxValue, ErrorMessage = "Please Select Location")]
        public int LocationId { get; set; }
        public Location Location_R { get; set; }
    }
}
In this entity we will be performing CREATE, READ, UPDATE & DELETE operations using EF Core.
Create Student functionality
We start with the first Blazor CRUD Operation which is the “CREATE” feature. So create a new Razor Component called CreateStudent.razor and add the following code to it:
@page "/CreateStudent"
@implements IDisposable

<link href="validation.css" rel="stylesheet" />

<h1 class="bg-info text-white">Create Student</h1>
<h2 class="text-success p-2">@FormSubmitMessage</h2>
<EditForm Model="StudentData" OnValidSubmit="HandleValidSubmit" OnInvalidSubmit="HandleInvalidSubmit">
    <DataAnnotationsValidator />
    <ValidationSummary />

    <div class="form-group">
        <label>Id</label>
        <InputNumber class="form-control" @bind-Value="StudentData.Id" disabled />
    </div>
    <div class="form-group">
        <label>Name</label>
        <ValidationMessage For="@(() => StudentData.Name)" />
        <InputText class="form-control" @bind-Value="StudentData.Name" />
    </div>
    <div class="form-group">
        <label>Age</label>
        <ValidationMessage For="@(() => StudentData.Age)" />
        <InputNumber class="form-control" @bind-Value="StudentData.Age" />
    </div>
    <div class="form-group">
        <label>DOB</label>
        <ValidationMessage For="@(() => StudentData.DOB)" />
        <InputDate class="form-control" @bind-Value="StudentData.DOB" />
    </div>
    <div class="form-group">
        <label>Standard</label>
        <ValidationMessage For="@(() => StudentData.Standard)" />
        <InputSelect class="form-control" @bind-Value="StudentData.Standard">
            <option selected disabled value="0">Choose a Standard</option>
            @foreach (var s in Standard)
            {
                <option value="@s.Value">@s.Key</option>
            }
        </InputSelect>
    </div>
    <div class="form-group">
        <label>Sex</label>
        <ValidationMessage For="@(() => StudentData.Sex)" />
        <InputRadioGroup class="form-control" @bind-Value="StudentData.Sex">
            @foreach (var sex in Sex)
            {
                <InputRadio Value="sex.Value" />@sex.Key
            }
        </InputRadioGroup>
    </div>
    <div class="form-group">
        <label>Email</label>
        <ValidationMessage For="@(() => StudentData.Email)" />
        <InputText class="form-control" @bind-Value="StudentData.Email" />
    </div>
    <div class="form-group">
        <label>Terms</label>
        <ValidationMessage For="@(() => StudentData.Terms)" />
        <InputCheckbox @bind-Value="StudentData.Terms" />
    </div>
    <div class="form-group">
        <label>School</label>
        <ValidationMessage For="@(() => StudentData.SchoolId)" />
        <SelectCommon RowType="School" RowData="Schools" @bind-MyPhrase="@StudentData.SchoolId">
            <SelectOption>
                <option selected disabled value="0">Choose a School</option>
            </SelectOption>
            <OptionValue Context="p">
                <option value="@p.Id">@p.Name</option>
            </OptionValue>
        </SelectCommon>
    </div>
    <div class="form-group">
        <label>Location</label>
        <ValidationMessage For="@(() => StudentData.LocationId)" />
        <SelectCommon RowType="Location" RowData="Locations" @bind-MyPhrase="@StudentData.LocationId">
            <SelectOption>
                <option selected disabled value="0">Choose a Location</option>
            </SelectOption>

            <OptionValue Context="p">
                <option value="@p.Id">@p.City, @p.State</option>
            </OptionValue>
        </SelectCommon>
    </div>
    <div class="form-group">
        <button type="submit" class="btn btn-primary">Click</button>
    </div>
</EditForm>

@code {
    [Inject]
    public DataContext Context { get; set; }

    public Student StudentData = new Student();
    public List<School> Schools = new List<School>();
    public List<Location> Locations = new List<Location>();

    public string FormSubmitMessage { get; set; } = "Form Data Not Submitted";

    public Dictionary<string, int> Standard = new Dictionary<string, int>() {
        {"Class 5", 5 },
        {"Class 6", 6 },
        {"Class 7", 7 },
        {"Class 8", 8 },
        {"Class 9", 9 },
        {"Class 10", 10 }
    };

    public Dictionary<string, string> Sex = new Dictionary<string, String>() {
        {"M", "Male" },
        {"F", "Female" }
    };

    public void HandleValidSubmit()
    {
        Context.Add(StudentData);
        Context.SaveChanges();
        FormSubmitMessage = "Form Data Submitted";
    }

    public void HandleInvalidSubmit() => FormSubmitMessage = "Invalid Data Submitted";

    protected async override Task OnParametersSetAsync()
    {
        Schools = await Context.School.ToListAsync();
        Locations = await Context.Location.ToListAsync();
    }

    public void Dispose() => Context.Entry(StudentData).State = EntityState.Detached;
}
Explanation : In this component we have added an EditForm component of Blazor and provided it with a Model of Student class type (i.e. StudentData).
public Student StudentData = new Student();Inside the EditForm component we have added Blazor Validation Component which will show validation message whenever a user enters wrong values to the fields, these are:
<DataAnnotationsValidator />
<ValidationSummary />
The ValidationMessage component will show validation message for a particular field. So, we have applied to every field.
We have also added various In-build Blazor Component for binding the different fields of the Student type. These are:
- InputNumber – which renders an input type number html element and we bind it to the Id and Age fields.
- InputText – which renders an input type text html element and we bind it to the Name and Email fields.
- InputDate – which renders an input type date html element and we bind it to the DOB field.
- InputSelect – which renders a select html element and we bind it to the Standard field.
- InputRadioGroup with InputRadio – they are used to render radio buttons for the Sex field.
- InputCheckbox – it renders a checkbox html element and we bind the Terms field to it.
- SelectCommon – it is a custom razor component that we will build shortly. We bind the SchoolId and LocationId fields to it.
Note that all these components have a @bind-Value attribute that should be specified with the field it binds to.
In the binding of the Standard field with the InputSelect component, notice the foreach loop for creating the options for the select element. We have also specified the default first options just before the foreach loop.
<InputSelect class="form-control" @bind-Value="StudentData.Standard">
    <option selected disabled value="0">Choose a Standard</option>
    @foreach (var s in Standard)
    {
        <option value="@s.Value">@s.Key</option>
    }
</InputSelect>
We have also defined a C# dictionary property called Standard that will contain the Standards for the student. The foreach loop is creating the options for the select element from this dictionary variable.
public Dictionary<string, int> Standard = new Dictionary<string, int>() {
    {"Class 5", 5 },
    {"Class 6", 6 },
    {"Class 7", 7 },
    {"Class 8", 8 },
    {"Class 9", 9 },
    {"Class 10", 10 }
};
The InputSelect will render the select element to contain the following code:
<select class="form-control valid" value="0">
    <option selected disabled value="0">Choose a Standard</option>
    <option value="5">Class 5</option>
    <option value="6">Class 6</option>
    <option value="7">Class 7</option>
    <option value="8">Class 8</option>
    <option value="9">Class 9</option>
    <option value="10">Class 10</option>
</select>We have used InputRadioGroup and InputRadio to bind the Sex field. We need to set @bind-Value to StudentData.Sex field. Then inside the InputRadioGroup component, we need to loop through the values of variable Sex (which contains two Sex values in a dictionary type variable), and create the Radio buttons using InputRadio component. This is shown in the below code.
<InputRadioGroup class="form-control" @bind-Value="StudentData.Sex">
    @foreach (var sex in Sex)
    {
        <InputRadio Value="sex.Value" />@sex.Key
    }
</InputRadioGroup>
This will render 2 radio buttons having the same name and so only one of the two can be selected at a time. The HTML generated for this is shown below.
<input class="valid" type="radio" name="7f27bb58c91648429f65227c48cc0cb4" value="Male" />M
<input class="valid" type="radio" name="7f27bb58c91648429f65227c48cc0cb4" value="Female" />F
Note – Sex is a dictionary type of variable and on looping through it – sex.Value will provide the Value of the current element and sex.Key will provide the Key of the current element. The ‘sex’ (note s is small) contains the current element of the variable Sex (note S is capital) in the loop.
In C# code it is declared as shown below:
public Dictionary<string, string> Sex = new Dictionary<string, String>() {
    {"M", "Male" },
    {"F", "Female" }
};The Terms field is bind to an InputCheckbox component as shown below and it will render an input type checkbox for it.
<InputCheckbox @bind-Value="StudentData.Terms" />The field that is bind to InputCheckbox should be a bool type. This is the reason why we defined the Terms property to be of bool type.
public bool Terms { get; set; }Creating a Blazor Template Components with Chain Binding for StudentId and LocationId
We have created a common Blazor Template Component called SelectCommon that will bind StudentId and LocationId.
This component SelectCommon.razor should be added to the Pages folder with the following code.
@typeparam RowType

<InputSelect class="form-control" @bind-Value="HandleChange">
    @if (SelectOption != null)
    {
        @SelectOption
    }

    @foreach (RowType item in RowData)
    {
        @OptionValue(item);
    }
</InputSelect>

@code {
    [Parameter]
    public RenderFragment SelectOption { get; set; }

    [Parameter]
    public RenderFragment<RowType> OptionValue { get; set; }

    [Parameter]
    public IEnumerable<RowType> RowData { get; set; }

    [Parameter]
    public int MyPhrase { get; set; }

    [Parameter]
    public EventCallback<int> MyPhraseChanged { get; set; }

    public int HandleChange
    {
        get { return MyPhrase; }
        set
        {
            MyPhrase = value;
            MyPhraseChanged.InvokeAsync(MyPhrase);
        }
    }

    [CascadingParameter]
    public EditContext CurrentEditContext { get; set; }

    protected override void OnInitialized()
    {
        CurrentEditContext.OnFieldChanged += (sender, args) =>
        {
            CurrentEditContext.Validate();
        };
    }
}
This component will render a HTML select element for the School and Location entities. These entities will be provided to RowData component parameter.
Let us explain it’s working in details. The @bind-MyPhrase attribute sends the value of SchoolId and LocationId to this component’s “MyPhase property”. Example – @bind-Value="StudentData.Email", this value is received by the parameter component –
[Parameter]
public int MyPhrase { get; set; }
Then in the component, we used @bind-Value attribute to bind to a property called HandleChange. It is defined as:
public int HandleChange
{
    get { return MyPhrase; }
    set
    {
        MyPhrase = value;
        MyPhraseChanged.InvokeAsync(MyPhrase);
    }
}
The work of this property is to do 3 things:
- 1. Get the value of MyPhrase property and bind the control with it.
- 2. Set the value of MyPhrase property to that sent from the parent component.
- 3. It also calls a callback method called MyPhraseChanged when the selection of item in the select element is changed by the user. This will notify the parent component that the MyPhase property has been changed. The below code does this notification.
MyPhraseChanged.InvokeAsync(MyPhrase);The work of OptionValue and RowData component properties is to create the options for the rendered select element. The “options” are created with the values of the School and Location entities.
<OptionValue Context="p">
    <option value="@p.Id">@p.Name</option>
</OptionValue>
The SelectCommon component is called from the CreateStudent.razor component as shown below.
// for StudentId
<SelectCommon RowType="School" RowData="Schools" @bind-MyPhrase="@StudentData.SchoolId">
    <SelectOption>
        <option selected disabled value="0">Choose a School</option>
    </SelectOption>
    <OptionValue Context="p">
        <option value="@p.Id">@p.Name</option>
    </OptionValue>
</SelectCommon>
// for LocationId
<SelectCommon RowType="Location" RowData="Locations" @bind-MyPhrase="@StudentData.LocationId">
    <SelectOption>
        <option selected disabled value="0">Choose a Location</option>
    </SelectOption>

    <OptionValue Context="p">
        <option value="@p.Id">@p.City, @p.State</option>
    </OptionValue>
</SelectCommon>
Note that the RowType attribute is provided with the type of the entity for which the select element will be created. We have provided it with School and Location type.
The other attribute called RowData is used to provide the value of the Student and Location entities.
These entities are defined in C# code as:
public List<School> Schools = new List<School>();
public List<Location> Locations = new List<Location>();
The values filled on these entities values are fetched from the database on the OnParametersSetAsync Lifecycle event.
protected async override Task OnParametersSetAsync()
{
    Schools = await Context.School.ToListAsync();
    Locations = await Context.Location.ToListAsync();
}
The EditForm component creates a cascading object called EditContext which holds information regarding the data editing process done on the EditForm.
We have used the EditContext to revalidate the form whenever the user selection of item changes in the select element. The code which does this work is:
[CascadingParameter]
public EditContext CurrentEditContext { get; set; }

protected override void OnInitialized()
{
    CurrentEditContext.OnFieldChanged += (sender, args) =>
    {
        CurrentEditContext.Validate();
    };
}
In this way this component will work for both StudentId and LocationId fields.
When the form is submitted with invalid values then validation messages are displayed to the user. We have provided with the validation attributes to the Student class. Example: for the Name field.
[Required]
[StringLength(50)]
public string Name { get; set; }
It will be necessary to enter a value as there is a Required attribute. Also, the max length should not be more than 50 due to StringLength attribute.
We have made the Terms field to be selected at all cost by providing with the Range attribute.
[Range(typeof(bool), "true", "true", ErrorMessage = "You must accept the Terms")]
public bool Terms { get; set; }
So, a form can only be submitted if Terms checkbox is selected by the user.
On form submission 2 cases can be formed. First one is when data is not correct and validation fails. In that case the HandleInvalidSubmit() method is called which will set the FormSubmitMessage value to “Invalid Data Submitted”.
public void HandleInvalidSubmit() => FormSubmitMessage = "Invalid Data Submitted";The second case comes when all the form fields have proper data. Here the method HandleValidSubmit() is called. It’s work is to insert the data to the database using Entity Framework core and change the FormSubmitMessage value to “Form Data Submitted”.
public void HandleValidSubmit()
{
    Context.Add(StudentData);
    Context.SaveChanges();
    FormSubmitMessage = "Form Data Submitted";
}<h2 class="text-success p-2">@FormSubmitMessage</h2>We have also implemented IDisposable.Dispose method to detach the EntityState of StudentData. This is because Blazor maintains a persistent connection with the server. So only a single instance of Entity Framework Core is shared by multiple components.
We would like each component to use a separate EF core instance which prevent unsaved data of one component to be shown on another component. Therefore, we have detached the EntityState.
public void Dispose() => Context.Entry(StudentData).State = EntityState.Detached; The Dispose method will be invoked when the component is about to be destroyed, which happens when navigation to another component occurs.
Run your app and go to the URL – https://localhost:44366/CreateStudent. Fill the values in the form and click the button to create the Student record. We have shown this in the below video.
Blazor Custom Validator
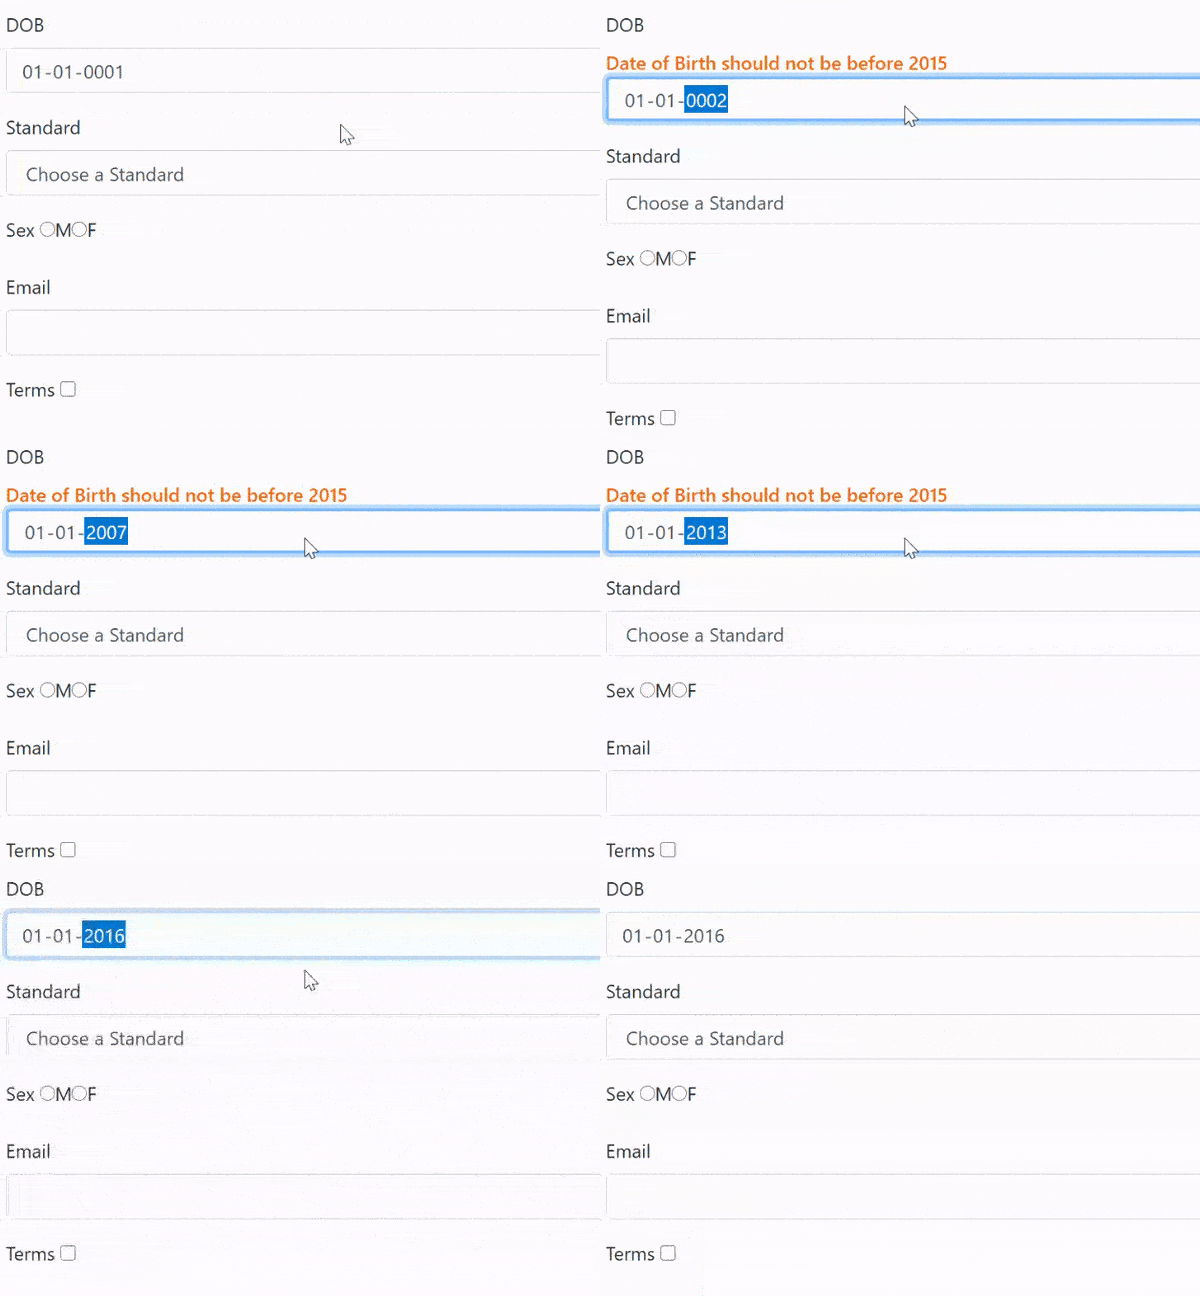
If the Blazor’s built-in validation components are not sufficient then we can create our own Custom Validators in Blazor. Let us create a custom validator for the DOB field. This validator will prevent date of births that are:
- 1. In the future.
- 2. Before 2015.
So, create a new class called DOB.cs inside the Models folder of your project and add the following code to it:
using System.ComponentModel.DataAnnotations;

namespace BlazorForms.Models
{
    public class DOB : ValidationAttribute
    {
        protected override ValidationResult IsValid(object value, ValidationContext validationContext)
        {
            if (Convert.ToDateTime(value) > DateTime.Now)
                return new ValidationResult("Date of Birth cannot be in future", new[] { validationContext.MemberName });
            else if (Convert.ToDateTime(value) < new DateTime(2015, 1, 1))
                return new ValidationResult("Date of Birth should not be before 2015", new[] { validationContext.MemberName });
            else
                return ValidationResult.Success;
        }
    }
}
The custom validators should be derived from ValidationAttribute class, and they should override ValidationResult method. In this method the custom validation logic is written.
The code inside this method is checking if the value received to it’s parameter is not in the future and not before 2015. In these cases, a new ValidationResult is returned.
If the code passes all the validations then ValidationResult.Success is returned.
Next, apply this attribute to the DOB field of the Student.cs class.
[DOB]
public DateTime DOB { get; set; }
It’s time to check how this custom validator works. We have shown this in the below video:
Read Student functionality
Now moving towards the READ CRUD Operation in Blazor, so create a new Razor Component called ReadStudent.razor. In this component show all the Student’s by fetching this information from the database. The code of this component is shown below.
@page "/ReadStudent"

<h1 class="bg-info text-white">Students</h1>

<table class="table table-sm table-bordered table-striped ">
    <thead>
        <tr>
            <th>ID</th>
            <th>Name</th>
            <th>Age</th>
            <th>DOB</th>
            <th>Standard</th>
            <th>Sex</th>
            <th>Email</th>
            <th>Terms</th>
            <th>School</th>
            <th>Location</th>
        </tr>
    </thead>
    <tbody>
        @foreach (Student s in Students)
        {
            <tr>
                <td>@s.Id</td>
                <td>@s.Name</td>
                <td>@s.Age</td>
                <td>@s.DOB.ToString("dddd, dd MMMM yyyy")</td>
                <td>@s.Standard</td>
                <td>@s.Sex</td>
                <td>@s.Email</td>
                <td>@s.Terms</td>
                <td>@s.School_R.Name</td>
                <td>@s.Location_R.City, @s.Location_R.State</td>
            </tr>
        }
    </tbody>
</table>

@code {
    [Inject]
    public DataContext Context { get; set; }

    public IEnumerable<Student> Students { get; set; } = Enumerable.Empty<Student>();
    protected override void OnInitialized()
    {
        Students = Context.Student.Include(p => p.School_R).Include(p => p.Location_R);
    }
}
The code of this component is fairly simple. The records are shown in HTML table. On the OnInitialized Lifecycle event of the component the fetching is done from Entity Framework Core as shown below.
protected override void OnInitialized()
{
    Students = Context.Student.Include(p => p.School_R).Include(p => p.Location_R);
}
The School Name which is a related record is fetch by using the reference navigation property called School_R as shown below:
@s.School_R.NameSimilar is the case for State and City values:
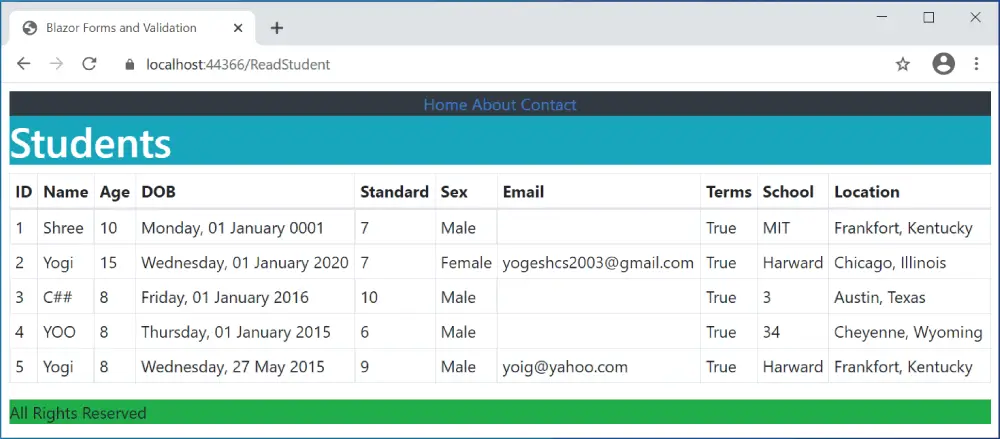
@s.Location_R.City, @s.Location_R.StateRun your app and go to the URL – https://localhost:44366/ReadStudent, where you will see all the students. Check the below image:
Update Student functionality
Now we move towards the Update CRUD Feature in Blazor. The idea is to let users to update a student record from the same component which creates new students. So little bit of changes are needed to be done to the CreateStudent.razor component. We have shown all these changes in highlighted way.
@page "/CreateStudent/{id:int}"
@page "/CreateStudent"
@implements IDisposable

<link href="/validation.css" rel="stylesheet" />

<h1 class="bg-info text-white">Create Student</h1>
<h2 class="text-success p-2">@FormSubmitMessage</h2>
<EditForm Model="StudentData" OnValidSubmit="HandleValidSubmit" OnInvalidSubmit="HandleInvalidSubmit">
    <DataAnnotationsValidator />
    <ValidationSummary />

    <div class="form-group">
        <label>Id</label>
        <InputNumber class="form-control" @bind-Value="StudentData.Id" disabled />
    </div>
    <div class="form-group">
        <label>Name</label>
        <ValidationMessage For="@(() => StudentData.Name)" />
        <InputText class="form-control" @bind-Value="StudentData.Name" />
    </div>
    <div class="form-group">
        <label>Age</label>
        <ValidationMessage For="@(() => StudentData.Age)" />
        <InputNumber class="form-control" @bind-Value="StudentData.Age" />
    </div>
    <div class="form-group">
        <label>DOB</label>
        <ValidationMessage For="@(() => StudentData.DOB)" />
        <InputDate class="form-control" @bind-Value="StudentData.DOB" />
    </div>
    <div class="form-group">
        <label>Standard</label>
        <ValidationMessage For="@(() => StudentData.Standard)" />
        <InputSelect class="form-control" @bind-Value="StudentData.Standard">
            <option selected disabled value="0">Choose a Standard</option>
            @foreach (var s in Standard)
            {
                <option value="@s.Value">@s.Key</option>
            }
        </InputSelect>
    </div>
    <div class="form-group">
        <label>Sex</label>
        <ValidationMessage For="@(() => StudentData.Sex)" />
        <InputRadioGroup class="form-control" @bind-Value="StudentData.Sex">
            @foreach (var sex in Sex)
            {
                <InputRadio Value="sex.Value" />@sex.Key
            }
        </InputRadioGroup>
    </div>
    <div class="form-group">
        <label>Email</label>
        <ValidationMessage For="@(() => StudentData.Email)" />
        <InputText class="form-control" @bind-Value="StudentData.Email" />
    </div>
    <div class="form-group">
        <label>Terms</label>
        <ValidationMessage For="@(() => StudentData.Terms)" />
        <InputCheckbox @bind-Value="StudentData.Terms" />
    </div>
    <div class="form-group">
        <label>School</label>
        <ValidationMessage For="@(() => StudentData.SchoolId)" />
        <SelectCommon RowType="School" RowData="Schools" @bind-MyPhrase="@StudentData.SchoolId">
            <SelectOption>
                <option selected disabled value="0">Choose a School</option>
            </SelectOption>
            <OptionValue Context="p">
                <option value="@p.Id">@p.Name</option>
            </OptionValue>
        </SelectCommon>
    </div>
    <div class="form-group">
        <label>Location</label>
        <ValidationMessage For="@(() => StudentData.LocationId)" />
        <SelectCommon RowType="Location" RowData="Locations" @bind-MyPhrase="@StudentData.LocationId">
            <SelectOption>
                <option selected disabled value="0">Choose a Location</option>
            </SelectOption>

            <OptionValue Context="p">
                <option value="@p.Id">@p.City, @p.State</option>
            </OptionValue>
        </SelectCommon>
    </div>
    <div class="form-group">
        <button type="submit" class="btn btn-primary">Click</button>
    </div>
</EditForm>
@code {
    [Inject]
    public DataContext Context { get; set; }

    [Inject]
    public NavigationManager NavManager { get; set; }

    [Parameter]
    public int Id { get; set; }

    public Student StudentData = new Student();
    public List<School> Schools = new List<School>();
    public List<Location> Locations = new List<Location>();

    public string FormSubmitMessage { get; set; } = "Form Data Not Submitted";

    public Dictionary<string, int> Standard = new Dictionary<string, int>() {
        {"Class 5", 5 },
        {"Class 6", 6 },
        {"Class 7", 7 },
        {"Class 8", 8 },
        {"Class 9", 9 },
        {"Class 10", 10 }
    };

    public Dictionary<string, string> Sex = new Dictionary<string, String>() {
        {"M", "Male" },
        {"F", "Female" }
    };

    public void HandleValidSubmit()
    {
        if (Id == 0)
          Context.Add(StudentData);
        Context.SaveChanges();
        //FormSubmitMessage = "Form Data Submitted";
        NavManager.NavigateTo("/ReadStudent");
    }

    public void HandleInvalidSubmit() => FormSubmitMessage = "Invalid Data Submitted";

    protected async override Task OnParametersSetAsync()
    {
        if (Id != 0)
          StudentData = await Context.Student.FindAsync(Id);
        Schools = await Context.School.ToListAsync();
        Locations = await Context.Location.ToListAsync();
    }

    public void Dispose() => Context.Entry(StudentData).State = EntityState.Detached;
}
The changes done to the component are as follows:
1. Added a new route for providing with the Id of the student.
@page "/CreateStudent/{id:int}"This means when the URL is https://localhost:44366/CreateStudent/10 then the component will open the student with id 10 for update purpose.
Similarly, the https://localhost:44366/CreateStudent/5 will open the 5th student records for update purpose.
2. The Id value provided in the route will be provided to the Id property.
[Parameter]
public int Id { get; set; }
Inside the OnParametersSetAsync() method we make sure to check if Id has some value. In that case we are fetching that student id from the database.
if (Id != 0)
    StudentData = await Context.Student.FindAsync(Id);
3. In the HandleValidSubmit() method we have added an if condition which helps us to update the record in case of Id having a value (i.e. > 0).
if (Id == 0)
  Context.Add(StudentData);
Context.SaveChanges();
These changes enable the same component to edit as well as insert student records.
We have also injected NavigationManager to the component since the user will be redirected to the Read Student component when updation of the record finishes.
[Inject]
public NavigationManager NavManager { get; set; }
The redirection is done in HandleValidSubmit() method.
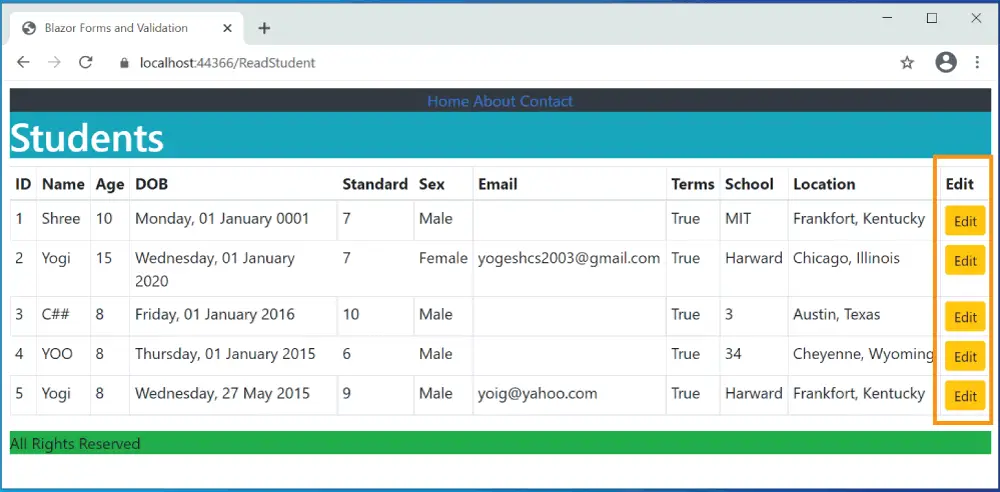
NavManager.NavigateTo("/ReadStudent");The final thing is to link the ReadStudent.razor component with edit feature. So add a new Edit column to the HTML table as shown below.
<table class="table table-sm table-bordered table-striped ">
    <thead>
        <tr>
            <th>ID</th>
            …
            <th>Edit</th>
        </tr>
    </thead>
    <tbody>
        @foreach (Student s in Students)
        {
            <tr>
                <td>@s.Id</td>
                …
                <td><a class="btn btn-sm btn-warning" href="/CreateStudent/@s.Id">Edit</a></td>
            </tr>
        }
    </tbody>
</table>
This will create the edit column which is shown by the below image:
Next, run your project and try editing a record. In the below video we am changing the last record name from Yogi to Jack.
Delete Student functionality
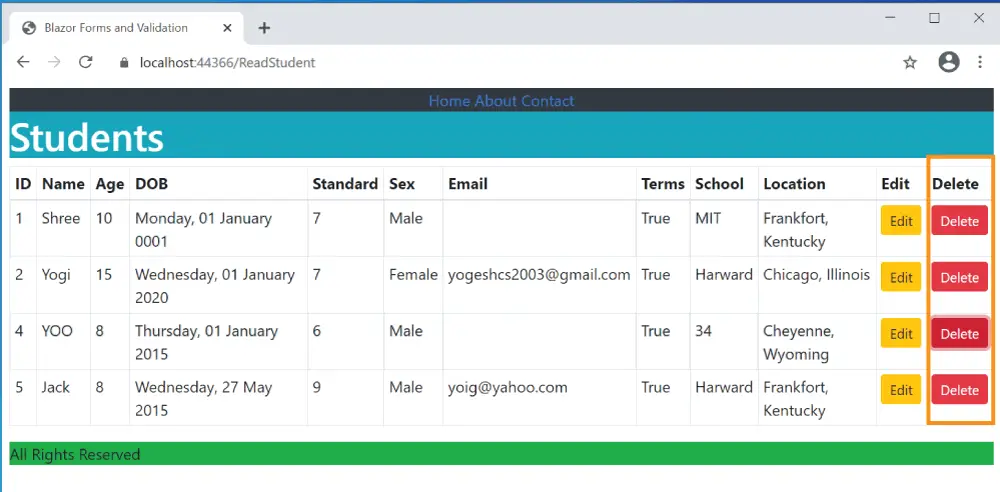
To create the Delete CRUD functionality in Blazor we add a new delete column on the html table of the ReadStudent.razor component. In this column add a button which on clicking will perform the deletion of the student’s record.
The codes to be added to the ReadStudent.razor component are shown in highlighted manner below.
@page "/ReadStudent"

<h1 class="bg-info text-white">Students</h1>

<table class="table table-sm table-bordered table-striped ">
    <thead>
        <tr>
            <th>ID</th>
            <th>Name</th>
            <th>Age</th>
            <th>DOB</th>
            <th>Standard</th>
            <th>Sex</th>
            <th>Email</th>
            <th>Terms</th>
            <th>School</th>
            <th>Location</th>
            <th>Edit</th>
            <th>Delete</th>
        </tr>
    </thead>
    <tbody>
        @foreach (Student s in Students)
        {
        <tr>
            <td>@s.Id</td>
            <td>@s.Name</td>
            <td>@s.Age</td>
            <td>@s.DOB.ToString("dddd, dd MMMM yyyy")</td>
            <td>@s.Standard</td>
            <td>@s.Sex</td>
            <td>@s.Email</td>
            <td>@s.Terms</td>
            <td>@s.School_R.Name</td>
            <td>@s.Location_R.City, @s.Location_R.State</td>
            <td><a class="btn btn-sm btn-warning" href="/CreateStudent/@s.Id">Edit</a></td>
            <td>
                <button class="btn btn-sm btn-danger"
                        @onclick="@(() => Delete(s))">
                    Delete
                </button>
            </td>
        </tr>
        }
    </tbody>
</table>

@code {
    [Inject]
    public DataContext Context { get; set; }

    public IEnumerable<Student> Students { get; set; } = Enumerable.Empty<Student>();
    protected override void OnInitialized()
    {
        Students = Context.Student.Include(p => p.School_R).Include(p => p.Location_R);
    }

    public void Delete(Student s)
    {
        Context.Remove(s);
        Context.SaveChanges();
    }
}
The Context.Remove(s) removes the entity while Context.SaveChanges() saves the changes to the database.
The delete column is shown in the below image:
The delete functionality is shown by the below video:
The Blazor CRUD Operations are now completed.
You can download the source codes:
In this tutorial we covered Blazor CRUD operations on a database using Entity Framework Core. We also performed full Form Validations on all the field using Blazor Form Components. I hope you enjoyed reading as much as I enjoyed writing this long tutorial for you all.





 Welcome to YogiHosting - A Programming Tutorial Website. It is used by millions of people around the world to learn and explore about ASP.NET Core, Blazor, jQuery, JavaScript, Docker, Kubernetes and other topics.
Hi
I got below error when try to execute the CreateStudent form while loading the page at the below shown line. Can you please explain what need to be done to resolve this issue.
public void Dispose() => Context.Entry(StudentData).State = EntityState.Detached;
Error Message:
System.ObjectDisposedException: ‘Cannot access a disposed context instance. A common cause of this error is disposing a context instance that was resolved from dependency injection and then later trying to use the same context instance elsewhere in your application. This may occur if you are calling ‘Dispose’ on the context instance, or wrapping it in a using statement. If you are using dependency injection, you should let the dependency injection container take care of disposing context instances.
Object name: ‘DataContext’.’
I think you missed some DI code. Please download the source codes of this tutorial from the download link and manually match all the codes from it.