Create ASP.NET Core Minimal API from Start till Finish
Minimal APIs are used to create HTTP APIs in a quick span of time with minimum dependencies. They are best suited for microservices and apps that require only minimum files with minimum dependencies. In ASP.NET Core Minimal APIs we do not use controllers instead all the API codes are written in the Program.cs file.
What are the advantages of minimal API? Minimal APIs are lightweight and have a fast execution as compared to traditional controller-based API. They can be built very quickly and easier for new developers to understand their codes.
Page Contents
ASP.NET Core Minimal API Project
In this article we are going to create a Minimal API Project from start and finish it by adding CRUD operations. This project will be called DailyWork and will be used to manage the daily works of people like us. These works will be stored in InMemory database and we will use Entity Framework Core to perform database operations.
This tutorial is a part of the ASP.NET Core Web API series which contains 5 tutorials to master this area:
- 1. API Controllers – Creating API in ASP.NET Core
- 2. How to Call Web API in ASP.NET Core
- 3. How to Call Web API from jQuery
- 4. Call Web API from JavaScript with XMLHttpRequest (XHR)
- 5. Create ASP.NET Core Minimal API from Start till Finish
The project will contain the following Minimal APIs:
| API | Description | Request Body | Response Body |
|---|---|---|---|
| GET /works | Get all the works that need to be done | None | Array of works |
| GET /works/complete | Get all completed works | None | Array of works |
| GET /works/{id} | Get a work by its id | None | A work with a given id |
| POST /works | Add a new work | Work that needs to be created | The newly created work |
| PUT /works/{id} | Update an existing work | Work that needs to be updated | None |
| DELETE /works/{id} | The work to be deleted | None | None |
Open Visual Studio and then create a new app by selecting ASP.NET Core Empty template. We use empty template since Minimal API uses minimum files & dependencies.
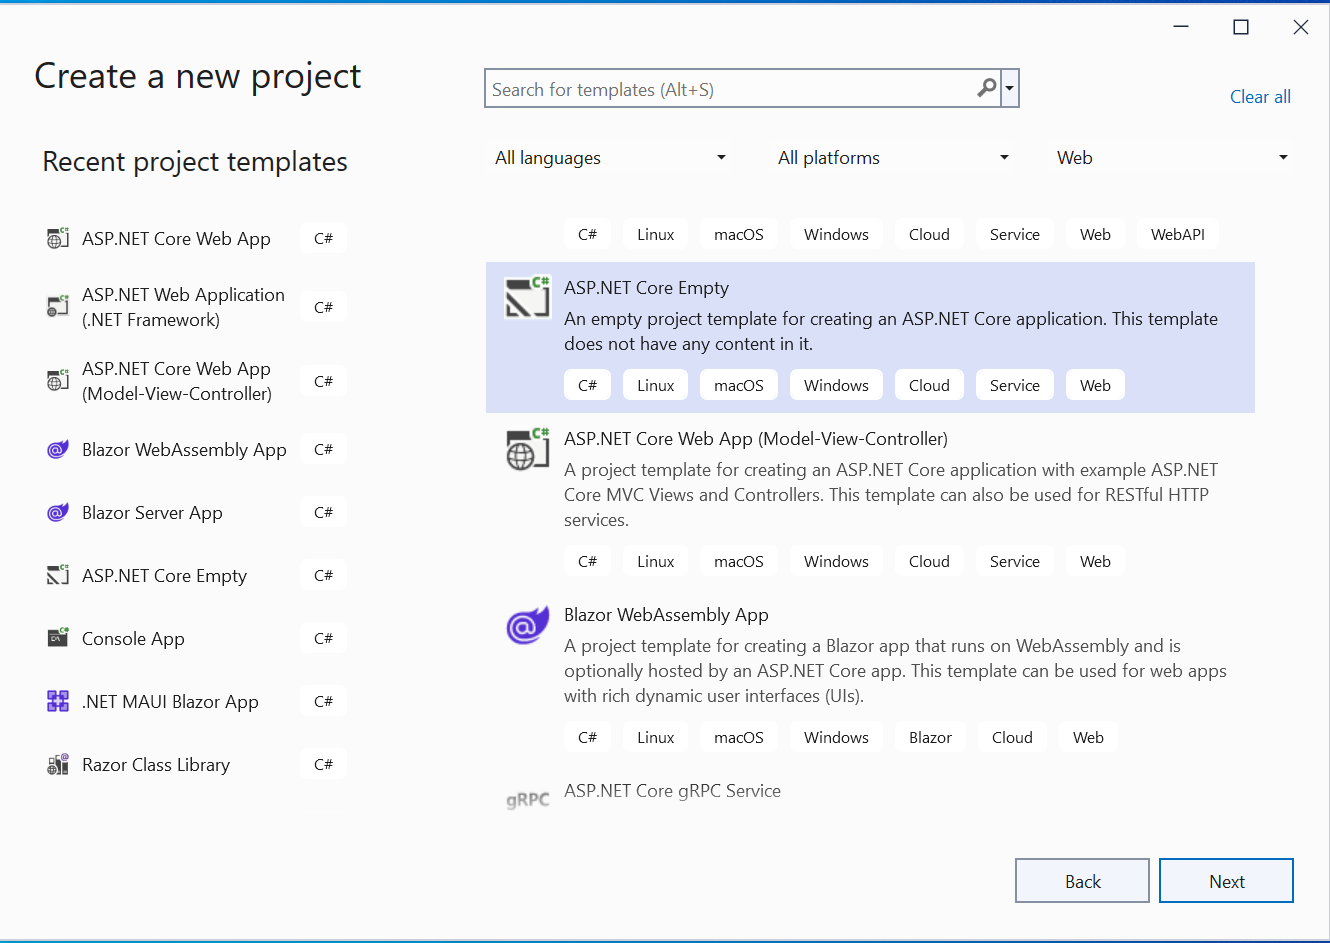
Name the app as DailyWork.
Database & Entity Framework Core
From the Tools ➤ NuGet Package Manager ➤ Manage NuGet Packages for Solution install the Microsoft.EntityFrameworkCore.InMemory package for the in-memory database for our Minimal API.

Now create a class called Work.cs with the following code:
public class Work
{
    public int Id { get; set; }

    public string Name { get; set; }

    public string TimeStart { get; set; }

    public string TimeEnd { get; set; }

    public bool IsComplete { get; set; }
}
This class will manage all the work of a person. For example the work id, name, whether it is complete or not, start and end time.
Next, create Database Context which will coordinate with Entity Framework Core and the database. Name this class WorkDB.cs and add the following code to it.
class WorkDb : DbContext
{
    public WorkDb(DbContextOptions<WorkDb> options)
		: base(options) { }

    public DbSet<Work> Works => Set<Work>();
}
Now the final thing is to register the Database Context on the Program.cs and specify the database name for the app. The following highlighted code needs to be added.
using DailyWork;
using Microsoft.EntityFrameworkCore;

var builder = WebApplication.CreateBuilder(args);

builder.Services.AddDbContext<WorkDb>(opt => opt.UseInMemoryDatabase("WorkDatabase"));

var app = builder.Build();

app.Run();
Create Minimal APIs
Now we start adding our Minimal API to manage daily works of any person. Note that the Minimal APIs should be added inside the “builder.Build” and “app.Run” in the Program.cs class.
var app = builder.Build();

// Minimal API code

app.Run();
Minimal API Post Type – Create Work
First, we need to add the API that will create a new work on the database. So, add the following code to your Program.cs class:
app.MapPost("/works", async (Work work, WorkDb db) =>
{
    db.Works.Add(work);
    await db.SaveChangesAsync();

    return Results.Created($"/works/{work.Id}", work);
});
This API is an HTTP POST type with endpoint /works. It implements MapPost to match POST type request. The parameters include a Work class object and a Database Context object, and saves them to the database using Entity Framework Core.
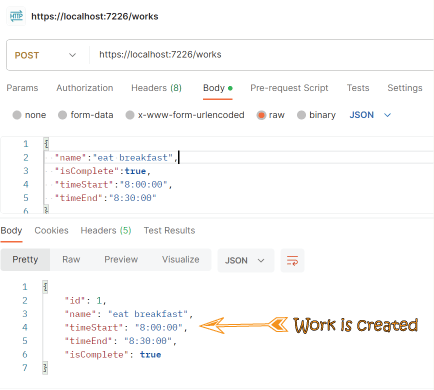
We can test the API through Postman. In Postman set –
- HTTP method to POST.
- URI to https://localhost:<port>/works
- In Body tab – select raw and set type to JSON.
In the request body enter the JSON:
{
  "name":"eat breakfast",
  "isComplete":true,
  "timeStart":"8:00:00",
  "timeEnd":"8:30:00"
}
Finally click the Send button.
The API will be called and a new work will be created. The Postman will show the created work json, see the screenshot below. Since it is the first work so id number 1 is given to it.
Congrats, our Minimal API is created and working properly. You can clearly see how quickly we have set it up, it hardly took just 5 minutes time. This is the power of Minimal API which you should definitely use in your apps.
Minimal API GET Type – Read Works
Here we have to create 3 API of GET type that will read the works. These are:
- Read All Works
- Read Completed Works
- Read a Work by it’s id
Add these 3 API codes to your Program class.
app.MapGet("/works", async (WorkDb db) =>
	await db.Works.ToListAsync());

app.MapGet("/works/complete", async (WorkDb db) =>
	await db.Works.Where(t => t.IsComplete).ToListAsync());

app.MapGet("/works/{id}", async (int id, WorkDb db) =>
	await db.Works.FindAsync(id)
		is Work work
			? Results.Ok(work)
			: Results.NotFound());
These 3 Minimal API implement MapGet method to match HTTP GET requests, however their endpoints are different. The API with /works endpoint simply returns all the works from the database.
The /works/complete API uses a “Where” condition to get all the completed works and returns them as a list in json format.
The remaining /works/{id} endpoint API, gets the work id in the URI itself and then uses FindAsync method to fetch it from the database.
First testing theGET /works Minimal API.
In Postman set –
- HTTP method to GET.
- URI to https://localhost:<port>/works
- Click Send button.
It produces a response similar to the following:
[
    {
        "id": 1,
        "name": "eat breakfast",
        "timeStart": "8:00:00",
        "timeEnd": "8:30:00",
        "isComplete": true
    }
]
Now testing theGET /works/complete Minimal API. Here we change the URI to https://localhost:<port>/works/complete, and click the Send button.
The output will show only the works that have the isComplete field “true”. Check this by adding a few works with isComplete field “false”. When you call the complete method, you will see only the completed works.
To test theGET /works{id} Minimal API.
In Postman set –
- HTTP method to GET.
- URI to https://localhost:<port>/works/1
- Click Send button.
It will give the following response.
{
    "id": 1,
    "name": "eat breakfast",
    "timeStart": "8:00:00",
    "timeEnd": "8:30:00",
    "isComplete": true
}
Minimal API PUT Type – Update a Work
Add the Update Minimal API which has a PUT endpoint /works/{id} which it implements using MapPut. The code is given below.
app.MapPut("/works/{id}", async (int id, Work work, WorkDb db) =>
{
    var todo = await db.Works.FindAsync(id);

    if (todo is null) return Results.NotFound();

    todo.Name = work.Name;
    todo.IsComplete = work.IsComplete;

    await db.SaveChangesAsync();

    return Results.NoContent();
});
A successful response returns 204 (No Content). The API requires the client to send the entire updated work in the request.
In Postman set –
- HTTP method to PUT.
- URI to https://localhost:<port>/works/1
- In Body tab – select raw and set type to JSON.
In the request body enter the JSON:
{
  "name":"go to work",
  "isComplete":true,
  "timeStart":"8:00:00",
  "timeEnd":"8:30:00"
}
Note that we changed the name to “go to work”.
Click the Send button to update this work.
Now make a new GET request to see the name is update to “go to work”.
Minimal API DELETE Type – Delete a Work
Finally we add the DELETE Minimal API that uses MapDelete method to delete a given work whose id is sent in the uri and returns status 204 on successful deletion. It’s code is shown below.
app.MapDelete("/works/{id}", async (int id, WorkDb db) =>
{
    if (await db.Works.FindAsync(id) is Work work)
    {
        db.Works.Remove(work);
        await db.SaveChangesAsync();
        return Results.NoContent();
    }
    return Results.NotFound();
});
In Postman set –
- HTTP method to DELETE.
- URI to https://localhost:<port>/works/1
- Click Send button.
This will delete the work with id 1 from the database.
The link to download the full source code of this tutorial is given below:
This completes the ASP.NET Core Minimal APIs where we have covered all the types GET, POST, PUT and DELETE. This hardly took no more than 20 minutes to learn and implement them in our app. I hope you enjoyed learning this great concept.




 Welcome to YogiHosting - A Programming Tutorial Website. It is used by millions of people around the world to learn and explore about ASP.NET Core, Blazor, jQuery, JavaScript, Docker, Kubernetes and other topics.