Host ASP.NET Core on Apache in Windows

Apache Web Server can be used to host ASP.NET Core apps. Here Apache is used as a reverse proxy server to redirect traffic to an ASP.NET Core web app running on Kestrel server. We will set the whole process in Windows 10 Operating System.
Page Contents
Install Apache in Windows
It should be noted that Apache developers does not provide an official windows package for this web server. However there are third party vendors who provide Apache Web Server installable package for Windows. We are going to use XAMPP package to install Apache on Windows.
This tutorial is a part of the .NET Hosting Series which contains a total of 5 tutorials, which are:
- How to Host ASP.NET Core App in a Windows Service
- Host ASP.NET Core app on IIS
- Host ASP.NET Core on Apache in Windows
- Host ASP.NET Core on Apache in Linux
- Host ASP.NET Core on Nginx in Linux
Download XAMPP and install it on your PC at C:\xampp location of your Windows OS. This is the default and most ideal place to run XAMPP on your pc.
Once the installation is finished run the xampp-control.exe file located inside the “xampp” folder.

The XAMPP Control panel will start and you can see options to run Apache, MySQL, FileZilla, and other softwares. Click the “Start” button for Apache and this will start Apache Web Server. I have shown this in the below image.

Now open http://localhost url on your brower and you will see a welcome page. Check the below image.

Publish an ASP.NET Core app
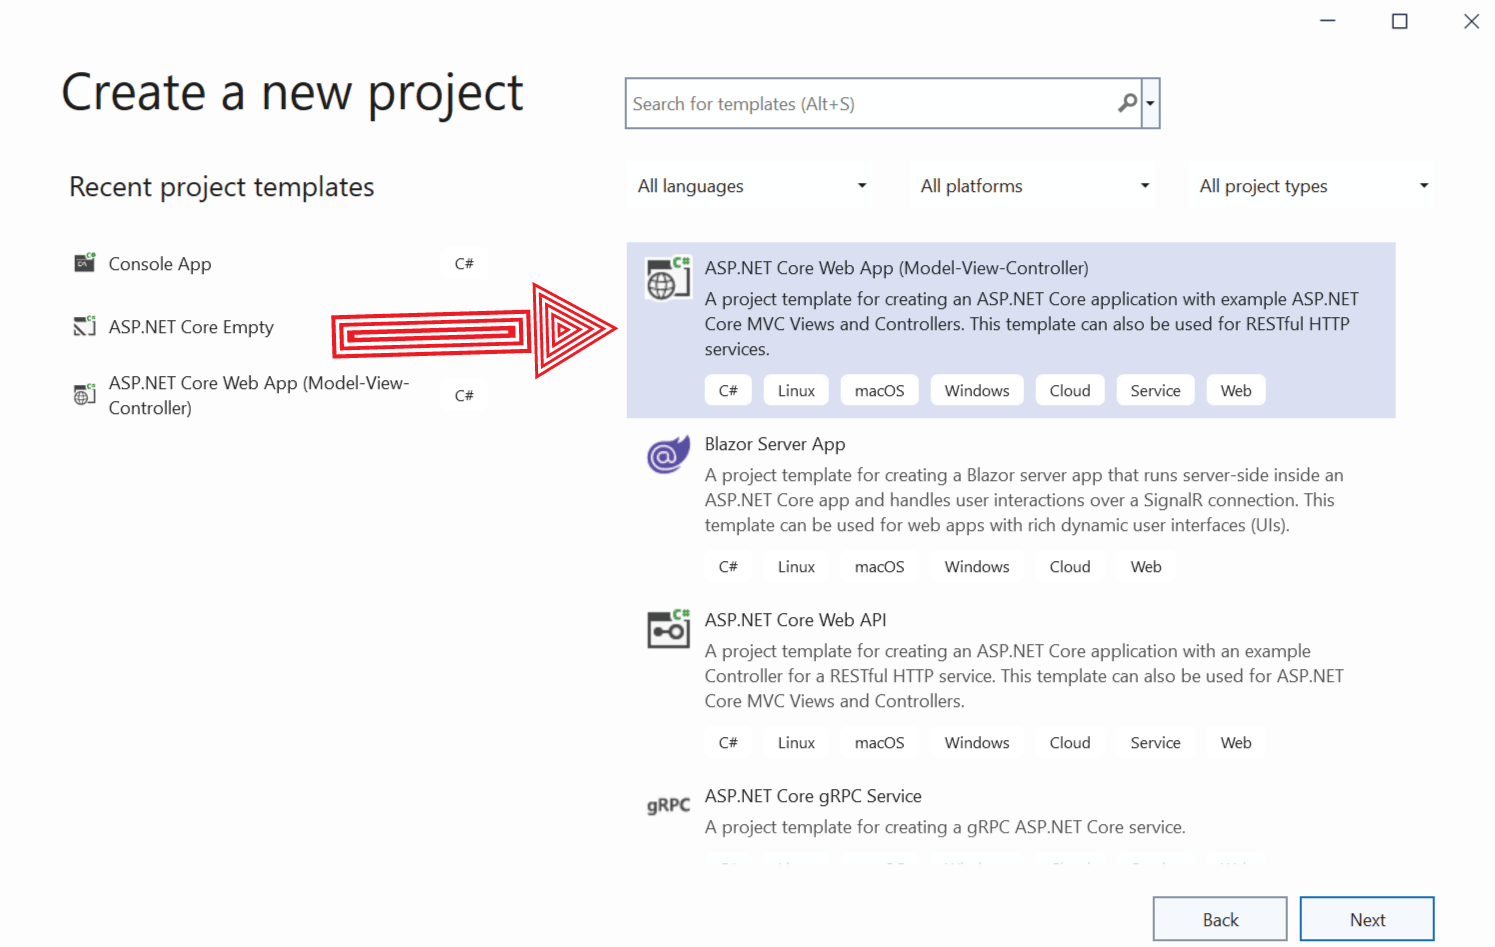
We are now ready to host our ASP.NET Core app on Apache running on Windows Operating System. First open Visual Studio and create a new ASP.NET Core MVC app and name it MyApp.
Since Apache acts as a reverse proxy and forward requests to Kestrel so we have to use the Forwarded Headers Middleware from the Microsoft.AspNetCore.HttpOverrides package. The middleware updates the Request.Scheme, using the X-Forwarded-Proto header, making redirect URIs, security policies, etc to work correctly.
We are using .NET 8.0 version for the app where this package comes installed by default so we don’t have to add it through NuGet. For previous versions of .NET it will be required to add this package from NuGet.
Next, open Program.cs class and import the namespace.
using Microsoft.AspNetCore.HttpOverrides;After that add the below given code just above the app.UseAuthentication() code line.
app.UseForwardedHeaders(new ForwardedHeadersOptions
{
    ForwardedHeaders = ForwardedHeaders.XForwardedFor | ForwardedHeaders.XForwardedProto
});
The app now uses ForwardedHeaders and is ready for Apache.
We will now publish the app. Right click on the app name in Solution Explorer and select Publish option. Next, select the “Folder” option since we will publish the app to a location on the drive.

After that select the folder location where the published app files will be created. I have chosen the default folder location which is bin\Release\net8.0\publish\. Click the “Finish” button to save the publish settings.

Finally, click the Publish button to publish the app. See the below image:

Host ASP.NET Core App on Apache in XAMPP running on Windows
In XAMPP, all our app files are put inside C:\xampp\htdocs folder. So create a new folder called myapp inside “C:\xampp\htdocs”. Move all the published app files, that are inside the “publish” folder, to the “myapp” folder.

Go inside the “myapp” folder where you will find MyApp.exe file. Double click on it to run the app from Kestrel web server. Now our app is running on Kestrel and available on http://localhost:5000. Check the below image.

We now have to perform some Apache Configurations so that Apache can redirect the traffic to kestrel.
Apache Configurations in XAMPP
In XAMPP all Apache files are kept inside the C:\xampp\apache folder. The httpd.conf file located inside C:\xampp\apache\conf is the main configuration file for the Apache HTTP Server. In this file we have to enable 2 Apache Modules which are:
- headers_module
- proxy_http_module
Open it on notepad. You will find them commented by the “#” sign added before them. Remove the # signs before both of them and save the file. These 2 modules are given below.
LoadModule headers_module modules/mod_headers.so
LoadModule proxy_http_module modules/mod_proxy_http.so
We will now dd our .NET app’s configurations to Apache Virtual Host file called httpd-vhosts.conf. This file is located inside the C:\xampp\apache\conf\extra location. Open httpd-vhosts.conf on notepad for editing purpose.
Go to the end of this file and add VirtualHost section given below. Then save this file.
<VirtualHost *:*>
    RequestHeader set "X-Forwarded-Proto" expr=%{REQUEST_SCHEME}
</VirtualHost>

<VirtualHost *:80>
    ProxyPreserveHost On
    ProxyPass / http://127.0.0.1:5000/
    ProxyPassReverse / http://127.0.0.1:5000/
    ServerName localhost
    ServerAlias *.localhost
    ErrorLog C:/xampp/apache/logs/error.log
</VirtualHost>
Here we have told Apache to accepts public traffic on port 80. ProxyPass and ProxyPassReverse values are given as the kestrel url for the hosted app. ServerName and ServerAlias value is localhost since we are hosting the .NET app locally. The ErrorLog contains the file where errors will be saved.
Let’s check if all the configurations are written correctly. For this open Shell given in the XAMPP Control Panel. Here run the command httpd -t and voila, everything is ok. Check the below image.

For Apache to take the new changes, Stop it and then Run it again from XAMPP Control panel. Also make sure the Kestrel server is running. Now open the URL – http://localhost on the browser. This will open the .NET App hosted on Apache in Windows. Check given below image showing my app is running.

Host ASP.NET Core App with SSL on Apache
We will create a self-signed SSL certificate and use it for our ASP.NET Core app hosted on Apache. We will use OpenSSL which is a Linux based utility to generate our SSL.
First we generate private key by the below given command.
openssl genrsa -des3 -out myapp.key 2048When it asks for a “pass phrase” enter a strong password and remember it.
Now create the insecure key, the one without a passphrase, and shuffle the key names:
openssl rsa -in myapp.key -out myapp.key.insecure
mv myapp.key myapp.key.secure
mv myapp.key.insecure myapp.key
Next create Certificate Signing Request by the below command. Here you will be asked to enter your country, city, organization, etc. Just remember to fill Common Name field value as the name of the domain for the app. I will be hosting the app from myapp.com so I gave this as the value for the common name field.
openssl req -new -key myapp.key -out myapp.csrFinally, create the SSL by running the below command.
openssl x509 -req -days 365 -in myapp.csr -signkey myapp.key -out myapp.crtIn the below Image I have shown all these steps. Check them carefully.

Four files are created:
- myapp.crt – it is the SSL Certificate.
- myapp.key – it is the private key.
- myapp.key.insecure – insecure private key.
- myapp.csr – certificate signing request.
Apache will only need the SSL Certificate and Private Key. So move myapp.crt & myapp.key files to the C:\xampp\htdocs\myapp folder where the app’s published files are kept.
After this we need to update the VirtualHost section in the httpd-vhosts.conf to use the SSL Certificate and also perform redirection in Apache from http to https version of the url. The updated code is given below:
<VirtualHost *:*>
    RequestHeader set "X-Forwarded-Proto" expr=%{REQUEST_SCHEME}
</VirtualHost>

<VirtualHost *:80>
    ServerName            myapp.com
    ServerAlias           *.myapp.com
    Redirect permanent     / https://myapp.com
</VirtualHost>

<VirtualHost *:443>
    Protocols             h2 http/1.1
    ProxyPreserveHost     On
    ProxyPass             / http://127.0.0.1:5000/
    ProxyPassReverse      / http://127.0.0.1:5000/
    ServerName            myapp.com
    ServerAlias           *.myapp.com
    ErrorLog              C:/xampp/apache/logs/error.log
    SSLEngine             on
    SSLProtocol           all -SSLv3 -TLSv1 -TLSv1.1
    SSLHonorCipherOrder   off
    SSLCompression        off
    SSLSessionTickets     on
    SSLUseStapling        off
    SSLCertificateFile    C:/xampp/htdocs/myapp/myapp.crt
    SSLCertificateKeyFile C:/xampp/htdocs/myapp/myapp.key
    SSLCipherSuite        ECDHE-ECDSA-AES128-GCM-SHA256:ECDHE-RSA-AES128-GCM-SHA256:ECDHE-ECDSA-AES256-GCM-SHA384:ECDHE-RSA-AES256-GCM-SHA384:ECDHE-ECDSA-CHACHA20-POLY1305:ECDHE-RSA-CHACHA20-POLY1305:DHE-RSA-AES128-GCM-SHA256:DHE-RSA-AES256-GCM-SHA384
</VirtualHost>
Note that we opened 443 port also to receive secured https requests. The SSLCertificateFile is provided with the location of the SSL certificate and SSLCertificateKeyFile is for the private key location. The ServerName and ServerAlias now have the value of “myapp.com” instead of earlier “localhost”. Also we have added Redirect permanent / https://myapp.com in port 80 block of VirtualHost to redirect http request to https.
Finally, we also need to add entry for “myapp.com” in the etc/hosts file. This file is located on C:\Windows\System32\drivers\etc directory. Open notepad in administrator mode and then in menu, go to “File > Open” and select “All Files”, you will now see this “hosts” file. Select it and open it for editing.

At the very end of this file add the below entry and save it.
127.0.0.1 myapp.comWell that’s it, restart Apache once more and open myapp.com on the browser. You will see warning for self-signed certificates saying “Your connection isn’t private”. Click “Advanced” button and select “Continue to myapp.com (unsafe)”. The site now opens in https version.

Click the “Not secure” button the browser and view the certificate.

We have successfully hosted an ASP.NET Core app on Apache in Windows. We also implemented SSL usage in Apache and redirected http to https requests. Hope you enjoyed learning from it. Let me know your thoughts in the comments section below.
SHARE THIS ARTICLE
Related Tutorials:


ABOUT THE AUTHOR
I hope you enjoyed reading this tutorial. If it helped you then consider buying a cup of coffee for me. This will help me in writing more such good tutorials for the readers. Thank you.

HELLO EVERYONE
 Welcome to YogiHosting - A Programming Tutorial Website. It is used by millions of people around the world to learn and explore about ASP.NET Core, Blazor, jQuery, JavaScript, Docker, Kubernetes and other topics.
SUBSCRIBE TO NEWSLETTER
Enter your email address to subscribe to this blog and receive notifications of new posts by email.
Join 90K other subscribers