


Duende IdentityServer with ASP.NET Core Identity and MongoDB as Database [Detailed Guide]
![Duende IdentityServer with ASP.NET Core Identity and MongoDB as Database [Detailed Guide]](https://www.yogihosting.com/wp-content/uploads/2021/08/IdentityServer-MongoDB-Identity.png "Duende IdentityServer with ASP.NET Core Identity and MongoDB as Database [Detailed Guide]")
This tutorial shows you how to set up Duende IdentityServer with ASP.NET Core Identity from scratch, using MongoDB as the underlying database. We’ll configure ASP.NET Core Identity to store client credentials in MongoDB. When a client requests authentication from IdentityServer, those credentials are validated directly against the MongoDB database through ASP.NET Core Identity.
By the end of this guide, you’ll have a fully secured Web API protected by Duende IdentityServer — built entirely from the ground up.
The source codes are given in GitHub repository.
Page Contents
- ASP.NET Core Identity with MongoDB as Database
- Duende IdentityServer with ASP.NET Core Identity and MongoDB as Database
- Duende IdentityServer Role and Policy Based Authentication
- ASP.NET Core – Duende IdentityServer authentication and authorization with Identity
What is IdentityServer?
IdentityServer acts as a central Authentication Server for applications allowing sign-on/sign-out and access control. IdentityServer uses OpenID Connect to verify the identity of clients and OAuth 2.0 framework for authorizing resources to authenticated clients. IdentityServer provides JWT tokens to clients and with these token they can identify themselves on the secured endpoints. IdentityServer is developed by Duende Software so it is also known as “Duende IdentityServer”.
Centralizing your authentication provider is a smart architectural choice — it eliminates the need to implement authentication logic separately in every application. Instead, IdentityServer acts as a single, centralized access control layer, securing all of your applications through one unified system.
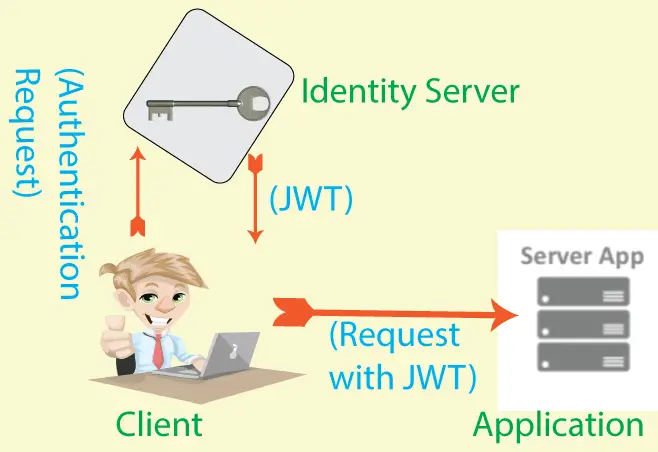
Duende IdentityServer has following features:
- Authentication Service
- Sign-on/Sign-out
- Access Control for APIs
- Federation Gateway for external identity providers like Azure Active Directory, Google, Facebook etc
What we will build?
Project 1: A Duende IdentityServer project with users stored in a MongoDB database.
Project 2: A Client Project containing secured Web API. This Web API is protected by IdentityServer.
You as a user will try to access the Web API on the browser. But before that you will need to authenticate yourself before IdentityServer. IdentityServer will check your credentials stored in the MongoDB database by ASP.NET Core Identity. Then provide you with an access token which you can then use to access the Web API on the browser.
IdentityServer vs ASP.NET Core Identity : IdentityServer provides authentication services via JWT tokens and uses OAuth 2.0 and OpenID Connect. ASP.NET Core Identity on the other hand is a framework that manages users, passwords, profile data, roles, claims, tokens, email confirmations, and more. Both IdentityServer and Identity are used together for creating highly secured systems.
IdentityServer OpenID Connect OAuth 2.0
IdentityServer implements the OpenID Connect and OAuth 2.0 protocols to handle authentication and authorization. OAuth 2.0 is an authorization protocol that grants third-party applications controlled access to resources on behalf of a user or client. OpenID Connect builds on top of OAuth 2.0, allowing clients to verify a user’s identity based on the authentication performed by IdentityServer.
Let us understand it with an example.
Suppose you make a request to a Web API secured by IdentityServer. The following things will happens:
- The Web API will say – ‘hey I want to verify your identity so I will redirect you to IdentityServer through OAuth 2.0 protocol’.
- IdentityServer will present you a login form so that you can login to your account.
- Once login, OAuth 2.0 will redirect you back to the Web API but this time you also have JWT access token with you. This access token is provided by IdentityServer.
- The Web API will now use OpenID Connect to verify your identity based on the token provided by IdentityServer. And now, you can access the Web API.
Creating Duende IdentityServer Project
Start by creating a new ASP.NET Core MVC app in Visual Studio and naming it ISExample. Then configure ASP.NET Core Identity to it. Next, configure ASP.NET Core Identity within the project. You can use any database for Identity — such as SQL Server or MongoDB — but make sure it includes login and logout views so users can sign in and out of their accounts.
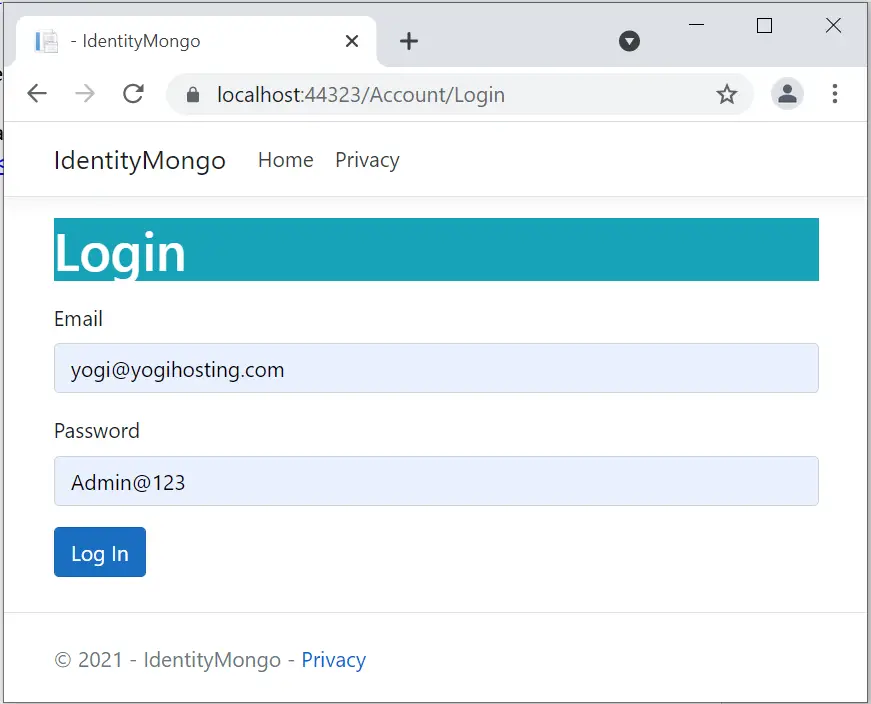
This project is already built and explained in detail in a previous tutorial: ASP.NET Core Identity with MongoDB. You can download the complete project directly from that tutorial. The image below shows the login screen for this project.
Next, we will setup Duende Identity Server in this project.
Setup Duende IdentityServer in ASP.NET Core
First install the following 2 packages to the project.
- Duende.IdentityServer
- Duende.IdentityServer.AspNetIdentity
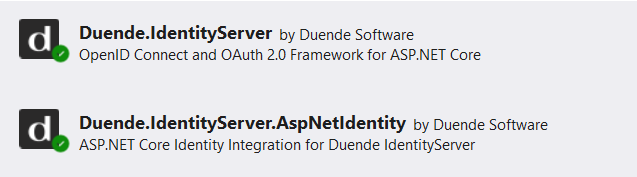
After the installation of the packages, it’s time to configure IdentityServer in the ASP.NET Core app.
IdentityServer settings in appsettings.json
We will keep the settings of Duende IdentityServer in appsettings.json file. In Program.cs, we will read these settings and configure IdentityServer.
So, add these settings shown in highlighted way to your “appsettings.json” file.
{
  "MongoDbConfig": {
    "Name": "Identity",
    "Host": "localhost",
    "Port": 27017
  },
  "IdentityServerSettings": {
    "Clients": [
      {
        "ClientId": "zorro",
        "AllowedGrantTypes": [
          "authorization_code"
        ],
        "RequireClientSecret": false,
        "RedirectUris": [
          "urn:ietf:wg:oauth:2.0:oob",
          "https://localhost:6001/signin-oidc"
        ],
        "AllowedScopes": [
          "openid",
          "profile",
          "fullaccess"
        ],
        "AlwaysIncludeUserClaimsInIdToken": true,
        "AllowOfflineAccess": true
      }
    ],
    "ApiScopes": [
      {
        "Name": "fullaccess"
      }
    ],
    "ApiResources": [
      {
        "Name": "IS4API",
        "Scopes": [
          "fullaccess"
        ],
        "UserClaims": [
          "role"
        ]
      }
    ]
  }
}
Note: The “MongoDbConfig” section contains the configuration settings for the MongoDB database. As discussed earlier, MongoDB is configured here to serve as the Identity database. I have explained the complete MongoDB configuration process in my previous tutorial, which you should definitely check out for a deeper and better understanding of the subject.
Now, let’s discuss each of these Duende IdentityServer settings one by one.
What are IdentityServer Clients
A client requests authentication tokens from IdentityServer. They must be registered in IdentityServer because only the registered clients can ask for tokens, requests from unregistered clients are not entertained at all.
In the json, I have defined the different properties of the client, these are ClientId, AllowedGrantTypes, RequireClientSecret, RedirectUris, and so on.
"Clients": [
    {
      "ClientId": "zorro",
      "AllowedGrantTypes": [
        "authorization_code"
      ],
      "RequireClientSecret": false,
      "RedirectUris": [
        "urn:ietf:wg:oauth:2.0:oob",
        "https://localhost:6001/signin-oidc"
      ],
      "AllowedScopes": [
        "openid",
        "profile",
        "fullaccess"
      ],
      "AlwaysIncludeUserClaimsInIdToken": true,
      "AllowOfflineAccess": true
    }
]ClientId: It is the id of the client which can be any name like test, postman, MyApp. etc. Here I have given it name as “Zorro”. Later, you will see that the Client Project has to specify this name when it will ask for tokens. Failing to provide a correct ClientId will result in getting invalid_client error response from IdentityServer.
More than one client can also be added as shown below:
"Clients": [
    {
         // client 1
    },
    {
         // client 2
    }
]
Each client is provided with individual values which they will use during interaction with IdentityServer. Some important ones are:
AllowedGrantTypes : This tells the IdentityServer that a particular client application is only permitted to use the “Authorization Code” grant type when requesting tokens (access tokens, ID tokens, etc.).
"AllowedGrantTypes": [
  "authorization_code"
]
Why authorization_code specifically?
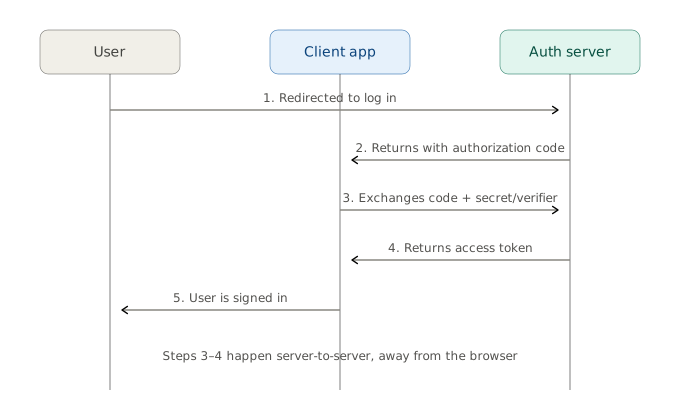
This is the most secure and recommended flow for apps that involve a user logging in (web apps, mobile apps, SPAs with PKCE). It works like this:
- User is redirected to the authorization server to log in.
- After login, the server redirects back to the app with a temporary authorization code.
- The app exchanges this code (server-side, along with a client secret or PKCE verifier) for an access token.
See the below image which explains this flow:
Well, you don’t have to perform these steps as they will be taken care by OpenID Connect. If you want to dive deep then see my tutorial on Implementing Google Contacts API where I have implemented these steps manually in C#.
RequireClientSecret : specify if the client needs a secret to request tokens. I have specified this as false. It’s default value is true, in that case you will have to add the Client Secret on the appsettings.json, and also the client project will have to provide this secret when it will ask for tokens.
"RequireClientSecret": falseProviding invalid secret when RequireClientSecret is true will result in invalid_client error returned by IdentityServer.
RedirectUris : This is the allow-list of URIs the IdentityServer is permitted to send the user back to after login, along with the authorization code. It’s a core anti-hijacking control in OAuth: the server will only redirect to one of these exact values — nothing else, even if the client requests it at runtime.
"RedirectUris": [
  "urn:ietf:wg:oauth:2.0:oob",
  "https://localhost:6001/signin-oidc"
]- urn:ietf:wg:oauth:2.0:oob – This is a special reserved value called “out-of-band” (OOB). It means: don’t redirect through a browser URL at all — instead, display the authorization code directly to the user (e.g., on a plain webpage: “Your code is: XYZ123. Copy and paste it into the app.”). This uri is used by API testing software like Postman for API testing purpose. In production you should not add this uri.
- https://localhost:6001/signin-oidc – This is a standard web-based redirect URI — this is where the browser gets sent after login, and it’s the conventional path name ASP.NET Core’s OpenID Connect middleware uses by default (/signin-oidc) to receive and process the authorization code. localhost:6001 indicates this is a development configuration; a real deployment would use a real domain. Note that the “localhost:6001” is the uri of the client project, the client project will have OpenID Connect configured in it. We will come back to this thing when we will create the Client Project.
AllowedScopes – this array lists the scopes the zorro client is allowed to request when it asks IdentityServer for tokens. Think of it as a whitelist — even if a client tries to request other scopes, IdentityServer will reject anything not in this list for that client.
"AllowedScopes": [
  "openid",
  "profile",
  "fullaccess"
]
Here I provided just 3 scopes:
- openid – this is a required scope for any OpenID Connect flow. It tells IdentityServer “I want authentication, not just an access token” — it’s what triggers the issuance of an ID token (a JWT that proves who the user is: their subject ID, when they authenticated, etc.). Without openid, you’re doing plain OAuth2 (authorization only), not OIDC (authentication).
- profile – a standard OIDC scope. When requested, it tells IdentityServer to include standard profile-related claims about the user — things like name, given_name, family_name, picture, updated_at, etc. (whichever of these the user’s claims actually have values for). These claims land either in the ID token (because of AlwaysIncludeUserClaimsInIdToken: true in the appsettings.json) or are retrievable via the UserInfo endpoint.
- fullaccess – this is not a standard/built-in scope — it’s the custom API scope. Requesting this scope is what causes IdentityServer to issue an access token that’s valid for calling your IS4API resource. Without this scope in the request, the client would only get an ID token (proving login) but no usable access token for hitting your API.
AlwaysIncludeUserClaimsInIdToken – it specifies if you want to include user claims in Id token. It must be set to true.
"AlwaysIncludeUserClaimsInIdToken": trueClaims are name/value pairs that contain information about a user eg Name is a claim of a user, similarly role, email, address are also claims.
AllowOfflineAccess – This setting controls whether the zorro client is permitted to obtain refresh tokens.
"AllowOfflineAccess": trueWhen a client requests offline_access and is authorized for it via this flag, IdentityServer will issue a refresh token alongside the access token.
Check the below image to understand this process:
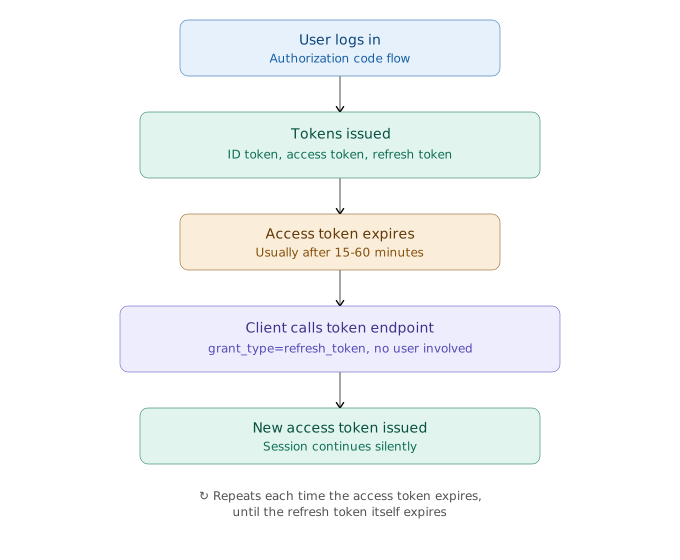
Access tokens are deliberately short-lived (often 15–60 minutes) for security — if one leaks, the exposure window is small. But that creates a UX problem: without a refresh token, once the access token expires, the user would need to be redirected back through the full login flow again to get a new one.
A refresh token solves this: it’s a long-lived credential the client stores, which it can silently exchange for a new access token (and often a new refresh token too) — no user interaction, no redirect, no re-entering credentials.
What are IdentityServer ApiScopes
ApiScopes are one of the core building blocks in Duende IdentityServer’s (and OAuth2/OIDC’s) resource model. They represent permissions that can be requested and granted for accessing an API — the “what can this token do” part of a token, as opposed to “who is this user.”
I defined a custom ApiScope called “fullaccess” for the ApiScope.
"ApiScopes": [
  {
    "Name": "fullaccess"
  }
]
So remember, an API Scope represents a permission that a client can request to access an API. In our case it means that a client can request permission called fullaccess.
Recall, the AllowedScopes section contains the fullaccess scope.
"AllowedScopes": [
  "openid",
  "profile",
  "fullaccess"
]
This means the client zorro is allowed to request the “fullaccess” scope.
How it connects with your API Resource
I also have:
"ApiResources": [
  {
    "Name": "IS4API",
    "Scopes": [
      "fullaccess"
    ],
    "UserClaims": [
      "role"
    ]
  }
]
This creates the following relationship:
Client: zorro
       │
       │ Requests scope
       ▼
   fullaccess
       │
       │ Belongs to
       ▼
 API Resource: IS4API
       │
       ▼
Protected API
Here, I have defined just a single custom Api Scopes but we can also have multiple API Scopes, see the example given below.
"ApiScopes": [
  {
    "Name": "fullaccess"
  },
  {
    "Name": "read"
  },
  {
    "Name": "write"
  }
],
What are IdentityServer ApiResources
APIResources represents an APIs or logical protected resources in Duende IdentityServer. In my case it is IS4API.
"ApiResources": [
  {
    "Name": "IS4API",
    "Scopes": [
      "fullaccess"
    ],
    "UserClaims": [
      "role"
    ]
  }
]
"Scopes": ["fullaccess"] – this associates the “fullaccess” API scope with the “IS4API” resource.
"UserClaims": ["role"] – this tells Duende IdentityServer that when creating an access token for the “IS4API” resource, the API may need the user’s role claim.
I gave it a name “IS4API”, when we will request for token in the client project, then we will have to provide this same name for the “Audience”. We will see this thing in details later on.
Defining IdentityServer settings class
We can now define a C# class that will be populated with the Duende IdentityServer settings stored in the appsettings.json. So, create a new class called IdentityServerSettings.cs inside the “Settings” folder of the project and add the following code to it.
using Duende.IdentityServer.Models;

namespace ISExample.Settings
{
    public class IdentityServerSettings
    {
        public IReadOnlyCollection<ApiScope> ApiScopes { get; init; }
        public IReadOnlyCollection<ApiResource> ApiResources { get; init; }

        public IReadOnlyCollection<Client> Clients { get; init; }

        public IReadOnlyCollection<IdentityResource> IdentityResources =>
            new IdentityResource[]
            {
                new IdentityResources.OpenId(),
                new IdentityResources.Profile(),
                new IdentityResource("roles", "User role(s)", new List<string> { "role" })
            };
    }
}
The properties – ApiScopes, ApiResources, Clients are the same once which we have added in the appsettings.json.
There is another property called IdentityResources which will hold the user data like userId, email, and phone number. We defined 2 resources – OpenId and Profile. Identity resources define which user identity claims can be requested and returned, primarily through the ID token and/or UserInfo endpoint, depending on the IdentityServer configuration and requested scopes. OpenId provides the sub claim, which uniquely identifies the user, while Profile provides profile-related claims such as first name, last name, and other standard user information.
With all that said it’s time to go to Program class where we will actually configure IdentityServer.
Configure IdentityServer on Program.cs
We configure IdentityServer on the Program.cs class. Add the below code lines to your program class.
var identityServerSettings = builder.Configuration.GetSection(nameof(IdentityServerSettings)).Get<IdentityServerSettings>();

builder.Services.AddIdentityServer(options =>
    {
        options.Events.RaiseErrorEvents = true;
        options.Events.RaiseFailureEvents = true;
        options.Events.RaiseErrorEvents = true;
    })
    .AddAspNetIdentity<ApplicationUser>()
    .AddInMemoryApiScopes(identityServerSettings.ApiScopes)
    .AddInMemoryApiResources(identityServerSettings.ApiResources)
    .AddInMemoryClients(identityServerSettings.Clients)
    .AddInMemoryIdentityResources(identityServerSettings.IdentityResources)
    .AddDeveloperSigningCredential();
First we populate the IdentityServerSettings.cs, which we created earlier, with the values stored in appsettings.json. This is done by reading ASP.NET Core appsettings.json from GetSection method of IConfigurationSection.
Next, we register Duende IdentityServer with the IServiceCollection by calling the AddIdentityServer method. IdentityServer provides several methods for configuring different aspects of IdentityServer in our application. These methods are configured using the corresponding values defined in the IdentityServerSettings class.
- AddAspNetIdentity : set it as a ApplicationUser type.
- AddInMemoryApiScopes : adds in-memory API scopes.
- AddInMemoryApiResources : adds in-memory API resources.
- AddInMemoryClients : adds in-memory clients.
- AddInMemoryIdentityResources : adds in-memory identity resources.
We also enabled events for success, error and failure. These will show the helpful messages on the console, an approach which you should use for debugging.
{
    options.Events.RaiseErrorEvents = true;
    options.Events.RaiseFailureEvents = true;
    options.Events.RaiseSuccessEvents = true;
})
AddDeveloperSigningCredential : This method generates a temporary signing key when the application starts. IdentityServer uses this key to digitally sign the tokens it issues, helping ensure that the tokens cannot be tampered with or forged. This method is intended for development purposes only and should not be used in a production environment.
The generated signing key is persisted to the file system, allowing the same key to be reused across application restarts. In a production environment, you should configure a proper signing certificate or key by using the AddSigningCredential method.
The final step is to add the IdentityServer middleware to the application’s request pipeline. This middleware exposes the OpenID Connect endpoints provided by IdentityServer. Add app.UseIdentityServer() in the Program class, immediately after the UseRouting middleware.
app.UseIdentityServer();I want the app should run from port 5001. It can be any port of your choice. So I go to launchsettings.json and then inside “https” section, I change the port to 5001.
"https": {
  "commandName": "Project",
  "dotnetRunMessages": true,
  "launchBrowser": true,
  "applicationUrl": "https://localhost:5001;http://localhost:5270",
  "environmentVariables": {
    "ASPNETCORE_ENVIRONMENT": "Development"
  }
}
Now run the application for the first time, and check the Solution Explorer window to find a new file is create by the name of tempkey.jwk. It is a JSON Web Key (JWK) file that IdentityServer generates when you use AddDeveloperSigningCredential(). It contains a cryptographic signing key in JSON format. IdentityServer uses this key to digitally sign the tokens it issues, such as access tokens and identity tokens.
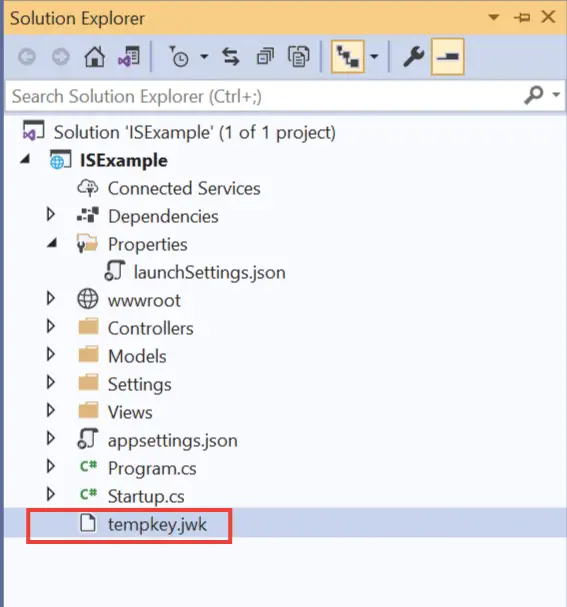
Congrats, Duende IdentityServer has been successfully setup in our project.
IdentityServer Discovery Endpoint
IdentityServer’s Discovery Endpoint provides it’s metadata like supported scopes, authorization endpoint, token endpoint and many other information. All these information are collectively called as Discovery Document. These metadata can be retrieved by the client applications to configure themselves accordingly.
Identity Server Discovery Endpoint can be accessed at the uri /.well-known/openid-configuration. In our IdentityServer project it’s url is – https://localhost:5001/.well-known/openid-configuration. The port will be different in your case. So, when we open this uri on the browser we are presented with the metadata information in json.
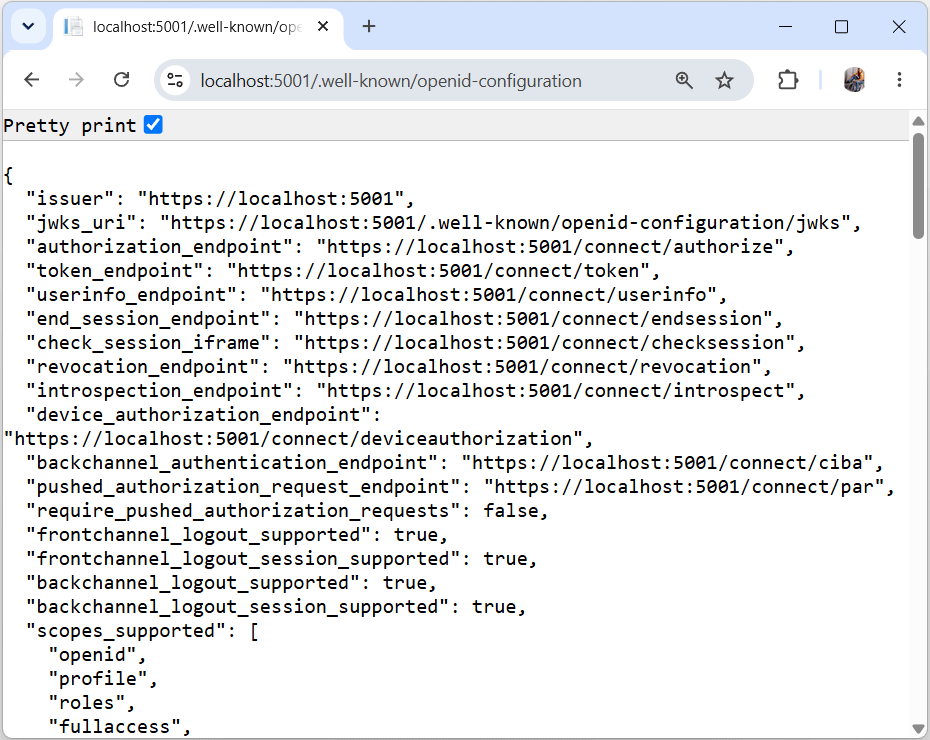
Important things to see in the JSON are the 5 things –
- authorization_endpoint
- token_endpoint
- scopes_supported
- claims_supported
- grant_types_supported
See below:
{
    "issuer": "https://localhost:5001",
    "jwks_uri": "https://localhost:5001/.well-known/openid-configuration/jwks",
    "authorization_endpoint": "https://localhost:5001/connect/authorize",
    "token_endpoint": "https://localhost:5001/connect/token",
    "userinfo_endpoint": "https://localhost:5001/connect/userinfo",
    "end_session_endpoint": "https://localhost:5001/connect/endsession",
    "check_session_iframe": "https://localhost:5001/connect/checksession",
    "revocation_endpoint": "https://localhost:5001/connect/revocation",
    "introspection_endpoint": "https://localhost:5001/connect/introspect",
    "device_authorization_endpoint": "https://localhost:5001/connect/deviceauthorization",
    "frontchannel_logout_supported": true,
    "frontchannel_logout_session_supported": true,
    "backchannel_logout_supported": true,
    "backchannel_logout_session_supported": true,
    "scopes_supported": [
        "openid",
        "profile",
        "fullaccess",
        "offline_access"
    ],
    "claims_supported": [
        "sub",
        "name",
        "family_name",
        "given_name",
        "middle_name",
        "nickname",
        "preferred_username",
        "profile",
        "picture",
        "website",
        "gender",
        "birthdate",
        "zoneinfo",
        "locale",
        "updated_at",
        "role"
    ],
    "grant_types_supported": [
        "authorization_code",
        "client_credentials",
        "refresh_token",
        "implicit",
        "password",
        "urn:ietf:params:oauth:grant-type:device_code"
    ],
    "response_types_supported": [
        "code",
        "token",
        "id_token",
        "id_token token",
        "code id_token",
        "code token",
        "code id_token token"
    ],
    "response_modes_supported": [
        "form_post",
        "query",
        "fragment"
    ],
    "token_endpoint_auth_methods_supported": [
        "client_secret_basic",
        "client_secret_post"
    ],
    "id_token_signing_alg_values_supported": [
        "RS256"
    ],
    "subject_types_supported": [
        "public"
    ],
    "code_challenge_methods_supported": [
        "plain",
        "S256"
    ],
    "request_parameter_supported": true
}
The authorization_endpoint is used to interact with the client project and obtain an authorization Grant while the token_endpoint is the IdentityServer’s uri which provides token for authenticated users.
The scopes_supported is what we set in the appsettings.json file earlier. Notice the “authorization_code” is available in the grant_types_supported, we set it on the appsettings.json.
Creating the Client Project
Our IdentityServer is up and running, it’s time to create the Client Project. So, create a new ASP.NET Core Web API project and name it ISClient.
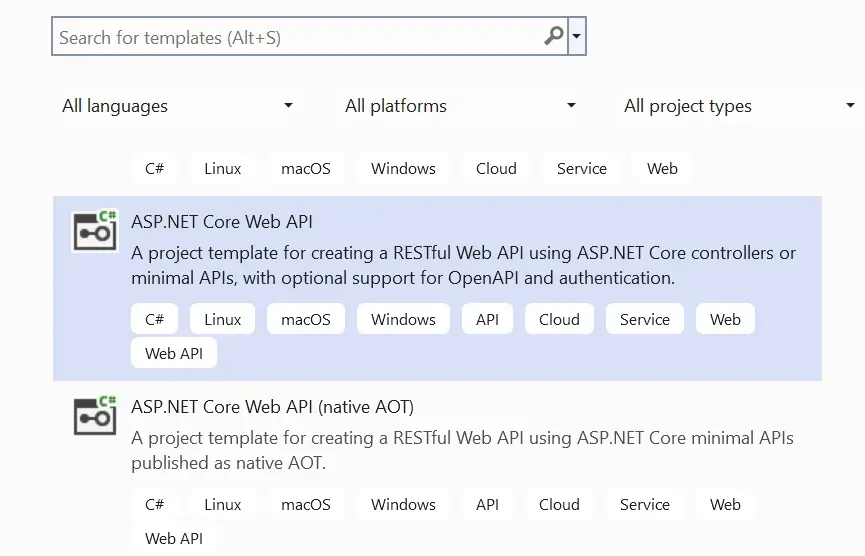
This Web API comes prebuilt with a WeatherForecast API which can be accessed from the uri – /WeatherForecast.
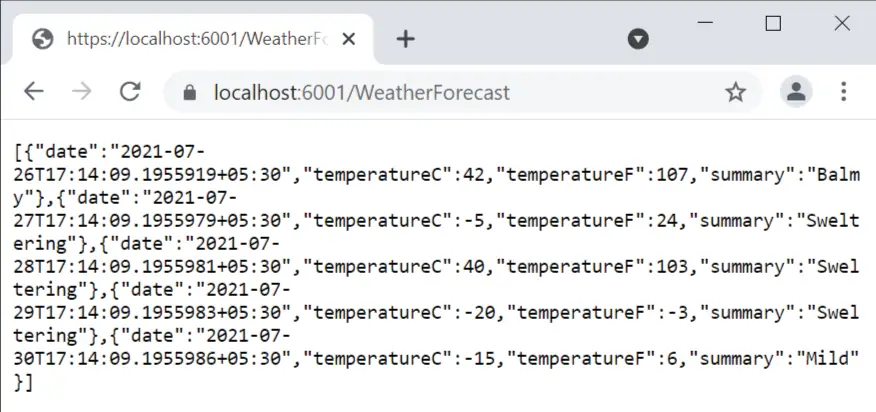
Our goal is to secure this Web API from IdentityServer.
Next, go to the launchSettings.json and change the applicationUrl to 6001 and 6000 ports for the https {…} block.
"https": {
  "commandName": "Project",
  "dotnetRunMessages": true,
  "launchBrowser": true,
  "launchUrl": "weatherforecast",
  "applicationUrl": "https://localhost:6001;http://localhost:6000",
  "environmentVariables": {
    "ASPNETCORE_ENVIRONMENT": "Development"
  }
},
For debugging purpose we want to display Authorization messages on the console. So go to the appsettings.json file and add the highlighted code line to it.
{
  "Logging": {
    "LogLevel": {
      "Default": "Information",
      "Microsoft.AspNetCore": "Warning",
      "Microsoft.AspNetCore.Authorization": "Information"
    }
  },
  "AllowedHosts": "*"
}
A quick recall, now we have 2 projects:
- Duende IdentityServer project.
- Client project holding the Web API and runs from 6001 port.
Securing Web API with IdentityServer
We’ll now Secure the ASP.NET Core Web API with Duende IdentityServer, ensuring that protected endpoints can only be accessed with valid access tokens. First install the package called IdentityModel, which provides a set of libraries for working with OpenID Connect, IdentityServer, and OAuth 2.0.
Install it by running the following command in the Package Manager Console:
Install-Package IdentityModelWe’ll also need the Microsoft.AspNetCore.Authentication.JwtBearer package, which adds middleware to enable the application to receive and validate JWT bearer tokens. Install it using the following command in the Package Manager Console:
Install-Package Microsoft.AspNetCore.Authentication.JwtBearerNext, Import the JwtBearer namespace on the Program.cs class.
using Microsoft.AspNetCore.Authentication.JwtBearer;Add the below code to the Program class:
builder.Services.AddAuthentication(JwtBearerDefaults.AuthenticationScheme)
    .AddJwtBearer(options =>
    {
        options.Authority = "https://localhost:5001";
        options.Audience = "IS4API";
    });
This adds the authentication service to your app, and sets the default scheme to “Bearer” (which is what JwtBearerDefaults.AuthenticationScheme resolves to). This means that unless told otherwise, the app will use the JWT Bearer scheme to authenticate requests — i.e., it will expect an Authorization: Bearer <token> header.
Things to note here:
- The JWT Bearer option’s authority value is the uri of the IdentityServer project which is https://localhost:5001. Behind the scenes, the middleware uses this URL to: Fetch the discovery document and retrieve the signing keys (JWKS) used to verify the token’s signature.
- So instead of you manually configuring signing keys, issuer, etc., it’s all pulled automatically from IdentityServer at startup (and cached) –
options.Audience = "IS4API". - This tells the middleware what audience (aud) claim to expect inside the token. When IdentityServer issues an access token, it stamps it with an audience matching the API resource it was requested for (in your case, likely something you defined as an ApiResource or ApiScope named “IS4API” in IdentityServer’s configuration).
- If the token’s aud claim doesn’t match this value, validation fails — this prevents a token issued for a different API from being used to fraudulently access this one.
- The JWT Bearer option’s Audience value should be the same as set on the “ApiResources” section on the appsettings.json file of the ISExample project. Recall, it was set as “IS4API”.
Also, add the authentication and authorization middewares.
app.UseAuthentication();
app.UseAuthorization();
Go to the WeatherForecastController.cs located inside the “Controller” folder and import the namespace:
using Microsoft.AspNetCore.Authorization;Now, add an [Authorize] Attribute to the Controller. With this we have secured our Web API Endpoint with IdentityServer.
using Microsoft.AspNetCore.Authorization;
using Microsoft.AspNetCore.Mvc;

namespace ISClient.Controllers
{
    [ApiController]
    [Route("[controller]")]
    [Authorize]
    public class WeatherForecastController : ControllerBase
    {
        ...
    }
}
With this I have secured the Web API and now I will test the working with Postman.
Fetching IdentityServer Token from Postman
Make sure both the “ISExample” & “ISClient” are running. Also the MongoDB docker container should be running. We did all this setup on our previous tutorial. Next, open POSTMAN and send a GET Request to the Weather Forecast url – https://localhost:6001/WeatherForecast. You will be getting a 401 Unauthorized Error. The reason is quite obvious, we need access token.
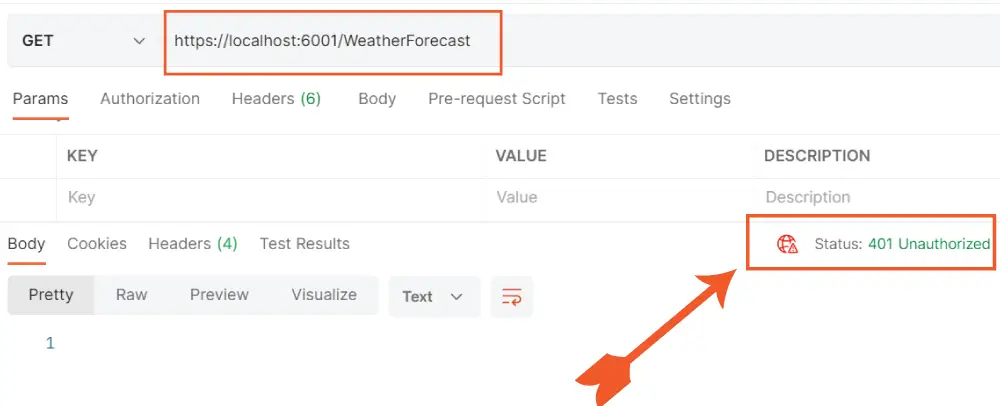
Check the console window, you will find a clear message telling what’s going on:
DenyAnonymousAuthorizationRequirement: Requires an authenticated user.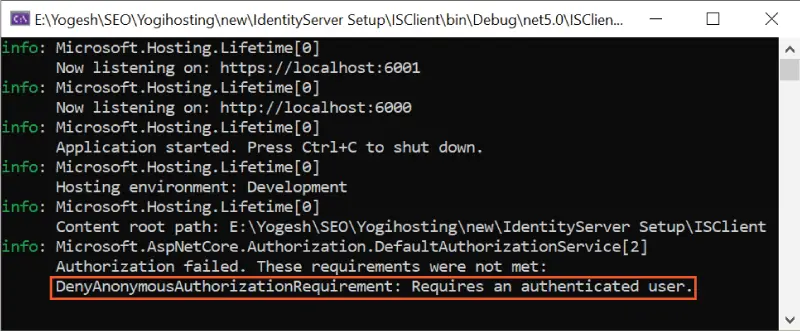
Now, let us request access token from Duende IdentityServer. So, in Postman, do the following things:
- Select Authorization tab.
- Select OAuth 2.0 for Type and Request Headers for “Add authorization data to”.
- For the Header Prefix select Bearer.
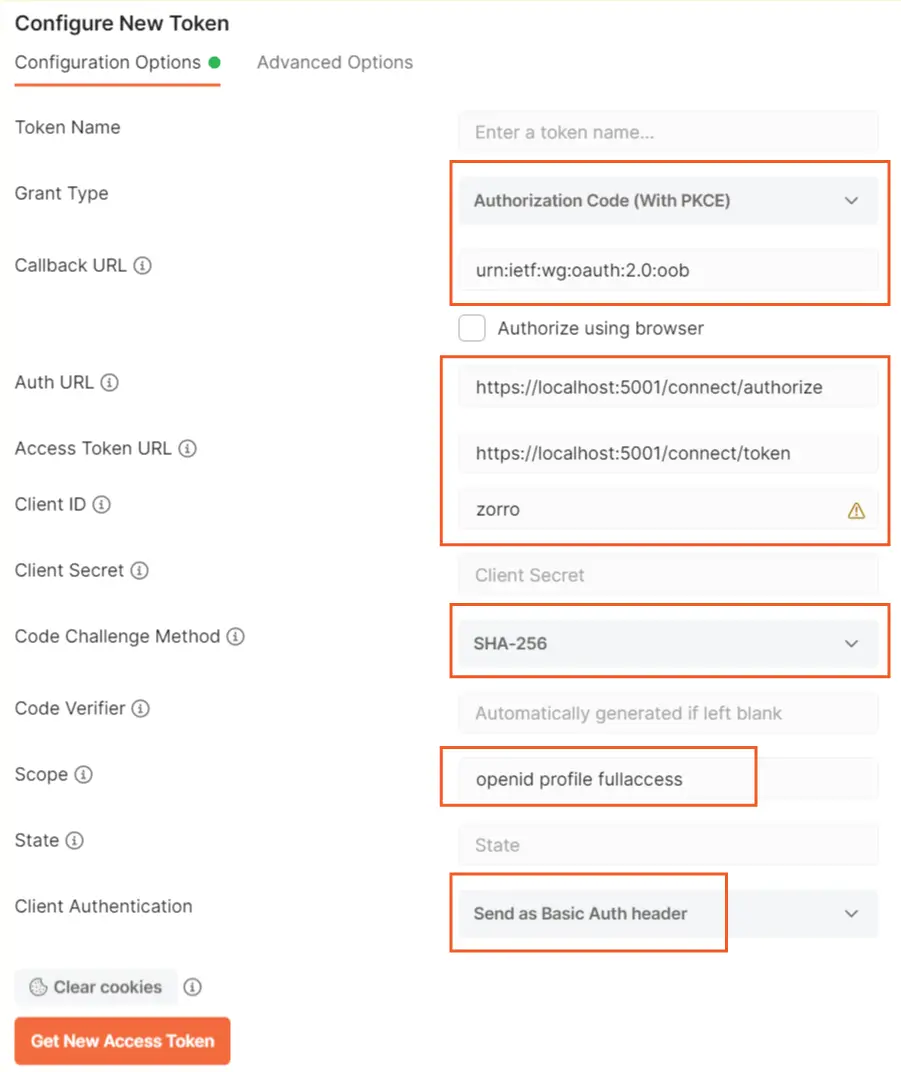
- For Grant Type select Authorization Code (With PKCE).
- Set Callback URL to urn:ietf:wg:oauth:2.0:oob. Recall it is the one we set for the RedirectUris in appsettings.json.
- Set Auth URL to the value of authorization_endpoint in the discovery endpoint which is https://localhost:5001/connect/authorize.
- Set Access Token URL to the value of token_endpoint in the discovery endpoint which is https://localhost:5001/connect/token.
- Client ID should be set at zorro. Recall we set this on the appsettings.json.
- Set Code Challenge Method to SHA-256.
- Set Scope to the 3 values which we set on the AllowedScopes in the appsettings.json. These were openid profile fullaccess.
- Set Client Authentication to Send as Basic Auth header.
Check the below 2 images where I have marked all of these settings.
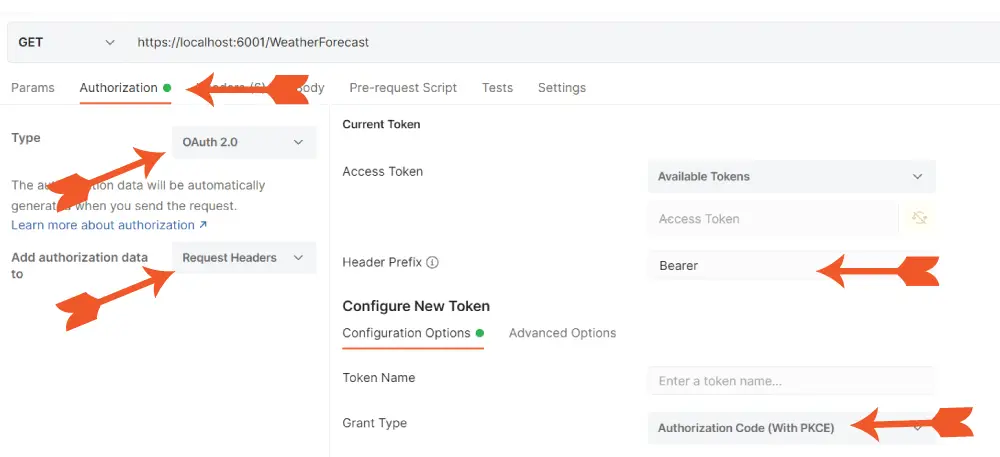
Now, click the Get New Access Token button. Postman will open a dialog which will show the login screen. So, login on this screen with the credentials of your Identity account.
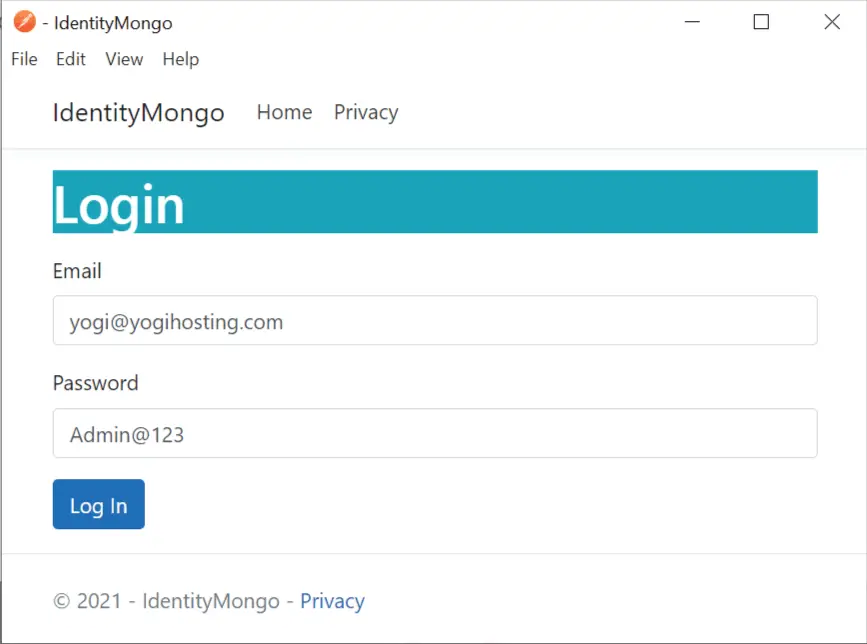
I had created the Username and Password in my earlier tutorial. This is stored on MongoDB database, so I log-on with these credentials
.- Email : yogi@yogihosting.com
- Password : Admin@123
On clicking the Log In button, we are presented with 2 tokens by IdentityServer, these are:
- Access token
- Id token
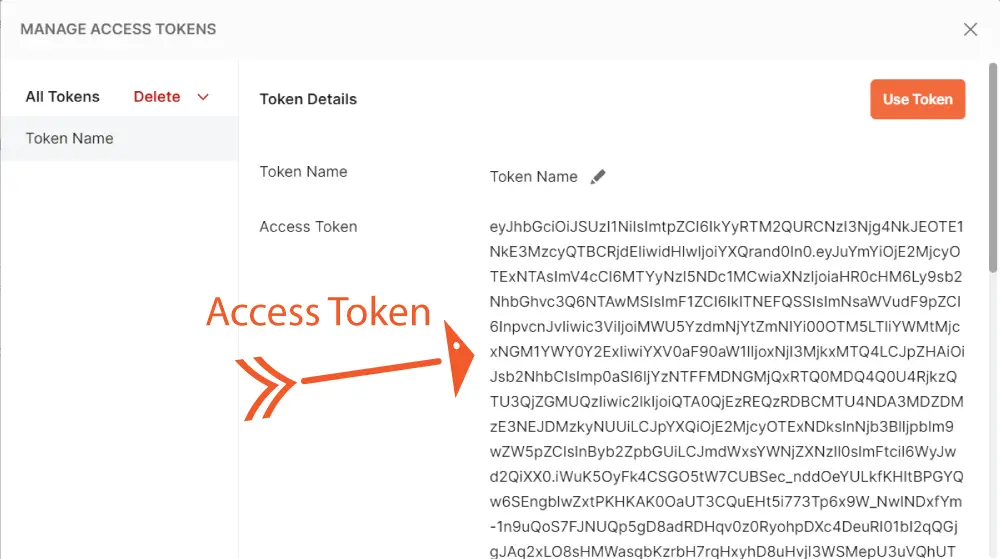
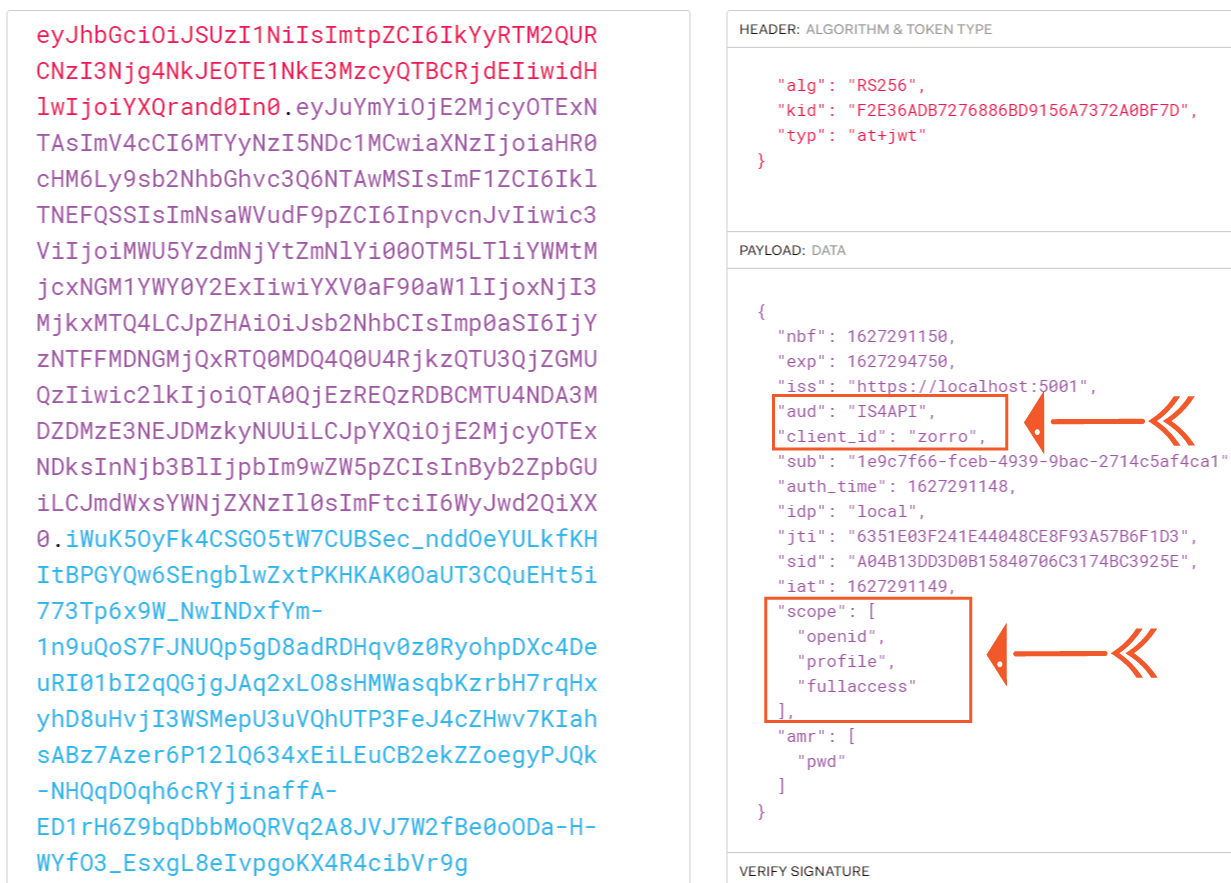
Copy the access token and decode it on jwt.io website. You will see it contains audience, client_id and scopes which we had set earlier.
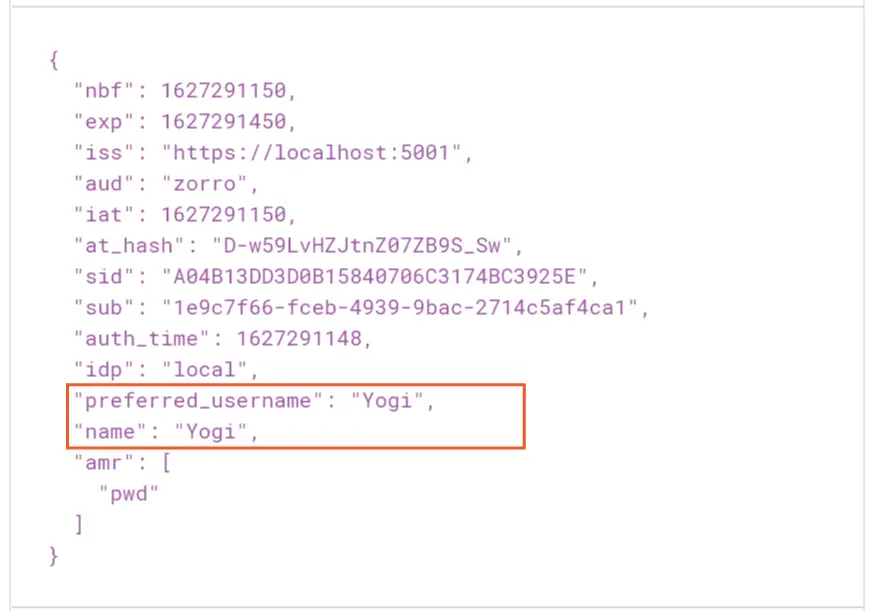
Next, decode the Id token (scroll down the postman screen to find the id token). The Id token contains the claims like name, preferred_username, etc.
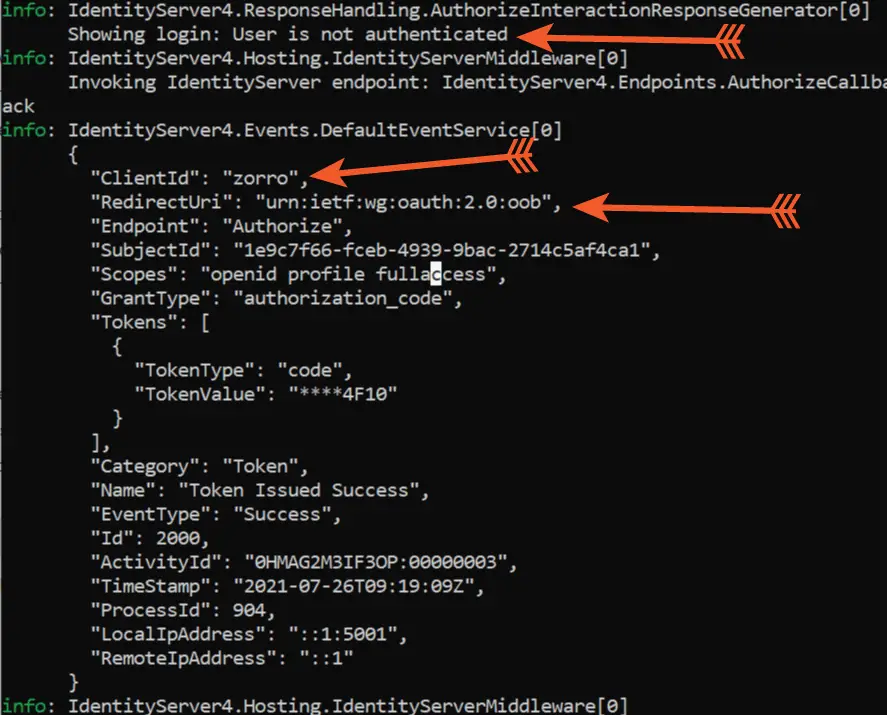
You can also check the logs on the console in the ISExample project. First it shows the message “Showing login: User is not authenticated”. After we performed the login, it shows client_id, granttype, scopes, redirecturi and so on. Logs are very helpful for debugging purpose.
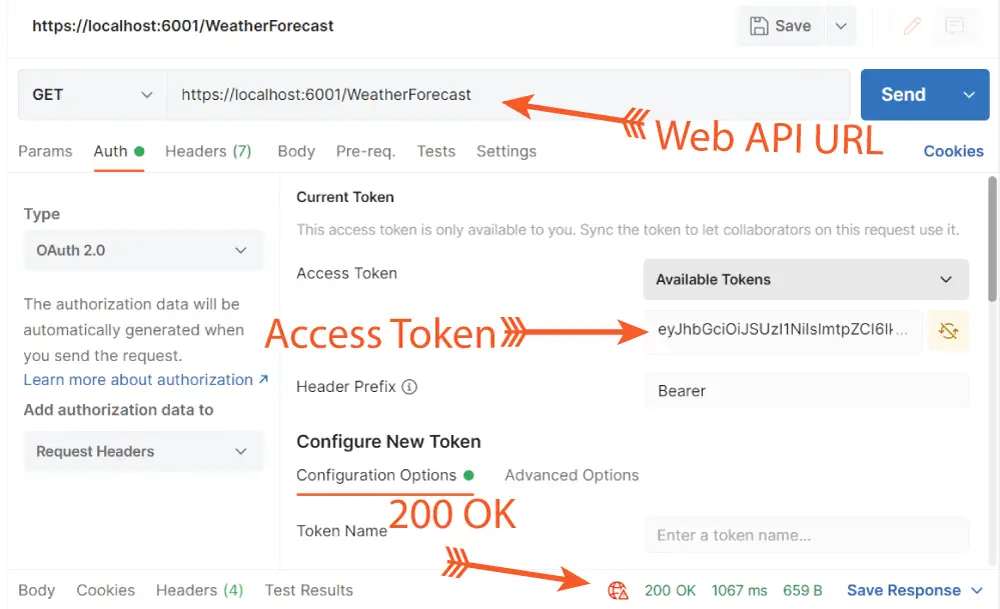
Coming back to Postman, click the Use Token button, this will copy the access token to the Access Token field and close the current dialog box. Now we can call the secured Web API with this token.
Add the url of the web api which is https://localhost:6001/WeatherForecast to the url text box in Postman. Also make sure that “GET” is selected on the dropdown then click the Send button. This time you will see 200 OK response which means the api is called successfully with the access token.
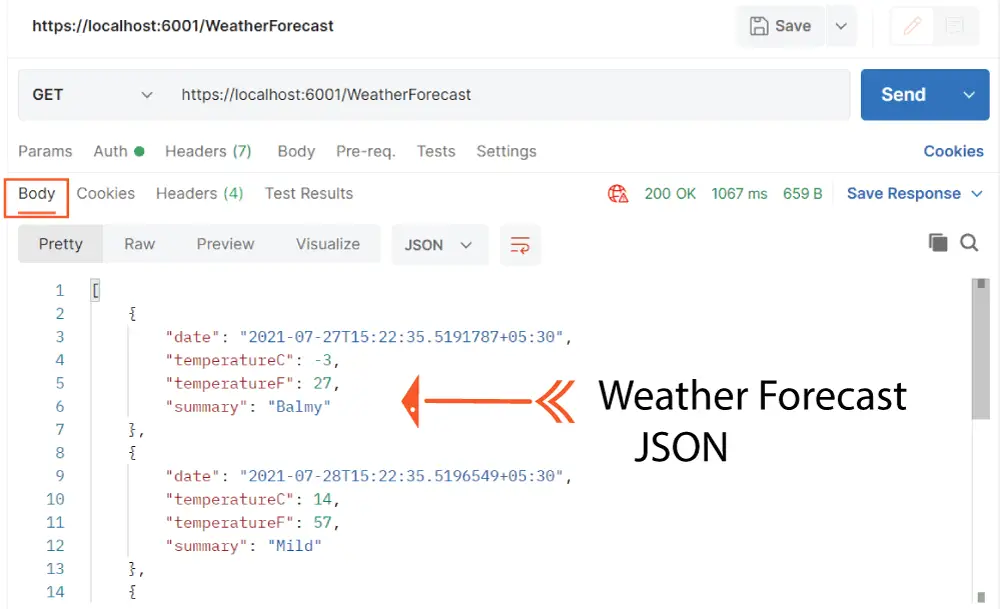
Check the Body tab in Postman where you will find the Weather details returned by the Web API in JSON format.
Congratulations, our Web API is protected by Duende IdentityServer and now we can call it through the access token provided by IdentityServer. It’s time to implement the final thing which is the OpenID Connect on the Client Project.
Implementing OpenID Connect
So far, we’ve seen that when a request is made to IdentityServer for authentication, a login screen is presented. We already have the login screen and the corresponding login action method set up in the IdentityServer project. After the access token is generated, we manually called the Web API by attaching the access token to the request header — and you may have noticed we were doing this manually in Postman.
This raises the question: how do we automate this process? In other words, the client project should be able to automatically call the API with the access token and retrieve the Weather Forecast data — without manual intervention.
The answer lies in OpenID Connect. By using OpenID Connect, the client project can automatically determine the identity of the user who has been authenticated by IdentityServer, and handle the token acquisition and API calls seamlessly on its behalf.
First install the package called Microsoft.AspNetCore.Authentication.OpenIdConnect to the “ISClient” project. The command is:
Install-Package Microsoft.AspNetCore.Authentication.OpenIdConnectIn the Program.cs, update the AddAuthentication method to include default scheme to “cookies” and defaultchallengescheme to “oidc”. Also add AddOpenIdConnect method for adding the following things:
- Authority – url of the IdentityServer project
- ClientId – zorro
- ResponseType – code
- Added openid, profile and fullaccess scopes with “Scope.Add” method.
- SaveTokens – true. So, ASP.NET Core will automatically store the resulting access and refresh token in the session.
All these changes are shown below.
builder.Services.AddAuthentication(JwtBearerDefaults.AuthenticationScheme);
builder.Services.AddAuthentication(options =>
    {
        options.DefaultScheme = "Cookies";
        options.DefaultChallengeScheme = "oidc";
    })
    .AddCookie("Cookies")
    .AddJwtBearer(options =>
    {
        options.Authority = "https://localhost:7274";
        options.Audience = "IS4API";
    })
    .AddOpenIdConnect("oidc", options =>
    {
        options.Authority = "https://localhost:7274";
        options.ClientId = "zorro";
        options.ResponseType = "code";
        options.Scope.Add("openid");
        options.Scope.Add("profile");
        options.Scope.Add("fullaccess");
        options.SaveTokens = true;
    });
So, we are using a cookie to locally sign-in the user and we will be using the OpenID Connect protocol. The AddCookie(“Cookies”) method species that we will be processing the cookie via OpenID Connect protocol.
Finally, SaveTokens is used to persist the tokens from IdentityServer in the cookie as they will be needed later.
One thing more, make sure you have correctly added signin-oidc in the RedirectUris value in appsettings.json of ISExample project. Since the client project is running from 6001 port therefore it’s value will be https://localhost:6001/signin-oidc.
"RedirectUris": [
  "urn:ietf:wg:oauth:2.0:oob",
  "https://localhost:6001/signin-oidc"
]
That’s all is the integration part. We can now do the testing.
Run both the ISExample and ISClient projects. Now in the browser open the url of the secured web api which is https://localhost:6001/WeatherForecast. You will be redirected to the login screen. After performing successfully login, you will be able to see the weather forecast json. I have shown this in the below given video.
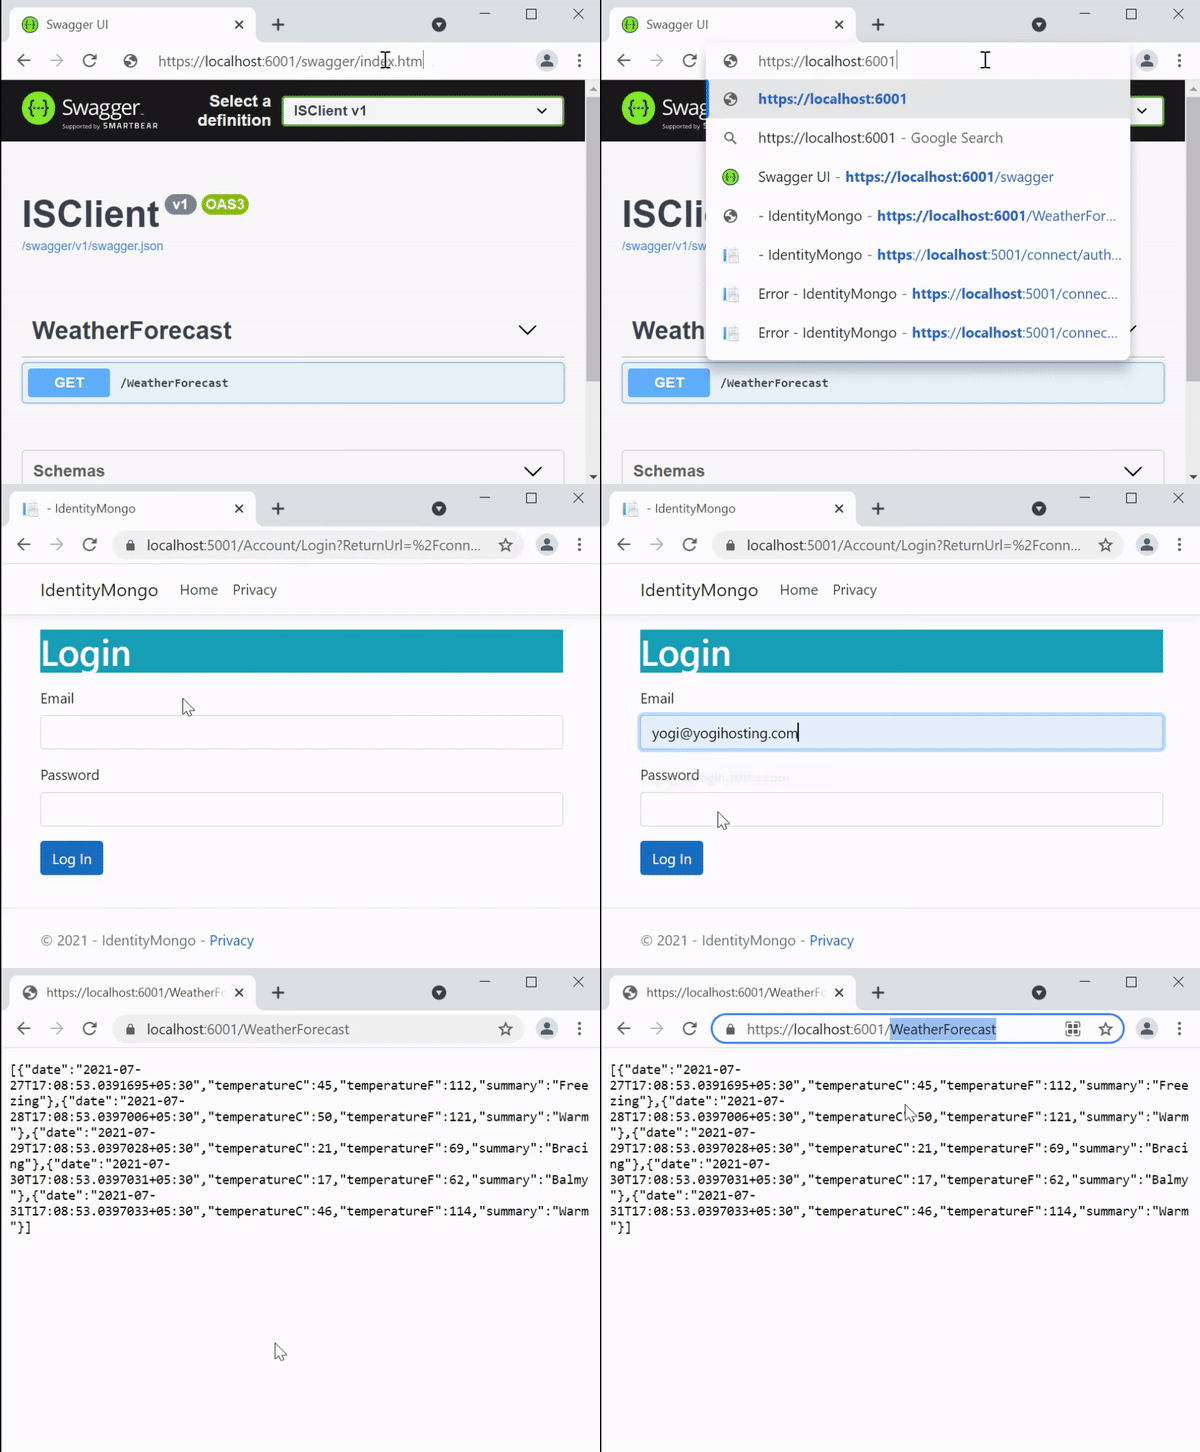
Congrats — OIDC has been successfully integrated, and our API is now fully secured and working from the browser.
I would also like to tell you that the Cookie will be strored on your browser so you don’t have to perform login again. If you would like to retest the working of the Client project then kindly delete all the cookies from the browser developer tools.
In the developer tools, go to the Application tab. On the left, select the Cookies section and select the url of the client project. You will see all the cookies. Select and delete them one by one. Check the below image describing the process.
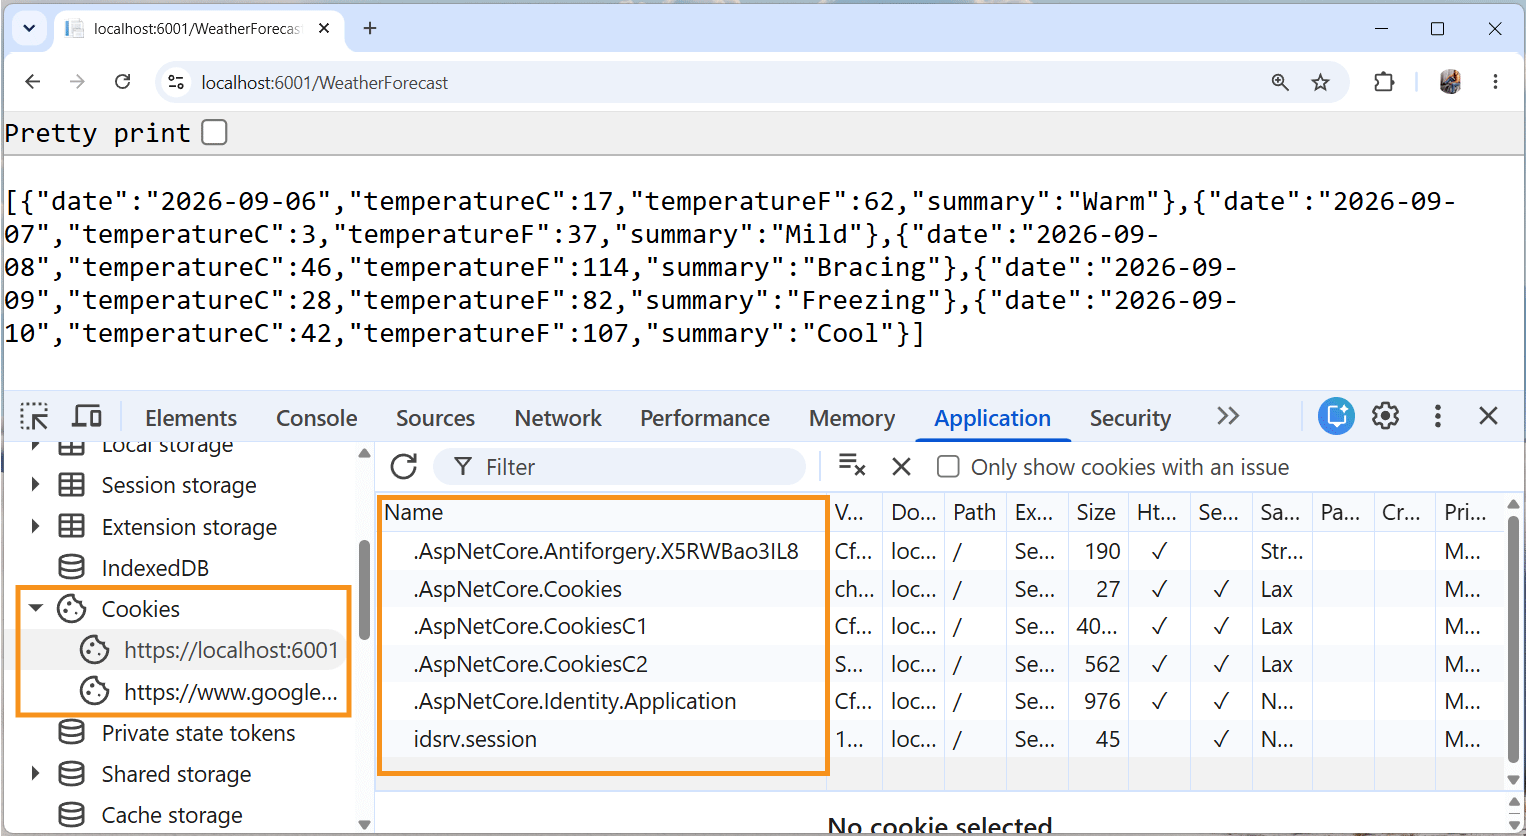
Once the cookies are deleted, you will be again asked to re-login when visiting secured urls.
Calling IdentityServer secured Web API
We can now call the Web API from our ISClient project by using HttpClient class. First thing to do is to change the authentication type on the Web API to “Bearer”. This is done by adding AuthenticationSchemes to JwtBearerDefaults.AuthenticationScheme in the [Authorize] attribute.
[ApiController]
[Route("[controller]")]
[Authorize(AuthenticationSchemes = JwtBearerDefaults.AuthenticationScheme)]
public class WeatherForecastController : ControllerBase
{
}
We should also add the Bearer authentication on the program class.
builder.Services.AddAuthentication(JwtBearerDefaults.AuthenticationScheme);Bearer authentication does the following validations.
- Makes sure the token is coming from a trusted issuer like IdentityServer.
- Validates the token so that it can be used with the api.
You can learn more about Bearer tokens on my JWT Series which contains just 2 tutorials:
Next, add a new controller called CallApiController.cs from where the API call will be made. It’s code is given below.
using IdentityModel.Client;
using Microsoft.AspNetCore.Authentication;
using Microsoft.AspNetCore.Authorization;
using Microsoft.AspNetCore.Mvc;
using Newtonsoft.Json;

namespace ISClient.Controllers
{
    [Authorize]
    public class CallApiController : Controller
    {
        public async Task<IActionResult> Index()
        {
            var accessToken = await HttpContext.GetTokenAsync("access_token");

            var weather = new List<WeatherForecast>();
            using (var client = new HttpClient())
            {
                client.SetBearerToken(accessToken);
                var result = await client.GetAsync("https://localhost:6001/WeatherForecast");
                if (result.IsSuccessStatusCode)
                {
                    var model = await result.Content.ReadAsStringAsync();
                    weather = JsonConvert.DeserializeObject<List<WeatherForecast>>(model);
                }
                else
                {
                    throw new Exception("Failed");
                }
            }
            return View(weather);
        }
    }
}
This controller is itself secured by IdentityServer as I have added Authorize attribute to it.
We get the access token from the code line:
var accessToken = await HttpContext.GetTokenAsync("access_token");We add this token to the authorization header of the HttpClient object.
client.SetBearerToken(accessToken);Then make GET request to the Web API.
var result = await client.GetAsync("https://localhost:6001/WeatherForecast");The JSON returned by the API has to be deserialized into List<WeatherForecast> so we need to install Newtonsoft.Json package in the project.
weather = JsonConvert.DeserializeObject<List<WeatherForecast>>(model);We also have to add the following 3 codes to enable controller with views and routing in the program class.
builder.Services.AddControllersWithViews();
app.UseRouting();
app.MapControllerRoute(
    name: "default",
    pattern: "{controller=Home}/{action=Index}/{id?}");
Next, create the Index view called Index.cshtml inside the “Views > CallApi” folder. The view accepts model of type List<WeatherForecast>, it will show weather data in an HTML table.
@model List<ISClient.WeatherForecast>
@{
    ViewData["Title"] = "Weather";
}
<h1>Weather</h1>

<table class="table table-striped">
    @foreach (var weather in Model)
    {
        <tr>
            <td>@weather.Date</td>
            <td>@weather.Summary</td>
            <td>@weather.TemperatureC</td>
            <td>@weather.TemperatureF</td>
        </tr>
    }
</table>
Run the project, and open the url of the CallApiController.cs which is – https://localhost:6001/CallApi. You will be redirected to Login page, once you performed the login, Duende IdentityServer will provide you tokens. With the access token the api call is made and Weather is shown on the browser.
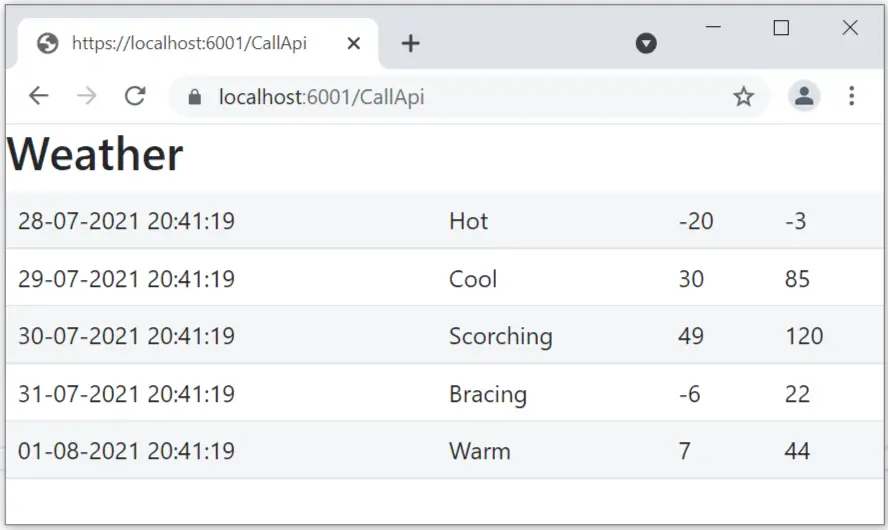
In this tutorial we learned to Setup Duende IdentityServer, it’s scopes, clients, resources and later on protected Web APIs through it. In the next tutorial we will perform Role and Policy based authentication with Duende IdentityServer.
SHARE THIS ARTICLE


Related Tutorials:




ABOUT THE AUTHOR
I hope you enjoyed reading this tutorial. If it helped you then consider buying a cup of coffee for me. This will help me in writing more such good tutorials for the readers. Thank you.

HELLO EVERYONE
 Welcome to YogiHosting - A Programming Tutorial Website. It is used by millions of people around the world to learn and explore about ASP.NET Core, Blazor, jQuery, JavaScript, Docker, Kubernetes and other topics.
SUBSCRIBE TO NEWSLETTER
Enter your email address to subscribe to this blog and receive notifications of new posts by email.
Join 90K other subscribers