


ASP.NET Core – Duende IdentityServer authentication and authorization with Identity
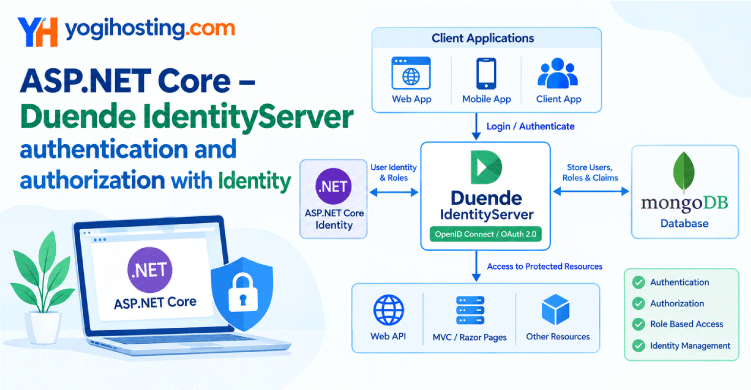
In this tutorial, we’ll integrate Duende IdentityServer with ASP.NET Core Identity in an ASP.NET Core application to enable secure authentication and authorization — allowing users to log in and log out of their accounts through Duende IdentityServer.
- ASP.NET Core Identity with MongoDB as Database
- Duende IdentityServer with ASP.NET Core Identity and MongoDB as Database
- Duende IdentityServer Role and Policy Based Authentication
- ASP.NET Core – Duende IdentityServer authentication and authorization with Identity
Page Contents
Here we will be creating 2 apps – First is Server app and Second is Client app.
- Server – it is an ASP.NET Core app with contains ASP.NET Core Identity along with Duende IdentityServer
- Client – it is an ASP.NET Core app whose secured pages are protected with Duende IdentityServer. This means, to access them, user has to authenticate himself with the Server app containing Duende IdentityServer.
Server – ASP.NET Core app + Identity + Duende IdentityServer
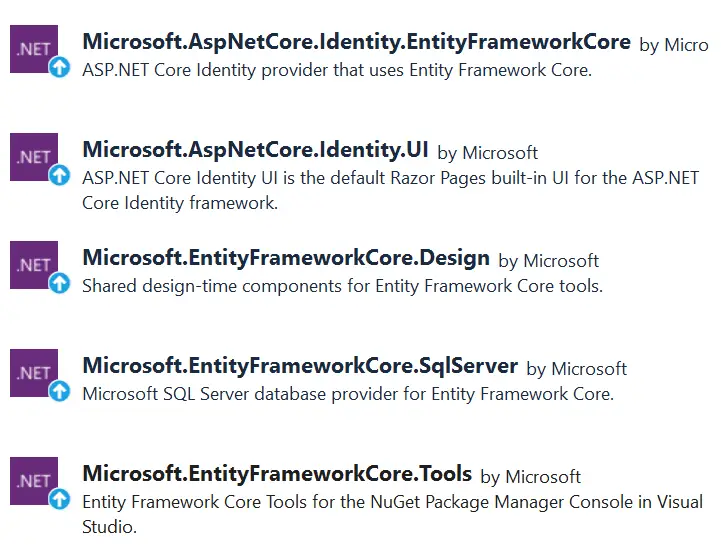
The Server app called DuendeIS is an ASP.NET Core app, here we have installed the Duende IdentityServer and ASP.NET Core Identity packages that are needed for performing Authentication and Authorization tasks. These packages are:
- Duende.IdentityServer.AspNetIdentity
- Microsoft.AspNetCore.Identity.EntityFrameworkCore
- Microsoft.AspNetCore.Identity.UI
- Microsoft.EntityFrameworkCore.SqlServer
- Microsoft.EntityFrameworkCore.Design
- Microsoft.EntityFrameworkCore.Tools
These packages are shown in the below image:
ASP.NET Core Identity integration process
For providing ASP.NET Core Identity support we have added Login, Logout, Register and other needed razor view files inside the Areas > Identity folder. We have shown this in the below image.

The Identity database connection string is defined in the appsettings.json file. The identity database used is MSSQLLocalDB type, this you can change as your wish.
"ConnectionStrings": {
  "DefaultConnection": "Server=(localdb)\\MSSQLLocalDB;Database=DISIdentity;Trusted_Connection=True;MultipleActiveResultSets=true"
}
The DB Context file called ApplicationDbContext.cs is located inside the “Models” folder and is defined as shown below.
public class ApplicationDbContext : IdentityDbContext
{
    public ApplicationDbContext(DbContextOptions<ApplicationDbContext> options)
        : base(options)
    {
    }
}
Finally, on the Program.cs class we have registed Identity Services as shown below.
builder.Services.AddDbContext<ApplicationDbContext>(options => options.UseSqlServer(builder.Configuration.GetConnectionString("DefaultConnection")));

builder.Services.AddIdentity<IdentityUser, IdentityRole>().AddDefaultUI().AddEntityFrameworkStores<ApplicationDbContext>().AddDefaultTokenProviders();
Duende IdentityServer integration process
Duende IdentityServer integration is added to the Program.cs and is shown below.
builder.Services.AddIdentityServer()
                .AddInMemoryClients(new Client[] {
                    new Client
                    {
                        ClientId = "duendeclient",
                        AllowedGrantTypes = GrantTypes.Implicit,
                        RedirectUris = { "https://localhost:7028/signin-oidc" },
                        PostLogoutRedirectUris = { "https://localhost:7028/signout-callback-oidc" },
                        FrontChannelLogoutUri = "https://localhost:7028/signout-oidc",
                        AllowedScopes = { "openid", "profile", "email", "phone" }
                    }
                })
                .AddInMemoryIdentityResources(new IdentityResource[] {
                    new IdentityResources.OpenId(),
                    new IdentityResources.Profile(),
                    new IdentityResources.Email(),
                    new IdentityResources.Phone(),
                })
                .AddAspNetIdentity<IdentityUser>();

app.UseIdentityServer();
Clients represent applications that can request JWT Tokens from your identityserver. We have defined an in-memory client with:
.AddInMemoryClients(new Client[] {
    new Client
    {
        ClientId = "duendeclient",
        AllowedGrantTypes = GrantTypes.Implicit,
        RedirectUris = { "https://localhost:7028/signin-oidc" },
        PostLogoutRedirectUris = { "https://localhost:7028/signout-callback-oidc" },
        FrontChannelLogoutUri = "https://localhost:7028/signout-oidc",
        AllowedScopes = { "openid", "profile", "email", "phone" }
    }
})
The above code include:
- Unique client ID –
duendeclient. Only requests from this registered client are accepted by the token service. - Grant type as
GrantTypes.Implicit– defines the allowed interaction pattern between the client and the token service. Note that implicit flow is deprecated in current OAuth guidance and returns tokens directly via the browser URL fragment; authorization code flow with PKCE (GrantTypes.Code) is the recommended choice for new clients. - RedirectUris as
https://localhost:7028/signin-oidc– the client app’s URL that the token service redirects back to after authentication. With implicit flow, tokens are returned directly to this URL; with authorization code flow, an authorization code is sent here instead, and the client exchanges it for tokens in a separate back-channel call. - PostLogoutRedirectUris – a client app’s URL where users are redirected to after logout.
- AllowedScopes as
openid, profile, email, phone– a list of scopes (aka resources) the client is allowed to access.
We also added identity resources to memory:
.AddInMemoryIdentityResources(new IdentityResource[] {
    new IdentityResources.OpenId(),
    new IdentityResources.Profile(),
    new IdentityResources.Email(),
    new IdentityResources.Phone(),
})
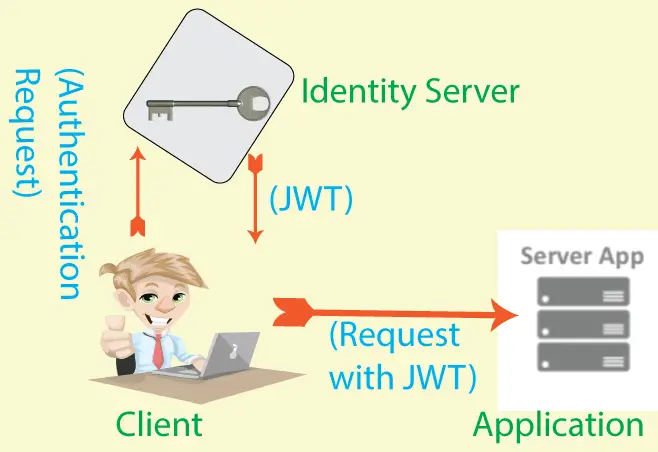
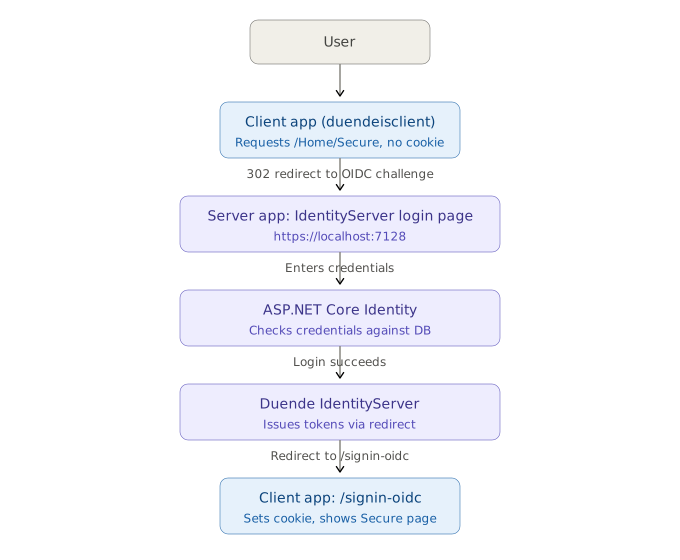
With this, our server app is complete. Now, when a client tries to access a secured resource, it’s redirected to the server app, where the user has to complete the login procedure via ASP.NET Core Identity. On successful login, IdentityServer issues a token to the client, which is then redirected back to the secured resource URL and can now access it.
This process is explained in the below image.
Let’s run Entity Framework Core migration commands to create the Identity database. So run the below commands one by one.
add-migration Migration1
Update-Database
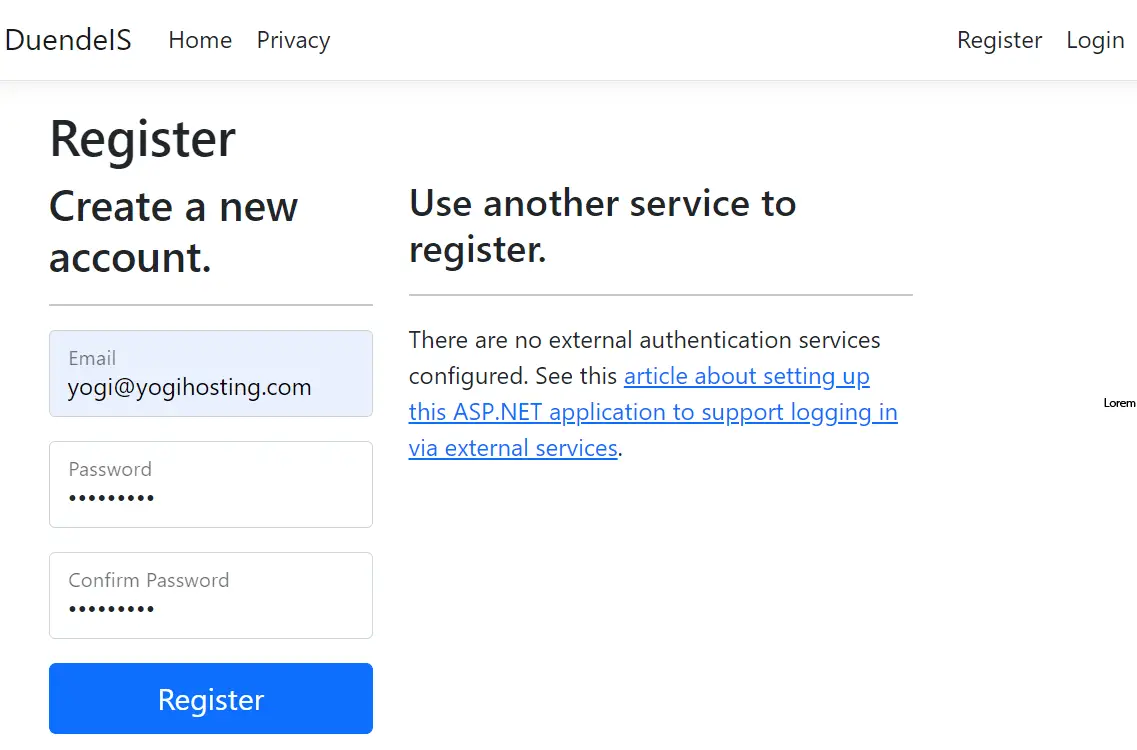
After this run the app and click the Register link given on the top menu. Here create a new Identity user with email – “yogi@yogihosting.com” and password – “Admin@123”. After the user is created click the “Logout” link. This user will be used for demonstrating the working of the client later on.
The below image shows we are creating this user.
Client – ASP.NET Core app with secured resource
The client app called DuendeISClient, is a simple ASP.NET Core MVC app, that contains secured areas. These area are protected by Duende Identity Server.
Inside the HomeController.cs, we added a secured action method. This method has [Authorize] attribute and is shown below.
[Authorize]
public IActionResult Secure()
{
    return View();
}
We are going to prevent anonymous access to this action method with Duende Identity Server. User will have to perform login to this ASP.NET Core Identity account before they can access this action method.
The razor view for this action method (named Secure.cshtml) will show the claims of the user and is given below.
@{
    ViewData["Title"] = "Secure";
}

<div class="text-center">
    <h1 class="display-4">Claims</h1>
    <dl>
        @foreach (var claim in User.Claims)
        {
            <dt>@claim.Type</dt>
            <dd>@claim.Value</dd>
        }
    </dl>
</div>
Configure OpenID Connect (OIDC)
In the Client app, install the package called Microsoft.AspNetCore.Authentication.OpenIdConnect. We then have to configure OpenID Connect(OIDC) authentication workflow in the program class.
In the Program.cs, we add the following code for OIDC.
builder.Services.AddAuthentication(options =>
{
    options.DefaultScheme = "cookies";
    options.DefaultChallengeScheme = "oidc";
}).AddCookie("cookies")
  .AddOpenIdConnect("oidc", options =>
  {
      options.Authority = "https://localhost:7128";
      options.ClientId = "duendeclient";
      options.MapInboundClaims = false;
      options.SaveTokens = true;
  });

app.UseAuthentication();
app.UseAuthorization();
We added cookie (with .AddCookie(“cookies”)) and OIDC (with .AddOpenIdConnect(“oidc”, options =>{…})) authentication to the app. The cookie will store the JWT token after a user is successfully login. This cookie will be transferred to the client app on every request, thus the app will be able to recognize the user and the user does not need to re-login again and again.
The authority is assigned to https://localhost:7128 which is the url of the server.
Also note the ClientId is assigned to “duendeclient” i.e. options.ClientId = “duendeclient”. Kindly recall that in the server app we have also added this same value on it’s program class.
Also add the UseAuthentication and UseAuthorization middlewares.
Showing the user login status
In the _Layout.cshtml, we added the the logout button.
<form class="form-inline" method="post" asp-controller="Home" asp-action="Logout">
    <button type="submit" class="nav-link btn btn-link text-dark">Logout</button>
</form>
The action Logout is defined on the HomeController.cs file.
[HttpPost]
public IActionResult Logout()
{
    return SignOut("cookies", "oidc");
}
Also, once the user is login, we are showing hello message with his username from the claims variable as given below.
if (User.Identity.IsAuthenticated)
{
    string name="Hello "+ User.Claims.Where(c => c.Type == "name").Select(c => c.Value).SingleOrDefault();
    @name;
}
Congrats, we just completed the integration part. We can now test the working of this app.
Testing the Duende Identity Server apps
Run both the Server and Client apps in Visual Studio. In the client app click the “Secure” link on the menu.
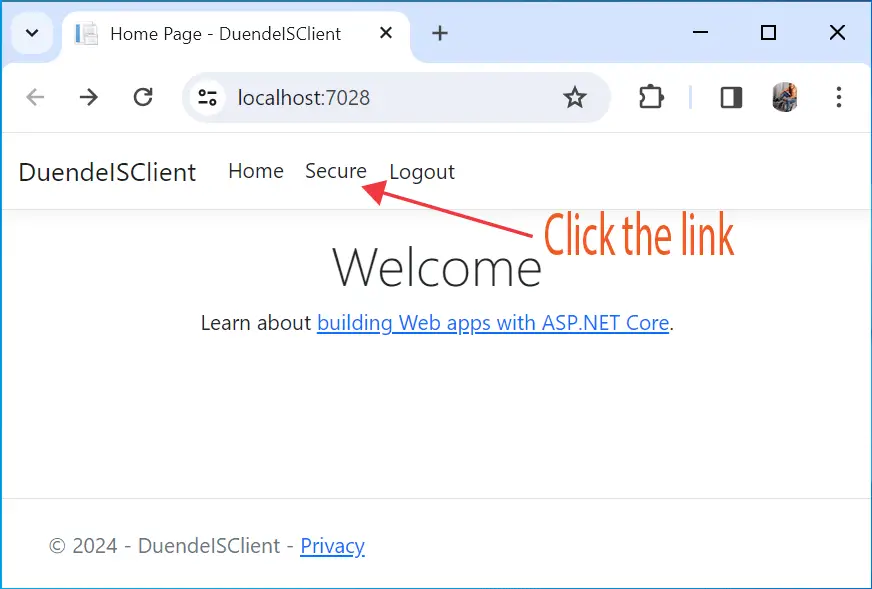
We will be redirected to the server app where login form will be presented to us.
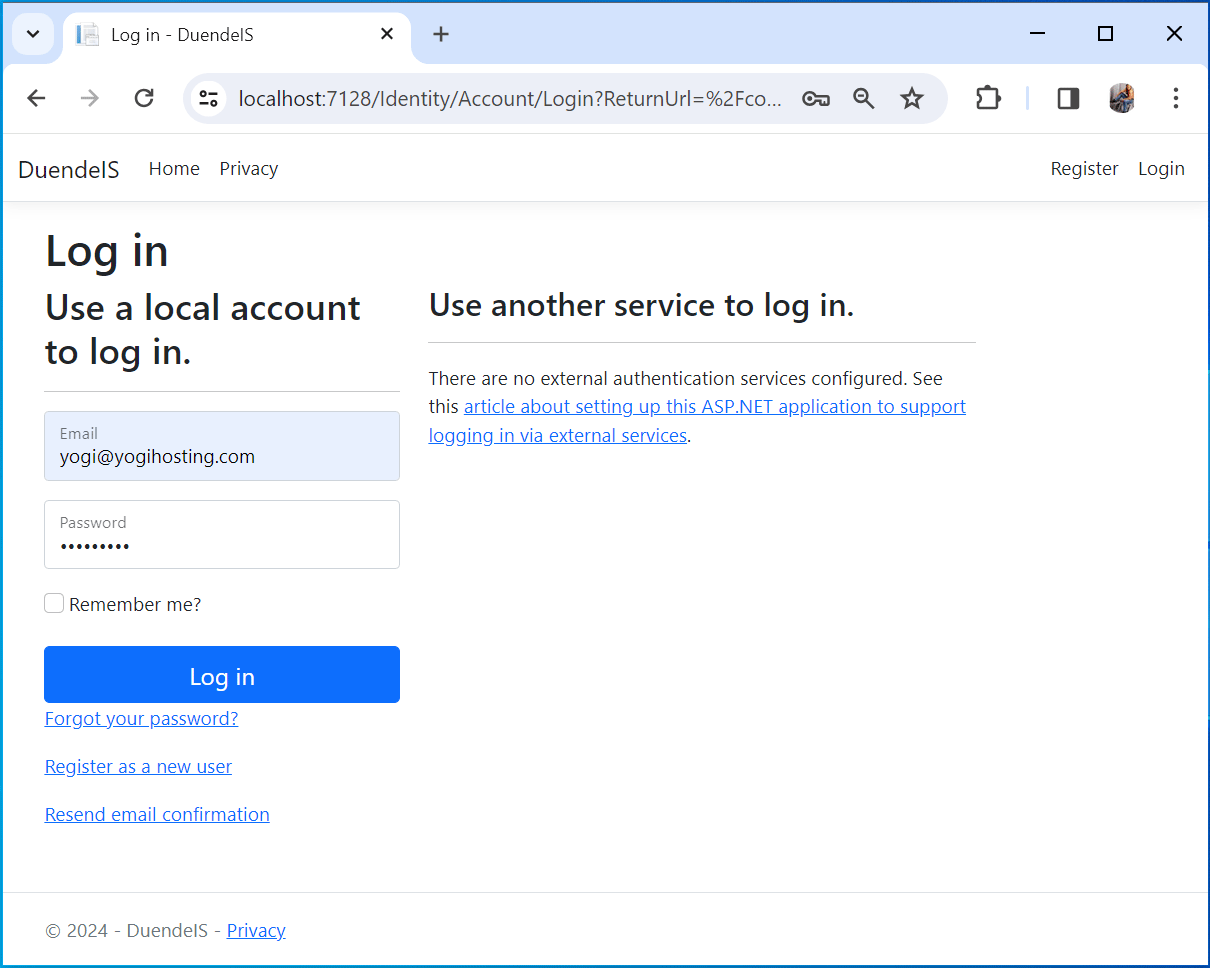
Here enter, email – “yogi@yogihosting.com” and password – “Admin@123” and click login button. Recall that this is the account we created earlier.
On successful login we will be redirected to the “Secure” url and we will be shown all our claims. Check the below image.
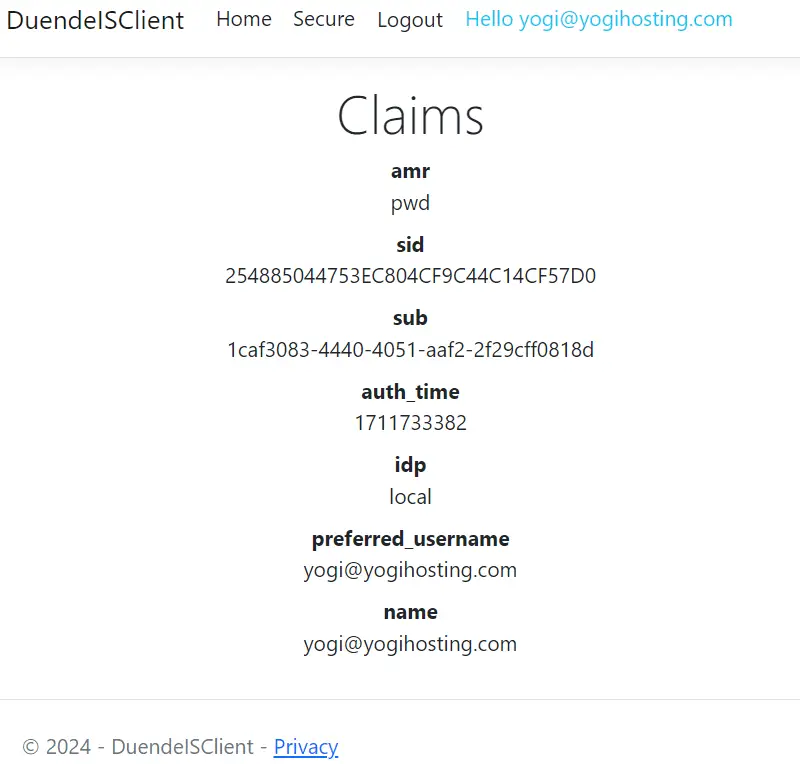
Congrats, the Duende Identity Server is working properly.
The below image explains the workflow:
In this tutorial we implement Duende Identity Server authentication and authorization features on ASP.NET Core app that has ASP.NET Core Identity added to it. We also implemented OpenID Connect and login, logout, register pages. If you have any questions then use the comments section below also don’t forget to download the GitHub repository.
SHARE THIS ARTICLE


Related Tutorials:




ABOUT THE AUTHOR
I hope you enjoyed reading this tutorial. If it helped you then consider buying a cup of coffee for me. This will help me in writing more such good tutorials for the readers. Thank you.

HELLO EVERYONE
 Welcome to YogiHosting - A Programming Tutorial Website. It is used by millions of people around the world to learn and explore about ASP.NET Core, Blazor, jQuery, JavaScript, Docker, Kubernetes and other topics.
SUBSCRIBE TO NEWSLETTER
Enter your email address to subscribe to this blog and receive notifications of new posts by email.
Join 90K other subscribers