


How to Call Web API in ASP.NET Core [.NET 10.0]
![How to Call Web API in ASP.NET Core [.NET 10.0]](https://www.yogihosting.com/wp-content/uploads/2019/03/aspnet-core-consume-api.png "How to Call Web API in ASP.NET Core [.NET 10.0]")
On my previous tutorial How to Create Web APIs in ASP.NET Core [RESTful pattern], I created a Web API from the beginning. Now I will call this API (i.e. consume the API) in another project known as client.
What is an API?
An API (Application Programming Interface) is a set of rules and protocols that allows different software applications to communicate and exchange data with one another. In simple terms, an API acts as a bridge that lets one application request information or services from another.
APIs power much of the technology we use every day — often without us even realizing it. For example:
- Weather apps use APIs to fetch real-time weather updates for your location.
- Stock market apps use APIs to display live stock prices for companies you’ve invested in Payment gateways use APIs to process transactions securely.
- Social media platforms use APIs to let third-party apps post updates or pull content.
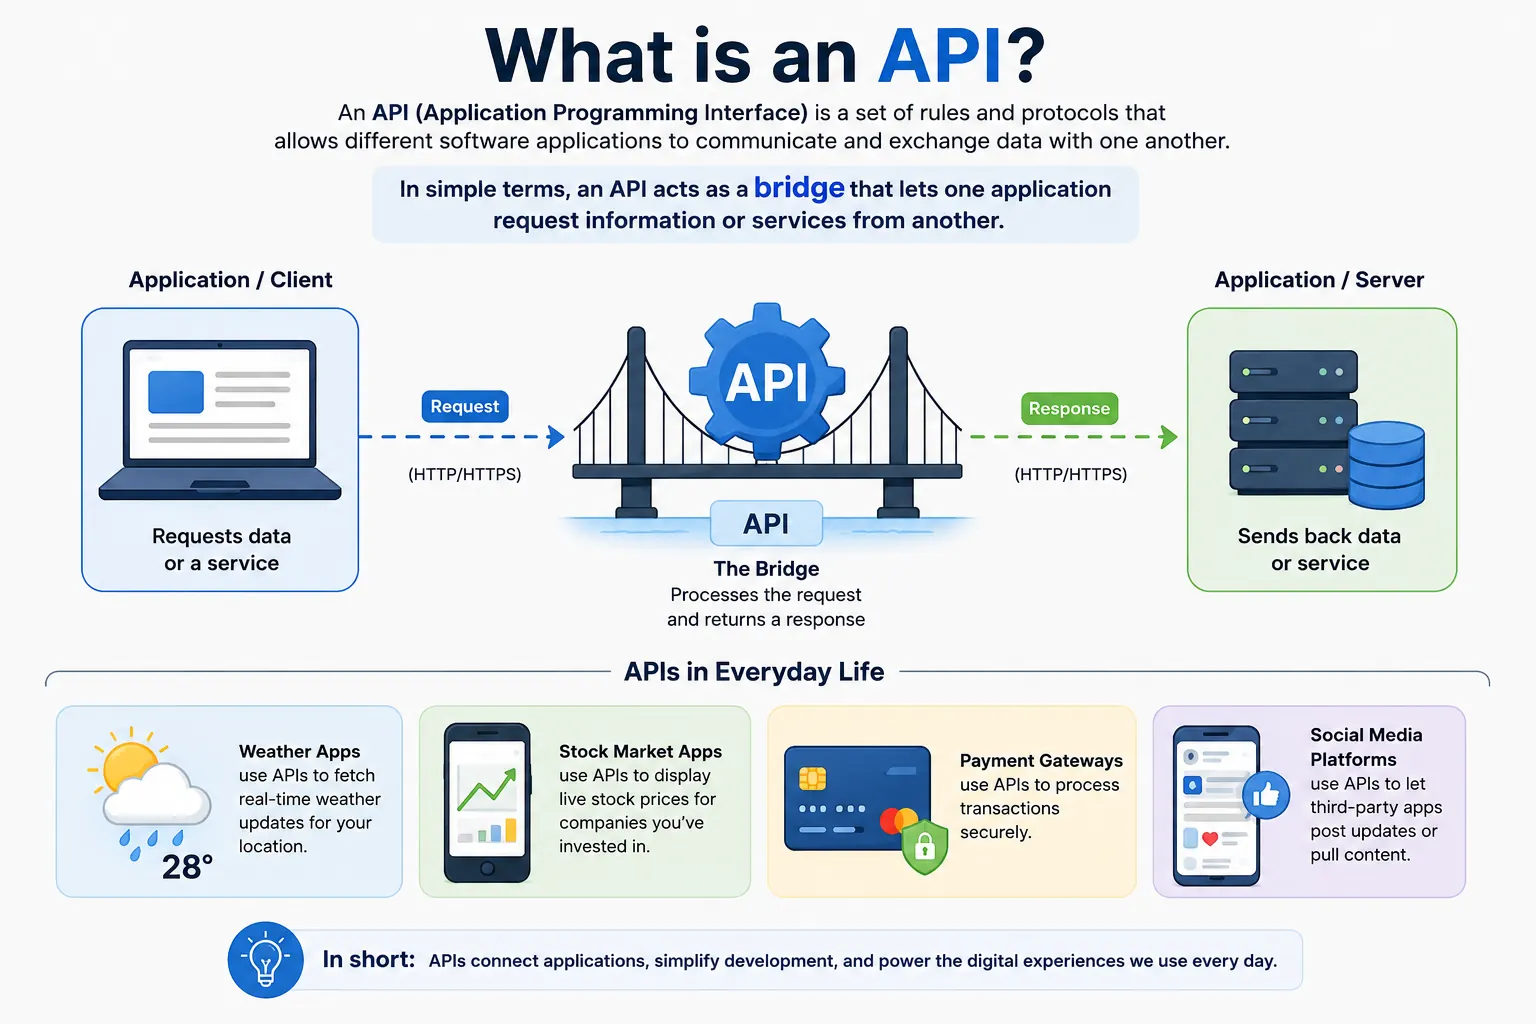
The Operating System (OS) of a computer provides a large collection of APIs (Application Programming Interfaces) that applications use to interact with system resources and perform various tasks. For example, when you double-click a folder, the operating system uses specific APIs to open the folder and display its contents. These OS APIs allow software applications to communicate with and access operating system features without needing to understand their internal implementation.
Web APIs are APIs that can be accessed or invoked over the web using a URL (Uniform Resource Locator). They allow applications and clients to communicate with a web server and exchange data over HTTP or HTTPS.
This tutorial is a part of the ASP.NET Core Web API series based on .NET 10.0 version. It contains 5 articles to master this area:
- 1. How to Create Web APIs in ASP.NET Core [RESTful pattern]
- 2. How to Call Web API in ASP.NET Core [with Codes]
- 3. How to Call Web API from jQuery
- 4. Call Web API from JavaScript with XMLHttpRequest (XHR)
- 5. Create ASP.NET Core Minimal API from Start till Finish
Page Contents
What are some API examples?
The most popular API are the ones which the people use daily, 3 of such APIs are:
- 1. Skyscanner which is a travel site which lets people research and book travel options for their trips. On their website, when you perform a search, the website calls a bunch of external APIs to fetch the current state of flights, hotels, etc. This is then displayed to you on the browser.
- 2. OpenWeatherMap which provides global weather data via API.
- 3. Yahoo Finance provides current stock prices and market news.
What is an API call?
An API (Application Programming Interface) is called when an application needs it to perform a specific task or access a particular resource. After processing the request, the API sends a response back to the calling application. This response typically includes the status of the operation, the requested data, or, if an error occurs, an appropriate HTTP status code and error message.
The question that arise is How to call an API? – An API can be called using software or applications designed to communicate with it. For example, an operating system, web browser, mobile app, or desktop application can call an API to perform a specific operation.
When an API is exposed through a URL, it can generally be accessed using HTTP or HTTPS protocols. The client sends an HTTP request to the API’s URL, and the API processes the request and returns an HTTP response containing the result.
Client → HTTP Request → Web API → HTTP Response → Client
This request-and-response model is the foundation of communication between modern applications and Web APIs.
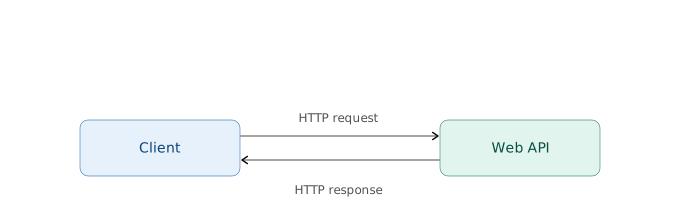
The Web APIs work with methods which are called by HTTP protocols. They are commonly called as Verbs, GET, PUT, POST, and DELETE are the most common ones.
Consume (Call) Web API in ASP.NET Core
Create a new ASP.NET Core Web MVC APP on Visual Studio, and name it APIConsume.
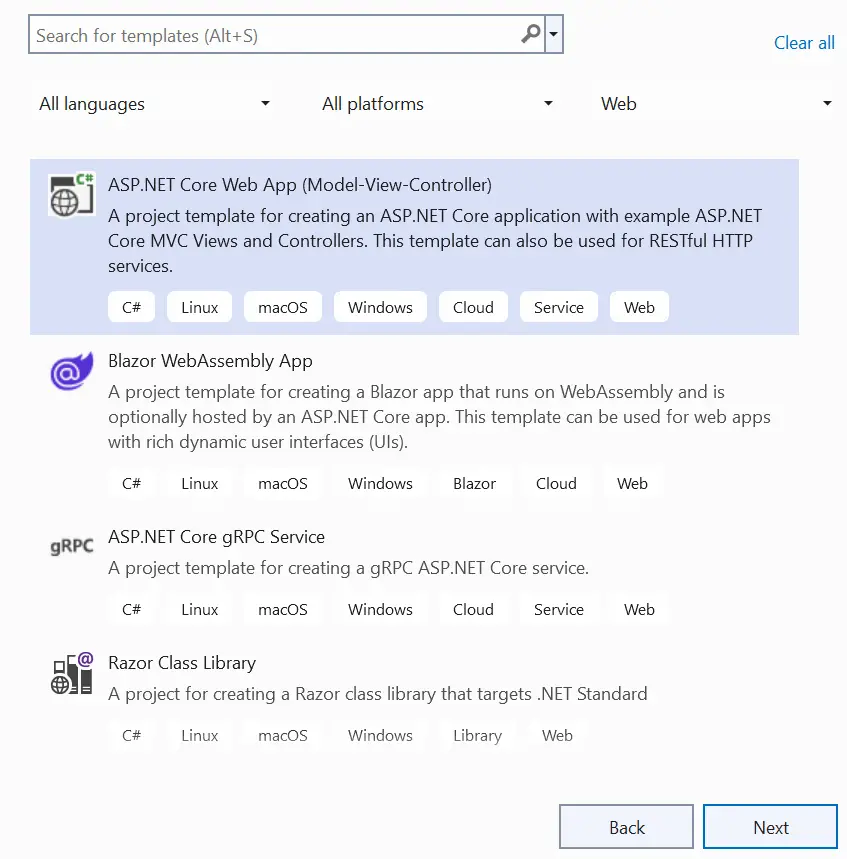
Remember to select the framework as DOT NET 10.0. I have shown this in the below image
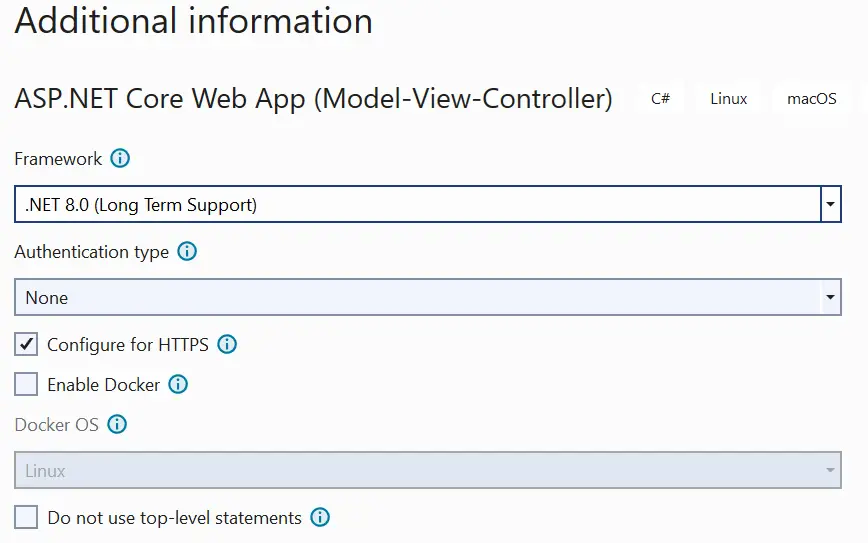
Models
Add a C# class called Reservation.cs to the Models folder of the app. The class code is shown below.
namespace APIConsume.Models
{
    public class Reservation
    {
        public int Id { get; set; }
	public string Name { get; set; }
	public string StartLocation { get; set; }
	public string EndLocation { get; set; }
    }
}
This class contains 4 properties for dealing with a reservation object. In a moment I will start using it and you will understand it’s working clearly.
Controller
Create a new controller file inside the Controllers folder, name it as HomeController.cs. This controller will have action methods to invoke methods of the Web API.
HttpClient to Call API
In order to Consume the Web API in this project, make sure your Web API project should be in running mode i.e. just press F5 key in Visual Studio to bring it to running mode. I made this Web API project in my previous tutorial and it’s link is given on the top of this article.
The HttpClient has some very important method to call Web API. These should be noted.
| Method | Description |
|---|---|
| GetAsync | Send a GET request to the specified URI as an asynchronous operation. |
| PostAsync | Send a POST request to the specified URI as an asynchronous operation. |
| PutAsync | Send a PUT request to the specified URI as an asynchronous operation. |
| SendAsync | Send an HTTP request as an asynchronous operation. |
| PatchAsync | Sends a PATCH request with a cancellation token as an asynchronous operation. |
| DeleteAsync | Send a DELETE request to the specified URI as an asynchronous operation. |
Now let us deal with each of these methods one by one.
Read Records from Web API
The Web API has a HttpGet method that returns all reservation records in JSON. This method’s code is.
[HttpGet]
public IEnumerable<Reservation> Get() => repository.Reservations;
To read all these reservation records, I have to make an HTTP GET Type of Request to this method of the Web API. So create a new controller inside the Controllers folder and name it HomeController.cs. Replace it’s Index action with the following version shown below.
using APIConsume.Models;
using Microsoft.AspNetCore.Mvc;
using System.Text.Json;

namespace APIConsume.Controllers
{
	public class HomeController : Controller
	{
		public async Task<IActionResult> Index()
		{
			List<Reservation> reservationList = new List<Reservation>();
			using (var httpClient = new HttpClient())
			{
				using (var response = await httpClient.GetAsync("https://localhost:44324/api/Reservation"))
				{
					string apiResponse = await response.Content.ReadAsStringAsync();

                    var options = new JsonSerializerOptions
                    {
                         PropertyNameCaseInsensitive = true
                     };

					reservationList = JsonSerializer.Deserialize<List<Reservation>>(apiResponse, options);
				}
			}
			return View(reservationList);
		}
	}
}
I used the HttpClient class of the System.Net.Http namespace to make an API request. You will notice that the Index Action is an asynchronous type that returns a Task. This is because the HttpClient class makes only asynchronous request which can only happen from an asynchronous action method.
I made the an HTTP GET request to the API in the line – var response = await httpClient.GetAsync("https://localhost:44324/api/Reservation"). Notice the URL of the API’s action is supplied to the GetAsync() method.
The Web API Response i.e. the data returned by the API is fetched from the code – await response.Content.ReadAsStringAsync(), and stored in the variable called apiResponse.
You already know that the API response is a JSON type of all the Reservation objects. So I can easily Deserialize the JSON to a List type object by using the JsonSerializer package. The Code that does this work is shown below.
reservationList = JsonSerializer.Deserialize<List<Reservation>>(apiResponse, options);We have set the PropertyNameCaseInsensitive = true . This is because JSON uses camelCase keys (“startLocation”), but our C# class properties are PascalCase (StartLocation). System.Text.Json does an exact match by default, so without this option, StartLocation would end up null after deserialization. Same for the other properties of the class.
Finally the List of Reservation objects which are stored in the variable called reservationList is returned to the View as the Model.
Now you need to create the Index View inside the Views ➤ Home folder to show all the reservations on an HTML table. The Index View code is given below:
@model IEnumerable<Reservation>

@{
    ViewData["Title"] = "All Reservations";
}

<h2>All Reservations</h2>
<a asp-action="AddReservation" class="btn btn-sm btn-primary">Add Reservation</a>
<a asp-action="GetReservation" class="btn btn-sm btn-secondary">Get Reservation</a>

<table class="table table-sm table-striped table-bordered m-2">
    <thead>
        <tr>
            <th>ID</th>
            <th>Name</th>
            <th>Start Location</th>
            <th>End Location</th>
            <th>Update</th>
            <th>Delete</th>
        </tr>
    </thead>
    <tbody>
        @foreach (var r in Model)
        {
            <tr>
                <td>@r.Id</td>
                <td>@r.Name</td>
                <td>@r.StartLocation</td>
                <td>@r.EndLocation</td>
                <td>
                    <a asp-action="UpdateReservation" asp-route-id="@r.Id">
                        <img src="/icon/edit.png" />
                    </a>
                </td>
                <td>
                    <form asp-action="DeleteReservation" method="post">
                        <input type="hidden" value="@r.Id" name="ReservationId" />
                        <input type="image" src="/icon/close.png" />
                    </form>
                </td>
            </tr>
        }
    </tbody>
</table>
This view is a strongly typed receiving an IEnumerable type as it’s model. There is a foreach loop to populate a table with all the reservations.
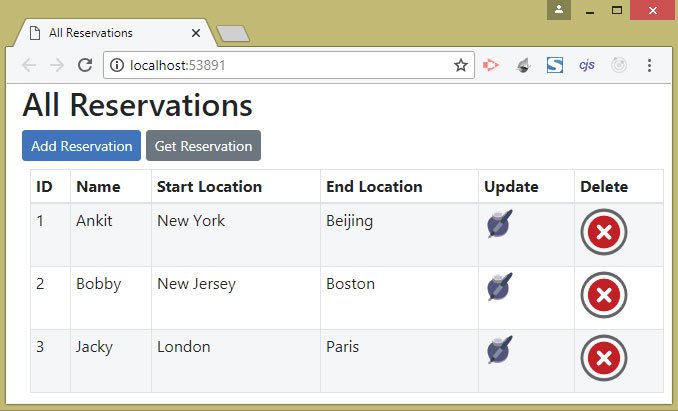
Now run your APIConsume project also make sure the APIControllers project is running to. You will notice a new browser window opens up and shows all the Reservations that are fetched from the Web API. The image below shows all the Reservations.
Reading a Reservation Record by it’s Id by calling the Web API
If I send an Id of a Reservation to the Web API then the API will send me back the reservation details of that Id. The Web API, which I have already created on my previous tutorial, has a HttpGet method with an id parameter. It’s work is to read a records whose id is provided to it. It’s code is shown below.
[HttpGet("{id}")]
public ActionResult<Reservation> Get(int id)
{
    if (id == 0)
        return BadRequest("Value must be passed in the request body.");
    return Ok(repository[id]);
}
Now I will call this method of the API from my client project. Do you remember that in the Index View I have created a link to Get Reservation, now I will add it’s functionality. So go to the Home Controller and add new actions called GetReservation to it. Their code is given below.
public ViewResult GetReservation() => View();

[HttpPost]
public async Task<IActionResult> GetReservation(int id)
{
    Reservation reservation = new Reservation();
    using (var httpClient = new HttpClient())
    {
        using (var response = await httpClient.GetAsync("https://localhost:44324/api/Reservation/" + id))
        {
            if (response.StatusCode == System.Net.HttpStatusCode.OK)
            {
                string apiResponse = await response.Content.ReadAsStringAsync();

                var options = new JsonSerializerOptions
                {
                    PropertyNameCaseInsensitive = true
                };

                reservation = JsonSerializer.Deserialize<Reservation>(apiResponse, options);
            }
            else
                ViewBag.StatusCode = response.StatusCode;
        }
    }
    return View(reservation);
}
I have added 2 GetReservation actions – HTTP GET & HTTP POST. The HTTP GET version simply returns the default view while the HTTP POST one has the task to Call the Web API and provide it with the reservation id. The API in turn will return the reservation details of that id.
The API Call is made by HttpClient class and the response, which is the Reservation object in JSON, is deserialized into the Reservation class object. The Reservation class object is then returned to the default view as Model.
Next, add the GetReservation.cshtml view file inside the Views ➤ Home folder. It’s full code is shown below.
@model Reservation
@{
    ViewBag.Title = "Get Reservation by Id";
}

<h2>Get Reservation by Id <a asp-action="Index" class="btn btn-sm btn-primary">Back</a></h2>
<h3>@ViewBag.StatusCode</h3>
<form method="post">
    <div class="form-group">
        <label for="id">Id:</label>
        <input class="form-control" name="id" />
    </div>
    <div class="text-center panel-body">
        <button type="submit" class="btn btn-sm btn-primary">Get Reservation</button>
    </div>
</form>

@if (Model != null)
{
    <h2>Reservation</h2>
    <table class="table table-sm table-striped table-bordered m-2">
        <thead>
            <tr>
                <th>ID</th>
                <th>Name</th>
                <th>Start Location</th>
                <th>End Location</th>
            </tr>
        </thead>
        <tbody>
            <tr>
                <td>@Model.Id</td>
                <td>@Model.Name</td>
                <td>@Model.StartLocation</td>
                <td>@Model.EndLocation</td>
            </tr>
        </tbody>
    </table>
}
The view contains a form, here the Reservation Id is added, and on clicking the button the Web API Call is made.
The expression – @if (Model != null) checks if the model is not null. In that case the Model data, which is Reservation data fetched from the API, is shown.
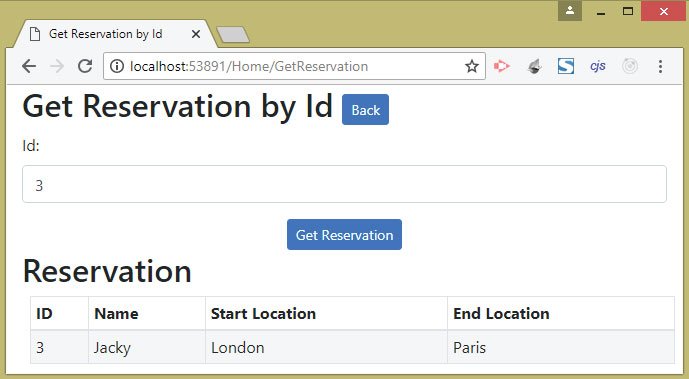
Now run your project and on the main page click the Get Reservation link. Add the Id as 3 and click the button. You will see the 3rd Reservation’s details shown on the view, see the image below:
Create a Reservation Record by Calling the Web API
The Web API has a [HttpPost] method that creates a new reservation. This method is shown below.
[HttpPost]
public Reservation Post([FromBody] Reservation res) =>
repository.AddReservation(new Reservation
{
    Name = res.Name,
    StartLocation = res.StartLocation,
    EndLocation = res.EndLocation
});
To add a new Reservation, I have to make a HTTP POST request to this method of the web API. I will make use of the PostAsync() method of the HttpClient class to make a call to this method. So add a new action method called AddReservation to the Home controller as highlighted by the below code.
using APIConsume.Models;
using Microsoft.AspNetCore.Mvc;
using System.Text.Json;
using System.Text;

namespace APIConsume.Controllers
{
    public class HomeController : Controller
    {
        // other methods

        public ViewResult AddReservation() => View();

        [HttpPost]
        public async Task<IActionResult> AddReservation(Reservation reservation)
        {
            Reservation receivedReservation = new Reservation();
            using (var httpClient = new HttpClient())
            {
                StringContent content = new StringContent(JsonSerializer.Serialize(reservation), Encoding.UTF8, "application/json");

                using (var response = await httpClient.PostAsync("https://localhost:44324/api/Reservation", content))
                {
                    string apiResponse = await response.Content.ReadAsStringAsync();

                    var options = new JsonSerializerOptions
                    {
                         PropertyNameCaseInsensitive = true
                     };

                    receivedReservation = JsonSerializer.Deserialize<Reservation>(apiResponse, options);
                }
            }
            return View(receivedReservation);
        }
    }
}
This Web API method needs the new reservation data in JSON format therefore I am serializing the reservation data into JSON and then converting it to a StringContent class type. Check the below code.
StringContent content = new StringContent(JsonSerializer.Serialize(reservation), Encoding.UTF8, "application/json");Next, this StringContent type object is added to the Web API request code by adding it to the 2nd parameter of the PostAsync() method. Check cod below.
using (var response = await httpClient.PostAsync("https://localhost:44324/api/Reservation", content))
{
}
The Web API method will add the new reservation to it’s repository and sends back the newly added reservation object as the API Response. This also contains the id of the created reservation.
The Response is Deserialized into the reservation type and in the end is transferred to the View as a model.
Now create the view called AddReservation view inside the Views ➤ Home folder with the following code:
@model Reservation
@{
    ViewBag.Title = "Add a Reservation";
}

<h2>Add a Reservation <a asp-action="Index" class="btn btn-sm btn-secondary">Back</a></h2>
<form asp-action="AddReservation" method="post">
    <div class="form-group">
        <label for="Name">Name:</label>
        <input class="form-control" name="Name" />
    </div>
    <div class="form-group">
        <label for="StartLocation">Start Location:</label>
        <input class="form-control" name="StartLocation" />
    </div>
    <div class="form-group">
        <label for="EndLocation">End Location:</label>
        <input class="form-control" name="EndLocation" />
    </div>
    <div class="text-center panel-body">
        <button type="submit" class="btn btn-sm btn-primary">Add</button>
    </div>
</form>

@if (Model != null)
{
    <h2>Reservation</h2>
    <table class="table table-sm table-striped table-bordered m-2">
        <thead>
            <tr>
                <th>ID</th>
                <th>Name</th>
                <th>Start Location</th>
                <th>End Location</th>
            </tr>
        </thead>
        <tbody>
            <tr>
                <td>@Model.Id</td>
                <td>@Model.Name</td>
                <td>@Model.StartLocation</td>
                <td>@Model.EndLocation</td>
            </tr>
        </tbody>
    </table>
}
The view has a HTML form for adding a new reservation while it’s model is of a type Reservation. Once the API response is received the controller sends it to the view as a Model, the view then checks if the Model is not null from the code – @if (Model != null).
If the model contains the newly created reservation data then it is shown on the HTML table.
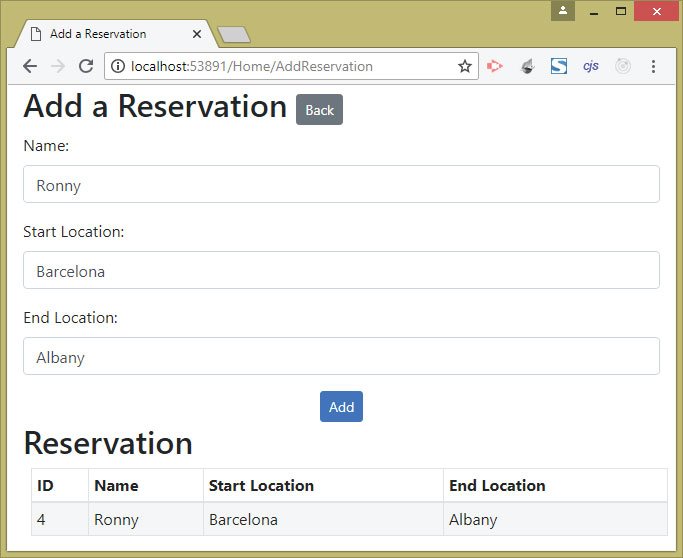
Now run your project and go to the add reservation page whose URL in my case is https://localhost:44334/Home/AddReservation. Fill the form and click the add button. The reservation will be created and it’s details will be shown on a table. Check below image.
Update a Reservation Records through the Web API
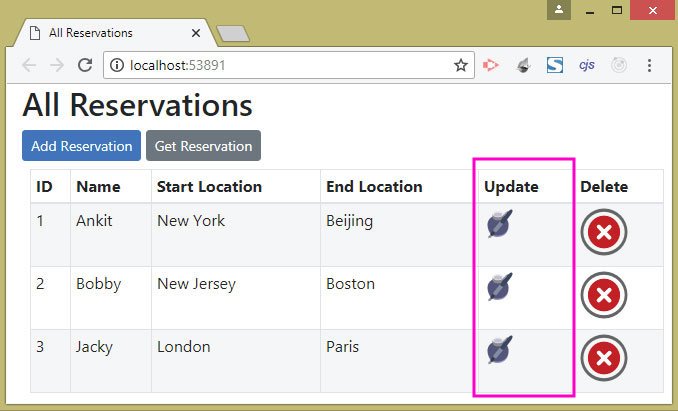
The page that shows all the reservations has an Update Column (a pen icon). If you click on this icon (see the below image) then you can update the corresponding reservation record.
Now I will create the Update Reservation functionality. Do you remember the Web API has a HttpPut method which has a task to update a reservation. See it’s code below.
[HttpPut]
public Reservation Put([FromForm] Reservation res) => repository.UpdateReservation(res);
using APIConsume.Models;
using Microsoft.AspNetCore.Mvc;
using System.Text.Json;
using System.Text;

namespace APIConsume.Controllers
{
    public class HomeController : Controller
    {
        // other methods

        public async Task<IActionResult> UpdateReservation(int id)
        {
            Reservation reservation = new Reservation();
            using (var httpClient = new HttpClient())
            {
                using (var response = await httpClient.GetAsync("https://localhost:44324/api/Reservation/" + id))
                {
                    string apiResponse = await response.Content.ReadAsStringAsync();

                    var options = new JsonSerializerOptions
                    {
                         PropertyNameCaseInsensitive = true
                     };

                     reservation = JsonSerializer.Deserialize<Reservation>(apiResponse, options);
                }
            }
            return View(reservation);
        }

        [HttpPost]
        public async Task<IActionResult> UpdateReservation(Reservation reservation)
        {
            Reservation receivedReservation = new Reservation();
            using (var httpClient = new HttpClient())
            {
                var content = new MultipartFormDataContent();
                content.Add(new StringContent(reservation.Id.ToString()), "Id");
                content.Add(new StringContent(reservation.Name), "Name");
                content.Add(new StringContent(reservation.StartLocation), "StartLocation");
                content.Add(new StringContent(reservation.EndLocation), "EndLocation");

                using (var response = await httpClient.PutAsync("https://localhost:44324/api/Reservation", content))
                {
                    string apiResponse = await response.Content.ReadAsStringAsync();
                    ViewBag.Result = "Success";

                    var options = new JsonSerializerOptions
                    {
                         PropertyNameCaseInsensitive = true
                     };

                      receivedReservation = JsonSerializer.Deserialize<Reservation>(apiResponse, options);
                }
            }
            return View(receivedReservation);
        }
    }
}
The HTTP GET version of the UpdateReservation action simply makes a GET type of request to the Web API. It provides the API with the Id of a reservation. The API will send it back the reservation record whose Id was provided to it. The reservation record is then shown on the default view.
The HTTP POST version of this action does the Update of the Reservation.
Since the PUT method of the API has [FromForm] attribute in it’s argument therefore I am creating a form data by using the MultipartFormDataContent. This form data will be sent to the API as:
var content = new MultipartFormDataContent();
content.Add(new StringContent(reservation.Id.ToString()), "Id");
content.Add(new StringContent(reservation.Name), "Name");
content.Add(new StringContent(reservation.StartLocation), "StartLocation");
content.Add(new StringContent(reservation.EndLocation), "EndLocation");
Notice I am sending the id, name, start location & end location of the reservation record to be updated in the Form data.
After updating the record the Web API will send back the response which is the updated reservation record, and this is shown on the view.
Now add the view called UpdateReservation.cshtml inside the Views ➤ Home folder with the following code:
@model Reservation
@{
    ViewBag.Title = "Update a Reservation";
}

<h2>Update a Reservation <a asp-action="Index" class="btn btn-sm btn-secondary">Back</a></h2>
<form method="post">
    <div class="form-group">
        <label asp-for="Id"></label>
        <input class="form-control" asp-for="Id" readonly />
    </div>
    <div class="form-group">
        <label asp-for="Name"></label>
        <input class="form-control" asp-for="Name" />
    </div>
    <div class="form-group">
        <label asp-for="StartLocation"></label>
        <input class="form-control" asp-for="StartLocation" />
    </div>
    <div class="form-group">
        <label asp-for="EndLocation"></label>
        <input class="form-control" asp-for="EndLocation" />
    </div>
    <div class="text-center panel-body">
        <button type="submit" class="btn btn-sm btn-primary">Update</button>
    </div>
</form>

@if (ViewBag.Result == "Success")
{
    <h2>Reservation</h2>
    <table class="table table-sm table-striped table-bordered m-2">
        <thead>
            <tr>
                <th>ID</th>
                <th>Name</th>
                <th>Start Location</th>
                <th>End Location</th>
            </tr>
        </thead>
        <tbody>
            <tr>
                <td>@Model.Id</td>
                <td>@Model.Name</td>
                <td>@Model.StartLocation</td>
                <td>@Model.EndLocation</td>
            </tr>
        </tbody>
    </table>
}
The view has a form where new values of the reservation are put, and on clicking the Update button the reservation is updated.
The API response is shown inside an HTML table which is also provided on the view.
Now it’s time to check the update functionality, so run your project and on the reservation table click on the pen icon against any of the reservation.
The reservation will be shown in a form which you can then update.
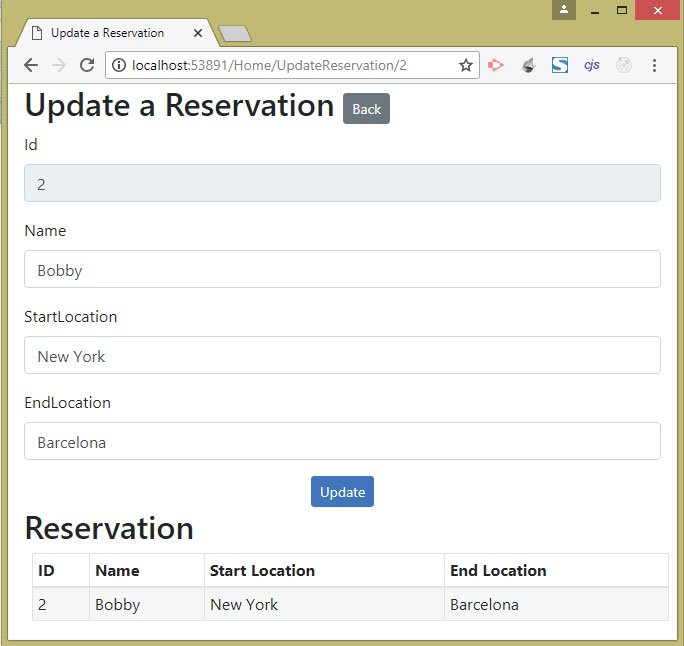
The below image shows that I have updated the start location to New York and end location to Barcelona of the 2nd reservation record.
Update a Reservation Record with “HTTP PATCH” through the Web API
The Web API has a HTTP PATCH method whose task is to update a reservation record. This method is shown below.
[HttpPatch("{id}")]
public StatusCodeResult Patch(int id, [FromBody]JsonPatchDocument<Reservation> patch)
{
    Reservation res = Get(id).Value;
    if (res != null)
    {
        patch.ApplyTo(res);
        return Ok();
    }
    return NotFound();
}
To invoke this PATCH method of the Web API, I will have to use the HttpRequestMessage class to initialize 3 properties. These properties are:
- 1. RequestUri – the URL to make the PATCH request.
- 2. Method – for specifying the HTTP method as PATCH.
- 3. Content – to specify the JSON, Encoding and media type.
The Patch method will need a JSON sent from the client. This JSON contains the operation to be performed along with fields and their new values. See this JSON format given below.
[
    { "op": "replace", "path": "Name", "value": "Ram"},
    { "op": "replace", "path": "StartLocation", "value": "Moscow"}
]
I have used replace for the op argument, and this specifies that I will be doing the update for the record. I have also specified the Name and the StartLocation fields will be updated along with their new values.
Now it’s time to Consume this method of the Web API from my client project. So go to the Home Controller and add the 2 actions called UpdateReservationPatch to it. See the below code.
using APIConsume.Models;
using Microsoft.AspNetCore.Mvc;
using System.Text.Json;
using System.Text;

namespace APIConsume.Controllers
{
    public class HomeController : Controller
    {
        // other methods

        public async Task<IActionResult> UpdateReservationPatch(int id)
        {
            Reservation reservation = new Reservation();
            using (var httpClient = new HttpClient())
            {
                using (var response = await httpClient.GetAsync("https://localhost:44324/api/Reservation/" + id))
                {
                    string apiResponse = await response.Content.ReadAsStringAsync();
                    var options = new JsonSerializerOptions
                    {
                         PropertyNameCaseInsensitive = true
                     };

                      reservation = JsonSerializer.Deserialize<Reservation>(apiResponse, options);
                }
            }
            return View(reservation);
        }

        [HttpPost]
        public async Task<IActionResult> UpdateReservationPatch(int id, Reservation reservation)
        {
            using (var httpClient = new HttpClient())
            {
                var patchOps = new object[]
                {
                     new { op = "replace", path = "/Name", value = reservation.Name },
                     new { op = "replace", path = "/StartLocation", value = reservation.StartLocation }
                };

                var request = new HttpRequestMessage
                {
                    RequestUri = new Uri("https://localhost:44324/api/Reservation/" + id),
                    Method = new HttpMethod("Patch"),
                    Content = new StringContent(JsonSerializer.Serialize(patchOps), Encoding.UTF8, "application/json-patch+json")
                };

                var response = await httpClient.SendAsync(request);
            }
            return RedirectToAction("Index");
        }
    }
}
The UpdateReservationPatch has 2 actions – HTTP GET & HTTP POST. The GET action will just fetch the reservation object who’s Id it supplied to it. The POST action will make the PATCH request.
Note that to make the HTTP PATCH request I will use the SendAsync() method of the HttpClient class. The JSON, which is provided to the StringContent class, contains the new values of the name and start location fields and are added by using the reservation.Name and reservation.StartLocation. In the end the action redirects to the Index View.
Now, add the view called UpdateReservationPatch.cshtml inside the Views ➤ Home folder with the following code:
@model Reservation
@{
    ViewBag.Title = "Update a Reservation from PATCH request";
}

<h2>Update a Reservation from Patch request<a asp-action="Index" class="btn btn-sm btn-secondary">Back</a></h2>
<form method="post">
    <div class="form-group">
        <label asp-for="Name"></label>
        <input class="form-control" asp-for="Name" />
    </div>
    <div class="form-group">
        <label asp-for="StartLocation"></label>
        <input class="form-control" asp-for="StartLocation" />
    </div>
    <div class="text-center panel-body">
        <button type="submit" class="btn btn-sm btn-primary">Update</button>
    </div>
</form>
The view contains a form where I am only binding the Name and the StartLocation fields so that the user can update their values to a new one.
I also need to create a link to the UpdateReservationPatch action from the Index view. I can do this thing by changing the asp-action attribute given on the Index view from UpdateReservation to UpdateReservationPatch. I have shown this in the below code.
...
<tbody>
    @foreach (var r in Model)
    {
        <tr>
            ...
            <td>
                <a asp-action="UpdateReservationPatch" asp-route-id="@r.Id">
                    <img src="/icon/edit.png" />
                </a>
            </td>
            ...
        </tr>
    }
...

</tbody>
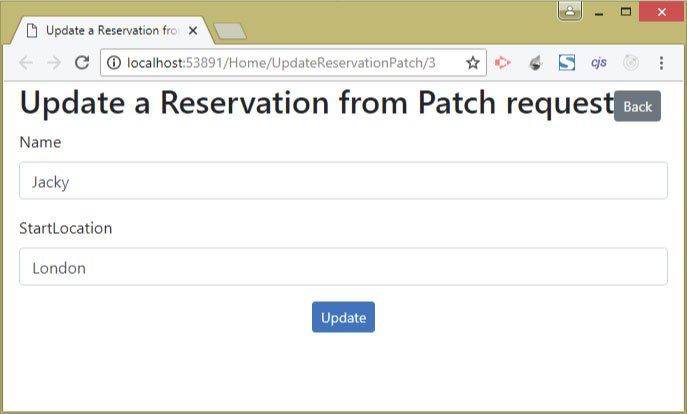
Now it’s time to test the Patch functionality. So run your project and click any of the update icon against any of the reservation. You will be taken to a new page where the Name and StartLocation fields will show the values of the reservation which was clicked. Now change the Name and StartLocation field’s values and click the Update button to update the records by PATCH request. Check the below image.
Delete a Reservation by calling the Web API
The Web API has a HttpDelete type method that will delete any record whose id is provided to it. This method is shown below.
[HttpDelete("{id}")]
public void Delete(int id) => repository.DeleteReservation(id);
From the client project I will call this method of the API and perform the delete operation. So add a new action method called DeleteReservation to the Home Controller of the client project. This action will delete a reservation record by calling the Web API’s delete method. It’s code is given below.
using APIConsume.Models;
using Microsoft.AspNetCore.Mvc;
using System.Text.Json;
using System.Text;

namespace APIConsume.Controllers
{
    public class HomeController : Controller
    {
        // other action

        [HttpPost]
        public async Task<IActionResult> DeleteReservation(int ReservationId)
        {
            using (var httpClient = new HttpClient())
            {
                using (var response = await httpClient.DeleteAsync("https://localhost:44324/api/Reservation/" + ReservationId))
                {
                    string apiResponse = await response.Content.ReadAsStringAsync();
                }
            }

            return RedirectToAction("Index");
        }
    }
}
This action has an argument called ReservationId which contains the id of the reservation to be deleted.
The reservation is deleted by making the HTTP DELETE request to the Web API’s method. I used the DeleteAsync method to make this request.
Notice the Delete column on the Index View ( which is a cross icon). If you click on this icon then you can delete the corresponding reservation record through the API.
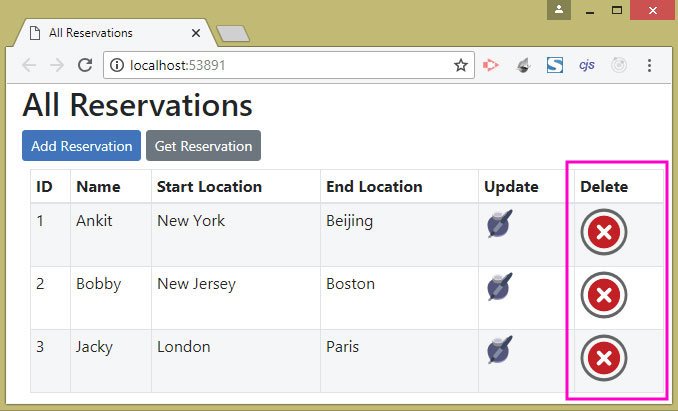
The Index View has a form which invokes the DeleteReservation action method. See below code.
<form asp-action="DeleteReservation" method="post">
    <input type="hidden" value="@r.Id" name="ReservationId" />
    <input type="image" src="/icon/close.png" />
</form>
Inside the form there is an image button and a hidden field which contains the reservation id for the particular record.
You can delete a reservation by clicking on the cross icon against it.
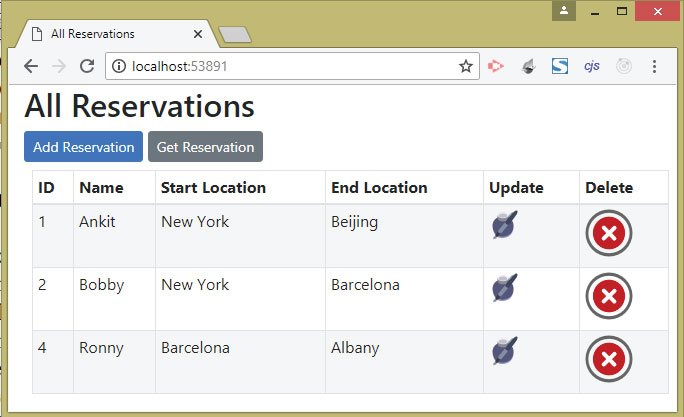
The below images shows the 3rd reservation is deleted from the repository:
Call Web API with PowerShell
You can Call Web API with PowerShell in order to test them. PowerShell makes it easy to create HTTP requests using command line. PowerShell commands can be executed using Visual Studio Package Manager Console, open it from Tools ➤ NuGet Package Manager ➤ Package Manager Console.
In Package Manager Console window execute the commands listed below:
PowerShell: HTTP GET Request to Web API
The PowerShell command for calling HTTP GET method of Web API is:
PM> Invoke-RestMethod https://localhost:44324/api/reservation -Method GETThe command will show all the reservations returned from the Web API as shown by the image given below:

The command that makes HTTP GET Request to fetch the 2nd reservation is:
PM> Invoke-RestMethod https://localhost:44324/api/reservation/2 -Method GETIt will show the 2nd reservation. See the below image:

PowerShell: HTTP POST Request to Web API
To call the HTTP POST method of Web API with PowerShell run the following command:
PM> Invoke-RestMethod https://localhost:44324/api/Reservation -Method POST -Body (@{Name="Jenny"; StartLocation="Moscow"; EndLocation="New Delhi"} | ConvertTo-Json) -ContentType "application/json"The command adds a new reservation to the repository.

The -Body argument specifies the body for the request which is encoded to JSON by using the ConvertTo-Json argument.
The -ContentType argument is used to set the Content-Type header for the request, which in my case is ‘application/json’.
PowerShell: HTTP PUT Request to Web API
The command to make HTTP PUT request with PowerShell is similar to the HTTP POST command and is given below:
PM> Invoke-RestMethod https://localhost:44324/api/Reservation -Method PUT -Body (@{Id="5"; Name="Mary"; StartLocation="Tokyo"; EndLocation="Abu Dhabi"}) -ContentType "application/x-www-form-urlencoded"Since I have to send the reservation object in Form Data therefore I have removed the ConvertTo-Json argument from the command. Also, I have set the –ContentType to application/x-www-form-urlencoded.
Once the command executes the 5th reservation record is updated with values as Mary for name, Tokyo for start location and Abu Dhabi for end location.
The below image illustrates this:

PowerShell: HTTP PATCH Request to Web API
Here I am making a HTTP PATCH request with PowerShell to update a reservation record. So in the JSON I will send the op argument with replace value.
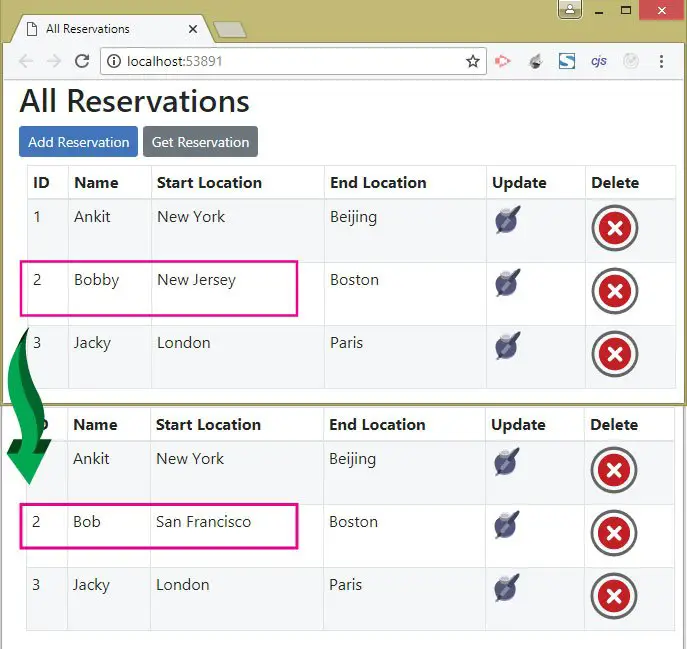
The below PATCH command will update the 2nd reservation’s name field to Bob and start location field to San Francisco.
PM> Invoke-RestMethod https://localhost:44324/api/Reservation/2 -Method PATCH -Body (@{ op="replace"; path="Name"; value="Bob"},@{ op="replace"; path="StartLocation";value="San Francisco"} | ConvertTo-Json) -ContentType "application/json-patch+json"The image below illustrates the change made to the 2nd reservation by the command:
PowerShell: HTTP DELETE Request to Web API
To Powershell command to call DELETE type method of Web API is:
PM> Invoke-RestMethod https://localhost:44324/api/Reservation/3 -Method DELETEThe above command will delete the 3rd reservation by invoking the Web API’s Delete Action method.
Securing Web APIs by KEYS
Not every client should have unrestricted access to a Web API. To protect sensitive API endpoints, you can Secure ASP.NET Core Web APIs with API keys. The client includes an API key with each request, and the Web API validates the key before processing the request. If the key is valid, the API processes the request and returns the response. If the key is missing or invalid, the API returns an HTTP 401 Unauthorized response.
A recommended approach is to send the API key through an HTTP request header. This keeps the key separate from the request body and provides a consistent way to authenticate API clients.
To understand how API key authentication works, consider a scenario where only authorized clients can add a reservation through a Web API. In this example, we will modify the HTTP POST action in the Web API controller to manually validate the API key received in the request header.
The API checks the supplied key before creating the reservation. If the key is valid, the reservation is added successfully. If the key is invalid or missing, the API rejects the request and returns a 401 Unauthorized response.
Therefore, modify the HTTP POST action of the Web API controller as shown below:
[HttpPost]
public IActionResult Post([FromBody] Reservation res)
{
    if (!Authenticate())
        return Unauthorized();
    return Ok(repository.AddReservation(new Reservation
    {
        Name = res.Name,
        StartLocation = res.StartLocation,
        EndLocation = res.EndLocation
    }));
}
The return type has been changed to IActionResult because the API action can return different HTTP responses depending on whether the client is authenticated. In this example, the action can return either an HTTP status code indicating an error or a successful response containing the newly created reservation.
If the Authenticate() method returns false, the API returns an HTTP 401 Unauthorized status code, indicating that the client does not have valid API credentials. If authentication succeeds, the API creates the reservation and returns an HTTP 200 OK response containing the newly created reservation object.
The Ok() method is used to return both the HTTP 200 status code and the reservation object in the response body.
You also need to add an Authenticate() method to the API controller. This method is responsible for reading the API key from the HTTP request header and validating it before allowing the client to access the protected API endpoint.
bool Authenticate()
{
    var allowedKeys = new[] { "Secret@123", "Secret#12", "SecretABC" };
    StringValues key = Request.Headers["Key"];
    int count = (from t in allowedKeys where t == key select t).Count();
    return count == 0 ? false : true;
}
The allowedKeys variable contains three valid API keys that are authorized to access the protected Web API. The Authenticate() method checks whether the API key provided in the HTTP request header matches any of these allowed keys. If a match is found, the method returns true; otherwise, it returns false.
Now go to the APIConsume project (i.e. the client project), and then inside the AddReservation action method of the HomeController, you add a key in the Header of the HTTP request with this code – httpClient.DefaultRequestHeaders.Add("Key", "Secret@123").
This adds the API key to the Key HTTP request header before the client sends the request to the Web API.
Also add a try catch block to deserialize the response to a reservation object. If the deserialization fails then it is because the API Response does not contain the reservation object. This is a case when the key is invalid and 401 status code is returned by the API.
In this example, the ViewBag.Result variable is assigned inside the catch block so that the 401 Unauthorized response returned by the API can be displayed to the user.
The updated AddReservation action method’s code is given below.
[HttpPost]
public async Task<IActionResult> AddReservation(Reservation reservation)
{
    Reservation receivedReservation = new Reservation();
    using (var httpClient = new HttpClient())
    {
        httpClient.DefaultRequestHeaders.Add("Key", "Secret@123");
        StringContent content = new StringContent(JsonSerializer.Serialize(reservation), Encoding.UTF8, "application/json");

        using (var response = await httpClient.PostAsync("https://localhost:44324/api/Reservation", content))
        {
            string apiResponse = await response.Content.ReadAsStringAsync();

            var options = new JsonSerializerOptions
            {
                 PropertyNameCaseInsensitive = true
            };

            if (response.StatusCode == System.Net.HttpStatusCode.OK)
                receivedReservation = JsonSerializer.Deserialize<Reservation>(apiResponse, options);
            else if (response.StatusCode == System.Net.HttpStatusCode.Unauthorized)
            {
                ViewBag.Result = apiResponse;
                return View();
            }
        }
    }
    return View(receivedReservation);
}
Now run your APIConsume project and add a new reservation from the URL https://localhost:44334/Home/AddReservation. You will be able to add the new reservation because the key which you provide is correct.
Now Change the key to a wrong one like – httpClient.DefaultRequestHeaders.Add("Key", "wrongkey"). Then try once again to add a new reservation. This time you will fail to do so and will see a JSON message:
{"type":"https://tools.ietf.org/html/rfc7235#section-3.1","title":"Unauthorized","status":401,"traceId":"|cccb5daa-43da21f99ce83682.1.f7315d9e_"}This is shown by the image given below:
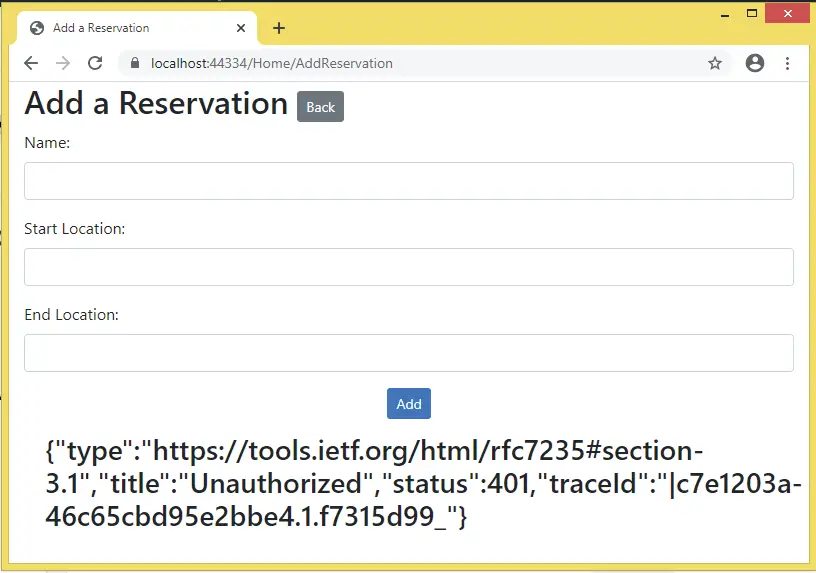
This JSON contains the title & status nodes containing the texts – Unauthorized & 401. You can simply extract these texts and show them on the view.
File Upload Web API
You can also upload files to remote servers through Web API. File uploads can be implemented by using the IFormFile interface as a parameter of the Web API action method. The IFormFile interface represents a file sent to the server as part of an HTTP request, typically through a multipart/form-data request.
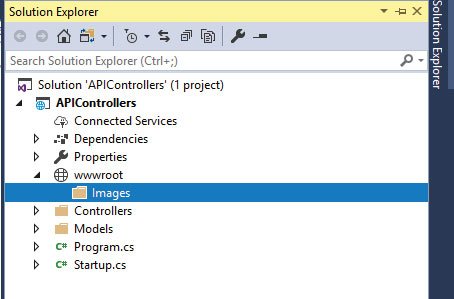
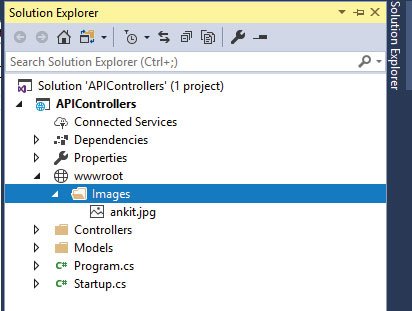
Let us create this file upload feature. First add Images folder inside the wwwroot folder of the APIControllers project. In that folder files sent by the client will be uploaded.
The following image shows the location of the “Images” folder:
To save uploaded files to the correct location on the server, the Web API needs information about its web hosting environment. ASP.NET Core provides the IWebHostEnvironment interface for accessing details about the application’s hosting environment, including the path to the wwwroot folder.
A recommended approach is to use ASP.NET Core Dependency Injection to inject IWebHostEnvironment into the constructor of the ReservationController. The interface belongs to the Microsoft.AspNetCore.Hosting namespace and provides the environment information required to determine where uploaded files should be stored.
Therefore, update the ReservationController in the APIControllers project as shown below:
using APIControllers.Models;
using Microsoft.AspNetCore.JsonPatch;
using Microsoft.AspNetCore.Mvc;

namespace APIControllers.Controllers
{
    [ApiController]
    [Route("api/[controller]")]
    public class ReservationController : ControllerBase
    {
        private IRepository repository;

        private IWebHostEnvironment webHostEnvironment;

        public ReservationController(IRepository repo, IWebHostEnvironment environment)
        {
            repository = repo;
            webHostEnvironment = environment;
        }

        // other methods
    }
}
Now you can use the webHostEnvironment variable to access information about the application’s hosting environment, including the physical path of the wwwroot directory.
Next, add a new action method named UploadFile to the ReservationController in the APIControllers project, as shown below:
[HttpPost("UploadFile")]
public async Task<string> UploadFile([FromForm] IFormFile file)
{
    string path = Path.Combine(webHostEnvironment.WebRootPath, "Images/" + file.FileName);
    using (var stream = new FileStream(path, FileMode.Create))
    {
        await file.CopyToAsync(stream);
    }
    return "https://localhost:44324/Images/" + file.FileName;
}
This action contains the [HttpPost("UploadFile")] attribute that specifies this action method will be invoked from the URL – /api/Reservation/UploadFile.
The client sends the file as part of the HTTP request, and the Web API saves the uploaded file in the wwwroot/Images folder.
The WebRootPath property of IWebHostEnvironment provides the absolute path to the application’s wwwroot directory. You can then use the Path.Combine() method from the System.IO namespace to construct the complete path where the uploaded file will be stored.
The file name is appended to this path using the FileName property of the IFormFile object. This creates the absolute file path required to save the uploaded file on the server.
The following FileStream code creates the file and writes the uploaded file contents to the specified location:
using (var stream = new FileStream(path, FileMode.Create))
{
    await file.CopyToAsync(stream);
}
In the end my action method is returning back the full path of the saved file to the client as a response.
Now going on the client side, which is the APIConsume project, where I will add a new action method that will upload the file by calling the Web API.
This action method is given below:
public ViewResult AddFile() => View();

[HttpPost]
public async Task<IActionResult> AddFile(IFormFile file)
{
    string apiResponse = "";
    using (var httpClient = new HttpClient())
    {
        var form = new MultipartFormDataContent();
        using (var fileStream = file.OpenReadStream())
        {
            form.Add(new StreamContent(fileStream), "file", file.FileName);
            using (var response = await httpClient.PostAsync("https://localhost:44324/api/Reservation/UploadFile", form))
            {
                response.EnsureSuccessStatusCode();
                apiResponse = await response.Content.ReadAsStringAsync();
            }
        }
    }
    return View((object)apiResponse);
}
This action method, whose name is AddFile, has a parameter of type IFormFile. This means I can get the file which is uploaded from the input control of file type, in the View through the ASP.NET Core Model Binding feature.
Next I am reading the file from the OpenReadStream() method, and adding it to the form data by using the MultipartFormDataContent class. The reason for adding the file to form data is because the Web API action method has the [FromForm] attribute.
Finally, I am making the API call to the URL – https://localhost:44324/api/Reservation/UploadFile with the HTTP POST request and the Web API response is returned to the View as Model.
The API returns a string which contains the full location of the uploaded file. At the last I casted this string to an object – (object)apiResponse and provided it to the default view.
Now create the View called AddFile.cshtml inside the Views ➤ Home folder with the code given below:
@model string
@{ ViewBag.Title = "Add File"; }

<h2>Add File</h2>
<a asp-action="Index" class="btn btn-sm btn-primary">Back</a>

<form method="post" enctype="multipart/form-data">
    <input type="file" name="file" />
    <div class="text-center panel-body">
        <button type="submit" class="btn btn-sm btn-primary">Add</button>
    </div>
</form>

@if (Model != null)
{
    <h2>Uploaded File</h2>
    <img src="@Model" />
}
The form should have the attribute – enctype="multipart/form-data" whenever you are uploading files.
The view has a model of type string so that I can show the API response inside an img tag.
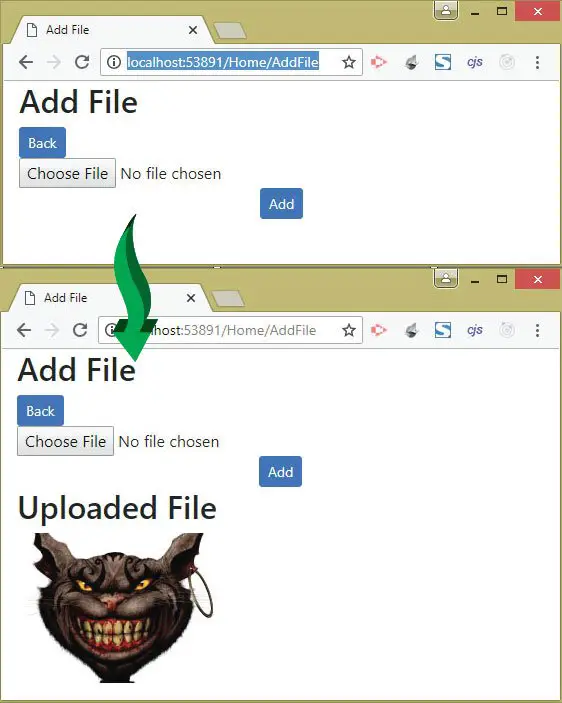
Now let us test it by uploading an image file. So run the application and go to the URL – https://localhost:44334/Home/AddFile. Click the file control and select an image then click the Add button. You will see the image gets uploaded within a matter of seconds and will be displayed on the View.
The image below illustrates this:
You can now find this file uploaded in the Images folder of the API Controllers project:
Returning Data from Web API in XML instead of JSON – [Produces] attribute
I told earlier that ASP.NET Core returns data in JSON by default. This is for the case if the action method has the return type of anything other than a string.
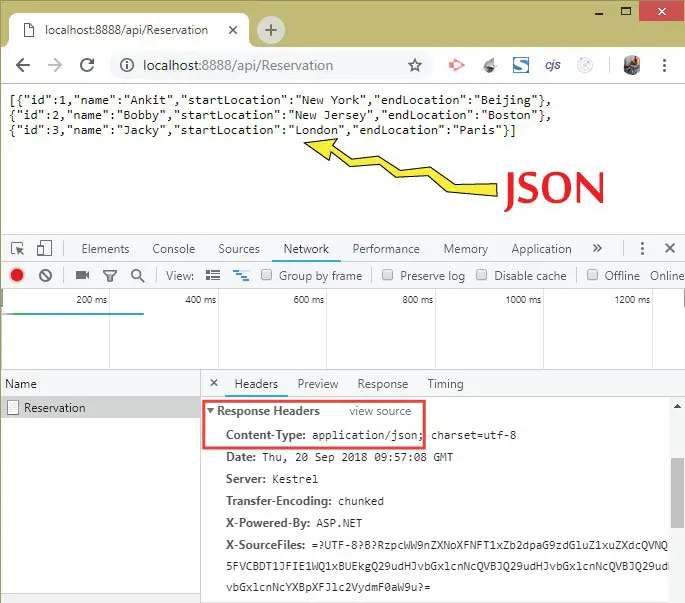
You may have noticed that if you run your APIControllers project and go to the URL – /api/Reservation, then you will get a JSON data containing all the reservations.
Check the Response Headers in your Network section of Chrome browser’s Developers Tools. You will find the Content-Type as application/json. This is shown in the below image:
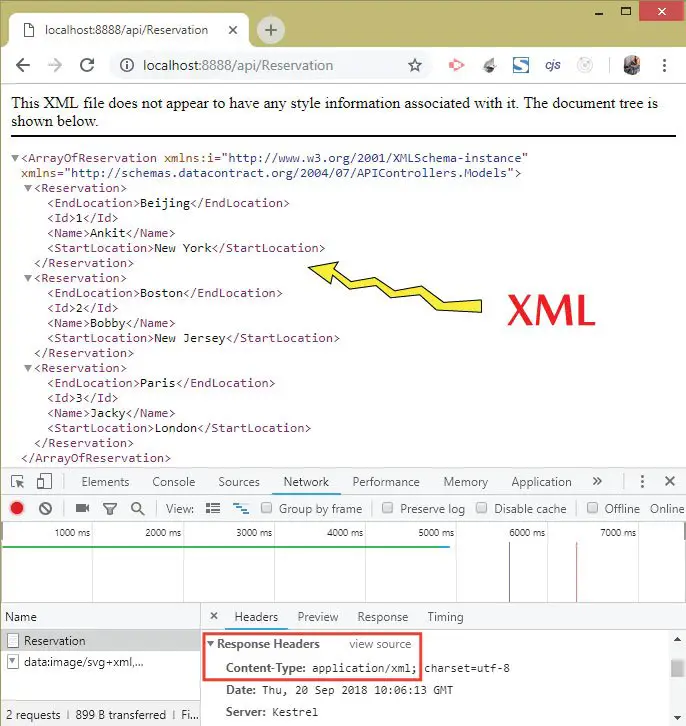
You can change this and make the Web API to return the data in XML rather than in JSON. For this you will have to add the AddXmlDataContractSerializerFormatters() method in the Program.cs.
builder.Services.AddControllersWithViews().AddXmlDataContractSerializerFormatters();Also add the attribute called [Produces("application/xml")] which forces the format used by the API response to XML.
See the below code where I have used this attribute on the GET action method:
[HttpGet]
[Produces("application/xml")]
public IEnumerable<Reservation> Get() {
    return repository.Reservations;
}
Now re-run your application and go to the same URL again. This time you will see the data in XML format and the Content-Type set as application/xml. See the below image:
Web APIs accepting XML [Consumes(“application/xml”)]
The [Consumes] attribute specifies data types that an action/controller accepts. Some Web APIs accepts only XML data and so have [Consumes("application/xml")] attribute on them. Let us see how to deal with it.
Go to the APIControllers app and add XML input formatter to the Web API in the program class:
builder.Services.AddControllers().AddXmlSerializerFormatters();Next, add a new action method called PostXml with the Consume attribute to accept only XML data. See it’s code below.
[HttpPost("PostXml")]
[Consumes("application/xml")]
public Reservation PostXml([FromBody] System.Xml.Linq.XElement res)
{
    return repository.AddReservation(new Reservation
    {
        Name = res.Element("Name").Value,
        StartLocation = res.Element("StartLocation").Value,
        EndLocation = res.Element("EndLocation").Value
    });
}
Two things to note here.
- It has the consume attribute –
[Consumes("application/xml")]. - It’s parameter is of type XElement.
The [Consume] attribute examines the Content-Type header in the HTTP Request made from the clients and decides whether the action method can process the request or not.
Now to invoke this Web API’s method from your client project you add an action method called AddReservationByXml having the code shown below.
public ViewResult AddReservationByXml() => View();

[HttpPost]
public async Task<IActionResult> AddReservationByXml(Reservation reservation)
{
    Reservation receivedReservation = new Reservation();

    using (var httpClient = new HttpClient())
    {
        StringContent content = new StringContent(ConvertObjectToXMLString(reservation), Encoding.UTF8, "application/xml");

        var options = new JsonSerializerOptions
        {
             PropertyNameCaseInsensitive = true
         };

        using (var response = await httpClient.PostAsync("https://localhost:44324/api/Reservation/PostXml", content))
        {
            string apiResponse = await response.Content.ReadAsStringAsync();
            receivedReservation = JsonSerializer.Deserialize<Reservation > (apiResponse, options);
        }
    }
    return View(receivedReservation);
}

string ConvertObjectToXMLString(object classObject)
{
    string xmlString = null;
    XmlSerializer xmlSerializer = new XmlSerializer(classObject.GetType());
    using (MemoryStream memoryStream = new MemoryStream())
    {
        xmlSerializer.Serialize(memoryStream, classObject);
        memoryStream.Position = 0;
        xmlString = new StreamReader(memoryStream).ReadToEnd();
    }
    return xmlString;
}
Important things to note here are:
- 1. You have to specify application/xml for the 3rd parameter (media type) of the StringContent class.
- 2. The ConvertObjectToXMLString is a custom function to create XML from any class object.
Finally add the View called AddReservationByXml.cshtml inside the Views ➤ Home folder (see below).
@model Reservation
@{
    ViewBag.Title = "Add a Reservation by XML";
}

<h2>Add a Reservation by XML <a asp-action="Index" class="btn btn-sm btn-secondary">Back</a></h2>
<form asp-action="AddReservationByXml" method="post">
    <div class="form-group">
        <label for="Name">Name:</label>
        <input class="form-control" name="Name" />
    </div>
    <div class="form-group">
        <label for="StartLocation">Start Location:</label>
        <input class="form-control" name="StartLocation" />
    </div>
    <div class="form-group">
        <label for="EndLocation">End Location:</label>
        <input class="form-control" name="EndLocation" />
    </div>
    <div class="text-center panel-body">
        <button type="submit" class="btn btn-sm btn-primary">Add</button>
    </div>
</form>

<h3 class="alert">@ViewBag.Result</h3>

@if (Model != null)
{
    <h2>Reservation</h2>
    <table class="table table-sm table-striped table-bordered m-2">
        <thead>
            <tr>
                <th>ID</th>
                <th>Name</th>
                <th>Start Location</th>
                <th>End Location</th>
            </tr>
        </thead>
        <tbody>
            <tr>
                <td>@Model.Id</td>
                <td>@Model.Name</td>
                <td>@Model.StartLocation</td>
                <td>@Model.EndLocation</td>
            </tr>
        </tbody>
    </table>
}Web APIs “Format-specific” Methods
A single method of the Web API can produce both JSON & XML result. For this you have to apply the FormatFilter attribute.
Add the below method to your Web API.
[HttpGet("ShowReservation.{format}"), FormatFilter]
public IEnumerable<Reservation> ShowReservation() => repository.Reservations;
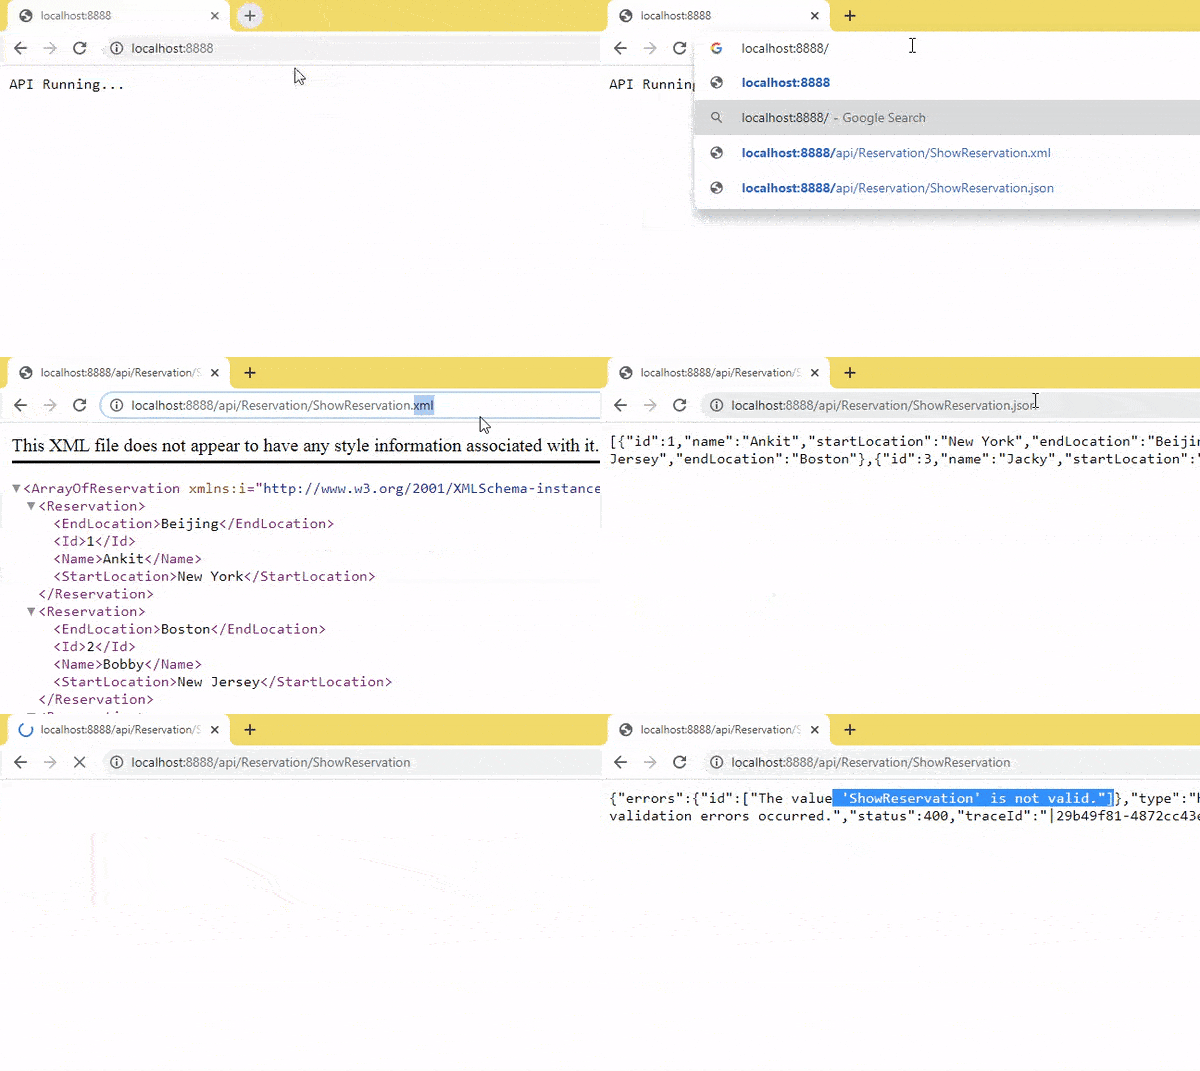
See I have applied the format filter like – [HttpGet("ShowReservation.{format}"), FormatFilter]. So this method can now send the reservation in both XML & JSON. This will reduce your code in a big way.
The URL to invoke the XML version:
https://localhost:44324/api/Reservation/ShowReservation.xml
The URL to invoke the JSON version:
https://localhost:44324/api/Reservation/ShowReservation.json
I have shown the working in the below video.
The link to download the full source code of this tutorial is given below:
ASP.NET Core MVC and learned how to build, consume, secure, and extend Web API applications. We covered important topics such as creating API controllers and HTTP endpoints, handling different HTTP methods, working with JSON and XML data, securing APIs with API keys, uploading files, and consuming Web APIs from client applications.
I hope this tutorial has helped you understand ASP.NET Core Web API development and gives you a useful reference for your future projects. If you found this article helpful, please consider sharing it with other ASP.NET Core developers and on social media. Your support helps the website reach more developers and allows me to continue creating detailed tutorials and practical programming guides. Also check the next tutorial – How to Call Web APIs from jQuery.
SHARE THIS ARTICLE


Related Tutorials:




ABOUT THE AUTHOR
I hope you enjoyed reading this tutorial. If it helped you then consider buying a cup of coffee for me. This will help me in writing more such good tutorials for the readers. Thank you.

HELLO EVERYONE
 Welcome to YogiHosting - A Programming Tutorial Website. It is used by millions of people around the world to learn and explore about ASP.NET Core, Blazor, jQuery, JavaScript, Docker, Kubernetes and other topics.
SUBSCRIBE TO NEWSLETTER
Enter your email address to subscribe to this blog and receive notifications of new posts by email.
Join 90K other subscribers