First CRUD Application in ASP.NET Core MVC 8.0 [Detailed & Illustrative]
![First CRUD Application in ASP.NET Core MVC 8.0 [Detailed & Illustrative]](https://www.yogihosting.com/wp-content/uploads/2018/12/first-crud-application-aspnet-core.jpg "First CRUD Application in ASP.NET Core MVC 8.0 [Detailed & Illustrative]")
In this tutorial we will create an ASP.NET Core CRUD operations Example. I will create an Employee form which can be filled and submitted. On submission, the employee information will be stored in a repository. Other than that we will also have Read, Update & Delete operations for the employee.
This Employee form has 5 fields:
- Name: contains employee name.
- Age: contains employee age.
- Salary: contains employee salary.
- Department: for employee department
- Sex: for employee sex.
Page Contents
What are CRUD Operations in ASP.NET Core?
CRUD is an acronym for Create, Read, Update, and Delete. CRUD Operations in ASP.NET Core are basically performing all these operations on a repository like a SQL Server database. In this tutorial we will perform CRUD Operations on a repository which is a static C# class.
How to perform CRUD Operations in ASP.NET Core?
The steps to perform CRUD Operations in ASP.NET Core are as follows:
- Create the repository like a database.
- Create ASP.NET Core application.
- Connect the application with the repository.
- Create all the CRUD operations in the application.
- Perform Testing.
- Host the application on IIS or Kestrel.
Creating CRUD Operations in ASP.NET Core
Let us now start building the CRUD Operations in an ASP.NET Core application. Open Visual Studio to create a new ASP.NET Core Web App (Model-View-Controller) project:
")
Name the project FirstApp and the location on your drive.

On the next screen select latest version .NET 8.0 and keep other settings as they are:

The Configure for HTTPS option comes selected by default. ASP.NET Core will create a development SSL Certificate for the app which will work on the browser for the development of the app.
ASP.NET Core Disable HTTPS
When creating an ASP.NET Core app, you will find an option saying Configure for HTTPS. If you want to disable https then simply “un-check” this option.
You can also disable HTTPS on an ASP.NET Core app from project properties:
- Right click to your project name in “solution explorer” and select Properties.
- Click on the Debug tab.
- Click – “Open debug launch profiles UI”.
- Click the “https” option to select it.
- Then click the delete profile button to delete it.
I have shown this in the screenshot.

Next, go to the Program.cs method and remove the https redirection middleware:
app.UseHttpsRedirection();I have to store the Employee data somewhere in my application. For this I will create a static class instead of a database to make this tutorial simple for beginners. Data in a static class remains persistent as long as the application is running so the application will behave exaclty like a database driven application. This also means we will be creating CRUD Operations without using Entity Framwork Core.
Proceed with creating a new class inside the Models folder and name it Repository.cs.
The Repository.cs class is given below:
namespace FirstApp.Models
{
    public static class Repository
    {
        private static List<Employee> allEmpoyees = new List<Employee>();
        public static IEnumerable<Employee> AllEmpoyees
        {
            get { return allEmpoyees; }
        }
        public static void Create(Employee employee)
        {
            allEmpoyees.Add(employee);
        }
    }
}
In this static class there is a private field called allEmployees which is of type List<Employee>. This field will contain all employees which are submitted from the form.
The public property called AllEmployees of type IEnumerable<Employee> which will return ‘allEmployees’ variable.
There is also a Create function that will simply add the employee, which is passed to it’s parameter, to the allEmployees list variable.
Create a class inside the Models folder and name is Employee.cs. Add the below code to this class:
using System;

namespace FirstApp.Models
{
    public class Employee
    {
        public string Name { get; set; }
        public int Age { get; set; }
        public decimal Salary { get; set; }
        public string Department { get; set; }
        public Char Sex { get; set; }
    }
}
Note: I have taken Char type for Sex property to hold either ‘M’ for male or ‘F’ for female.
Now I will create the form, so create Create.cshtml razor view inside Views ➤ Employee folder.
Next, add model of type Employee to it on the top – @model Employee.
Also create a html form where users can fill and submit an employee details.
The whole code of the Create View is given below:
@model Employee
@{
    ViewData["Title"] = "Create";
}

<h2>Create</h2>
<form method="post">
    <p>
        <label asp-for="Name">Your Name:</label>
        <input asp-for="Name" />
    </p>
    <p>
        <label asp-for="Age">Your Age:</label>
        <input asp-for="Age" />
    </p>
    <p>
        <label asp-for="Salary">Your Salary:</label>
        <input asp-for="Salary" />
    </p>
    <p>
        <label asp-for="Department">Your Department:</label>
        <select asp-for="Department">
            <option value="Development">Development</option>
            <option value="HR">HR</option>
            <option value="Research">Research</option>
        </select>
    </p>
    <p>
        <label asp-for="Sex">Your Sex:</label>
        <input type="radio" asp-for="Sex" value="M" />Male
        <input type="radio" asp-for="Sex" value="F" />Female
    </p>
    <p><button type="submit">Submit</button></p>
</form>
When you see the form’s code you will notice asp-for attributes applied on the HTML tags. The asp-for is a tag helper attribute which binds the HTML tags (labels, inputs, select, etc) with the model properties.
@addTagHelper *, Microsoft.AspNetCore.Mvc.TagHelpers. Consider reading Introduction to Tag Helpers in ASP.NET Core to get a really good idea about them.The asp-for attribute on the label element sets the value of it’s for attribute. The asp-for attribute on the input & select elements set its ‘id’ and ‘name’ elements.
So for the asp-for tag applied on the ‘Name’ section of the form (given below):
<label asp-for="Name">Your Name:</label>
<input asp-for="Name" />
The HTML formed on the browser will be:
<p>
    <label for="Name">Your Name:</label>
    <input type="text" id="Name" name="Name" value="">
</p>
In the same way the asp-for tag helper is applied to the select tag.
<select asp-for="Department">
    <option value="Development">Development</option>
    <option value="HR">HR</option>
    <option value="Research">Research</option>
</select>
For creating Radio buttons I have created 2 inputs of type radio, and also bind both of them to the Sex property by using asp-for tag helpers. You may also note one has the value ‘M’ (for male) and other ‘F’ (for female).
<input type="radio" asp-for="Sex" value="M" />Male
<input type="radio" asp-for="Sex" value="F" />Female
There is also a button of type submit just before the ending form tag. When this button is clicked the form is submitted.
Next I will create the Controller.
Create a new ASP.NET Core Controller file inside the Controllers folder and name it EmployeeController.cs. In the Controller you have to Create action method for the View.
Recall in the above section I created a View called Create.cshtml. Now in the Controller, I have to create not one but two versions of action methods for this View:
- 1. First version of action method will be of HTTP GET type and will be invoked when the browser issues the request normally. This action method will be called when someone visits this link – /Employee/Create.
- 2. Second version of action method will be of HTTP POST type and will be invoked when the form is submitted. This version of the action method will be responsible for receiving submitted data.
The names of both version of action methods will be same. The post version will however carry an [HttpPost] attribute.
So add these 2 versions of ‘Create’ action method on the Controller which will then look like as shown below:
using FirstApp.Models;
using Microsoft.AspNetCore.Mvc;

namespace FirstApp.Controllers
{
    public class EmployeeController : Controller
    {
        public IActionResult Index()
        {
            return View();
        }

        // HTTP GET VERSION
        public IActionResult Create()
        {
            return View();
        }

        // HTTP POST VERSION
        [HttpPost]
        public IActionResult Create(Employee employee)
        {
            Repository.Create(employee);
            return View("Thanks", employee);
        }
    }
}
The HTTP GET version of ‘Create’ action method simply returns the View. It does not require any attribute like post version.
The HTTP POST of the ‘Create’ action method contains the [HttpPost] attribute. It also has a parameter of type ‘Employee’. When the form’s button is clicked this parameter automatically gets the value of all HTML tags filled by the user. This is done automatically by ASP.NET Core Model Binding feature.
Next the Employee data (which is submitted from the form) is added to the repository and the user is returned to the ‘Thanks’ View along with the submitted employee data.
Add Thanks.cshtml Razor View File inside the Views ➤ Employee folder and add the below code to it:
@model Employee
@{
    ViewData["Title"] = "Thanks";
}

<h2>Thanks, @Model.Name</h2>
I just added @model Employee at the top because it will be receiving the Employee type data for the Model.
Inside the h2 tag, a thanks message will be shown with the Employee Name – @Model.Name.
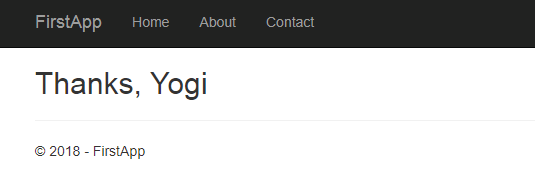
I have a basic working example ready now. So run your application and navigate to /Employee/Create on your browser.
You will see the form, fill it and click the submit button:
On submitting you will see the thanks message with the employee name.
In this section I will create the Read feature where details of all employees can be read. I will use the Index action method which will return Repository.AllEmpoyees to the View. As you remember Repository.AllEmpoyees contains list of all employees.
The code for this is given below:
using FirstApp.Models;
using Microsoft.AspNetCore.Mvc;

namespace FirstApp.Controllers
{
    public class EmployeeController : Controller
    {
        public IActionResult Index()
        {
            return View(Repository.AllEmpoyees);
        }

        // Removed for clarity
    }
}
Next, create the Index Razor View called Index.cshtml inside the Views ➤ Employee folder and add the below code to it:
@model IEnumerable<Employee>
@{
    ViewData["Title"] = "Index";
}

<h2>Here is the list of Employees</h2>
<table style="width:50%">
    <thead>
        <tr>
            <th>Name</th>
            <th>Age</th>
            <th>Salary</th>
            <th>Department</th>
            <th>Sex</th>
        </tr>
    </thead>
    <tbody>
        @foreach (Employee e in Model)
        {
            <tr>
                <td>@e.Name</td>
                <td>@e.Age</td>
                <td>@e.Salary</td>
                <td>@e.Department</td>
                <td>@e.Sex</td>
            </tr>
        }
    </tbody>
</table>
Obviously the View has the model of type IEnumerable<Employee> as it will receive list of Employees. To display all these Employees I have used a HTML Table, in the table I am iterating all the employees using the foreach loop and displaying their data one by one inside the tbody element.
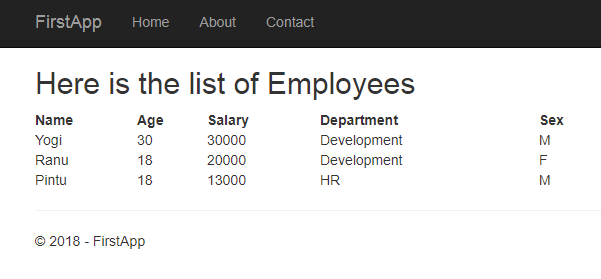
To test how this works create a few employees and then go to /Employee URL on your browser. You will see all Employees like the figure below:
Let us now link the views using anchor tags.
On the Thanks.cshtml view add the code line:
<a asp-action="Index">View All Employees</a>Put it just before the h2 tag.
This line will create the anchor tag that will link to the Index View. The asp-action is a tag helper that tells anchor to link to the Index view of the same Controller where you are currently in.
The Thanks.cshtml code will become:
@model Employee
@{
    ViewData["Title"] = "Thanks";
}
<a asp-action="Index">View All Employees</a>
<h2>Thanks, @Model.Name</h2>
In the same way add the anchor tag code to the Index view. This will link it to the Create.cshtml View. The Index.cshtml code will become:
<a asp-action="Create">Create an Employees</a>@model IEnumerable<Employee>
@{
ViewData["Title"] = "Index";
}
<a asp-action="Create">Create an Employees</a>
<h2>Here is the list of Employees</h2>
<table style="width:50%">
...
</table>
Finally, link the Create View to the Index View by adding this code –
<a asp-action="Index">View All Employees</a>The Create.cshtml code will become:
@model Employee
@{
    ViewData["Title"] = "Create";
}
<a asp-action="Index">View All Employees</a>
<h2>Create</h2>
<form method="post">
    ...
</form>
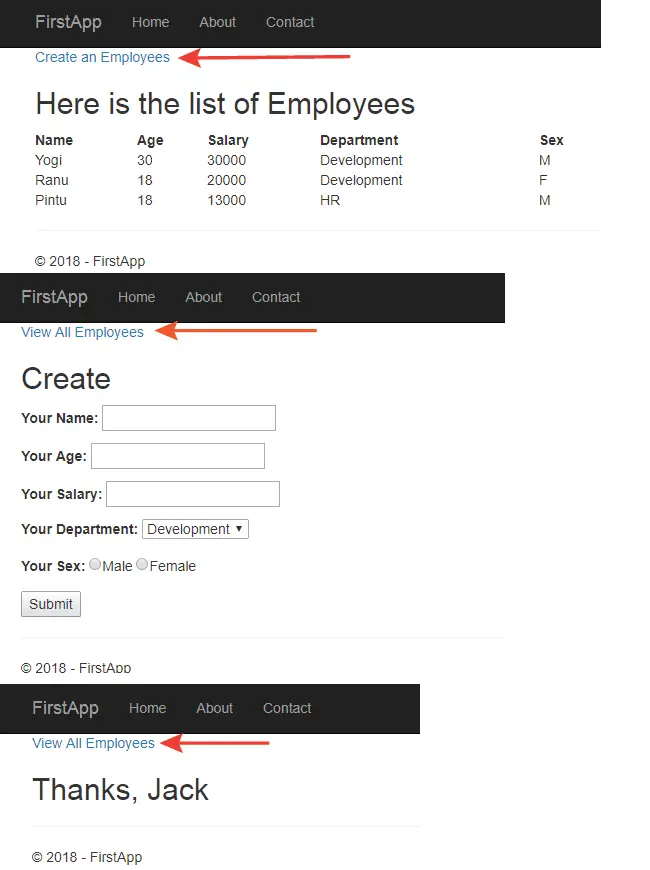
The given image shows the anchor tags on each of the 3 Views:
In this section I will create Update Employee feature. The whole concept of update is to send the employee “name” to Update action method in the form of query string. There I will fetch all the details of the employee that has the “name” as specified in the query string.
I will provide Update link besides every employee displayed on the table in the Index View. So add a new td element inside the foreach block:
<td><a asp-action="Update" asp-route-empname="@e.Name">Update</a></td></span>Now the Index View code will look like this:
@model IEnumerable<Employee>
@{
    ViewData["Title"] = "Index";
}
<a asp-action="Create">Create an Employees</a>

<h2>Here is the list of Employees</h2>
<table style="width:50%">
    <thead>
        <tr>
            <th>Name</th>
            <th>Age</th>
            <th>Salary</th>
            <th>Department</th>
            <th>Sex</th>
            <th></th>
        </tr>
    </thead>
    <tbody>
        @foreach (Employee e in Model)
        {
            <tr>
                <td>@e.Name</td>
                <td>@e.Age</td>
                <td>@e.Salary</td>
                <td>@e.Department</td>
                <td>@e.Sex</td>
                <td><a asp-action="Update" asp-route-empname="@e.Name">Update</a></td>
            </tr>
        }
    </tbody>
</table>
The asp-route-* is a route tag helper that will create a query string by the name given at ‘*’, here it will be ‘empname’. See the below code:
<a asp-action="Update" asp-route-empname="@e.Name">Update</a>It will create an anchor tag with the “href” attribute linking to the Update action method and having ‘empname’ as query string. In short the ‘href’ of anchor will be – /Update?empname=name-of-employee.
Run the application and go to the Index View. You will see the update links for each employee as shown on the image below:
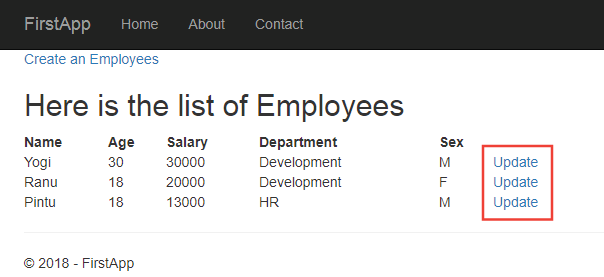
Now go to your Controller and add the HTTP GET and HTTP POST versions of Update action method. They are given on the code below:
using FirstApp.Models;
using Microsoft.AspNetCore.Mvc;

namespace FirstApp.Controllers
{
    public class EmployeeController : Controller
    {
        // Removed for clarity

        public IActionResult Update(string empname)
        {
            Employee employee = Repository.AllEmpoyees.Where(e => e.Name == empname).FirstOrDefault();
            return View(employee);
        }

        [HttpPost]
        public IActionResult Update(Employee employee, string empname)
        {
            Repository.AllEmpoyees.Where(e => e.Name == empname).FirstOrDefault().Age = employee.Age;
            Repository.AllEmpoyees.Where(e => e.Name == empname).FirstOrDefault().Salary = employee.Salary;
            Repository.AllEmpoyees.Where(e => e.Name == empname).FirstOrDefault().Department = employee.Department;
            Repository.AllEmpoyees.Where(e => e.Name == empname).FirstOrDefault().Sex = employee.Sex;
            Repository.AllEmpoyees.Where(e => e.Name == empname).FirstOrDefault().Name = employee.Name;

            return RedirectToAction("Index");
        }
    }
}
In the HTTP GET version of Update action method, the parameter string empname will get the value of query string variable empname by model binding.
I then get the employee details whose name was sent in the query string. For this I use LINQ to search the Repository. The employeed details is filled to an employee type object called employee which is returned to the Update view.
In the HTTP POST version of the Update action method there are 2 parameters – Employee employee, string empname. The “employee” parameter will contain the Employee data submitted by the form while “empname” will be contain the name of the employee in the query string.
Next, I am finding the employee details whose name matches ‘empname’ value, and updating it’s fields (Age, Salary, Department, Sex, Name) with the new ones the ‘employee’ parameter holds. In the end the user is redirected to the index action.
Create the update view called Update.cshtml inside the Views ➤ Employee folder. The contents of the Update View is totally same like the Create View except for the – ViewData[“Title”] = “Update” and the <h2>Update</h2>.
The Update View is given below:
@model Employee
@{
    ViewData["Title"] = "Update";
}
<a asp-action="Index">View All Employees</a>
<h2>Update</h2>
<form method="post">
    <p>
        <label asp-for="Name">Your Name:</label>
        <input asp-for="Name" />
    </p>
    <p>
        <label asp-for="Age">Your Age:</label>
        <input asp-for="Age" />
    </p>
    <p>
        <label asp-for="Salary">Your Salary:</label>
        <input asp-for="Salary" />
    </p>
    <p>
        <label asp-for="Department">Your Department:</label>
        <select asp-for="Department">
            <option value="Development">Development</option>
            <option value="HR">HR</option>
            <option value="Research">Research</option>
        </select>
    </p>
    <p>
        <label asp-for="Sex">Your Sex:</label>
        <input type="radio" asp-for="Sex" value="M" />Male
        <input type="radio" asp-for="Sex" value="F" />Female
    </p>
    <p><button type="submit">Submit</button></p>
</form>
Run the app and test the update link to be sure the feature is working properly.
To delete an employee from the repository, first create Delete static method in the Repository.cs file.
namespace FirstApp.Models
{
    public static class Repository
    {
        // Removed for clarity

        public static void Delete(Employee employee)
        {
            allEmpoyees.Remove(employee);
        }
    }
}
Next add HTTP POST action method by name ‘Delete’ in the Controller.
using FirstApp.Models;
using Microsoft.AspNetCore.Mvc;

namespace FirstApp.Controllers
{
    public class EmployeeController : Controller
    {
        // Removed for clarity

        [HttpPost]
        public IActionResult Delete(string empname)
        {
            Employee employee = Repository.AllEmpoyees.Where(e => e.Name == empname).FirstOrDefault();
            Repository.Delete(employee);
            return RedirectToAction("Index");
        }
    }
}
The Delete action method is POST type and contains name of the employee in it’s parameter i.e. string empname. The Delete action fills the details of the employee, whose name is same as what it receives in it’s parameter), in an Employee object through the code – Employee employee = Repository.AllEmpoyees.Where(e => e.Name == empname).FirstOrDefault();. Then it calls the Delete method of the repository to remove it from the repository. In the end the user is redirected to the Index action method.
For calling the Delete action method go to the Index View and add a new td element inside the foreach block. Inside this td create a form element.
<form asp-route-empname="@e.Name" asp-action="Delete" method="post">
    <button type="submit">Delete</button>
</form>
This form has a button which when clicked will invoke the ‘Delete’ action method. The asp-action is a tag helper that is used to set the form’s action, which in this case is the Delete action method. The asp-route-* is a tag helper which will add “empnane” query string parameter to the URL. This “empname” variable will contain the name of the employee.
So, the Delete action’s parameter string empname will bind to this query string value due to model binding feature of .NET.
Now the code of Index View has become:
@model IEnumerable<Employee>
@{
    ViewData["Title"] = "Index";
}
<a asp-action="Create">Create an Employees</a>

<h2>Here is the list of Employees</h2>
<table style="width:50%">
    <thead>
        <tr>
            <th>Name</th>
            <th>Age</th>
            <th>Salary</th>
            <th>Department</th>
            <th>Sex</th>
            <th></th>
            <th></th>
        </tr>
    </thead>
    <tbody>
        @foreach (Employee e in Model)
        {
            <tr>
                <td>@e.Name</td>
                <td>@e.Age</td>
                <td>@e.Salary</td>
                <td>@e.Department</td>
                <td>@e.Sex</td>
                <td><a asp-action="Update" asp-route-empname="@e.Name">Update</a></td>
                <td>
                    <form asp-route-empname="@e.Name" asp-action="Delete" method="post">
                        <button type="submit">Delete</button>
                    </form>
                </td>
            </tr>
        }
    </tbody>
</table>
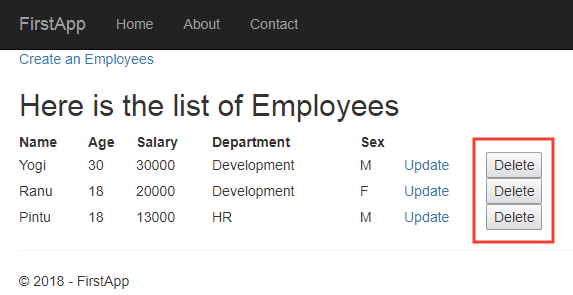
You can check the working of the Delete feature by running your application and click the ‘Delete’ button against any of the Employee.
The below image shows the delete buttons added against each employee:
Adding Validations
You may have noticed that on the Create Employee page the user can simply submit the form without filling any of the fields. So this will give rise to bad entries which you should prevent in your application. Here Validations will come out handy.
Go to your Employee.cs class in the Models folder and import the namespace – System.ComponentModel.DataAnnotations to it.
Add the attributes like shown on the modified Employee.cs file below:
namespace FirstApp.Models
using System.ComponentModel.DataAnnotations;

namespace FirstApp.Models
{
    public class Employee
    {
        [Required(ErrorMessage = "Please enter your name")]
        public string Name { get; set; }

        [Range(16, 60, ErrorMessage = "Ages 16-60 only")]
        public int Age { get; set; }

        [RegularExpression(@"\d+(\.\d{1,2})?", ErrorMessage = "Invalid, enter like # or #.##")]
        public decimal Salary { get; set; }

        public string Department { get; set; }

        [RegularExpression(@"^[MF]+$", ErrorMessage = "Select any one option")]
        public Char Sex { get; set; }
    }
}
ASP.NET Core MVC automatically detects the attributes and uses them to validate data during the model binding process.
I have used 3 different types of attributes here:
- 1. The [Required] attribute is used to specify that the field on which it is applied cannot contain null or empty. I applied them to the string property ‘Name’ so that MVC forces user to fill the ‘Name’ text box.
- 2. The [Range] attribute specify the numeric range value for the field. I applied it on the ‘Age’ field so that only ages from 16 to 60 are accepted by the text box.
- 3. The [RegularExpression] attribute specifies that the field value much match the Regular Expression value. I applied on the ‘Sex’ field with expression ^[MF]+$ so that user has to select radio button. Remember my radio buttons have value ‘M’ & ‘F’ so if user does not selects any of them then Regular Expression will fail and so will the validation.
The default value of char is ‘\0’ so the Required attribute is also useless for the Sex field.
The case of Department field is different. It gets applied on select control and so user cannot escape selecting an option.
To show these validation errors on the View, you add a control like ‘span’, ‘label’ or ‘div’ besides each of the controls which the user has to fill or select. You also have to bind this control to the validation error message with asp-validation-for tag helper.
Example: For the name field add the span element like shown below. This will make the span to show validation errors of “Name” field.
<label asp-for="Name">Your Name:</label>
<input asp-for="Name" />
<span asp-validation-for="Name"></span>
Do this for wherever you have to show the validation message. So you update your Views – Create.cshtml & Update.cshtml files like shown below:
Create.cshtml
@model Employee
@{
    ViewData["Title"] = "Create";
}
<a asp-action="Index">View All Employees</a>
<h2>Create</h2>
<form method="post">
    <p>
        <label asp-for="Name">Your Name:</label>
        <input asp-for="Name" />
        <span asp-validation-for="Name"></span>
    </p>
    <p>
        <label asp-for="Age">Your Age:</label>
        <input asp-for="Age" />
        <span asp-validation-for="Age"></span>
    </p>
    <p>
        <label asp-for="Salary">Your Salary:</label>
        <input asp-for="Salary" />
        <span asp-validation-for="Salary"></span>
    </p>
    <p>
        <label asp-for="Department">Your Department:</label>
        <select asp-for="Department">
            <option value="Development">Development</option>
            <option value="HR">HR</option>
            <option value="Research">Research</option>
        </select>
        <span asp-validation-for="Department"></span>
    </p>
    <p>
        <label asp-for="Sex">Your Sex:</label>
        <input type="radio" asp-for="Sex" value="M" />Male
        <input type="radio" asp-for="Sex" value="F" />Female
        <span asp-validation-for="Sex"></span>
    </p>
    <p><button type="submit">Submit</button></p>
</form>
Update.cshtml
@model Employee
@{
    ViewData["Title"] = "Update";
}
<a asp-action="Index">View All Employees</a>
<h2>Update</h2>
<form method="post">
    <p>
        <label asp-for="Name">Your Name:</label>
        <input asp-for="Name" />
        <span asp-validation-for="Name"></span>
    </p>
    <p>
        <label asp-for="Age">Your Age:</label>
        <input asp-for="Age" />
        <span asp-validation-for="Age"></span>
    </p>
    <p>
        <label asp-for="Salary">Your Salary:</label>
        <input asp-for="Salary" />
        <span asp-validation-for="Salary"></span>
    </p>
    <p>
        <label asp-for="Department">Your Department:</label>
        <select asp-for="Department">
            <option value="Development">Development</option>
            <option value="HR">HR</option>
            <option value="Research">Research</option>
        </select>
        <span asp-validation-for="Department"></span>
    </p>
    <p>
        <label asp-for="Sex">Your Sex:</label>
        <input type="radio" asp-for="Sex" value="M" />Male
        <input type="radio" asp-for="Sex" value="F" />Female
        <span asp-validation-for="Sex"></span>
    </p>
    <p><button type="submit">Submit</button></p>
</form>
Finally I have to make the necessary changes on the Controller. Open your EmployeeController.cs and change the HTTP POST versions of Create and Update actions as shown below in highlighted color:
[HttpPost]
public IActionResult Create(Employee employee)
{
    if (ModelState.IsValid)
    {
        Repository.Create(employee);
        return View("Thanks", employee);
    }
    else
        return View();
}

[HttpPost]
public IActionResult Update(Employee employee, string empname)
{
    if (ModelState.IsValid)
    {
        Repository.AllEmpoyees.Where(e => e.Name == empname).FirstOrDefault().Age = employee.Age;
        Repository.AllEmpoyees.Where(e => e.Name == empname).FirstOrDefault().Salary = employee.Salary;
        Repository.AllEmpoyees.Where(e => e.Name == empname).FirstOrDefault().Department = employee.Department;
        Repository.AllEmpoyees.Where(e => e.Name == empname).FirstOrDefault().Sex = employee.Sex;
        Repository.AllEmpoyees.Where(e => e.Name == empname).FirstOrDefault().Name = employee.Name;

        return RedirectToAction("Index");
    }
    else
        return View();
}
The main thing which I have done is adding an if else condition which checks whether ModelState is valid – if (ModelState.IsValid). In ModelState, .NET keeps the details of the validation checks, if all validations pass then only .NET makes the ModelState as valid.
Therefore if the ModelState is valid only then I am adding or updating the Employee in the Repository. This completes the validation section of MVC.
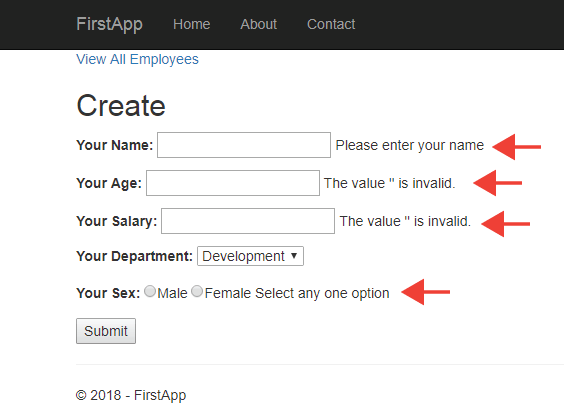
Try submitting the employee form without filling or selecting any value on the controls. You will see the validation errors like shown in the image below:
Adding Styles
To make the appearance of the application good you have to add some CSS Style.
You may ask where is the application’s Style Sheet? The answer is – open the _ViewStart.cshtml file located in the Views folder. This file contains the layout of all the Views in your application.
The _ViewStart.cshtml file’s code will look like:
@{
    Layout = "_Layout";
}
It specifies the Layout which is _Layout.cshtml and is located inside the Views ➤ Shared folder. Open the layout file.
The code of _Layout.cshtml file is given below:
<!DOCTYPE html>
<html lang="en">
<head>
    <meta charset="utf-8" />
    <meta name="viewport" content="width=device-width, initial-scale=1.0" />
    <title>@ViewData["Title"] - FirstApp</title>
    <link rel="stylesheet" href="~/lib/bootstrap/dist/css/bootstrap.min.css" />
    <link rel="stylesheet" href="~/css/site.css" asp-append-version="true" />
    <link rel="stylesheet" href="~/FirstApp.styles.css" asp-append-version="true" />
</head>
<body>
    ... Removed for clarity
</body>
</html>
It has the HTML Structure that gives the necessary design to all your Views. See inside the head area you will find site.css as the stylesheet of the app. This stylesheet file location is “wwwroot/css/style.css”.
<head>
    <meta charset="utf-8" />
    <meta name="viewport" content="width=device-width, initial-scale=1.0" />
    <title>@ViewData["Title"] - FirstApp</title>
    <link rel="stylesheet" href="~/lib/bootstrap/dist/css/bootstrap.min.css" />
    <link rel="stylesheet" href="~/css/site.css" asp-append-version="true" />
    <link rel="stylesheet" href="~/FirstApp.styles.css" asp-append-version="true" />
</head>
So you now know where you have to place your CSS codes.
Open the site.css file and add the following code to style the form and the table.
.container a {
    font-family: 'Adobe Arabic';
    font-size: 25px;
}

form p label {
    width: 10%;
}

form p input[type="text"], form p input[type="number"], form p select {
    width: 20%;
}

form p span {
    width: 20%;
    color: Red;
}

form p button, table button {
    background-color: #006bff;
    color: #FFF;
}

form p .input-validation-error {
    border: 1px solid Red;
    background-color: #fee;
}

table {
    border: solid 1px #ff6a00;
}

    table thead {
        background: #b6ff00;
    }

    table td, table th {
        padding: 10px;
    }
ASP.NET Core MVC adds class="input-validation-error" to controls when validation fails. Do the inspection of the html of any control with chrome “Inspect” tools to find this class. See the below html of the input control for the Name field.
<input type="text" class="input-validation-error" data-val="true" data-val-required="Please enter your name" id="Name" name="Name" value="">Therefore I added a red border to them though my CSS code below:
form p .input-validation-error {
    border: 1px solid Red;
    background-color: #fee;
}
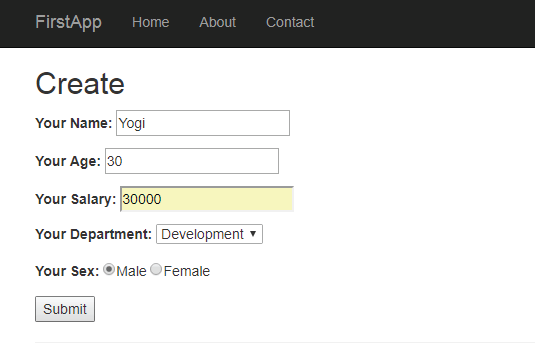
Now with these styles the Create Employee page will look like this:

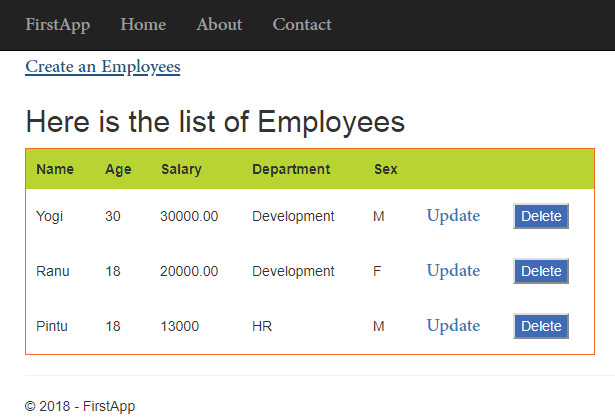
And all the employees displayed on the table will look like this:
You can download the full codes of this tutorial from the below link:
This tutorial gives you a quick and an excellent picture of ASP.NET Core MVC and explains you how to quickly start working on this framework. I performed ASP.NET Core CRUD without Entity Framework Core and hope you enjoyed learning it, makes sure to download it and study it’s codes.
SHARE THIS ARTICLE
Related Tutorials:


ABOUT THE AUTHOR
I hope you enjoyed reading this tutorial. If it helped you then consider buying a cup of coffee for me. This will help me in writing more such good tutorials for the readers. Thank you.

HELLO EVERYONE
 Welcome to YogiHosting - A Programming Tutorial Website. It is used by millions of people around the world to learn and explore about ASP.NET Core, Blazor, jQuery, JavaScript, Docker, Kubernetes and other topics.
SUBSCRIBE TO NEWSLETTER
Enter your email address to subscribe to this blog and receive notifications of new posts by email.
Join 90K other subscribers