


Microservices API Gateway to unify Multiple Microservices
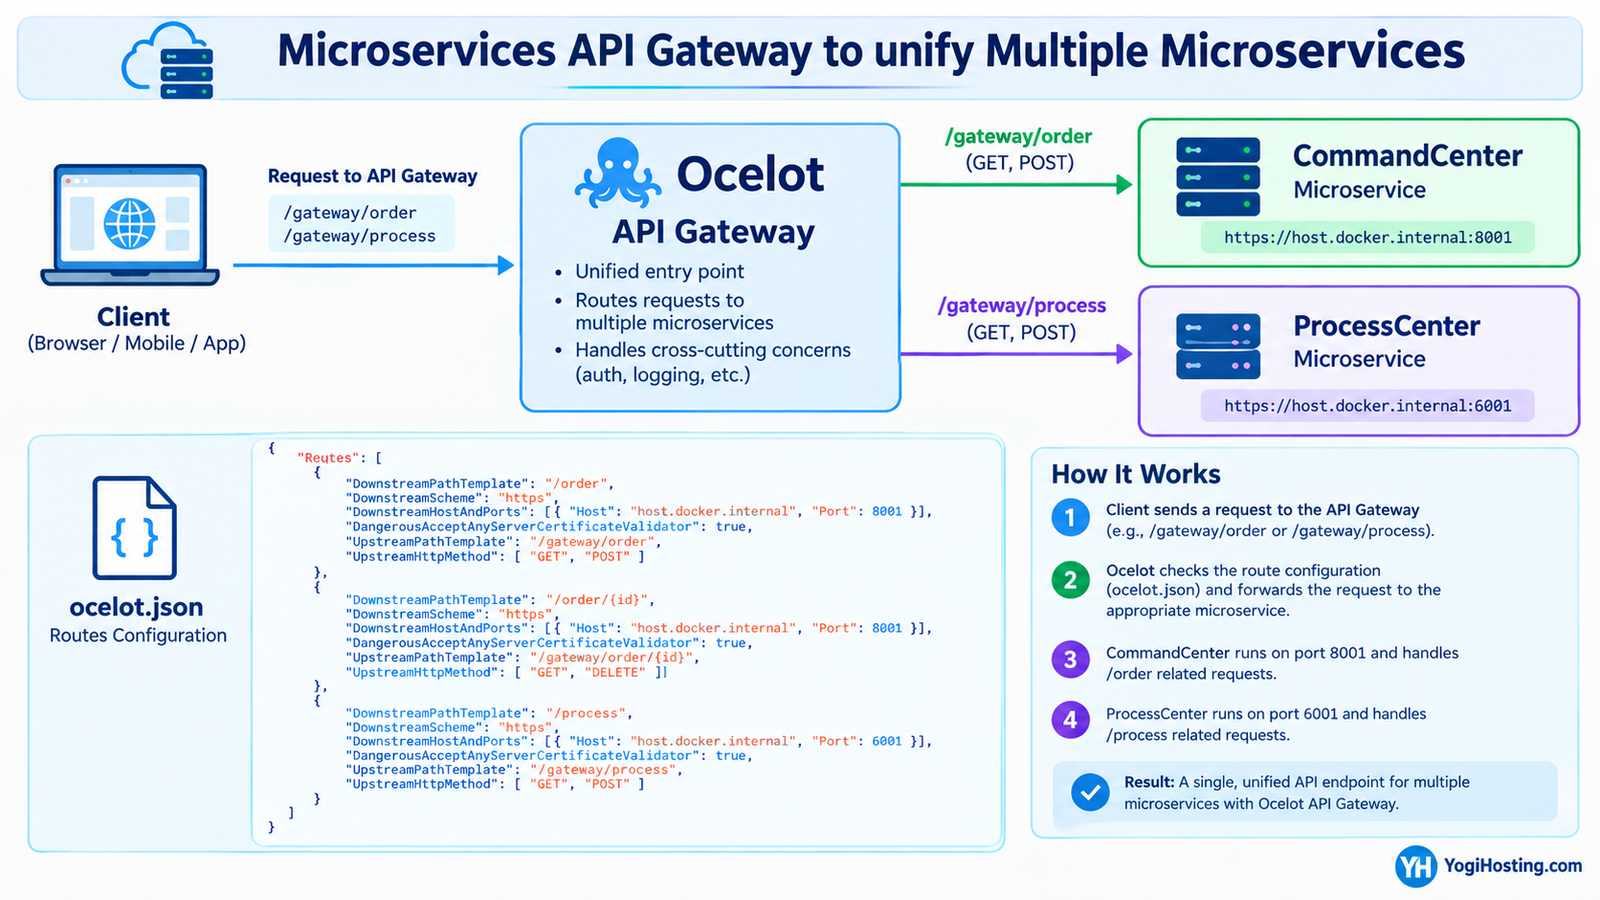
In a Microservices Architecture, clients often need to call many different service URLs, which quickly becomes hard to manage. An API gateway such as Ocelot solves this by acting as a single entry point: it receives each incoming HTTP request from the client and forwards it to the appropriate microservice. Ocelot is configured through a JSON file that defines the upstream and downstream routes.
An upstream request is the request the client sends to the API gateway, while a downstream request is the request the gateway sends on to the Microservice.
You can find the complete Source Code at my GitHub Repository.
Page Contents
We already have our 2 Microservices running, which we built in the previous two tutorials. These are:
- CommandCenter
- ProcessCenter
Once we install the Ocelot API gateway, all communication with these microservices will go through it rather than directly. The image below shows this setup. In this arrangement, the client never talks to the microservices directly. It sends every request to the gateway, which matches the request against the routes defined in its configuration file and forwards it to the correct microservice. The microservice’s response then travels back through the gateway to the client. This means the client only needs to know one address, the gateway’s, no matter how many services sit behind it. I have shown this in the below image.
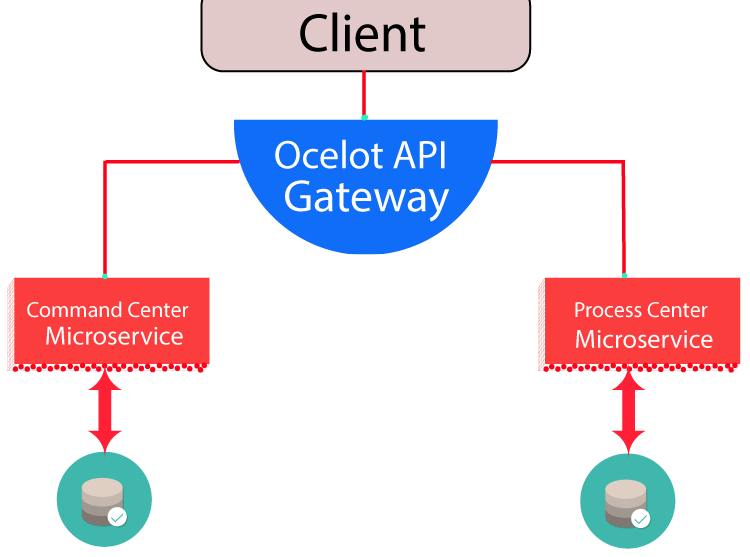
Keeping the services behind a gateway also gives us a few practical benefits:
- Single Entry Point: Clients use one base URL instead of tracking a separate URL for every Microservice.
- Flexibility: We can change a microservice’s address or port by updating the gateway configuration, without touching any client code.
- Central Control: Cross-cutting concerns such as authentication, rate limiting, and logging can be handled in one place instead of in every service.
In the next steps, we will install Ocelot, configure its routes in the ocelot.json file, and test that requests reach both microservices through the gateway.
Building Ocelot API Gateway
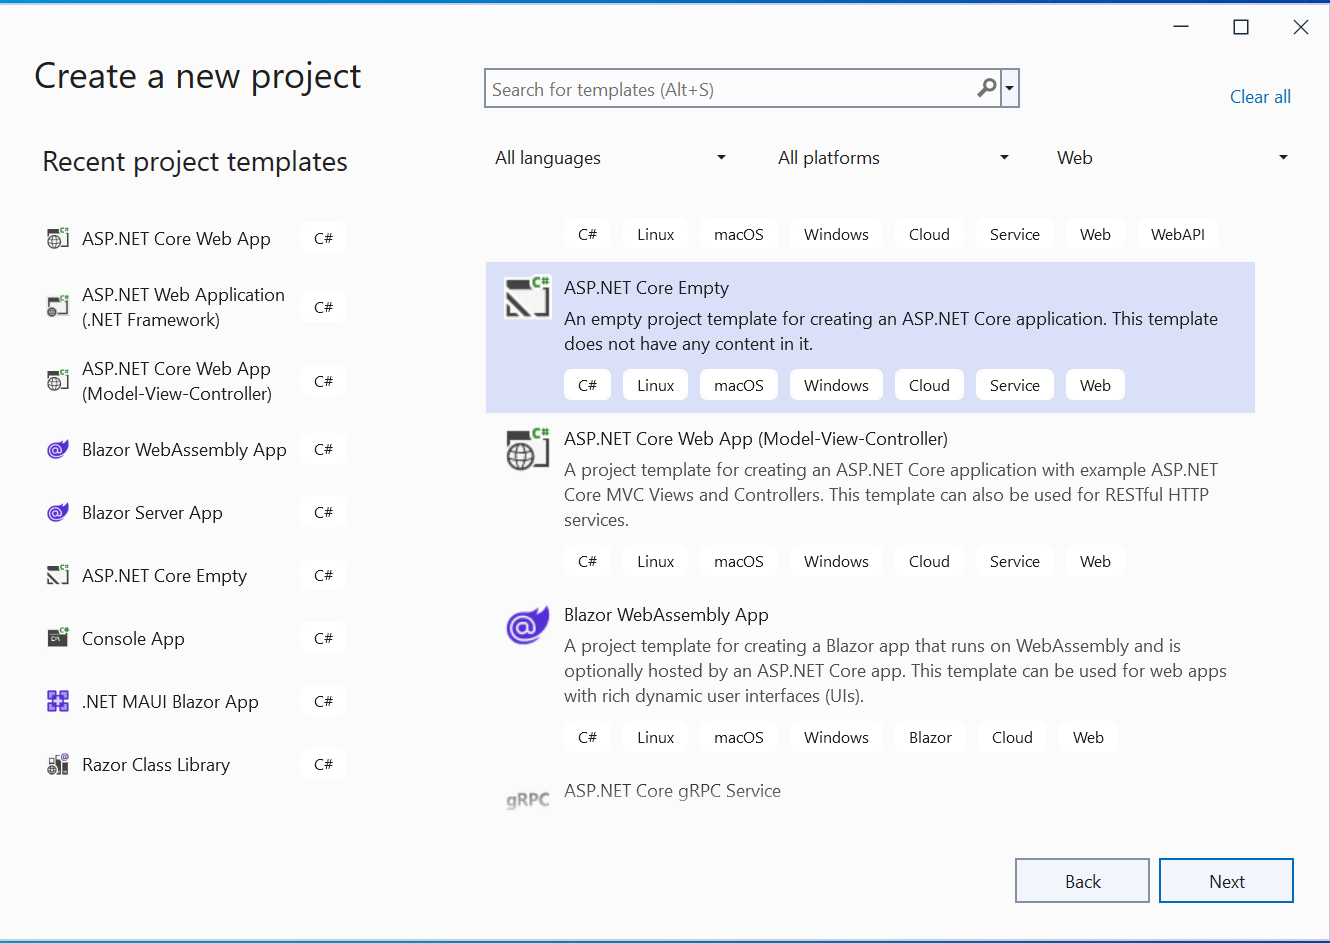
Let us build Ocelot API Gateway for our Drone Pizza Delivery application. So open Visual Studio and create a new ASP.NET Core Empty Project.
Name the project as OcelotGateway.
Keep the option Enable container support as unchecked. We will add docker container support later on.
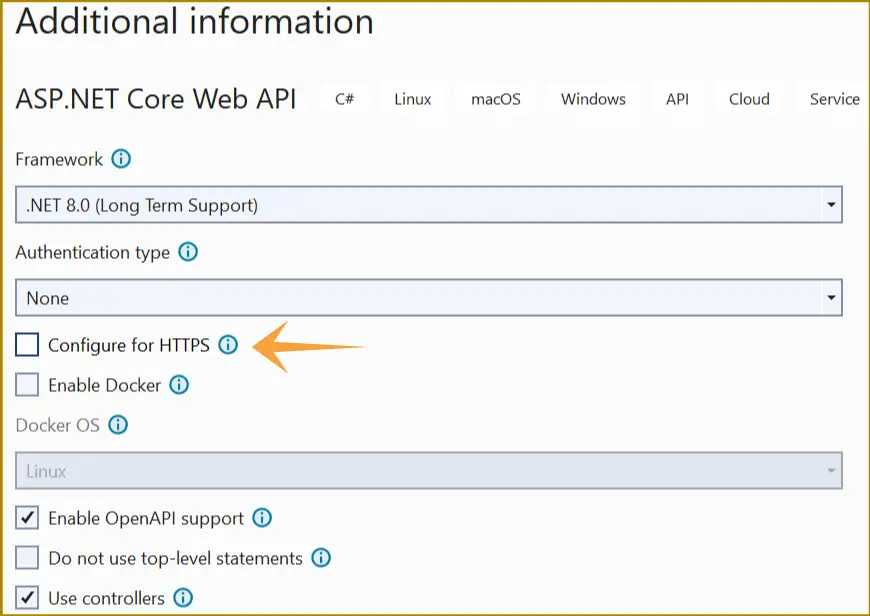
Click the Create button.
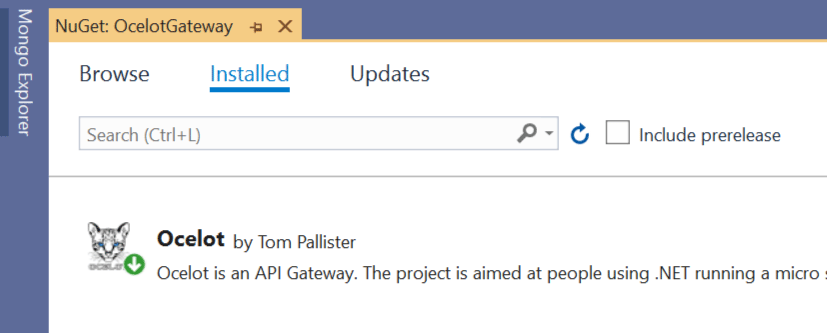
Next, Install Ocelot package from NuGet.
Now I configure Ocelot. So open Program.cs file and add Ocelot configurations as shown in highlighted manner:
using Ocelot.DependencyInjection;
using Ocelot.Middleware;

var builder = WebApplication.CreateBuilder(args);

builder.Configuration.AddJsonFile("ocelot.json", optional: false, reloadOnChange: true);
builder.Services.AddOcelot();

var app = builder.Build();

await app.UseOcelot();

app.MapGet("/", () => "Hello World!");

app.Run();
I have added a json file called ocelot.json which the app can access. In this file the ocelot configuration routes will be kept.
Configuring Routes for Ocelot API Gateway
Now coming to the most important part which is the formation of routes for Ocelot API Gateway. So create ocelot.json file on the root of the app and add to it the following code:
{
  "Routes": [
    {
      "DownstreamPathTemplate": "/order",
      "DownstreamScheme": "https",
      "DownstreamHostAndPorts": [
        {
          "Host": "host.docker.internal",
          "Port": 8001
        }
      ],
      "DangerousAcceptAnyServerCertificateValidator": true,
      "UpstreamPathTemplate": "/gateway/order",
      "UpstreamHttpMethod": [ "GET", "POST" ]
    }
  ]
}The above code tells the gateway: “When a client calls /gateway/order, forward the request to the 1st Microservice. That is CommandCenter.” Here is what each part does.
Routes
An array holding one or more route definitions. Each route maps one upstream URL (what the client calls) to one downstream URL (what the microservice exposes). This file has just one route, for the order service.
Upstream settings (client → gateway)
UpstreamPathTemplate: "/gateway/order"is the URL the client calls on the gateway, for examplehttps://localhost:5001/gateway/order. Note that when I will run the Ocelot project from Docker container I will set it’s port to be 5001. This you will see later on in this tutorial.UpstreamHttpMethod: ["GET", "POST"]means the route only accepts GET and POST requests. A PUT or DELETE to this URL will not match the route, and Ocelot will return a 404.
Downstream settings (gateway → microservice)
DownstreamPathTemplate: "/order"is the path the gateway calls on the microservice. So/gateway/orderbecomes /order.DownstreamScheme: "https"means the gateway talks to the microservice over HTTPS.DownstreamHostAndPortsgives the address of the microservice: hosthost.docker.internaland port8001.
Why host.docker.internal?
If the gateway runs inside a Docker container, localhost would point to the container itself, not your machine. host.docker.internal is a special DNS name that lets a container reach services running on the host machine, so the gateway can reach the order API on port 8001.
DangerousAcceptAnyServerCertificateValidator: true
During development, microservices usually use a self-signed HTTPS certificate, which the gateway would normally reject. This setting makes Ocelot skip certificate validation so the call succeeds. As the name warns, it is unsafe and should only be used in development, never in production, where you should use a properly trusted certificate.
The full flow
- The client sends GET https://<gateway>/gateway/order.
- Ocelot matches it to this route (path and method both fit).
- Ocelot forwards it to https://host.docker.internal:8001/order.
- The microservice’s response goes back through the gateway to the client.
Now let us add other routes for GetByIdAsync, PutAsync and DeleteAsync methods which also needs order id value in the URL.
{
  "Routes": [
    {
      "DownstreamPathTemplate": "/order",
      "DownstreamScheme": "https",
      "DownstreamHostAndPorts": [
        {
          "Host": "host.docker.internal",
          "Port": 8001
        }
      ],
      "DangerousAcceptAnyServerCertificateValidator": true,
      "UpstreamPathTemplate": "/gateway/order",
      "UpstreamHttpMethod": [ "GET", "POST" ]
    },
    {
      "DownstreamPathTemplate": "/order/{id}",
      "DownstreamScheme": "https",
      "DownstreamHostAndPorts": [
        {
          "Host": "host.docker.internal",
          "Port": 8001
        }
      ],
      "DangerousAcceptAnyServerCertificateValidator": true,
      "UpstreamPathTemplate": "/gateway/order/{id}",
      "UpstreamHttpMethod": [ "GET", "PUT", "DELETE" ]
    }
  ]
}
In the second route notice I have specified:
DownstreamPathTemplate value as /order/{id} which is the URI of the CommandCenter microservice.
UpstreamPathTemplate value as /gateway/order/{id}.
UpstreamHttpMethod value to be GET, PUT and DELETE.
So GetByIdAsync, PutAsync and DeleteAsync methods which now be accessed from https://localhost:5001/gateway/order/{id}.
In the same way we can add the routes for the ProcessCenter microservice also. Below I have added the route for the GetAsync and PostAsync methods of the ProcessController.
{
  "Routes": [
    {
      "DownstreamPathTemplate": "/order",
      "DownstreamScheme": "https",
      "DownstreamHostAndPorts": [
        {
          "Host": "host.docker.internal",
          "Port": 8001
        }
      ],
      "DangerousAcceptAnyServerCertificateValidator": true,
      "UpstreamPathTemplate": "/gateway/order",
      "UpstreamHttpMethod": [ "GET", "POST" ]
    },
    {
      "DownstreamPathTemplate": "/order/{id}",
      "DownstreamScheme": "https",
      "DownstreamHostAndPorts": [
        {
          "Host": "host.docker.internal",
          "Port": 8001
        }
      ],
      "DangerousAcceptAnyServerCertificateValidator": true,
      "UpstreamPathTemplate": "/gateway/order/{id}",
      "UpstreamHttpMethod": [ "GET", "PUT", "DELETE" ]
    },
    {
      "DownstreamPathTemplate": "/process",
      "DownstreamScheme": "https",
      "DownstreamHostAndPorts": [
        {
          "Host": "host.docker.internal",
          "Port": 6001
        }
      ],
      "DangerousAcceptAnyServerCertificateValidator": true,
      "UpstreamPathTemplate": "/gateway/process",
      "UpstreamHttpMethod": [ "GET", "POST" ]
    }
  ]
}
So now ProcessCenter microservice can be accessed on the URL – https://localhost:5001/gateway/process.
Include Ocelot API Gateway URL in ProcessCenter microservice API code
The ProcessCenter Microservice also calls the CommandCenter Microservice. We can now change the URL with that of the Ocelot API Gateway.
So in the Program class change the URL:
builder.Services.AddHttpClient<OrderClient>(a =>
{
    a.BaseAddress = new Uri("https://host.docker.internal:5001");
})
.ConfigurePrimaryHttpMessageHandler(() => new HttpClientHandler
{
    ServerCertificateCustomValidationCallback =
        HttpClientHandler.DangerousAcceptAnyServerCertificateValidator
})
.AddTransientHttpErrorPolicy(b => b.Or<TimeoutRejectedException>().WaitAndRetryAsync(
    5,
    c => TimeSpan.FromSeconds(Math.Pow(2, c))
))
.AddTransientHttpErrorPolicy(b => b.Or<TimeoutRejectedException>().CircuitBreakerAsync(
    3,
    TimeSpan.FromSeconds(15)
))
.AddPolicyHandler(Policy.TimeoutAsync<HttpResponseMessage>(1));
https://host.docker.internal:5001 is the address of the microservice that OrderClient.cs calls.
Next change the URL in the OrderClient.cs class as:
public async Task<IReadOnlyCollection<OrderDto>> GetOrderAsync()
{
    var items = await httpClient.GetFromJsonAsync<IReadOnlyCollection<OrderDto>>("/gateway/order");
    return items;
}
This completes the integration of Ocelot API Gateway.
Adding Ocelot project to Docker Compose
Right click the Ocelot project name in the solution explorer and select Add ➤ Container Compose Support.
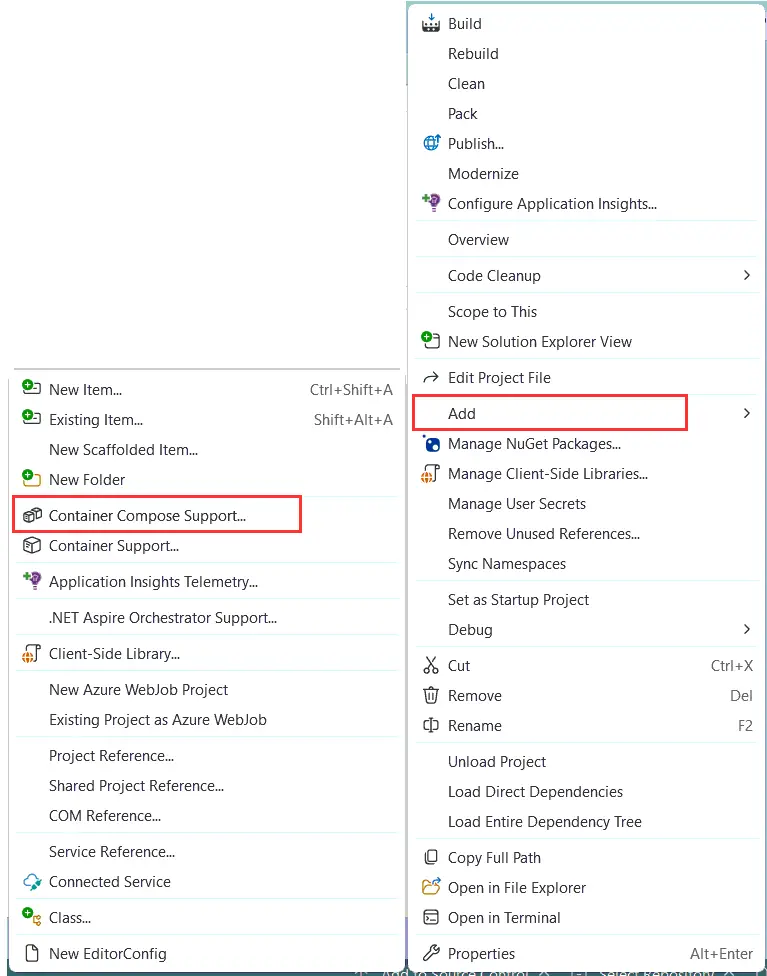
Next, you will see a new Container Scaffolding Options dialog. Here keep all the settings as it is and click OK.
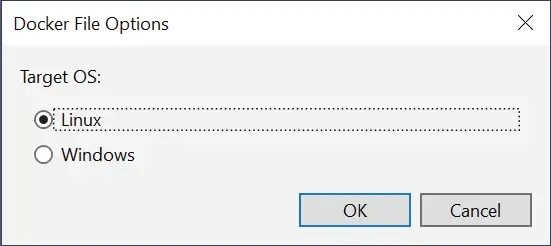
Next, click the OK button
The docker-compose.yml file is created with ocelotgateway service added to it.
services:
  ocelotgateway:
    image: ${DOCKER_REGISTRY-}ocelotgateway
    build:
      context: .
      dockerfile: OcelotGateway/Dockerfile
I will now update the docker-compose.override.yml to add the port mappings as shown below.
services:
  ocelotgateway:
    environment:
      - ASPNETCORE_ENVIRONMENT=Development
      - ASPNETCORE_HTTP_PORTS=8080
      - ASPNETCORE_HTTPS_PORTS=8081
    ports:
      - "5000:8080"
      - "5001:8081"
    volumes:
      - ${APPDATA}/Microsoft/UserSecrets:/home/app/.microsoft/usersecrets:ro
      - ${APPDATA}/Microsoft/UserSecrets:/root/.microsoft/usersecrets:ro
      - ${APPDATA}/ASP.NET/Https:/home/app/.aspnet/https:ro
      - ${APPDATA}/ASP.NET/Https:/root/.aspnet/https:ro
Lets run the Ocelot project with Docker Compose. So run these 2 commands one by one.
docker-compose build
docker-compose up -d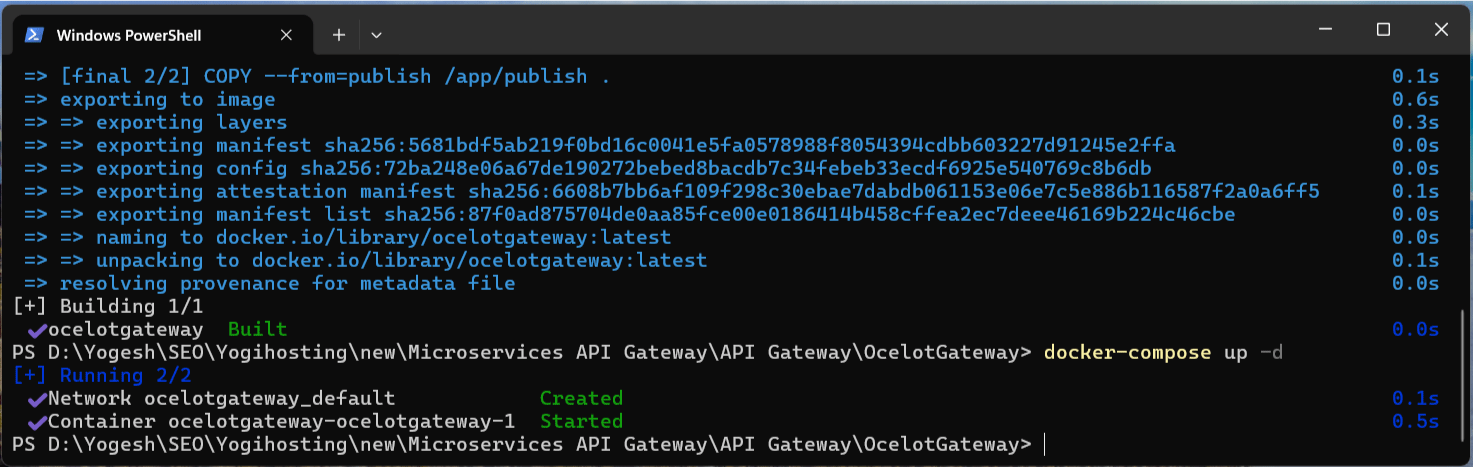
Also make sure the CommandCenter and ProcessCenter Microservice are running. The docker compose commands remains the same – docker-compose up -d.
So now we have CommandCenter, ProcessCenter and ocelotgateway running from separate docker containers. We can now test the microservices.
Testing with Postman
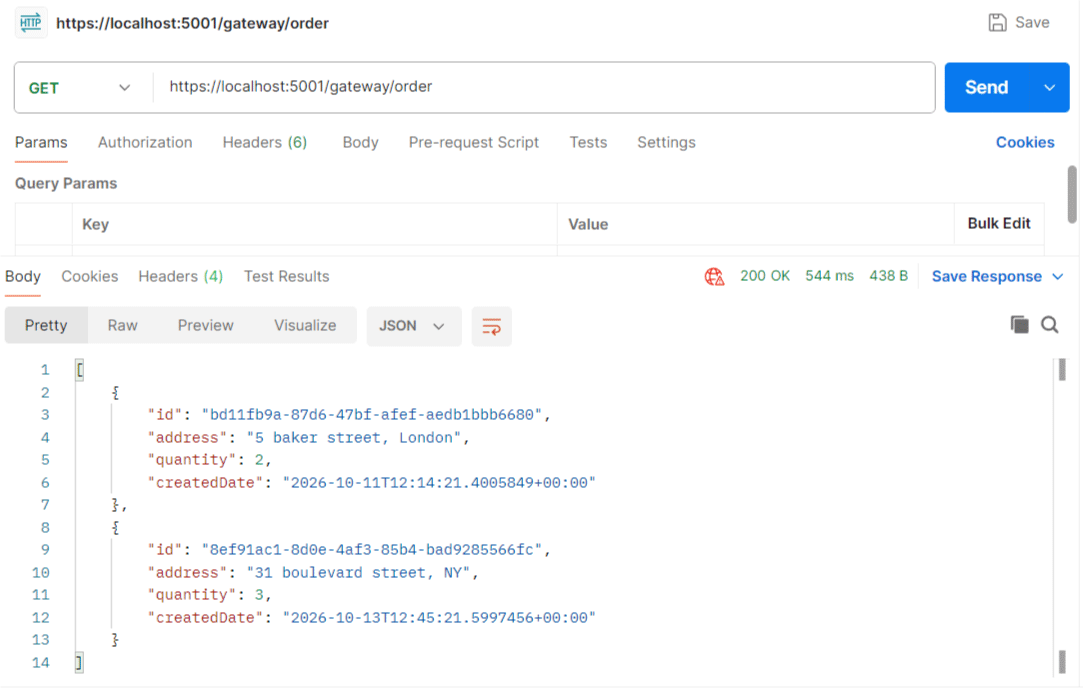
Let us now test it with Postman. Open Postman, then make a get request to Ocelot Gateway API URI – https://localhost:5001/gateway/order. It will call the CommandCenter Microservice to will fetch all the pizza orders. See the below image where I have shown this:
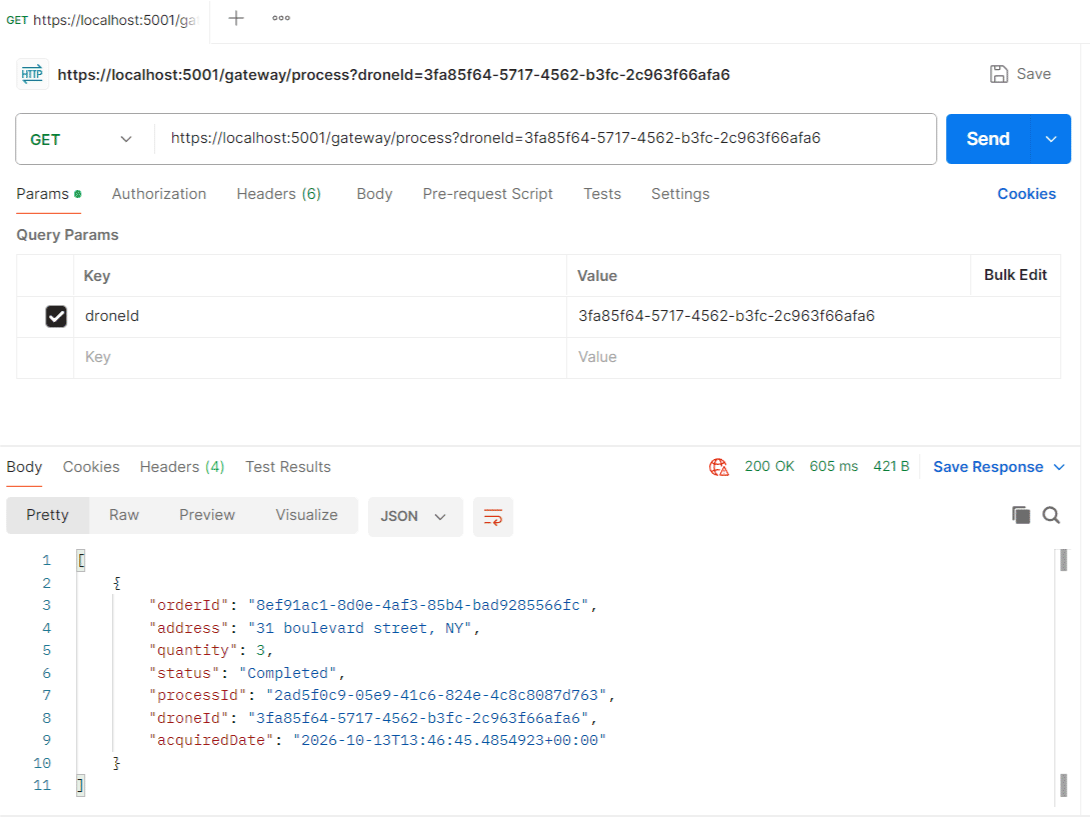
The ProcessCenter microservice can be accessed on the URL – https://localhost:5001/gateway/process. Here make a GET request with a key called droneId with value of 3fa85f64-5717-4562-b3fc-2c963f66afa6. The API gave the combined data from the two Microservice as before. Check below image:
Testing the Microservices User Interface
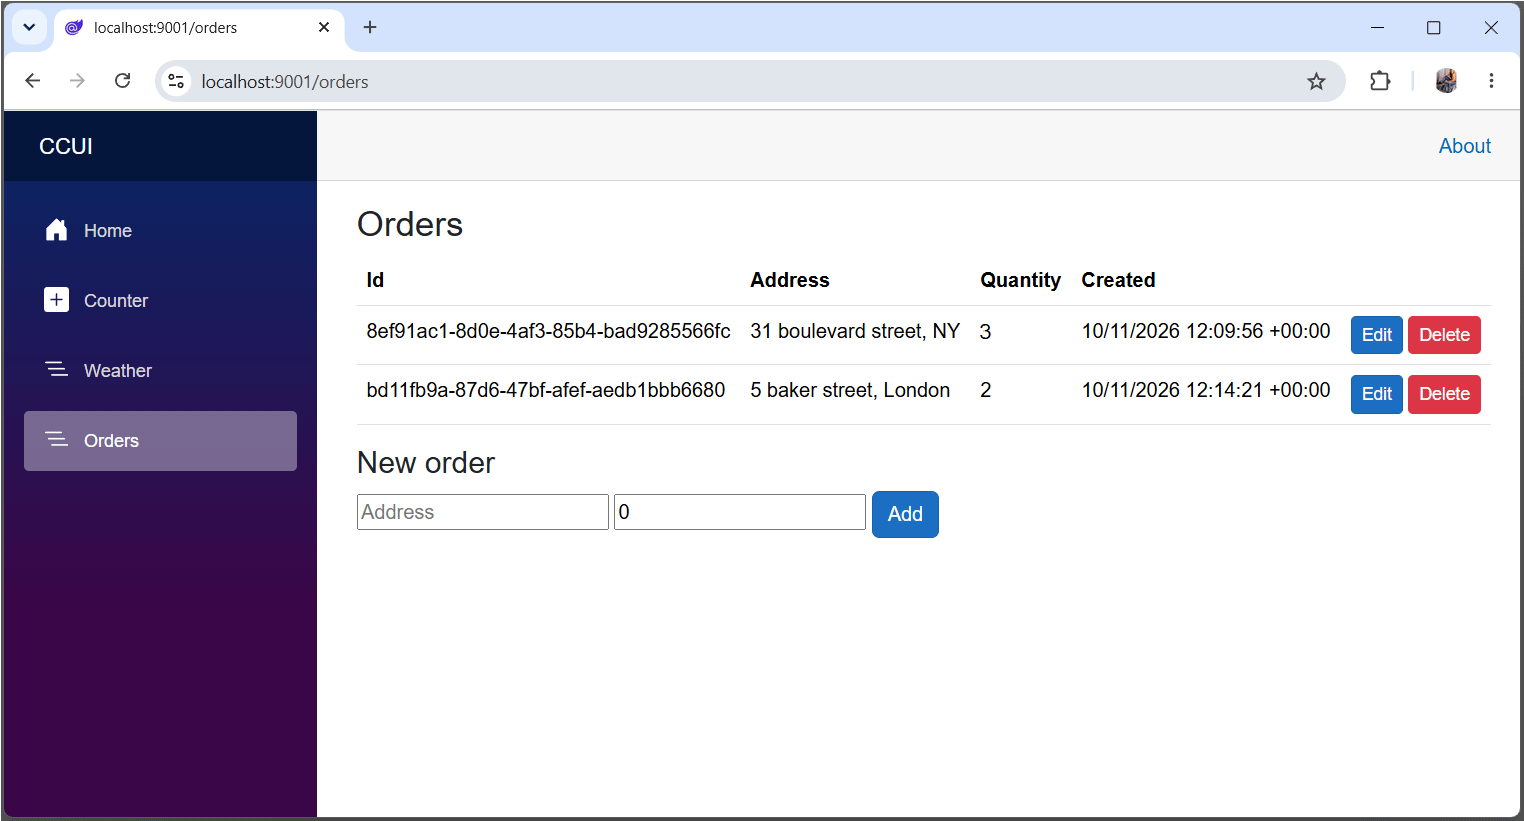
Open the url of CCUI which is https://localhost:9001/orders. Here I can see both the pizza order. This means Ocelot API Gateway is correctly calling CommandCenter microservice.
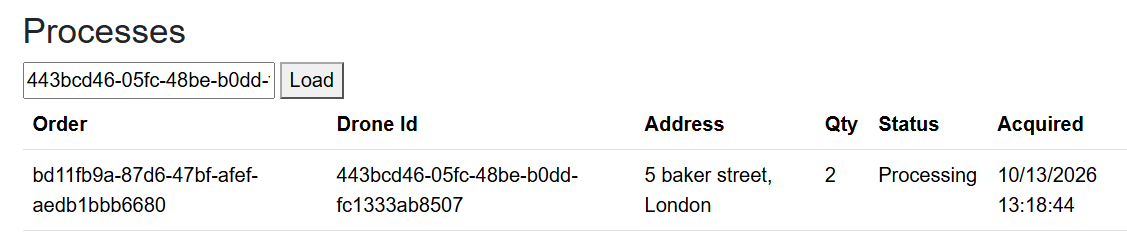
Now I open the URL of PCUI which is https://localhost:7001/processes. Here I enter the drone id in the text box and click the “Load” button. This will show all the prizza orders that are assigned to be delivered by a given drone. See below image:
Congrats, this means the Ocelot API Gateway integration is perfectly OK and all the Microservices are up and running smoothly.
In this tutorial, we added an Ocelot API gateway to our Pizza Drone delivery microservices application. We configured routes in ocelot.json, mapped upstream URLs to the order and process services, and tested that requests reach each microservice through a single entry point. Along the way, we also saw how Docker networking (host.docker.internal) and resilience policies fit into the picture.
With the gateway in place, clients only need to know one address, and we can change, move, or scale individual services without breaking them. It is also the natural place to add features such as authentication, rate limiting, caching, and load balancing, which we can explore in future tutorials.
I hope you enjoyed learning about it. If you have questions or run into any issues, leave a comment below and I will be happy to help.
SHARE THIS ARTICLE


Related Tutorials:

ABOUT THE AUTHOR
I hope you enjoyed reading this tutorial. If it helped you then consider buying a cup of coffee for me. This will help me in writing more such good tutorials for the readers. Thank you.

HELLO EVERYONE
 Welcome to YogiHosting - A Programming Tutorial Website. It is used by millions of people around the world to learn and explore about ASP.NET Core, Blazor, jQuery, JavaScript, Docker, Kubernetes and other topics.
SUBSCRIBE TO NEWSLETTER
Enter your email address to subscribe to this blog and receive notifications of new posts by email.
Join 90K other subscribers