


First ASP.NET Core Microservice with Web API CRUD Operations on a MongoDB Database
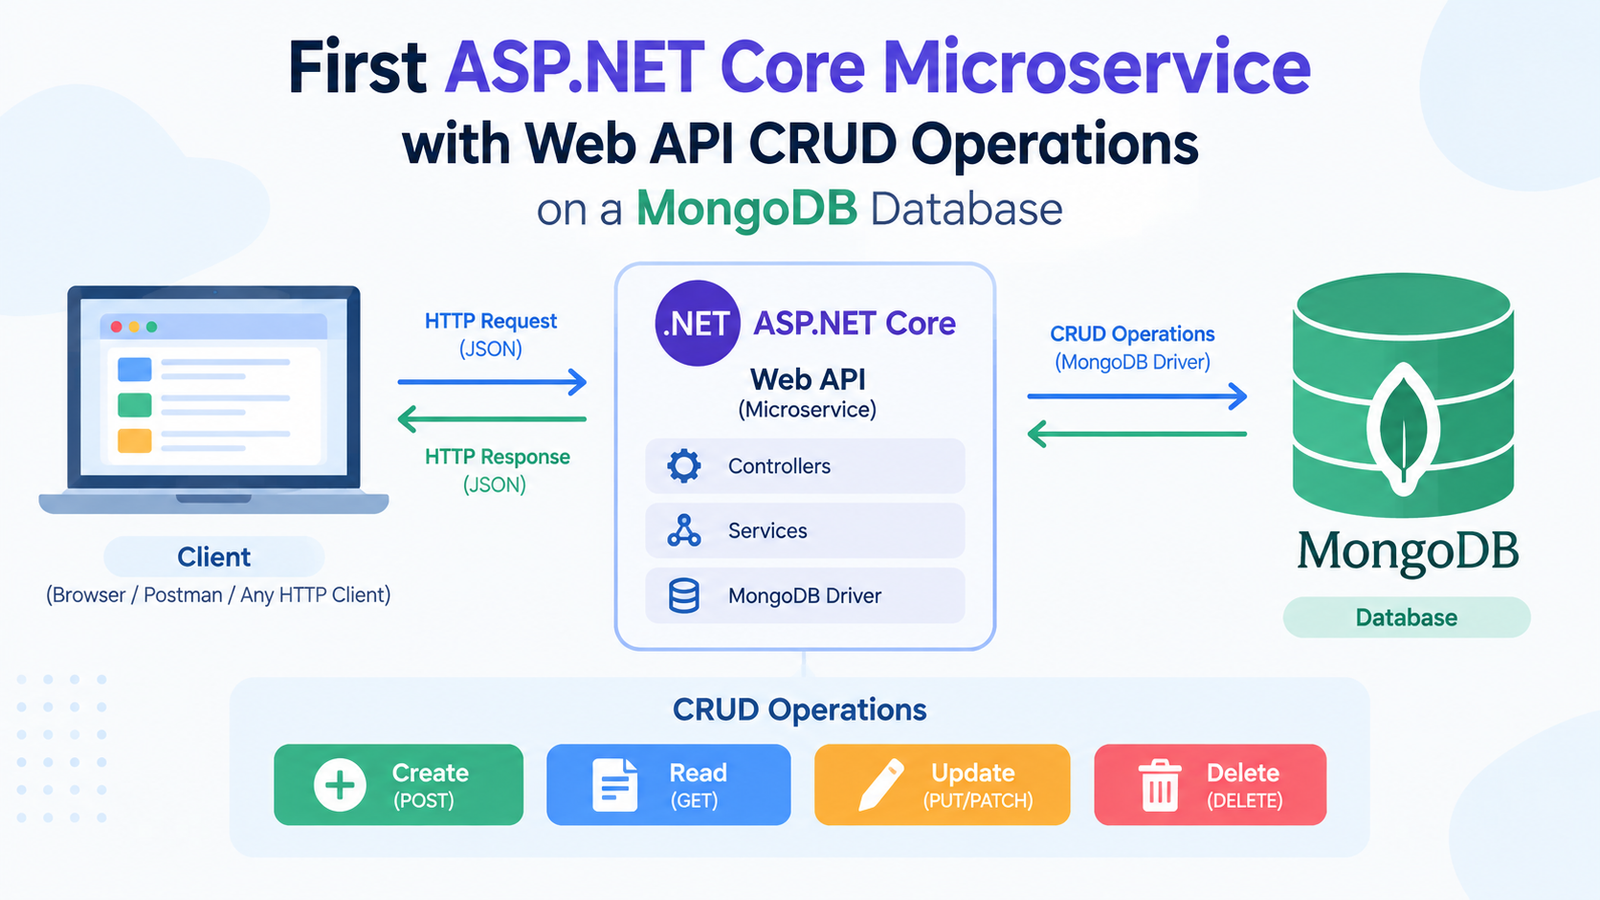
This tutorial walks through creating a first Microservice in ASP.NET Core that handles CRUD operations against a MongoDB database via Web API endpoints. The service will serve as one component of a drone pizza delivery application.
Page Contents
Drone Pizza Delivery Application in Microservices Architecture
This tutorial series builds a complete Drone Pizza Delivery Application with a Microservices Architecture. The application has two microservices: CommandCenter, which receives pizza orders, and ProcessCenter, which coordinates drone delivery of those orders.
You can find the complete Source Code at my GitHub Repository.

This tutorial covers building the first microservice, CommandCenter. The next tutorial builds the second, ProcessCenter. Following that, I will connect the two microservices through the RabbitMQ message broker to complete the drone pizza delivery application.
What is a Microservice
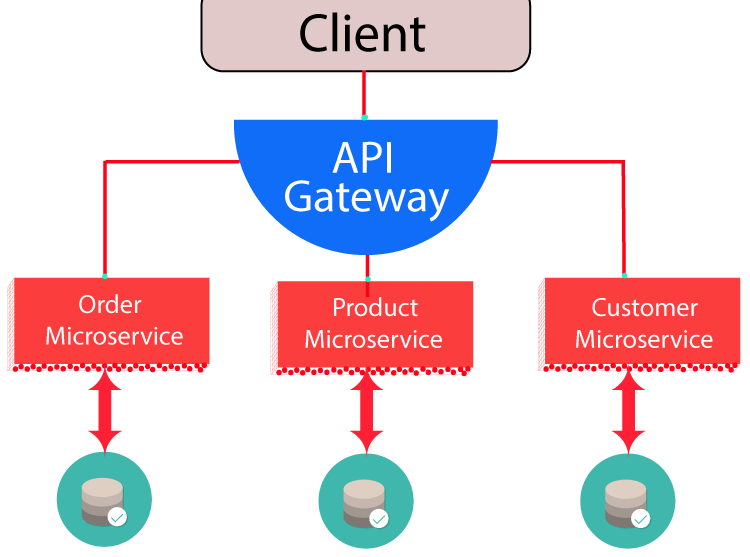
A Microservices Architecture breaks an application into smaller, independent components, each responsible for a single purpose. Each of these components is known as a microservice. For example, an e-commerce application could have three microservices:
- Order microservice
- Product microservice
- Customer microservice
Microservices need to be independent of one another so that each can keep running even if the others are down. For instance, the Order microservice should continue to work if the Product and Customer microservices go down, and the same should hold for the other two. Each microservice can also have its own dedicated database and be hosted separately on a different server.
Check the microservice architecture diagram given below:
Characteristics of Microservices
Microservices share a few defining characteristics:
- Loosely coupled: Each service is independent, so a change or failure in one has little effect on the others.
- Technology flexibility: Each service can be written in a different language or framework, whichever suits its job best.
- Dedicated database: Each service owns its data, which keeps services from depending on one another’s data stores.
- Separately hosted: Services can be deployed and run on different servers, and scaled on their own.
- Small, focused teams: Each service is typically built and maintained by a small team of developers.
- Independent updates: Updating one service shouldn’t require changing the others, so releases are quicker and less likely to break anything.
Benefits of using Microservices
Microservices offer several advantages over a traditional monolithic design:
- Fault isolation: Because services are loosely coupled, a bug or failure in one service won’t take down the whole application.
- Low-risk deployments: Each service is deployed on its own, so releasing a change affects only that service rather than the entire application.
- Easier development: Each service has a small code base, which makes it simpler to understand, build, and test.
- Easier maintenance and scaling: Services can be maintained separately, and only the services under heavy load need to be scaled up.
Monolith Architecture
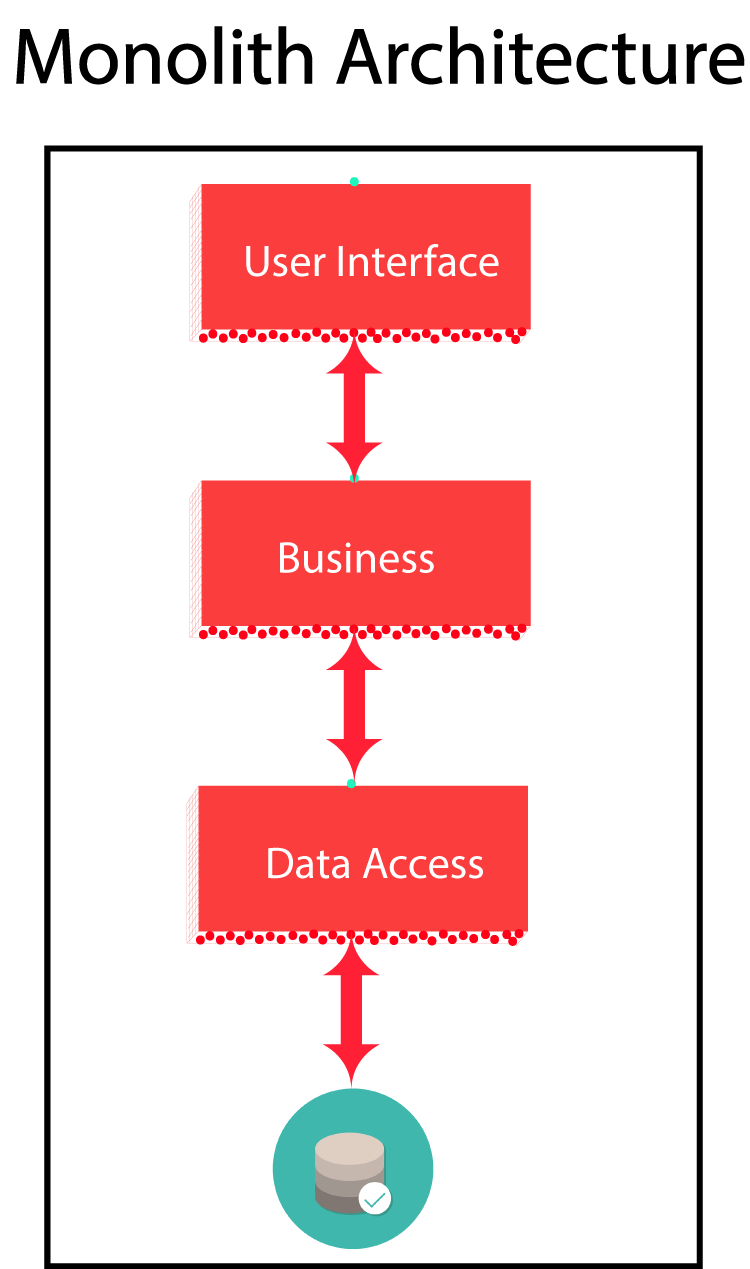
A Monolith is the traditional way of building applications, in which the services are tightly coupled with one another. It is fine for small to mid-sized applications, but the real trouble starts when you need to scale.
The characteristics of a monolith are:
- Tightly coupled services that must be deployed on a single server.
- Publishing a new feature is risky and causes downtime, since the whole application must be deployed again.
- Scaling requires rewriting a large part of the code base.
Creating First ASP.NET Core Microservice
I will now build our First ASP.NET Core microservice, which consists of three parts:
- An ASP.NET Core Web API project containing CRUD Operations
- A Blazor Web APP that will form the UI for the Microservice
- A MongoDB Database that stores the data for the Microservice
All three parts will run in separate Docker containers.
In Visual Studio, create a new ASP.NET Core Web API project.
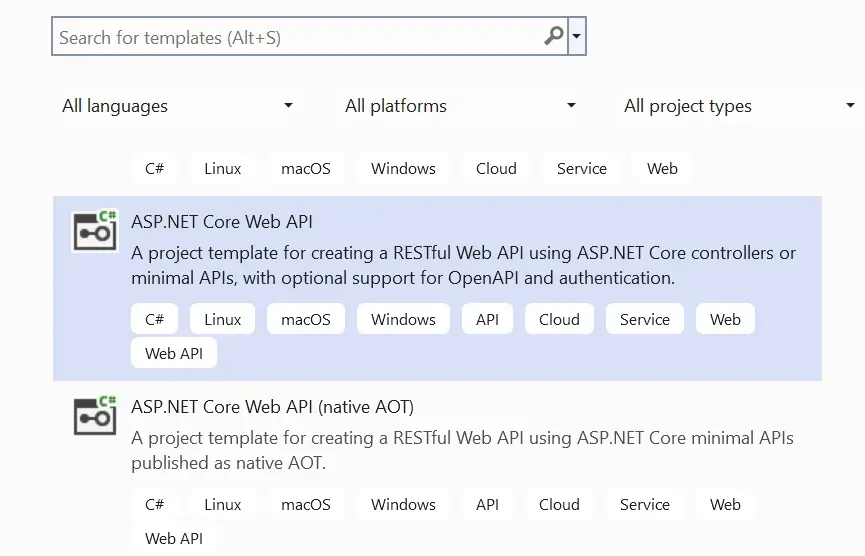
Give the app name as CommandCenter, and un-check the option – Place solution and project in the same directory.
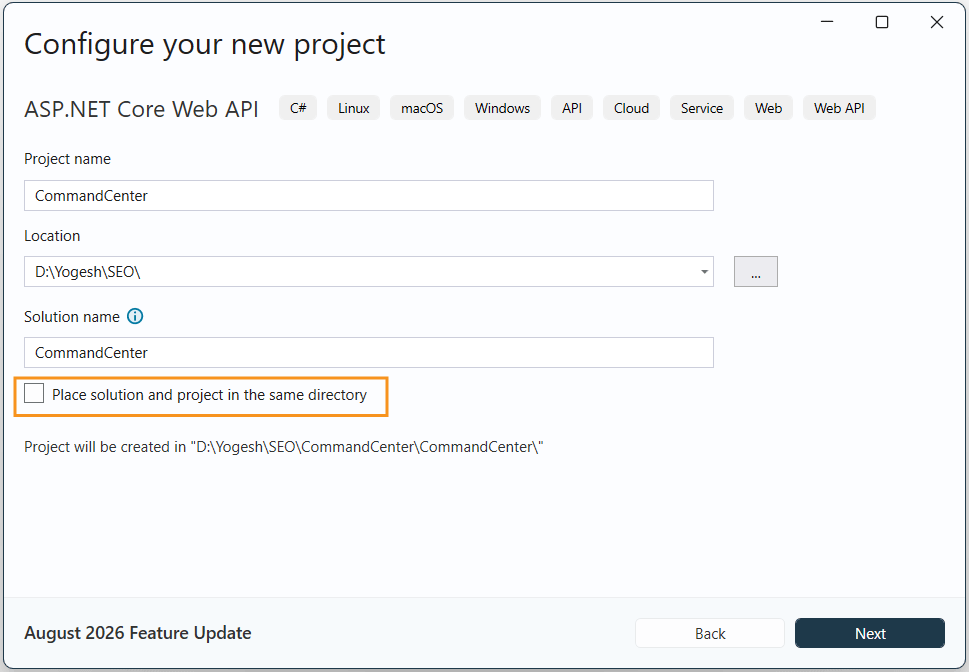
Click the Next button.
On the next screen keep the option Enable container support unchecked. We will add docker container support later on.
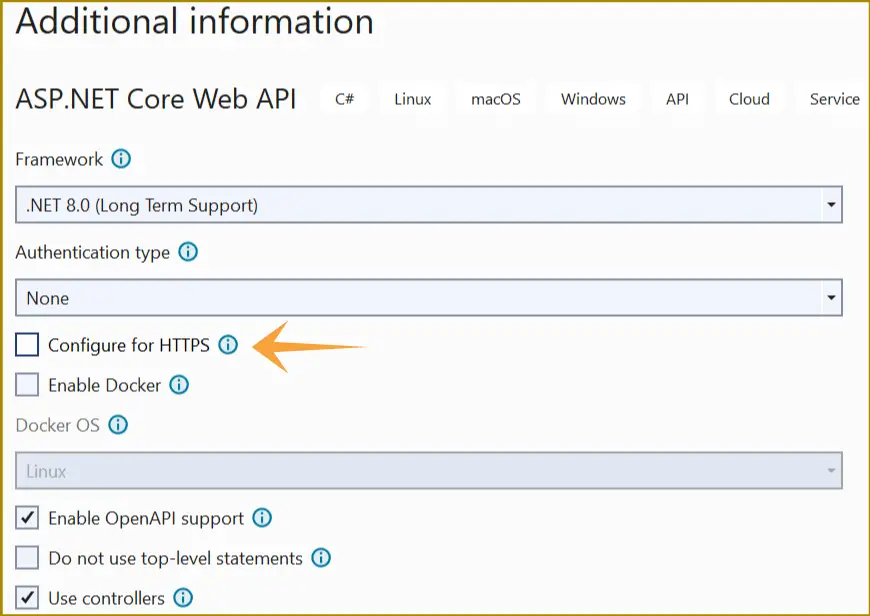
Next, click the Create button to create this microservice.
Our microservice will deal with Pizza Orders that will be stored in a MongoDB database. There will be only 4 fields for the pizza order. These are:
- Id – for the pizza order number, its value will be of GUID type.
- Address – the pizza delivery address of type string.
- Quantity – number of pizzas to be delivered and is of type int.
- CreatedDate – the order created date and is of type DateTimeOffset.
Create a new folder called Entity in the project root, and add a file named IEntity.cs to it. This file will hold an interface called IEntity, whose full code is given below:
namespace CommandCenter.Entity
{
    public interface IEntity
    {
        Guid Id { get; set; }
    }
}
Next, add another class named Order.cs to the Entity folder, as shown below:
namespace CommandCenter.Entity
{
    public class Order : IEntity
    {
        public Guid Id { get; set; }
        public string Address { get; set; }
        public int Quantity { get; set; }
        public DateTimeOffset CreatedDate { get; set; }
    }
}
The Order class implements the IEntity interface.
Now add another file, IRepository.cs, to the Entity folder. It defines a generic interface, IRepository<T>, constrained so that T must implement IEntity. Its full code is given below:
using System.Linq.Expressions;

namespace CommandCenter.Entity
{
    public interface IRepository<T> where T : IEntity
    {
        Task CreateAsync(T entity);
        Task<IReadOnlyCollection<T>> GetAllAsync();
        Task<IReadOnlyCollection<T>> GetAllAsync(Expression<Func<T, bool>> filter);
        Task<T> GetAsync(Guid id);
        Task<T> GetAsync(Expression<Func<T, bool>> filter);
        Task RemoveAsync(Guid id);
        Task UpdateAsync(T entity);
    }
}
IRepository<T> is a generic interface whose type parameter T must implement IEntity. It declares the methods for performing CRUD operations on the MongoDB database.
The Func delegate enables filtering records. For example, Expression<Func<T, bool>> filter lets us pass in a function that accepts a T and returns a bool, where T is an IEntity type as defined earlier.
In the project root, create a folder named Infrastructure, then add a class file named Dtos.cs inside it, as shown below:
using System.ComponentModel.DataAnnotations;

namespace CommandCenter.Infrastructure
{
    public record OrderDto(Guid Id, string Address, int Quantity, DateTimeOffset CreatedDate);
    public record CreateOrderDto([Required] string Address, [Range(0, 1000)] int Quantity);
    public record UpdateOrderDto([Required] string Address, [Range(0, 1000)] int Quantity);
}
This file defines three Data Transfer Objects (DTOs), which carry data between layers and hold no business logic. I use record types rather than classes because they are concise and immutable. We will use these DTOs in the Web API shortly.
Now add Extensions.cs to the same Infrastructure folder. It contains an extension method on Order that converts it to the OrderDto defined above:
using CommandCenter.Entity;

namespace CommandCenter.Infrastructure
{
    public static class Extensions
    {
        public static OrderDto AsDto(this Order order)
        {
            return new OrderDto(order.Id, order.Address, order.Quantity, order.CreatedDate);
        }
    }
}
MongoDB Connection String, Configuration, Repository and Settings
Now I will configure the MongoDB settings so that the ASP.NET Web API application can connect to the database and perform CRUD operations on it.
First, add two sections called ServiceSettings and MongoDbSettings to the appsettings.json file, as highlighted below:
{
  "Logging": {
    "LogLevel": {
      "Default": "Information",
      "Microsoft.AspNetCore": "Warning"
    }
  },
  "ServiceSettings": {
    "ServiceName": "Order"
  },
  "MongoDbSettings": {
    "Host": "mongo",
    "Port": "27017"
  },
  "AllowedHosts": "*"
}
ServiceName is the name of the MongoDB database (Order). The Host and Port values in MongoDbSettings are combined to form the connection string used to reach the MongoDB server.
In “Host”: “mongo”, the value mongo is not a keyword. It is the name of the MongoDB service in my docker-compose.yml file, which we will set up later in this tutorial.
The value 27017 is the port on which MongoDB listens for connections. It is MongoDB’s default port.
Now we create classes to hold the MongoDB values from appsettings.json. In the project root, add a folder named Setting containing two classes, MongoDbSettings.cs and ServiceSettings.cs.
The code of MongoDbSettings.cs is:
namespace CommandCenter.Setting
{
    public class MongoDbSettings
    {
        public string Host { get; init; }
        public string Port { get; init; }
        public string ConnectionString => $"mongodb://{Host}:{Port}";
    }
}
The code of ServiceSettings.cs class is:
namespace CommandCenter.Setting
{
    public class ServiceSettings
    {
        public string ServiceName { get; init; }
    }
}
Next comes the repository that talks directly to MongoDB. In the project root, create a folder named MongoDB and add a class named MongoRepository.cs to it. The class implements IRepository<T>, so it must implement all of that interface’s methods. Its full code is given below:
using CommandCenter.Entity;
using MongoDB.Driver;
using System.Linq.Expressions;

namespace CommandCenter.MongoDB
{
    public class MongoRepository<T> : IRepository<T> where T : IEntity
    {
        private readonly IMongoCollection<T> collection;
        private readonly FilterDefinitionBuilder<T> filterBuilder = Builders<T>.Filter;

        public MongoRepository(IMongoDatabase database, string collectionName)
        {
            collection = database.GetCollection<T>(collectionName);
        }

        public async Task<IReadOnlyCollection<T>> GetAllAsync()
        {
            return await collection.Find(filterBuilder.Empty).ToListAsync();
        }

        public async Task<IReadOnlyCollection<T>> GetAllAsync(Expression<Func<T, bool>> filter)
        {
            return await collection.Find(filter).ToListAsync();
        }

        public async Task<T> GetAsync(Guid id)
        {
            FilterDefinition<T> filter = filterBuilder.Eq(e => e.Id, id);
            return await collection.Find(filter).FirstOrDefaultAsync();
        }

        public async Task<T> GetAsync(Expression<Func<T, bool>> filter)
        {
            return await collection.Find(filter).FirstOrDefaultAsync();
        }

        public async Task CreateAsync(T entity)
        {
            if (entity == null)
            {
                throw new ArgumentNullException(nameof(entity));
            }
            await collection.InsertOneAsync(entity);
        }

        public async Task UpdateAsync(T entity)
        {
            if (entity == null)
            {
                throw new ArgumentNullException(nameof(entity));
            }
            FilterDefinition<T> filter = filterBuilder.Eq(e => e.Id, entity.Id);
            await collection.ReplaceOneAsync(filter, entity);
        }

        public async Task RemoveAsync(Guid id)
        {
            FilterDefinition<T> filter = filterBuilder.Eq(e => e.Id, id);
            await collection.DeleteOneAsync(filter);
        }
    }
}
To let our ASP.NET Core Web API talk to MongoDB, we need to install the official MongoDB driver in the project. The driver is distributed as the MongoDB.Driver package on NuGet, and it provides the classes we use to connect to the database and run queries, such as MongoClient, IMongoDatabase, IMongoCollection<T>, and the filter builders used in MongoRepository. It also includes the BSON libraries that convert our C# objects to and from the format MongoDB stores.
You can add the package in either of these ways:
- Visual Studio: Right-click the project in Solution Explorer, choose Manage NuGet Packages, search for MongoDB.Driver on the Browse tab, and click Install.
- Command line: Run dotnet add package MongoDB.Driver from the project folder.
Once the package is installed, the MongoDB namespaces (for example MongoDB.Driver) become available, and the code in this tutorial will compile.
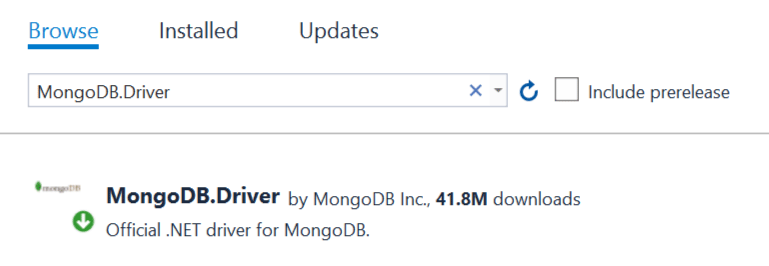
Next, we add extension methods on IServiceCollection that register our MongoDB services with dependency injection. They create a singleton MongoRepository<T> configured with the MongoDB settings, and we will call them from Program.cs.
Add a class named Extensions.cs to the MongoDB folder with this code:
using CommandCenter.Entity;
using CommandCenter.Setting;
using MongoDB.Bson.Serialization.Serializers;
using MongoDB.Bson.Serialization;
using MongoDB.Bson;
using MongoDB.Driver;

namespace CommandCenter.MongoDB
{
    public static class Extensions
    {
        public static IServiceCollection AddMongo(this IServiceCollection services)
        {
            BsonSerializer.RegisterSerializer(new GuidSerializer(BsonType.String));
            BsonSerializer.RegisterSerializer(new DateTimeOffsetSerializer(BsonType.String));
            services.AddSingleton(a =>
            {
                var configuration = a.GetService<IConfiguration>();
                var serviceSettings = configuration.GetSection(nameof(ServiceSettings)).Get<ServiceSettings>();
                var mongoDbSettings = configuration.GetSection(nameof(MongoDbSettings)).Get<MongoDbSettings>();
                var mongoClient = new MongoClient(mongoDbSettings.ConnectionString);
                return mongoClient.GetDatabase(serviceSettings.ServiceName);
            });
            return services;
        }

        public static IServiceCollection AddMongoRepository<T>(this IServiceCollection services, string collectionName) where T : IEntity
        {
            services.AddSingleton<IRepository<T>>(a =>
            {
                var database = a.GetService<IMongoDatabase>();
                return new MongoRepository<T>(database, collectionName);
            });
            return services;
        }
    }
}
The file contains two extension methods:
- AddMongo reads the MongoDB settings from appsettings.json and registers a singleton IMongoDatabase. It also configures BsonSerializer so that Guid and DateTimeOffset values are stored as strings.
- AddMongoRepository<T> registers MongoRepository<T> as a singleton, so any class that asks for IRepository<T>, such as our API controller, receives it through dependency injection.
Now, I will need to register these methods in the Program.cs class. So, add the highlighted code given below on the Program.cs class.
using CommandCenter.Entity;
using CommandCenter.MongoDB;

var builder = WebApplication.CreateBuilder(args);

// Add services to the container.
builder.Services.AddMongo().AddMongoRepository<Order>("pizzaItems");
builder.Services.AddControllers(options =>
{
    options.SuppressAsyncSuffixInActionNames = false;
});

builder.Services.AddEndpointsApiExplorer();
builder.Services.AddSwaggerGen();

var app = builder.Build();

// Configure the HTTP request pipeline.
if (app.Environment.IsDevelopment())
{
    app.UseSwagger();
    app.UseSwaggerUI();
}

app.UseAuthorization();

app.MapControllers();

app.Run();
See the below code line:
builder.Services.AddMongo().AddMongoRepository<Order>("pizzaItems");builder.Services is the dependency injection (DI) container. This line calls the two extension methods we wrote in MongoDB/Extensions.cs, chained together. Chaining works because each method returns the same IServiceCollection.
AddMongo()registers the BSON serializers (so Guid and DateTimeOffset are stored as strings) and a singleton IMongoDatabase. That database is built from ServiceSettings and MongoDbSettings in appsettings.json, so it connects to the Order database at mongo:27017.AddMongoRepository<Order>("pizzaItems")registers a singletonIRepository<Order>. When something asks for IRepository<Order>, DI supplies a MongoRepository<Order> that works on the MongoDB collection named pizzaItems.
Note that pizzaItems will be the collection name for the MongoDB database.
builder.Services.AddControllers(options =>
{
    options.SuppressAsyncSuffixInActionNames = false;
});
By default, ASP.NET Core (3.0 and later) removes the Async suffix from action names. A method named GetByIdAsync is internally registered as the action GetById. The option defaults to true, meaning “suppress (strip) the suffix”.
Setting SuppressAsyncSuffixInActionNames to false keeps the name exactly as written, so GetByIdAsync stays GetByIdAsync.
The PostAsync method contains this line:
return CreatedAtAction(nameof(GetByIdAsync), new { id = order.Id }, order);nameof(GetByIdAsync) produces the string “GetByIdAsync”. CreatedAtAction uses that string to look up the action and build the Location header (/order/{id}). With the default setting, the action is registered as GetById, so the lookup for GetByIdAsync fails and the POST throws an error at runtime (typically an InvalidOperationException about no route matching).
With the option set to false, the registered name and the nameof string match, and the Location header is generated correctly.
Creating Web API to Perform CRUD operations
I will create a Web API that will perform CRUD operations for the pizza orders. So, add a new controller called OrderController.cs inside the Controllers folder. Add the following code to it:
using CommandCenter.Entity;
using CommandCenter.Infrastructure;
using Microsoft.AspNetCore.Mvc;

namespace CommandCenter.Controllers
{
    [ApiController]
    [Route("order")]
    public class OrderController : ControllerBase
    {
        private readonly IRepository<Order> repository;
        public OrderController(IRepository<Order> repository)
        {
            this.repository = repository;
        }

        [HttpGet]
        public async Task<ActionResult<IEnumerable<OrderDto>>> GetAsync()
        {
            var items = (await repository.GetAllAsync()).Select(a => a.AsDto());
            return Ok(items);
        }

        [HttpGet("{id}")]
        public async Task<ActionResult<OrderDto>> GetByIdAsync(Guid id)
        {
            var item = await repository.GetAsync(id);
            if (item == null)
            {
                NotFound();
            }
            return item.AsDto();
        }

        [HttpPost]
        public async Task<ActionResult<OrderDto>> PostAsync(CreateOrderDto createOrderDto)
        {
            var order = new Order
            {
                Address = createOrderDto.Address,
                Quantity = createOrderDto.Quantity,
                CreatedDate = DateTimeOffset.UtcNow,
            };
            await repository.CreateAsync(order);
            return CreatedAtAction(nameof(GetByIdAsync), new { id = order.Id }, order);
        }

        [HttpPut("{id}")]
        public async Task<IActionResult> PutAsync(Guid id, UpdateOrderDto updateItemDto)
        {
            var existingOrder = await repository.GetAsync(id);
            if (existingOrder == null)
            {
                return NotFound();
            }
            existingOrder.Address = updateItemDto.Address;
            existingOrder.Quantity = updateItemDto.Quantity;
            await repository.UpdateAsync(existingOrder);
            return NoContent();
        }

        [HttpDelete("{id}")]
        public async Task<IActionResult> DeleteAsync(Guid id)
        {
            var item = await repository.GetAsync(id);
            if (item == null)
            {
                return NotFound();
            }
            await repository.RemoveAsync(item.Id);
            return NoContent();
        }
    }
}
Few things to note here:
- The OrderController.cs is actually an “ApiController” since there is [ApiController] attribute applied to it.
- Next, there is a
[Route("order")]attribute applied which will call this controller from the url – https://localhost:8001/order. You will see this when I will add the Web API (i.e. Microservice) to Docker Compose. - The controller receives
IRepository<Order>object in it’s constructor by dependency injection. In fact, if you recall, we already defined this injection will be of a MongoRepository<T> object in singleton mode. See AddMongoRepository<T> method in the Extensions.cs class of the MongoDB folder.
The controller has Web API methods to handle the HttpGet, HttpPost HttpPut and HttpDelete types of requests. In order to test these methods, we will need to install Swagger to our project.
Install Swagger
Swagger is the most widely used tooling ecosystem for developing APIs. To install Swagger, add the package called Swashbuckle.AspNetCore from NuGet. It provides Swagger tools for documenting APIs built on ASP.NET Core.
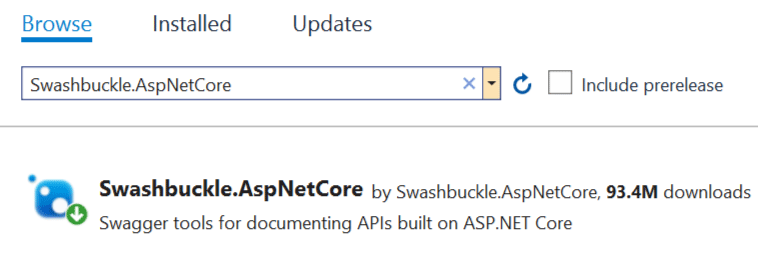
Next, open the Program.cs class and add the needed swagger codes as shown below:
using CommandCenter.Entity;
using CommandCenter.MongoDB;

var builder = WebApplication.CreateBuilder(args);

// Add services to the container.
builder.Services.AddMongo().AddMongoRepository<Order>("pizzaItems");
builder.Services.AddControllers(options =>
{
    options.SuppressAsyncSuffixInActionNames = false;
});

builder.Services.AddEndpointsApiExplorer();
builder.Services.AddSwaggerGen();

var app = builder.Build();

// Configure the HTTP request pipeline.
if (app.Environment.IsDevelopment())
{
    app.UseSwagger();
    app.UseSwaggerUI();
}

app.UseAuthorization();

app.MapControllers();

app.Run();
Blazor Web APP: User Interface of Microservice
Let’s create a Blazor Web App that will serve as the user interface of the Microservice.
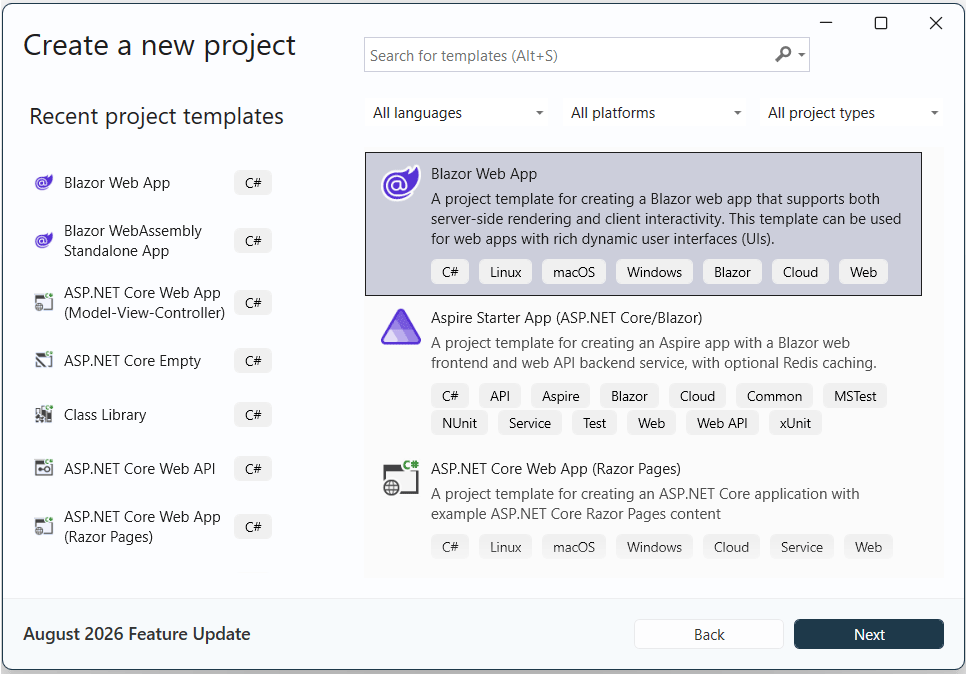
Right-click the solution and add a new Blazor Web App project. Name it CCUI. In the Program.cs file of the Blazor Web App add the following code:
builder.Services.AddScoped(sp => new HttpClient
{
    BaseAddress = new Uri("http://commandcenter:8080/")   // your API's URL
});

builder.Services.AddScoped<OrderService>();
BaseAddress is the root URL for every request made with this client. Later I can call client.GetAsync(“api/order”) and it resolves to http://commandcenter:8080/api/order.
commandcenter:8080 is the Docker Compose service name of the microservice, followed by its port. Inside a Docker network, containers reach each other by service name, and Docker’s internal DNS resolves that name to the right container. The port is the container’s internal port, not the host-mapped one. This URL only works when your Blazor app also runs inside the same Compose network. If you run the app locally from Visual Studio instead, use http://localhost:<mapped-port>/, where <mapped-port> is the host port defined in your Compose file.
I also register my OrderService class, which wraps the API calls. When a component or another service asks for OrderService, the container creates it and automatically injects the HttpClient through its constructor.
Next, I’ll create an OrderService.cs class that acts as a wrapper around the CommandCenter Microservice. It calls the microservice’s Order API through an injected HttpClient, so the Blazor components never deal with HTTP details directly. Check it’s code given below.
public class OrderService
{
    private readonly HttpClient _http;
    public OrderService(HttpClient http) => _http = http;

    public Task<List<OrderDto>?> GetAllAsync() =>
        _http.GetFromJsonAsync<List<OrderDto>>("order");

    public Task<OrderDto?> GetByIdAsync(Guid id) =>
        _http.GetFromJsonAsync<OrderDto>($"order/{id}");

    public async Task<OrderDto?> CreateAsync(CreateOrderDto dto)
    {
        var response = await _http.PostAsJsonAsync("order", dto);
        response.EnsureSuccessStatusCode();
        return await response.Content.ReadFromJsonAsync<OrderDto>();
    }

    public async Task UpdateAsync(Guid id, UpdateOrderDto dto)
    {
        var response = await _http.PutAsJsonAsync($"order/{id}", dto);
        response.EnsureSuccessStatusCode();
    }

    public async Task DeleteAsync(Guid id)
    {
        var response = await _http.DeleteAsync($"order/{id}");
        response.EnsureSuccessStatusCode();
    }
}
Key points:
- Relative URLs: “order” is combined with the base address, so the full URL becomes http://commandcenter:8080/order.
- GetFromJsonAsync, PostAsJsonAsync, PutAsJsonAsync: helper methods that handle JSON serialization and deserialization for you.
- EnsureSuccessStatusCode(): throws an HttpRequestException if the API returns an error status (4xx or 5xx), so failures aren’t silently ignored.
- Nullable return types (OrderDto?): the result can be null if the API returns an empty body or null JSON.
- Different DTOs: CreateOrderDto and UpdateOrderDto are used for input, and OrderDto for output, which keeps the API contract clean.
Next, I’ll add a folder named Infrastructure and create a Dtos.cs file inside it, which contains the DTOs. Its code is given below:
using System.ComponentModel.DataAnnotations;

namespace CCUI.Infrastructure
{
    public record OrderDto(Guid Id, string Address, int Quantity, DateTimeOffset CreatedDate);
    public record CreateOrderDto([Required] string Address, [Range(0, 1000)] int Quantity);
    public record UpdateOrderDto([Required] string Address, [Range(0, 1000)] int Quantity);
}
Finally, I will add 2 Razor Components inside the Components ➤ Pages folder. These are:
@page "/orders"
@using CCUI.Infrastructure
@rendermode InteractiveServer
@inject OrderService OrderService

<h3>Orders</h3>

@if (orders == null)
{
    <p>Loading...</p>
}
else
{
    <table class="table">
        <thead>
            <tr><th>Id</th><th>Address</th><th>Quantity</th><th>Created</th><th></th></tr>
        </thead>
        <tbody>
            @foreach (var o in orders)
            {
                <tr>
                    <td>@o.Id</td>
                    <td>@o.Address</td>
                    <td>@o.Quantity</td>
                    <td>@o.CreatedDate.ToLocalTime()</td>
                    <td>
                        <a class="btn btn-primary btn-sm" href="orders/edit/@o.Id">Edit</a>
                        <button class="btn btn-danger btn-sm" @onclick="() => Delete(o.Id)">Delete</button>
                    </td>
                </tr>
            }
        </tbody>
    </table>
}

<h4>New order</h4>
<EditForm Model="newOrder" OnValidSubmit="Create">
    <InputText @bind-Value="newOrder.Address" placeholder="Address" />
    <InputNumber @bind-Value="newOrder.Quantity" />
    <button type="submit" class="btn btn-primary">Add</button>
</EditForm>

@code {
    private List<OrderDto>? orders;
    private CreateOrder newOrder = new();

    protected override async Task OnInitializedAsync() => await Load();

    private async Task Load() => orders = await OrderService.GetAllAsync();

    private async Task Create()
    {
        await OrderService.CreateAsync(new CreateOrderDto(newOrder.Address, newOrder.Quantity));
        newOrder = new();
        await Load();
    }

    private async Task Delete(Guid id)
    {
        await OrderService.DeleteAsync(id);
        await Load();
    }

    // EditForm needs a mutable class (records are immutable)
    private class CreateOrder
    {
        public string Address { get; set; } = "";
        public int Quantity { get; set; }
    }
}
This Razor component defines an Orders page at the /orders route that runs in Interactive Server mode (@rendermode InteractiveServer), so button clicks and form submissions are handled over a live connection, and it injects the OrderService to talk to the CommandCenter API. When the component initializes, OnInitializedAsync calls Load(), which fetches all orders into the orders list; until that list is populated, the page shows “Loading…”, and afterward it renders a table with a row for each order showing its address, quantity, and creation date (converted to local time), plus an Edit link that navigates to orders/edit/{id} and a Delete button that calls Delete(id), which removes the order through the service and reloads the list.
Below the table, an EditForm bound to the newOrder object lets the user enter an address and quantity, and when the form is submitted validly, Create() maps those values into a CreateOrderDto, sends it to the API, resets the form with a fresh newOrder, and reloads the table. The small private CreateOrder class exists because EditForm needs a mutable model with settable properties for two-way binding, which the immutable record DTO cannot provide.
@page "/orders/edit/{Id:guid}"

@using CCUI.Infrastructure
@rendermode InteractiveServer

@inject OrderService OrderService
@inject NavigationManager Navigation

<h3>Edit order</h3>

@if (loading)
{
    <p>Loading...</p>
}
else if (model == null)
{
    <p>Order not found.</p>
}
else
{
    <EditForm Model="model" OnValidSubmit="Save">
        <DataAnnotationsValidator />
        <ValidationSummary />

        <div class="mb-3">
            <label>Address</label>
            <InputText class="form-control" @bind-Value="model.Address" />
        </div>
        <div class="mb-3">
            <label>Quantity</label>
            <InputNumber class="form-control" @bind-Value="model.Quantity" />
        </div>

        <button type="submit" class="btn btn-primary" disabled="@saving">Save</button>
        <a class="btn btn-secondary" href="orders">Cancel</a>
    </EditForm>

    @if (error != null)
    {
        <p class="text-danger">@error</p>
    }
}

@code {
    [Parameter] public Guid Id { get; set; }

    private EditModel? model;
    private bool loading = true;
    private bool saving;
    private string? error;

    protected override async Task OnInitializedAsync()
    {
        try
        {
            var order = await OrderService.GetByIdAsync(Id);
            if (order != null)
                model = new EditModel { Address = order.Address, Quantity = order.Quantity };
        }
        catch (HttpRequestException)
        {
            // 404 from the API ends up here with GetFromJsonAsync
            model = null;
        }
        finally
        {
            loading = false;
        }
    }

    private async Task Save()
    {
        saving = true;
        error = null;
        try
        {
            await OrderService.UpdateAsync(Id, new UpdateOrderDto(model!.Address, model.Quantity));
            Navigation.NavigateTo("orders");
        }
        catch (HttpRequestException ex)
        {
            error = $"Update failed: {ex.Message}";
        }
        finally
        {
            saving = false;
        }
    }

    // Mutable class for form binding (records are immutable)
    private class EditModel
    {
        [System.ComponentModel.DataAnnotations.Required]
        public string Address { get; set; } = "";

        [System.ComponentModel.DataAnnotations.Range(1, int.MaxValue)]
        public int Quantity { get; set; }
    }
}
This Razor component defines the Edit Order page at the route /orders/edit/{Id:guid}, where the Id segment is constrained to a GUID and bound to the Id parameter, and it runs in Interactive Server mode with OrderService and NavigationManager injected. In OnInitializedAsync, it fetches the order by its ID and copies the address and quantity into a mutable EditModel (needed because EditForm can’t bind to immutable records); if the API returns a 404, GetFromJsonAsync throws an HttpRequestException, which is caught so model stays null, and the finally block sets loading to false. While loading, the page shows “Loading…”, if no order was found it shows “Order not found.”, and otherwise it renders an EditForm with Address and Quantity inputs, where DataAnnotationsValidator and ValidationSummary enforce the [Required] rule on Address and the [Range(1, int.MaxValue)] rule on Quantity.
When the form is validly submitted, Save() sets saving to true (which disables the Save button to prevent double submits), clears any previous error, sends an UpdateOrderDto through OrderService.UpdateAsync, and then navigates back to the orders list; if the update fails, the exception is caught and an “Update failed” message is displayed in red, and the finally block resets saving. The Cancel link simply returns to the orders page without saving.
I also add a link to the Orders.razor on the NavMenu.razor component.
<div class="nav-item px-3">
    <NavLink class="nav-link" href="orders">
        <span class="bi bi-list-nested-nav-menu" aria-hidden="true"></span> Orders
    </NavLink>
</div>
Adding CommandCenter, CCUI, and MongoDB to Docker Compose
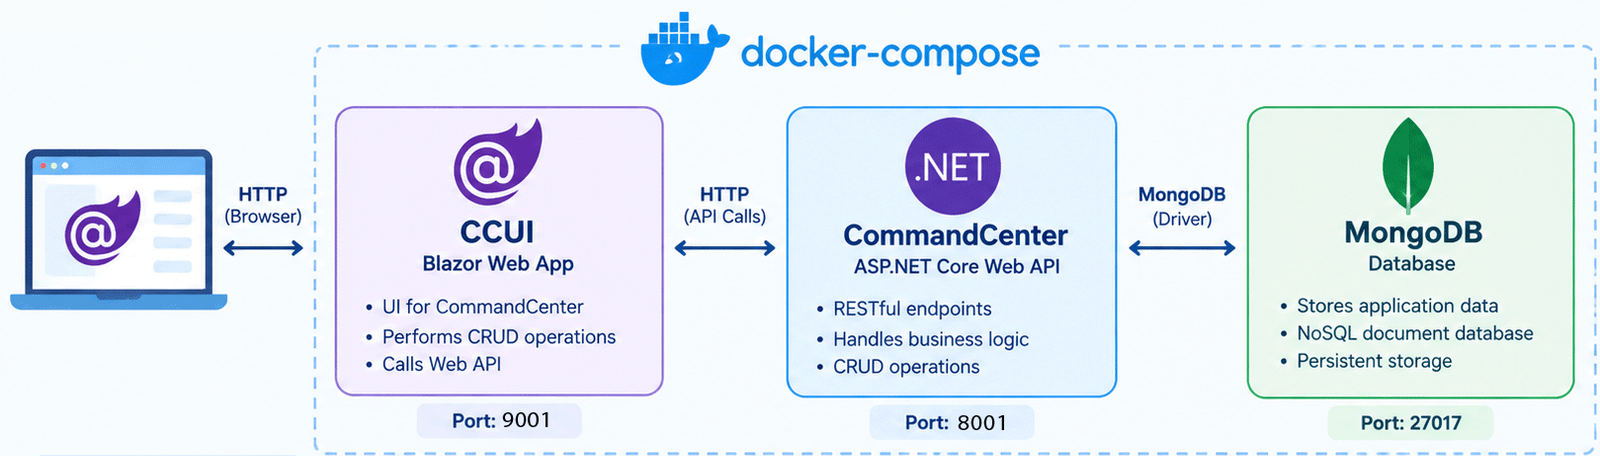
Right now the solution has three parts: the CommandCenter project, which holds the Microservice Web API; the CCUI project, a Blazor Web App that serves as the UI for the Microservice; and MongoDB, the database that stores the microservice’s records.
I will add all these 3 parts to Docker Compose. Docker Compose lets you run the Web API, the UI, and the database with one command. Compose puts all the services on a shared network, so each container can reach the others by service name. That means CommandCenter can talk to MongoDB, and CCUI can talk to CommandCenter, without hard-coded IP addresses.
The below image explains the docker compose setup of these 3 parts:
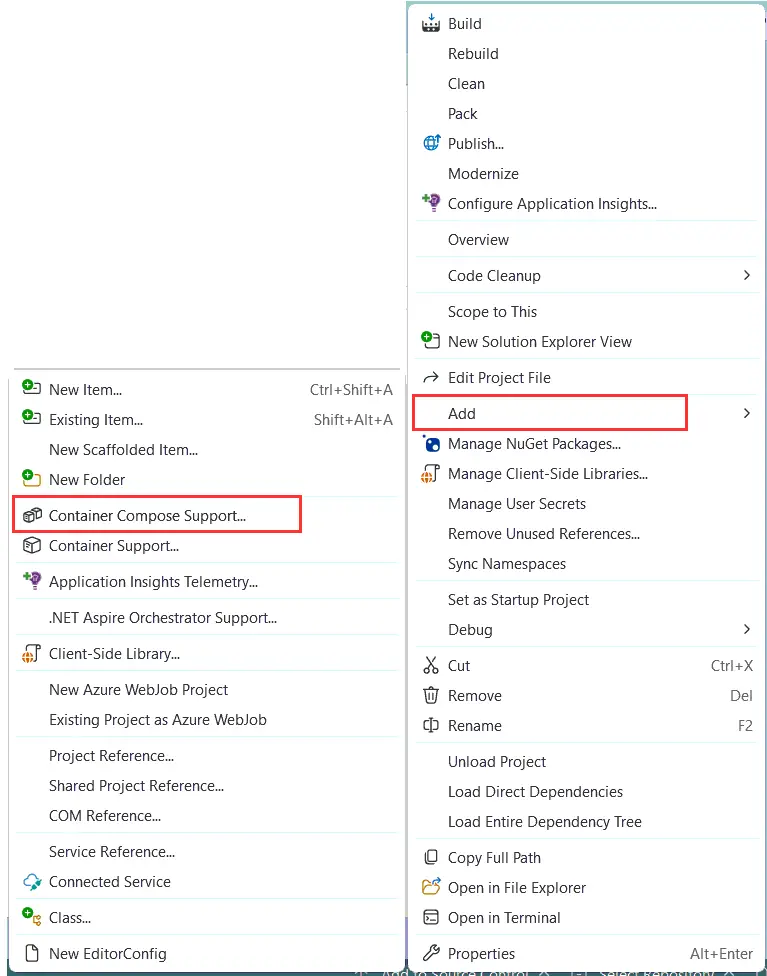
So, right click the CommandCenter project name in the solution explorer and select Add ➤ Container Compose Support.
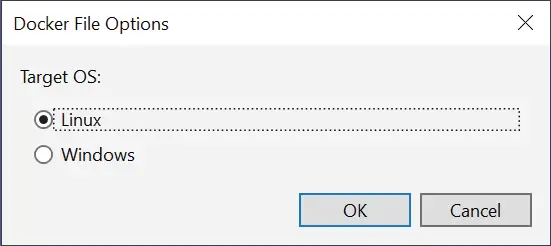
Next, you will see a new Container Scaffolding Options dialog. Here keep all the settings as it is and click OK.
When I click the OK button, Visual Studio creates 2 things:
Visual Studio creates a docker-compose.yml file in a new project called docker-compose. This project is added to the solution. The below image shows this:
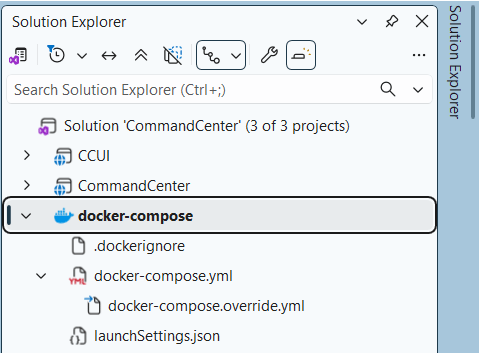
The docker-compose project is shown in boldface font, as it is also made the startup project.
Also check the Visual Studio menu bar on the top where you can see that this newly created project is set as a startup project for the solution.
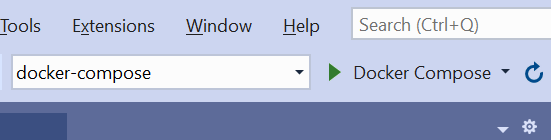
Open the docker-compose.yml, it will have the following code:
services:
  commandcenter:
    image: ${DOCKER_REGISTRY-}commandcenter
    build:
      context: .
      dockerfile: CommandCenter/Dockerfile
    depends_on:
      - mongo
This code defines a Compose service named commandcenter. The image line sets the name of the Docker image, using ${DOCKER_REGISTRY-} as an optional prefix that Visual Studio fills in when you push to a registry (if the variable isn’t set, it’s just commandcenter). The build section tells Compose to build that image from the CommandCenter/Dockerfile, using the current folder (.) as the build context, so the Dockerfile can access files across the whole solution. Finally, depends_on makes Compose start the mongo container before commandcenter, though it only waits for Mongo to start, not for it to be fully ready to accept connections.
Note that another file called docker-compose.override.yml is created to extend services for the docker-compose.yml. You can see it by clicking the arrow given on the front of docker-compose.yml file in visual studio. In the docker-compose.override.yml file update the ports section as:
ports:
  - "8000:8080"
  - "8001:8081"
This ports section maps ports on your computer (the host) to ports inside the container, in the format host:container. Inside the container the app listens on 8080 for HTTP and 8081 for HTTPS, so 8000:8080 means that visiting http://localhost:8000 on your machine reaches the app’s HTTP port, and 8001:8081 does the same for HTTPS. The host ports (8000 and 8001) can be any free ports you choose, which is useful for avoiding conflicts with other services, while the container ports must match what the app actually listens on.
The docker-compose.override.yml file now should look like:
services:
  commandcenter:
    environment:
      - ASPNETCORE_ENVIRONMENT=Development
      - ASPNETCORE_HTTP_PORTS=8080
      - ASPNETCORE_HTTPS_PORTS=8081
    ports:
      - "8000:8080"
      - "8001:8081"
    volumes:
      - ${APPDATA}/Microsoft/UserSecrets:/home/app/.microsoft/usersecrets:ro
      - ${APPDATA}/Microsoft/UserSecrets:/root/.microsoft/usersecrets:ro
      - ${APPDATA}/ASP.NET/Https:/home/app/.aspnet/https:ro
      - ${APPDATA}/ASP.NET/Https:/root/.aspnet/https:ro
Visual Studio also creates a Dockerfile inside the CommandCenter project for the project. A Dockerfile is a text file containing step-by-step instructions for building a Docker image of your CommandCenter project .It’s code is given below:
# This stage is used when running from VS in fast mode (Default for Debug configuration)
FROM mcr.microsoft.com/dotnet/aspnet:10.0 AS base
USER $APP_UID
WORKDIR /app
EXPOSE 8080
EXPOSE 8081

# This stage is used to build the service project
FROM mcr.microsoft.com/dotnet/sdk:10.0 AS build
ARG BUILD_CONFIGURATION=Release
WORKDIR /src
COPY ["CommandCenter/CommandCenter.csproj", "CommandCenter/"]
RUN dotnet restore "./CommandCenter/CommandCenter.csproj"
COPY . .
WORKDIR "/src/CommandCenter"
RUN dotnet build "./CommandCenter.csproj" -c $BUILD_CONFIGURATION -o /app/build

# This stage is used to publish the service project to be copied to the final stage
FROM build AS publish
ARG BUILD_CONFIGURATION=Release
RUN dotnet publish "./CommandCenter.csproj" -c $BUILD_CONFIGURATION -o /app/publish /p:UseAppHost=false

# This stage is used in production or when running from VS in regular mode (Default when not using the Debug configuration)
FROM base AS final
WORKDIR /app
COPY --from=publish /app/publish .
ENTRYPOINT ["dotnet", "CommandCenter.dll"]
Next, I do the same thing for adding Container Compose Support for the second project which is the CCUI. So right click on the project name on the solution explorer and select Add ➤ Container Compose Support.
Next, you will see a new Container Scaffolding Options dialog. Here keep all the settings as it and click OK.
As soon as I click the OK button, Visual Studio will do 2 things:
- Creates a new Dockerfile for the CCUI project.
- Adds a new service to the docker-compose.yml file. This service specifies the second container which will run the second project i.e. CCUI.
The Dockerfile of the CCUI project is given below.
# This stage is used when running from VS in fast mode (Default for Debug configuration)
FROM mcr.microsoft.com/dotnet/aspnet:10.0 AS base
USER $APP_UID
WORKDIR /app
EXPOSE 8080
EXPOSE 8081

# This stage is used to build the service project
FROM mcr.microsoft.com/dotnet/sdk:10.0 AS build
ARG BUILD_CONFIGURATION=Release
WORKDIR /src
COPY ["CCUI/CCUI.csproj", "CCUI/"]
RUN dotnet restore "./CCUI/CCUI.csproj"
COPY . .
WORKDIR "/src/CCUI"
RUN dotnet build "./CCUI.csproj" -c $BUILD_CONFIGURATION -o /app/build

# This stage is used to publish the service project to be copied to the final stage
FROM build AS publish
ARG BUILD_CONFIGURATION=Release
RUN dotnet publish "./CCUI.csproj" -c $BUILD_CONFIGURATION -o /app/publish /p:UseAppHost=false

# This stage is used in production or when running from VS in regular mode (Default when not using the Debug configuration)
FROM base AS final
WORKDIR /app
COPY --from=publish /app/publish .
ENTRYPOINT ["dotnet", "CCUI.dll"]
Open the docker-compose.yml and you can notice the second service i.e. ccui is added to it.
ccui:
  image: ${DOCKER_REGISTRY-}ccui
  build:
    context: .
    dockerfile: CCUI/Dockerfile
I now move to docker-compose.override.yml file and update ports section as shown below. This will allow me to access the CCUI project from the url – https://localhost:9001/.
ports:
  - "9000:8080"
  - "9001:8081"
The full code of docker-compose.override.yml is given below.
services:
  commandcenter:
    environment:
      - ASPNETCORE_ENVIRONMENT=Development
      - ASPNETCORE_HTTP_PORTS=8080
      - ASPNETCORE_HTTPS_PORTS=8081
    ports:
      - "8000:8080"
      - "8001:8081"
    volumes:
      - ${APPDATA}/Microsoft/UserSecrets:/home/app/.microsoft/usersecrets:ro
      - ${APPDATA}/Microsoft/UserSecrets:/root/.microsoft/usersecrets:ro
      - ${APPDATA}/ASP.NET/Https:/home/app/.aspnet/https:ro
      - ${APPDATA}/ASP.NET/Https:/root/.aspnet/https:ro
  ccui:
    environment:
      - ASPNETCORE_ENVIRONMENT=Development
      - ASPNETCORE_HTTP_PORTS=8080
      - ASPNETCORE_HTTPS_PORTS=8081
    ports:
      - "9000:8080"
      - "9001:8081"
    volumes:
      - ${APPDATA}/Microsoft/UserSecrets:/home/app/.microsoft/usersecrets:ro
      - ${APPDATA}/Microsoft/UserSecrets:/root/.microsoft/usersecrets:ro
      - ${APPDATA}/ASP.NET/Https:/home/app/.aspnet/https:ro
      - ${APPDATA}/ASP.NET/Https:/root/.aspnet/https:ro
The final thing I have to add the MongoDB section to the docker-compose.yml file. The full code is given below.
services:
  ccui:
    image: ${DOCKER_REGISTRY-}ccui
    build:
      context: .
      dockerfile: CCUI/Dockerfile

  commandcenter:
    image: ${DOCKER_REGISTRY-}commandcenter
    build:
      context: .
      dockerfile: CommandCenter/Dockerfile
    depends_on:
      - mongo

  mongo:
    image: mongo
    container_name: mongo
    ports:
      - 27017:27017
    volumes:
      - mongodbdata:/data/db

volumes:
  mongodbdata:
The mongo service runs MongoDB from the official mongo image on Docker Hub, so there’s no Dockerfile or build step. container_name: mongo fixes the container’s name to mongo, and since it matches the service name, the API can connect to it with the host mongo. The 27017:27017 port mapping exposes MongoDB’s default port on your machine, which lets you connect from tools like MongoDB Compass (the containers themselves don’t need it, as they reach Mongo over the Docker network). The mongodbdata:/data/db line mounts a named volume, declared in the volumes: section at the bottom, onto the folder where MongoDB stores its data, so your records survive when the container is stopped, removed, or rebuilt.
Congrats, we have successfully added The CommandCenter, CCUI and MongoDB to docker compose and it’s time to run the Microservice from Docker Compose.
Testing Microservices Operations with CCUI (Blazor Web App)
Let us build the images for every service in your docker compose file. So open Command Prompt or Powershell and navigate to the directory of docker-compose.yml file. Then run the command:
docker-compose build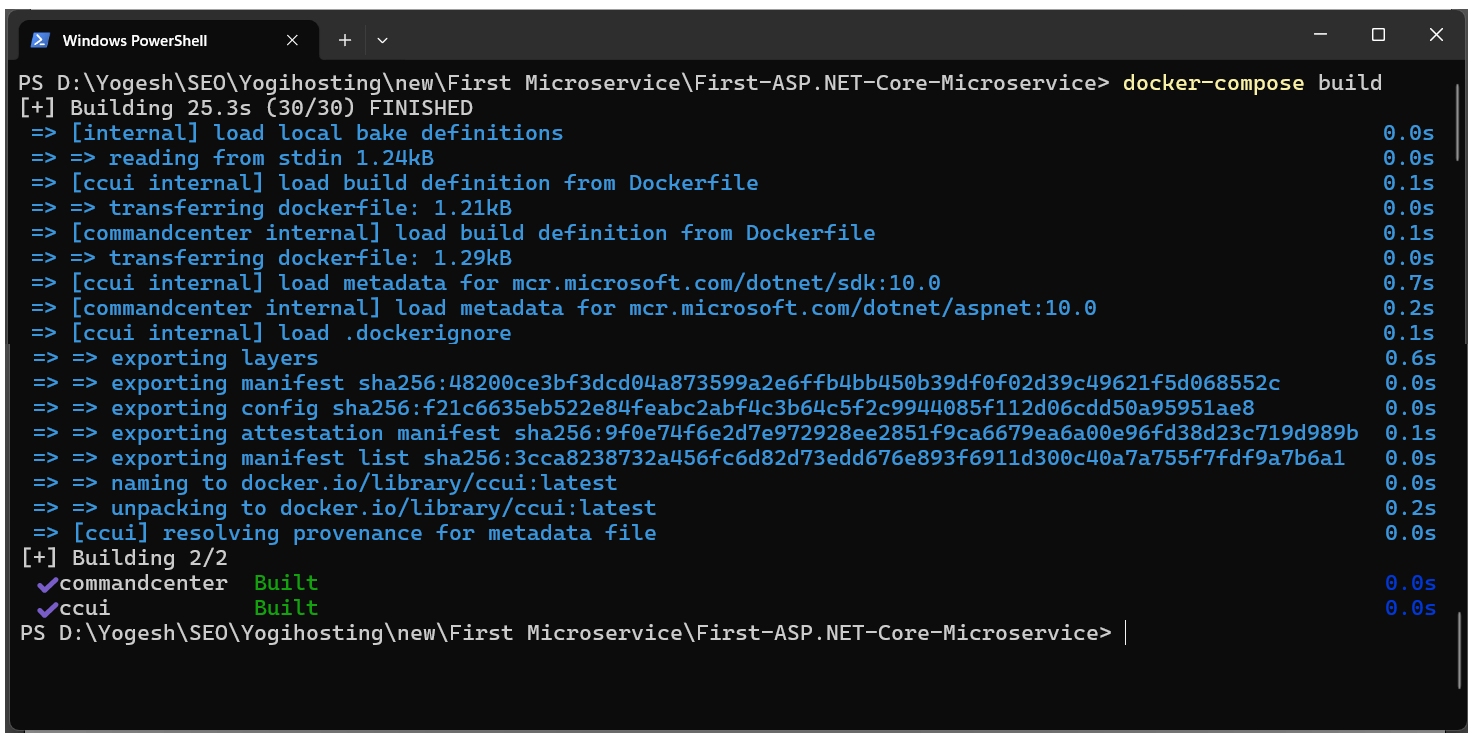
After this I start all the services in your compose file, running them in detached mode (the -d flag). The command to run is:
docker-compose up -d
This command creates three Docker containers, one each for CommandCenter, CCUI, and MongoDB, and runs them in the background.
Check the docker desktop to find these containers.

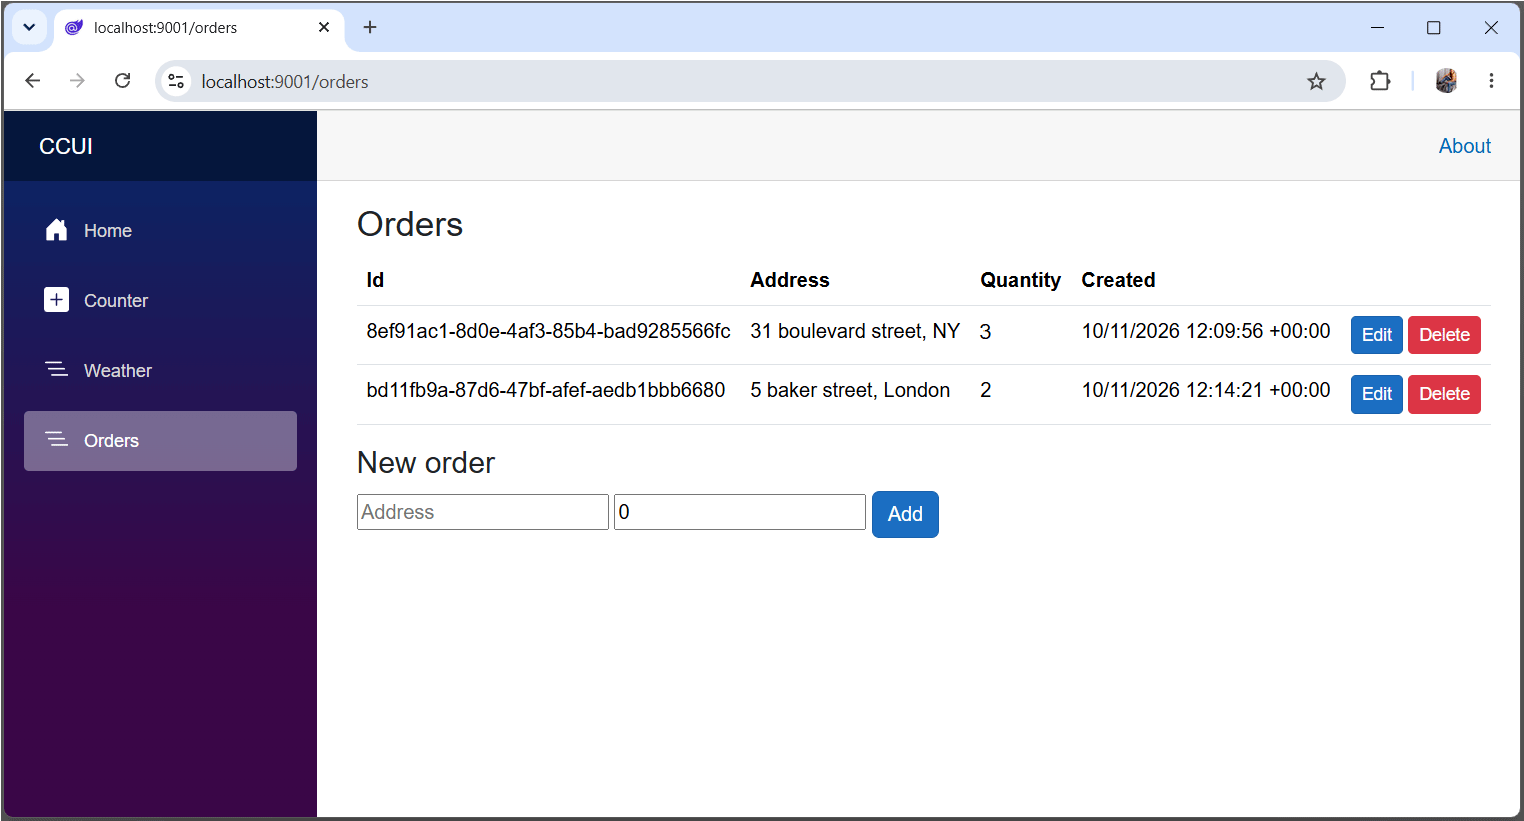
Now, lets open the CCUI app on the browser. It’s url being – https://localhost:9001/. Here I create a new pizza order, for address enter 31 boulevard street, NY and for quantity enter 3. Then click the Add button. This will insert the order to the MongoDB database. See below image:
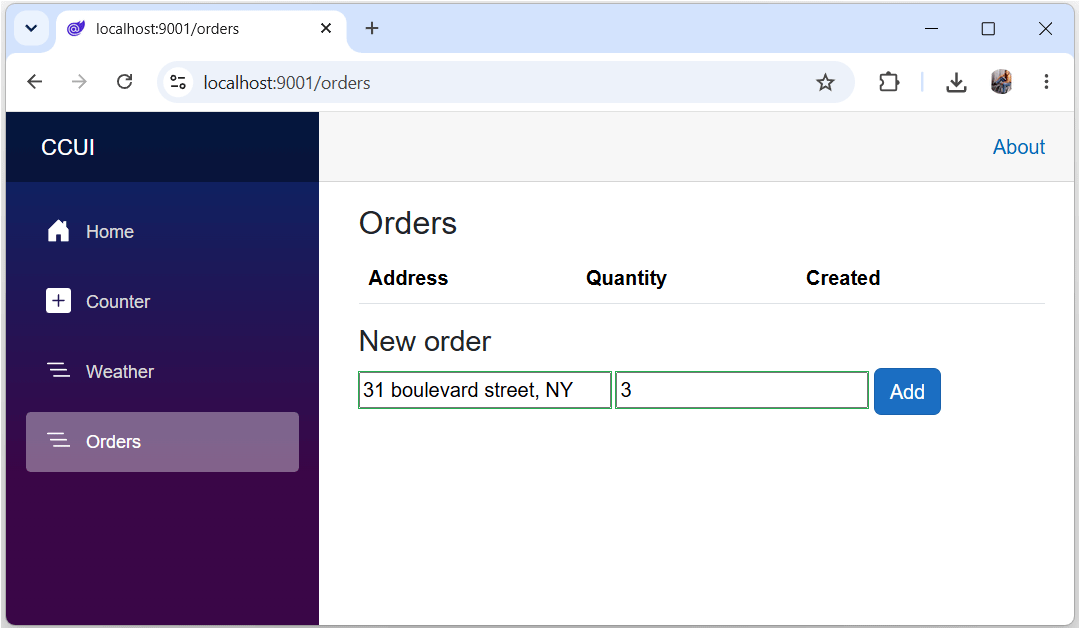
Let’s add one more order, this time for 2 pizzas. Notice that all the orders are listed at the top, each with Edit and Delete buttons. This means I can perform full CRUD operations on pizza orders through this page. Check the image below:
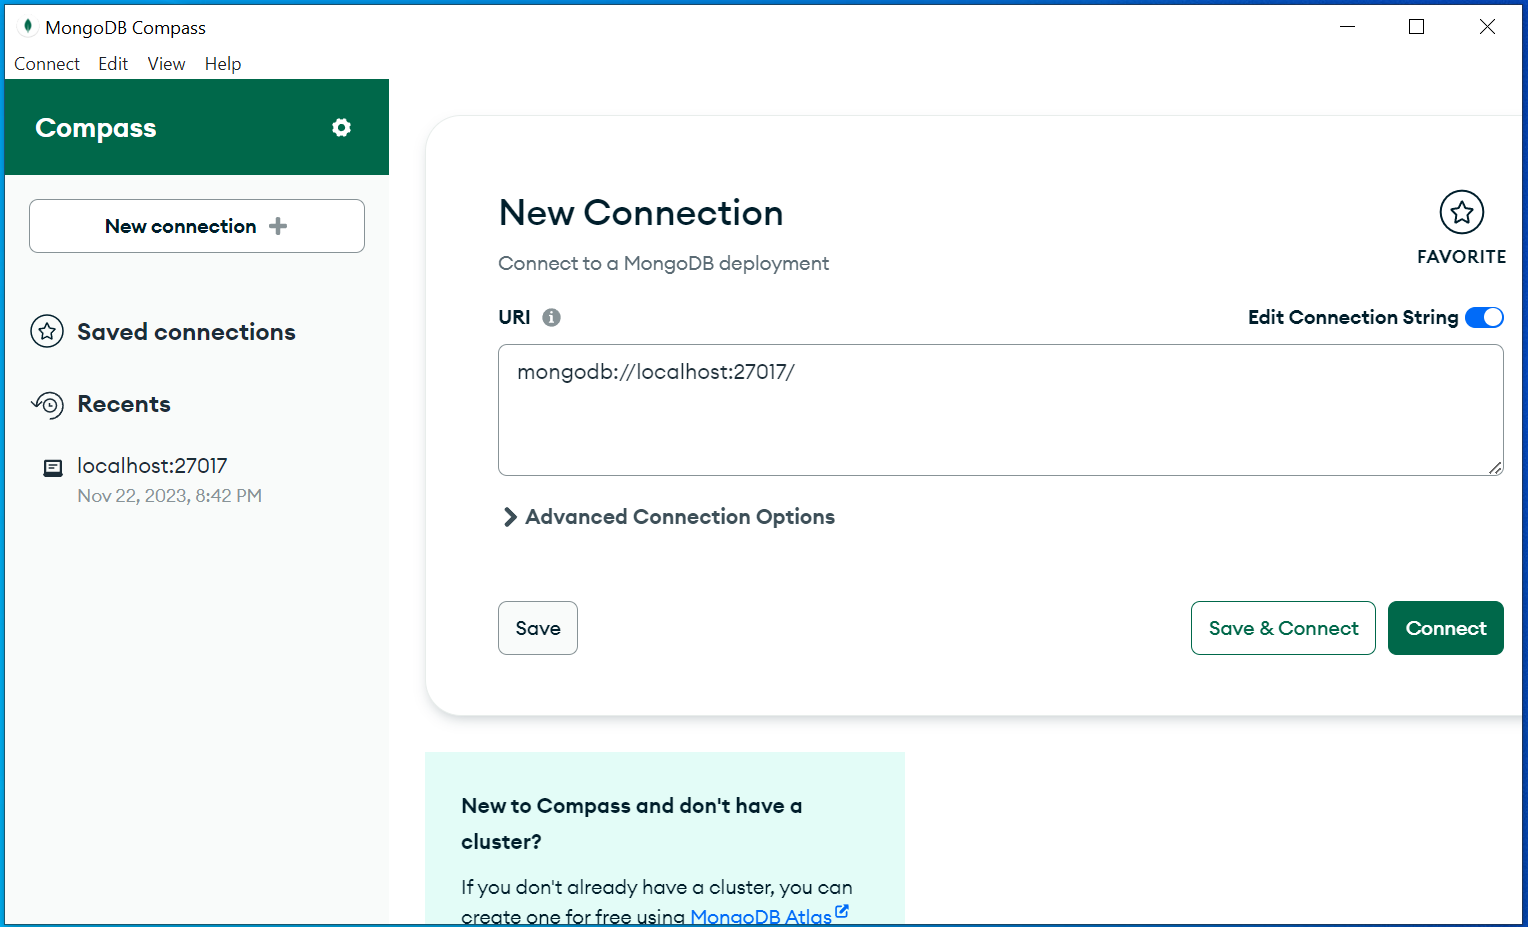
In Compass, click Add new connection. In the URI field add mongodb://localhost:27017, then click the Save & Connect button to connect with the MongoDB running on the Docker Container.
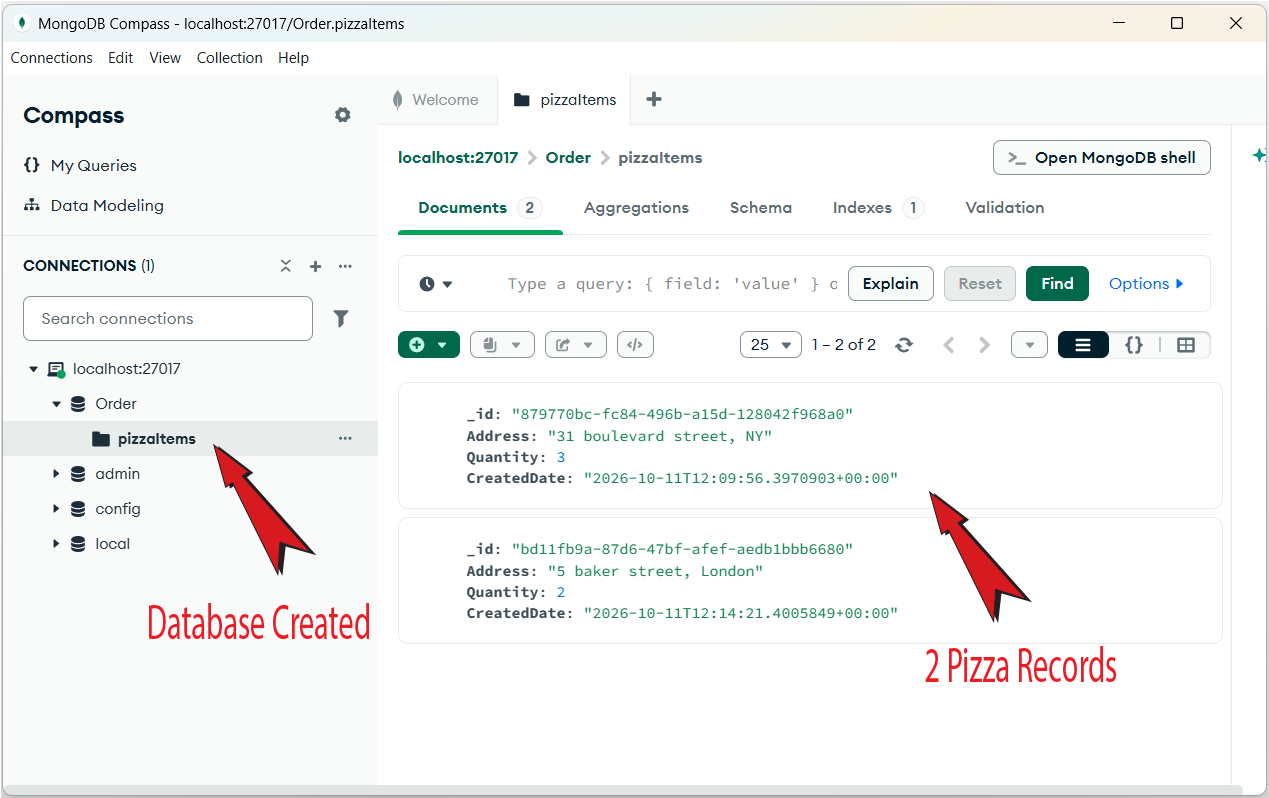
You will now see the “Order” database is created. Click it’s arrow to see the collection called pizzaItems. Now click the pizzaItems to see the 2 newly created pizza order which we just created. See the below image.
You can test the Edit and Delete features on your own. Congratulations, the CCUI user interface for the microservice is working properly. Pizza records are being inserted, read, updated, and deleted correctly from the UI, which makes Web API calls to the CommandCenter microservice project.
Testing CRUD Operations with Swagger
I will now test the CRUD operations of the CommandCenter Microservice directly with Swagger. Open the url of CommandCenter project with is – https://localhost:8001/swagger. This will open swagger page showing all the Web API CRUD operations.
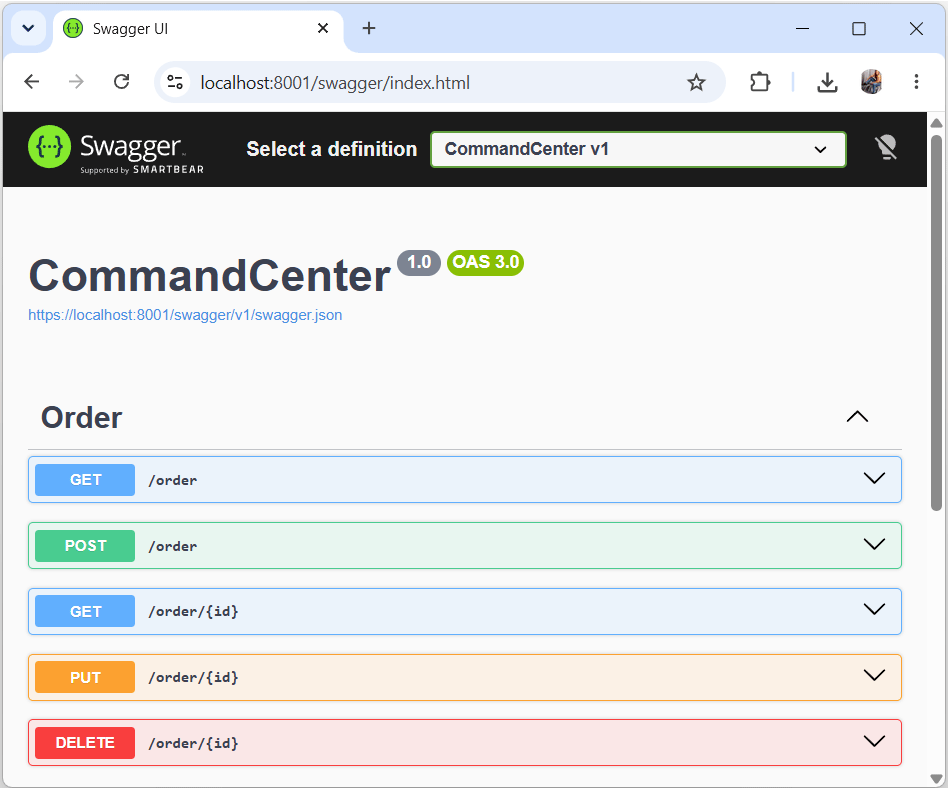
Now let us test these web api methods of the CommandCenter Microservice one by one with swagger.
Create an Order
The PostAsync() method creates a new order in the MongoDB database. It receives CreateOrderDto record type in it’s parameter and returns CreatedAtAction method with the created order and it’s location uri.
[HttpPost]
public async Task<ActionResult<OrderDto>> PostAsync(CreateOrderDto createOrderDto)
{
    var order = new Order
    {
        Address = createOrderDto.Address,
        Quantity = createOrderDto.Quantity,
        CreatedDate = DateTimeOffset.UtcNow,
    };
    await repository.CreateAsync(order);
    return CreatedAtAction(nameof(GetByIdAsync), new { id = order.Id }, order);
}
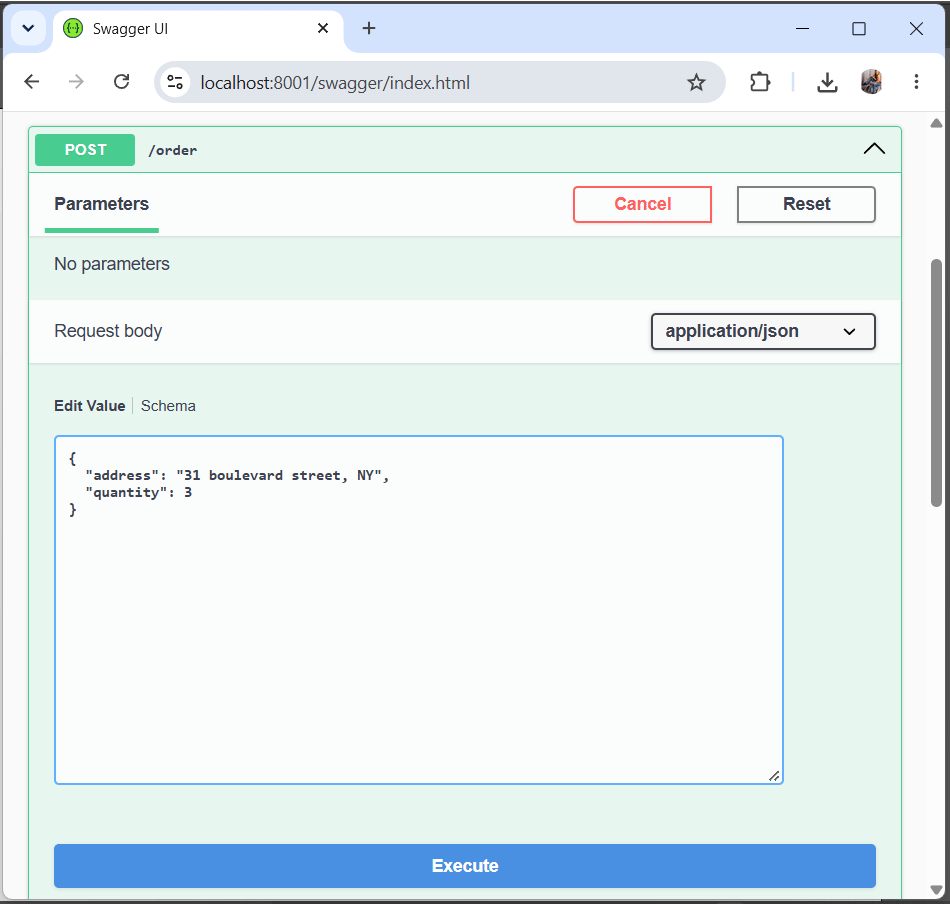
In the swagger page, click the “POST” button and click the Try it out button. Then on the request body box, enter the address and quantity value to the JSON (like what I did in the image given below). Next click the Execute button.
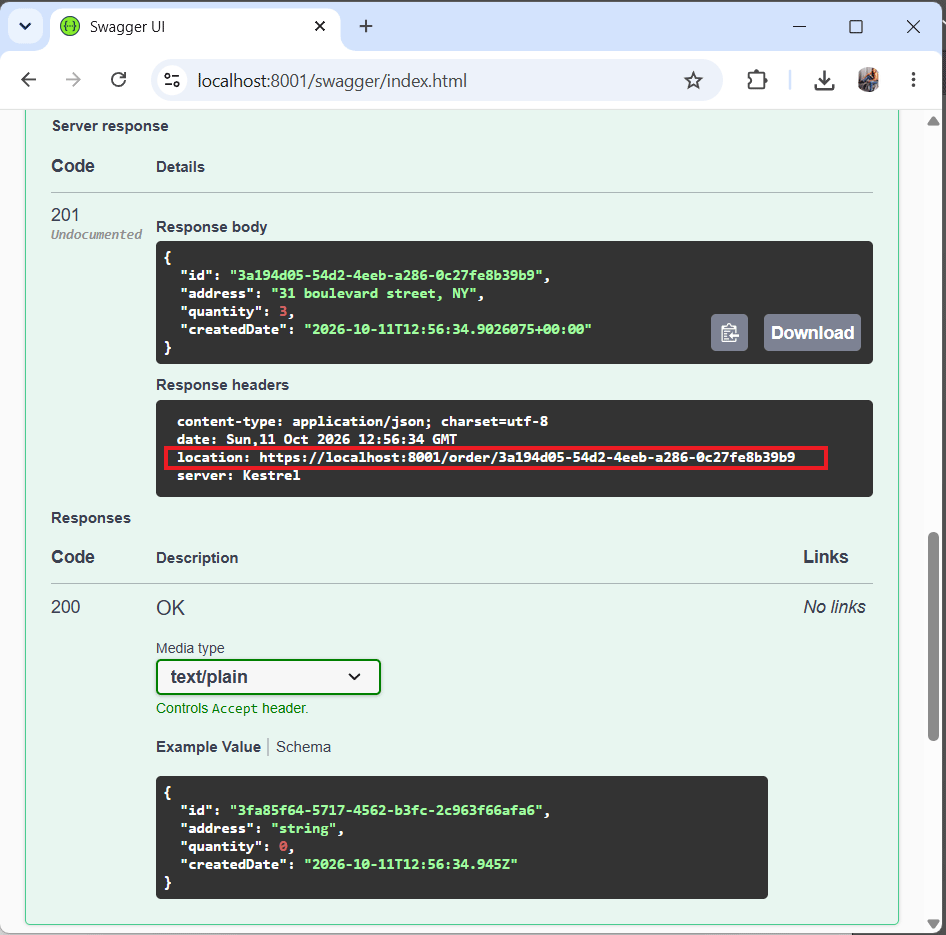
The order will be created and on the response body the order is shown in json format. On the response headers there is a location field which contains the uri of this order like https://localhost:8001/order/3a194d05-54d2-4eeb-a286-0c27fe8b39b9. The CreatedAtAction which we returned from the method adds location field on the response headers.
Get all Orders
The GetAsync() method returns all the order in the MongoDB database.
[HttpGet]
public async Task<ActionResult<IEnumerable<OrderDto>>> GetAsync()
{
    var items = (await repository.GetAllAsync()).Select(a => a.AsDto());
    return Ok(items);
}
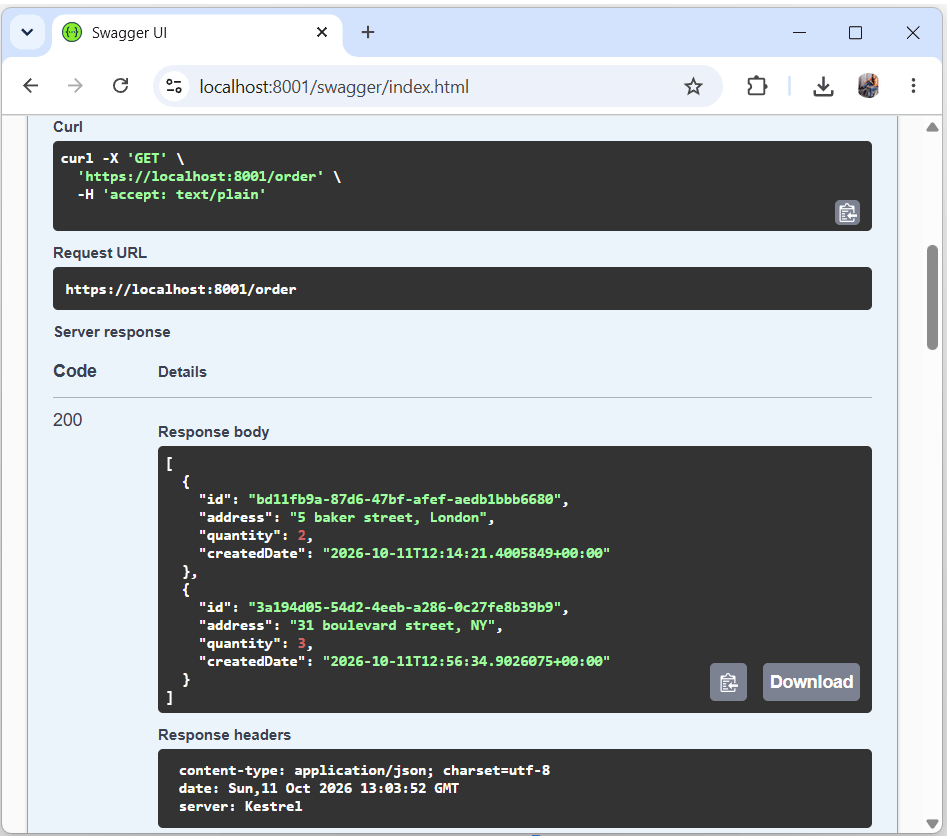
In the swagger page click the GET button then click the Try it out button, and after this click the Execute button. This will execute this method, on the response body you will see all the orders in json. Currently there are 2 pizza records in the MongoDB database so it is showing only 2 records. See the below image:
Get Order by it’s Id
The GetByIdAsync() method of the API gives the order json when you provide the order id.
[HttpGet("{id}")]
public async Task<ActionResult<OrderDto>> GetByIdAsync(Guid id)
{
    var item = await repository.GetAsync(id);
    if (item == null)
    {
        NotFound();
    }
    return item.AsDto();
}
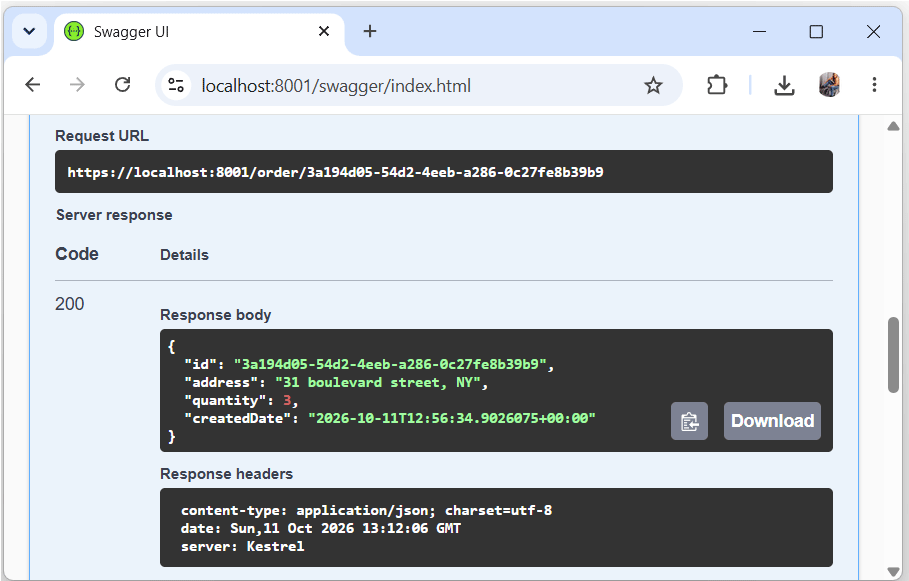
In the swagger page click the GET button that has the text /order/{id} written next to it. Enter the order id and click Execute button (get the Order Id by clicking the first GET button which has /order text written next to it).
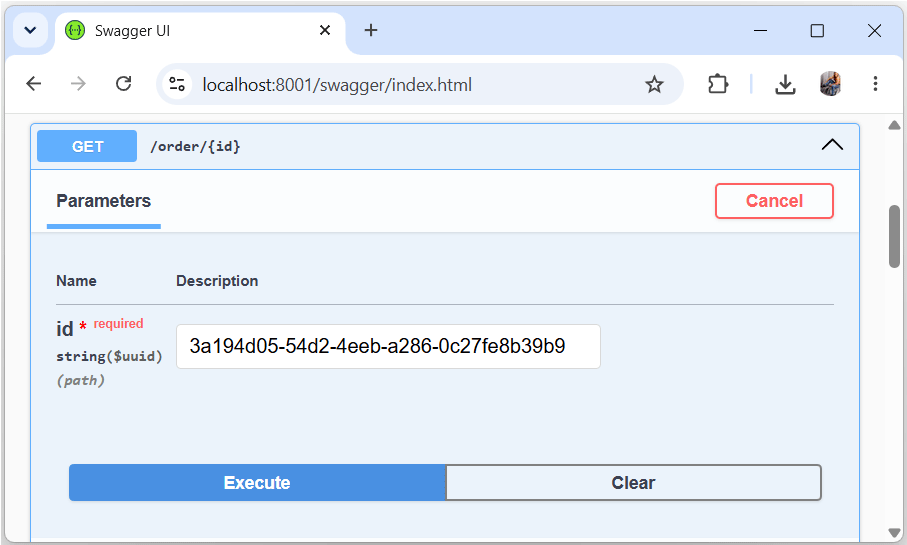
In the response body you will see the order in json.
Update an Order
The PutAsync() method is used for updating an order.
[HttpPut("{id}")]
public async Task<IActionResult> PutAsync(Guid id, UpdateOrderDto updateItemDto)
{
    var existingOrder = await repository.GetAsync(id);
    if (existingOrder == null)
    {
        return NotFound();
    }
    existingOrder.Address = updateItemDto.Address;
    existingOrder.Quantity = updateItemDto.Quantity;
    await repository.UpdateAsync(existingOrder);
    return NoContent();
}
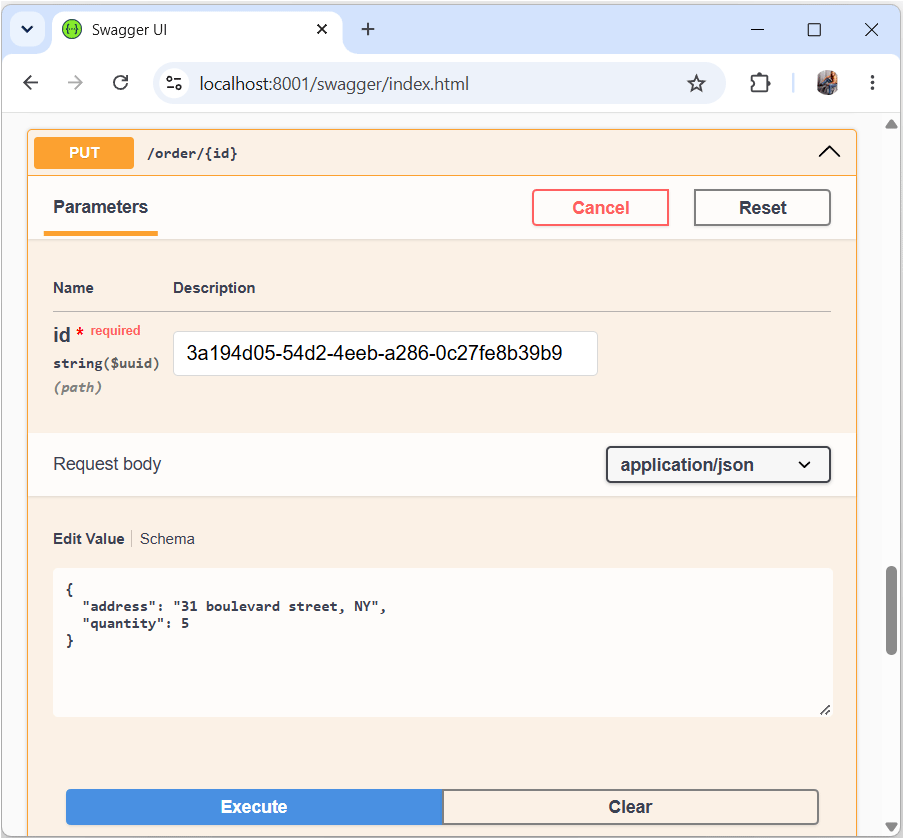
In the swagger page click the PUT button and enter the order id to the Id field. Then on the request body JSON enter the new value for the order. In the below image I have changed the quantity to 5, so when I execute this method the quantity will be updated from 3 to 5.
Delete an Order
The DeleteAsync() method deletes an order from the MongoDB database. It accepts the order id to be deleted on it’s parameter.
[HttpDelete("{id}")]
public async Task<IActionResult> DeleteAsync(Guid id)
{
    var item = await repository.GetAsync(id);
    if (item == null)
    {
        return NotFound();
    }
    await repository.RemoveAsync(item.Id);
    return NoContent();
}
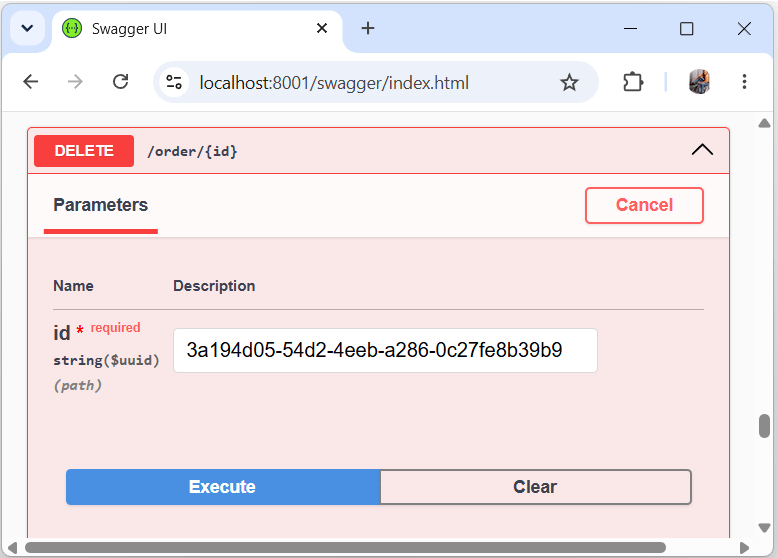
In the swagger page click the Delete button then enter the order id and click Execute. This will delete the order from the database.
Well thats it. The CRUD operations are working correctly.
We have successfully created our First ASP.NET Core Microservice, which performs Web API CRUD operations on a MongoDB database. In the next tutorial, we will create a Second Microservice and set up communication between it and this first Microservice.
SHARE THIS ARTICLE


Related Tutorials:



ABOUT THE AUTHOR
I hope you enjoyed reading this tutorial. If it helped you then consider buying a cup of coffee for me. This will help me in writing more such good tutorials for the readers. Thank you.

HELLO EVERYONE
 Welcome to YogiHosting - A Programming Tutorial Website. It is used by millions of people around the world to learn and explore about ASP.NET Core, Blazor, jQuery, JavaScript, Docker, Kubernetes and other topics.
SUBSCRIBE TO NEWSLETTER
Enter your email address to subscribe to this blog and receive notifications of new posts by email.
Join 90K other subscribers