


Microservices Asynchronous Communication with RabbitMQ and MassTransit
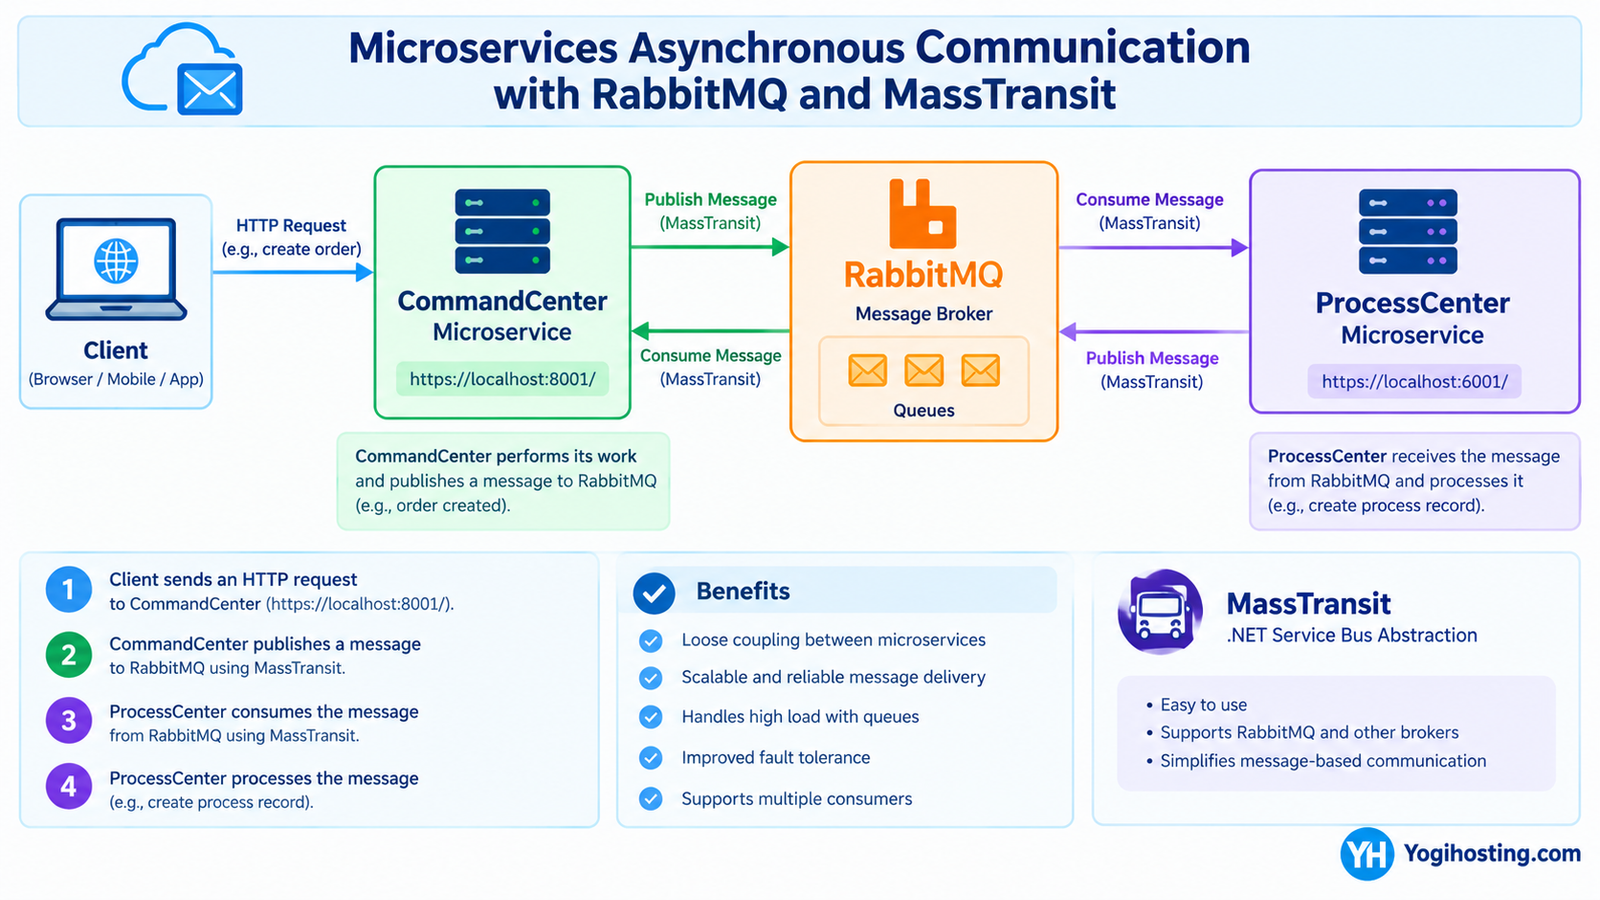
In this tutorial, we’ll explore how Asynchronous Communication works between Microservices. Our Pizza Drone Delivery application has two Microservices: CommandCenter and ProcessCenter. Right now, they talk to each other synchronously through the HttpClient class. We’ll switch this to Asynchronous Communication using RabbitMQ, an open-source message broker.
You can find this tutorial’s the complete Source Code at my GitHub Repository.
Page Contents
What is RabbitMQ
RabbitMQ is a popular open-source message broker that enables asynchronous communication between microservices. Rather than calling each other directly, services exchange messages through RabbitMQ, which helps ensure that messages are not lost and are delivered to the right consumer.
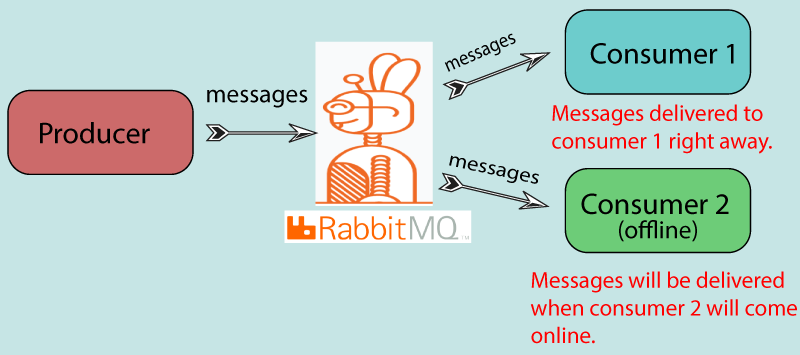
In simple terms, one microservice publishes messages to RabbitMQ, so it is called the Publisher. RabbitMQ stores these messages on its local storage and delivers them to a second microservice, called the Consumer. Once a message has been delivered and acknowledged, RabbitMQ removes it from its storage.
A message can be anything, from a simple string to a class object (typically serialized as JSON when it is sent).
Characteristics of RabbitMQ
RabbitMQ provides:
- Better Scalability: RabbitMQ makes it easy to scale a microservices application. New services can be added at any time and communicate through RabbitMQ without needing direct connections to each other. You can also run multiple instances of a consumer to process messages in parallel, which helps handle higher loads.
- Reliable Message Delivery: Even if a consumer microservice goes down, RabbitMQ keeps its messages safely stored in the queue. Once the consumer is back up, the messages are delivered, so nothing is lost. (For this to hold across a broker restart, queues and messages need to be configured as durable and persistent.)
- Loose Coupling: The publisher doesn’t need to know who consumes its messages, or even whether a consumer is running. Each microservice only needs to know about the broker, so services can be developed, deployed, and updated independently of one another.
- Improved Performance and Responsiveness: With synchronous HttpClient calls, the caller must wait for a response. With RabbitMQ, the publisher sends the message and moves on immediately, so the user doesn’t have to wait for slow downstream processing.
- Load Balancing: When multiple consumers listen to the same queue, RabbitMQ distributes messages among them (round-robin by default). This spreads the workload evenly and lets you add more consumers as traffic grows.
- Flexible Message Routing: Through exchanges (direct, topic, fanout, and headers), RabbitMQ can route a single message to one queue or many. For example, when an order is placed, one message can notify the ProcessCenter, an email service, and an analytics service at the same time.
- Message Acknowledgements: A consumer confirms to RabbitMQ that a message was processed successfully. If it fails or crashes before acknowledging, RabbitMQ re-delivers the message to another consumer, which gives you at-least-once delivery.
- Fault Tolerance and High Availability: A failure in one microservice doesn’t cascade to others. RabbitMQ also supports clustering and quorum queues, so messages stay available even if one broker node fails.
- Retry and Dead-Letter Handling: Messages that repeatedly fail can be retried or moved to a dead-letter queue for later inspection, so bad messages don’t block the rest of the system. MassTransit also provides built-in retry policies and error queues.
- Language and Platform Independence: RabbitMQ supports many programming languages and protocols (such as AMQP), so microservices written in .NET, Java, Python, or Node.js can communicate through the same broker
- Traffic Spike Handling (Buffering): If a sudden burst of messages arrives, the queue acts as a buffer. Consumers process messages at their own pace instead of being overwhelmed.
- Easy Monitoring and Management: RabbitMQ ships with a management UI and HTTP API where you can inspect queues, message rates, consumers, and connections, which makes troubleshooting much easier.
Setting Publisher microservice in RabbitMQ
Let us now integrate RabbitMQ to our first Microservice which is CommandCenter. This microservice will be set as Publisher so it will publish messages to RabbitMQ. Then RabbitMQ will deliver those messages asynchronously to ProcessCenter microservice.
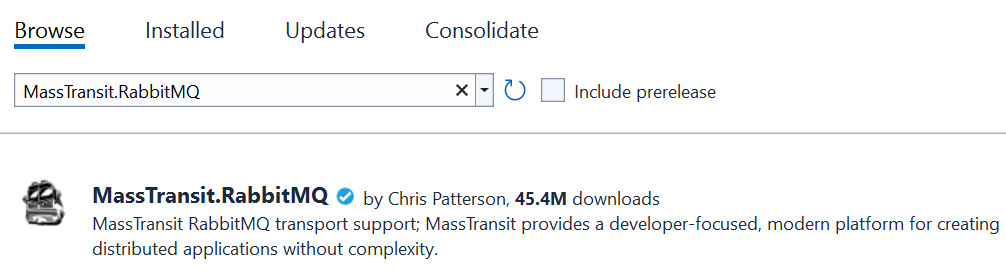
First of all, add MassTransit.RabbitMQ NuGet packages to the “CommandCenter” ASP.NET Core Web API project:
Now open appsettings.json file and add section for “RabbitMQSettings” as shown below:
{
  "Logging": {
    "LogLevel": {
      "Default": "Information",
      "Microsoft.AspNetCore": "Warning"
    }
  },
  "ServiceSettings": {
    "ServiceName": "Order"
  },
  "MongoDbSettings": {
    "Host": "mongo",
    "Port": "27017"
  },
  "RabbitMQSettings": {
    "Host": "rabbitmq"
  },
  "AllowedHosts": "*"
}
Since we are running the Microservices with docker compose, each container can reach the others using the service name defined in the docker compose file. Docker’s internal DNS resolves that name to the container’s IP address. So if your compose file has a service called rabbitmq, then "Host": "rabbitmq" points to that container.
Next, open the Setting folder and add a new class called RabbitMQSettings.cs to it. It’s code is given below:
namespace CommandCenter.Setting
{
    public class RabbitMQSettings
    {
        public string Host { get; init; }
    }
}
Now we create Message object of type Record. They will take the messages to RabbitMQ. So inside the Infrastructure folder create a new class called Contracts.cs which creates 3 message objects – OrderCreated, OrderUpdated and OrderDeleted. The code of Contracts.cs is given below:
namespace Infrastructure
{
    public record OrderCreated(Guid Id, string Address, int Quantity, DateTimeOffset CreatedDate);
    public record OrderUpdated(Guid Id, string Address, int Quantity, DateTimeOffset CreatedDate);
    public record OrderDeleted(Guid Id);
}Now in the Program.cs class configure MassTransit for the microservice to work as a publisher of messages. I have shown this in highlighted code below:
using CommandCenter.Entity;
using CommandCenter.MongoDB;
using CommandCenter.Setting;
using MassTransit;
using System.Reflection;

var builder = WebApplication.CreateBuilder(args);

// Add services to the container.
var serviceSettings = builder.Configuration.GetSection(nameof(ServiceSettings)).Get<ServiceSettings>();
builder.Services.AddMassTransit(x =>
{
    x.AddConsumers(Assembly.GetEntryAssembly());
    x.UsingRabbitMq((context, configurator) =>
    {
        var rabbitMqSettings = builder.Configuration.GetSection(nameof(RabbitMQSettings)).Get<RabbitMQSettings>();
        configurator.Host(rabbitMqSettings.Host);
        configurator.ConfigureEndpoints(context, new KebabCaseEndpointNameFormatter(serviceSettings.ServiceName, false));
    });
});

builder.Services.AddMongo().AddMongoRepository<Order>("pizzaItems");
builder.Services.AddControllers(options =>
{
    options.SuppressAsyncSuffixInActionNames = false;
});

// Learn more about configuring Swagger/OpenAPI at https://aka.ms/aspnetcore/swashbuckle
builder.Services.AddEndpointsApiExplorer();
builder.Services.AddSwaggerGen();

var app = builder.Build();

// Configure the HTTP request pipeline.
if (app.Environment.IsDevelopment())
{
    app.UseSwagger();
    app.UseSwaggerUI();
}

app.UseAuthorization();

app.MapControllers();

app.Run();
Points to note:
- AddMassTransit sets up the MassTransit service bus and registers the consumers found in the current application. I used the Assembly.GetEntryAssembly() method to scan the running application’s assembly and register all of its consumers automatically.
- UsingRabbitMq configures MassTransit to use RabbitMQ as the transport for sending messages. Here the RabbitMQ host is specified, and the receive endpoints (queues) are set up so that messages are delivered to the right consumers. I used the KebabCaseEndpointNameFormatter to name these endpoints, which converts consumer class names into lowercase, hyphen-separated queue names (for example, OrderCreatedConsumer becomes order-created).
KebabCaseEndpointNameFormatter is a MassTransit class that decides what names your RabbitMQ queues (receive endpoints) get. It converts consumer class names into lowercase, hyphen-separated names, which is called kebab-case (words joined by hyphens, like a kebab skewer).
What it does in the code:
configurator.ConfigureEndpoints(context, new KebabCaseEndpointNameFormatter(serviceSettings.ServiceName, false));The two constructor arguments:
- serviceSettings.ServiceName is the prefix. In your appsettings.json this is “Order”, so every queue name starts with order-.
- false is the includeNamespace flag. It tells the formatter not to include the consumer’s namespace in the queue name.
If you have a consumer class named OrderCreatedConsumer, the queue name becomes: order-order-created. The formatter removes the Consumer suffix, splits the class name at each capital letter, lowercases everything, and joins the parts with hyphens. Then it adds the prefix.
What is MassTransit
MassTransit is a .NET abstraction layer to work on RabbitMQ. It makes easier to work with RabbitMQ by providing lots of friendly methods. In our context, we are using MassTransit to publish / receive messages from our RabbitMQ server.
Install the MassTransit package from NuGet.
Now coming to OrderController.cs where I will be publishing messages for 3 cases:
- When an Order is created.
- When an Order is updated.
- When an Order is deleted.
I have shown all the new updated code in highlighted way below:
using CommandCenter.Entity;
using CommandCenter.Infrastructure;
using Infrastructure;
using MassTransit;
using Microsoft.AspNetCore.Mvc;

namespace CommandCenter.Controllers
{
    [ApiController]
    [Route("order")]
    public class OrderController : ControllerBase
    {
        private readonly IRepository<Order> repository;
        public readonly IPublishEndpoint publishEndpoint;

        public OrderController(IRepository<Order> repository, IPublishEndpoint publishEndpoint)
        {
            this.repository = repository;
            this.publishEndpoint = publishEndpoint;
        }

        [HttpGet]
        public async Task<ActionResult<IEnumerable<OrderDto>>> GetAsync()
        {
            var items = (await repository.GetAllAsync()).Select(a => a.AsDto());
            return Ok(items);
        }

        [HttpGet("{id}")]
        public async Task<ActionResult<OrderDto>> GetByIdAsync(Guid id)
        {
            var item = await repository.GetAsync(id);
            if (item == null)
            {
                NotFound();
            }
            return item.AsDto();
        }

        [HttpPost]
        public async Task<ActionResult<OrderDto>> PostAsync(CreateOrderDto createOrderDto)
        {
            var order = new Order
            {
                Address = createOrderDto.Address,
                Quantity = createOrderDto.Quantity,
                CreatedDate = DateTimeOffset.UtcNow,
            };
            await repository.CreateAsync(order);
            await publishEndpoint.Publish(new OrderCreated(order.Id, order.Address, order.Quantity, order.CreatedDate));
            return CreatedAtAction(nameof(GetByIdAsync), new { id = order.Id }, order);
        }

        [HttpPut("{id}")]
        public async Task<IActionResult> PutAsync(Guid id, UpdateOrderDto updateItemDto)
        {
            var existingOrder = await repository.GetAsync(id);
            if (existingOrder == null)
            {
                return NotFound();
            }
            existingOrder.Address = updateItemDto.Address;
            existingOrder.Quantity = updateItemDto.Quantity;
            await repository.UpdateAsync(existingOrder);
            await publishEndpoint.Publish(new OrderUpdated(existingOrder.Id, existingOrder.Address, existingOrder.Quantity, existingOrder.CreatedDate));
            return NoContent();
        }

        [HttpDelete("{id}")]
        public async Task<IActionResult> DeleteAsync(Guid id)
        {
            var item = await repository.GetAsync(id);
            if (item == null)
            {
                return NotFound();
            }
            await repository.RemoveAsync(item.Id);
            await publishEndpoint.Publish(new OrderDeleted(id));
            return NoContent();
        }
    }
}
Points to note:
- 1. The constructor get the object IPublishEndpoint and it is used for publishing messages.
- 2. In the PostAsync method, after the Order is created, the message is published to RabbitMQ. This message is of type OrderCreated.
await publishEndpoint.Publish(new OrderCreated(order.Id, order.Address, order.Quantity, order.CreatedDate));- 3. Similary, in the PutAsync method the message is published. The message is of type OrderUpdated.
await publishEndpoint.Publish(new OrderUpdated(existingOrder.Id, existingOrder.Address, existingOrder.Quantity, existingOrder.CreatedDate));- 4. When the Order is deleted another message is published which contains the id of the deleted order. It is of type OrderDeleted.
await publishEndpoint.Publish(new OrderDeleted(id));Setting Consumer microservice in RabbitMQ
We will now create the ProcessCenter microservice as a Consumer for messages in RabbitMQ. So install the same MassTransit.RabbitMQ NuGet Packages on the ProcessCenter Web API also.
Next, on the appsettings.json file add the RabbitMQSettings section:
{
  "Logging": {
    "LogLevel": {
      "Default": "Information",
      "Microsoft.AspNetCore": "Warning"
    }
  },
  "ServiceSettings": {
    "ServiceName": "Process"
  },
  "MongoDbSettings": {
    "Host": "mongo1",
    "Port": "27016"
  },
  "RabbitMQSettings": {
    "Host": "host.docker.internal"
  },
  "AllowedHosts": "*"
}
Next, inside the “Setting” folder create RabbitMQSettings.cs class with the following code:
namespace ProcessCenter.Setting
{
    public class RabbitMQSettings
    {
        public string Host { get; init; }
    }
}
Next, inside the Infrastructure folder create Contracts.cs file. It is the same file which we also created on the CommandCenter microservice to. The Contracts.cs code is given below:
namespace Infrastructure
{
    public record OrderCreated(Guid Id, string Address, int Quantity, DateTimeOffset CreatedDate);
    public record OrderUpdated(Guid Id, string Address, int Quantity, DateTimeOffset CreatedDate);
    public record OrderDeleted(Guid Id);
}Next, on the Program.cs file, configure RabbitMQ and MassTransit like before:
using Polly.Timeout;
using Polly;
using ProcessCenter.Client;
using ProcessCenter.Entity;
using ProcessCenter.MongoDB;
using MassTransit;
using System.Reflection;
using ProcessCenter.Setting;

var builder = WebApplication.CreateBuilder(args);

// Add services to the container.
builder.Services.AddMassTransit(x =>
{
    x.AddConsumers(Assembly.GetEntryAssembly());
    x.UsingRabbitMq((context, configurator) =>
    {
        var configuration = context.GetService<IConfiguration>();
        var serviceSettings = configuration.GetSection(nameof(ServiceSettings)).Get<ServiceSettings>();
        var rabbitMqSettings = configuration.GetSection(nameof(RabbitMQSettings)).Get<RabbitMQSettings>();
        configurator.Host(rabbitMqSettings.Host);
        configurator.ConfigureEndpoints(context, new KebabCaseEndpointNameFormatter(serviceSettings.ServiceName, false));
        configurator.UseMessageRetry(b =>
        {
            b.Interval(3, TimeSpan.FromSeconds(5));
        });
    });
});

builder.Services.AddMongo().AddMongoRepository<Process>("processItems").AddMongoRepository<Order>("pizzaItems");

builder.Services.AddHttpClient<OrderClient>(a =>
{
    a.BaseAddress = new Uri("https://host.docker.internal:8001");
})
.ConfigurePrimaryHttpMessageHandler(() => new HttpClientHandler
{
    ServerCertificateCustomValidationCallback =
    HttpClientHandler.DangerousAcceptAnyServerCertificateValidator
})
.AddTransientHttpErrorPolicy(b => b.Or<TimeoutRejectedException>().WaitAndRetryAsync(
    5,
    c => TimeSpan.FromSeconds(Math.Pow(2, c))
))
.AddTransientHttpErrorPolicy(b => b.Or<TimeoutRejectedException>().CircuitBreakerAsync(
    3,
    TimeSpan.FromSeconds(15)
))
.AddPolicyHandler(Policy.TimeoutAsync<HttpResponseMessage>(1));

builder.Services.AddControllers();

// Learn more about configuring Swagger/OpenAPI at https://aka.ms/aspnetcore/swashbuckle
builder.Services.AddEndpointsApiExplorer();
builder.Services.AddSwaggerGen();

var app = builder.Build();

// Configure the HTTP request pipeline.
if (app.Environment.IsDevelopment())
{
    app.UseSwagger();
    app.UseSwaggerUI();
}

app.UseAuthorization();

app.MapControllers();

app.Run();
Storing the PizzaItems Collection in MongoDB for ProcessCenter Microservice
We have our Message Producers and Consumers set up so it makes sense to store the messages in MongoDB database. This is because RabbitMQ will keep the messages in the memory only till they are delivered.
So, in our ProcessCenter microservice the message which are consumed will be stored in MongoDB. In the “Entity” folder create Order.cs class whose code is given below.
namespace ProcessCenter.Entity
{
    public class Order : IEntity
    {
        public Guid Id { get; set; }
        public string Address { get; set; }
        public int Quantity { get; set; }
        public DateTimeOffset CreatedDate { get; set; }
    }
}
Next configure MongoDB on the Program.cs class by adding .AddMongoRepository
builder.Services.AddMongo().AddMongoRepository<Process>("processItems").AddMongoRepository<Order>("pizzaItems"); Here I have added “pizzaItems” collection in the AddMongoRepository method.
Next, on the root of the ProcessCenter app, create a new folder called “Consumers” and to it add a new class called OrderCreatedConsumer.cs whose code is given below:
using Infrastructure;
using MassTransit;
using ProcessCenter.Entity;

namespace ProcessCenter.Consumers
{
    public class OrderCreatedConsumer : IConsumer<OrderCreated>
    {
        private readonly IRepository<Order> repository;
        public OrderCreatedConsumer(IRepository<Order> repository)
        {
            this.repository = repository;
        }

        public async Task Consume(ConsumeContext<OrderCreated> context)
        {
            var message = context.Message;
            var item = await repository.GetAsync(message.Id);
            if (item != null)
            {
                return;
            }

            item = new Order
            {
                Id = message.Id,
                Address = message.Address,
                Quantity = message.Quantity
            };

            await repository.CreateAsync(item);
        }
    }
}
This class inherits from IConsumer<OrderCreated> so it will act as a consumer of OrderCreated. This means this call will get message whenever an order is created on the CommandCenter microservice. In fact when it receives the message from RabbitMQ then they are inserted to MongoDB database.
In the “Consumers” folder create another class called OrderUpdatedConsumer.cs which will consume the updated order message. It’s code is given below:
using Infrastructure;
using MassTransit;
using ProcessCenter.Entity;

namespace ProcessCenter.Consumers
{
    public class OrderUpdatedConsumer : IConsumer<OrderUpdated>
    {
        private readonly IRepository<Order> repository;
        public OrderUpdatedConsumer(IRepository<Order> repository)
        {
            this.repository = repository;
        }

        public async Task Consume(ConsumeContext<OrderUpdated> context)
        {
            var message = context.Message;
            var item = await repository.GetAsync(message.Id);
            if (item == null)
            {
                item = new Order
                {
                    Id = message.Id,
                    Address = message.Address,
                    Quantity = message.Quantity
                };
                await repository.CreateAsync(item);
            }
            else
            {
                item.Address = message.Address;
                item.Quantity = message.Quantity;

                await repository.UpdateAsync(item);
            }
        }
    }
}
This class updates the entry in the MongoDB pizzaItems collection.
Next, inside the “Consumers” folder create another class called OrderDeletedConsumer.cs which will consume the deleted order message. It’s code is given below:
using Infrastructure;
using MassTransit;
using ProcessCenter.Entity;

namespace ProcessCenter.Consumers
{
    public class OrderDeletedConsumer : IConsumer<OrderDeleted>
    {
        private readonly IRepository<Order> repository;
        public OrderDeletedConsumer(IRepository<Order> repository)
        {
            this.repository = repository;
        }

        public async Task Consume(ConsumeContext<OrderDeleted> context)
        {
            var message = context.Message;
            var item = await repository.GetAsync(message.Id);
            if (item == null)
            {
                return;
            }
            await repository.RemoveAsync(message.Id);
        }
    }
}
Finally, in the ProcessController.cs, changes needs to be made to the GetAsync(Guid droneId) method so that it fetches the Process record from PizzaItems and ProcessItems collection. The necessary codes is highlighted below:
using Microsoft.AspNetCore.Mvc;
using ProcessCenter.Entity;
using ProcessCenter.Infrastructure;
using static ProcessCenter.Infrastructure.Dtos;

namespace ProcessCenter.Controllers
{
    [ApiController]
    [Route("process")]
    public class ProcessController : ControllerBase
    {
        private readonly IRepository<Process> repository;
        private readonly IRepository<Order> orderRepository;
        public ProcessController(IRepository<Process> repository, IRepository<Order> orderRepository)
        {
            this.repository = repository;
            this.orderRepository = orderRepository;
        }

        [HttpGet]
        public async Task<ActionResult<IEnumerable<ProcessDto>>> GetAsync(Guid droneId)
        {
            if (droneId == Guid.Empty)
            {
                return BadRequest();
            }

            var processEntities = await repository.GetAllAsync(a => a.DroneId == droneId);
            var itemIds = processEntities.Select(a => a.OrderId);
            var orderEntities = await orderRepository.GetAllAsync(a => itemIds.Contains(a.Id));

            var processDtos = processEntities.Select(a =>
            {
                var orderItem = orderEntities.Single(b => b.Id == a.OrderId);
                return a.AsDto(orderItem.Address, orderItem.Quantity);
            });

            return Ok(processDtos);
        }

        [HttpPost]
        public async Task<ActionResult> PostAsync(GrantOrderDto grantOrderDto)
        {
            var process = await repository.GetAsync(a => a.DroneId == grantOrderDto.DroneId && a.OrderId == grantOrderDto.OrderId);
            if (process == null)
            {
                process = new Process
                {
                    DroneId = grantOrderDto.DroneId,
                    OrderId = grantOrderDto.OrderId,
                    Status = grantOrderDto.Status,
                    AcquiredDate = DateTimeOffset.UtcNow
                };

                await repository.CreateAsync(process);
            }
            else
            {
                process.Status = grantOrderDto.Status;
                await repository.UpdateAsync(process);
            }
            return Ok();
        }
    }
}
Installing RabbitMQ with Docker
We have to add RabbitMQ section in the docker-compose.yml file of the CommandCenter app. See code below:
services:
  commandcenter:
    image: ${DOCKER_REGISTRY-}commandcenter
    build:
      context: .
      dockerfile: CommandCenter/Dockerfile

  ccui:
    image: ${DOCKER_REGISTRY-}ccui
    build:
      context: .
      dockerfile: CCUI/Dockerfile

  mongo:
    image: mongo
    container_name: mongo
    ports:
      - 27017:27017
    volumes:
      - mongodbdata:/data/db

  rabbitmq:
    image: rabbitmq:management
    container_name: rabbitmq
    ports:
      - 5672:5672
      - 15672:15672
    volumes:
      - rabbitmqdata:/var/lib/rabbitmq
    hostname: rabbitmq

volumes:
  mongodbdata:
  rabbitmqdata:
The rabbitmq section defines a Docker container that runs the RabbitMQ message broker alongside your other services. The image: rabbitmq:management is the RabbitMQ image. The container_name: rabbitmq is the docker container name that will run the RabbitMQ.
Moving to the ports section where each entry is host_port:container_port, which publishes a container port to your machine.
- 5672:5672 is the AMQP port. Applications use it to publish and consume messages. Containers inside the compose network use it directly, and publishing it also lets an app running on your machine connect via localhost:5672.
- 15672:15672 is the management UI port. Open http://localhost:15672 in your browser to see the dashboard. The default login is guest / guest.
volumes: – rabbitmqdata:/var/lib/rabbitmq mounts a named Docker volume (rabbitmqdata, declared at the bottom of the file) into the folder where RabbitMQ stores its data. Without it, queues and stored messages would be lost whenever the container is removed. With it, the data persists across restarts and recreations.
hostname: rabbitmq sets the container’s internal hostname. This matters more than it looks: RabbitMQ keeps its data in a folder named after the node name, which is derived from the hostname. If the hostname changed between runs (Docker normally assigns a random one), RabbitMQ would look in a different folder and your persisted data would appear to be gone. Fixing it to rabbitmq keeps the data folder consistent.
volumes: at the bottom of the file:
volumes:
  mongodbdata:
  rabbitmqdata:
This declares the named volumes used by the services. Docker creates and manages them, and they survive docker compose down (unless you add -v).
Your commandcenter container connects to rabbitmq:5672 over the internal Docker network. You, as the developer, open localhost:15672 to watch the queues. And thanks to the volume and fixed hostname, messages stored in durable queues survive container restarts.
Let us build the images for every service in your docker compose file. So open Command Prompt or PowerShell and navigate to the directory of docker-compose.yml file. Then run the command:
docker-compose buildAfter this I start all the services in your compose file, running them in detached mode (the -d flag). The command to run is:
docker-compose up -d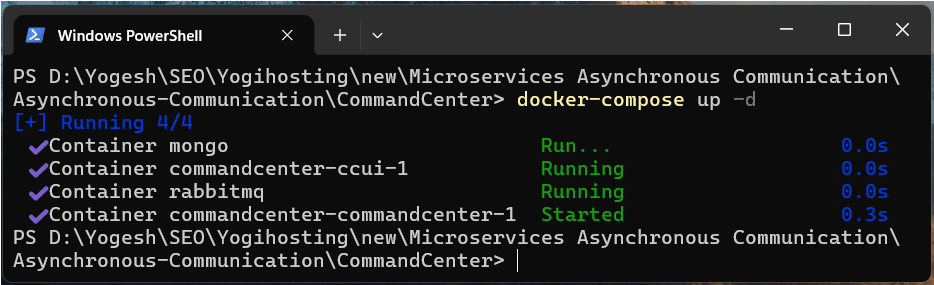
Now in your browser, open the url of the RabbitMQ management portal, this url is http://localhost:15672/. For the username and password enter “guest” and click the Login button.
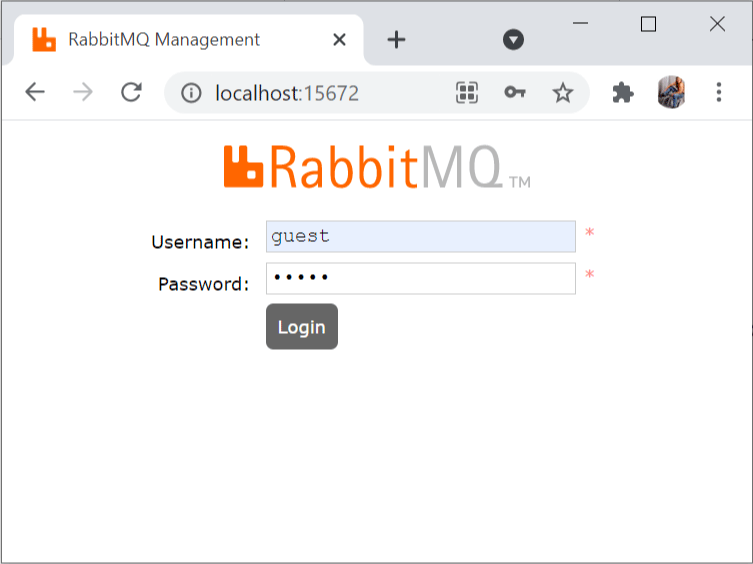
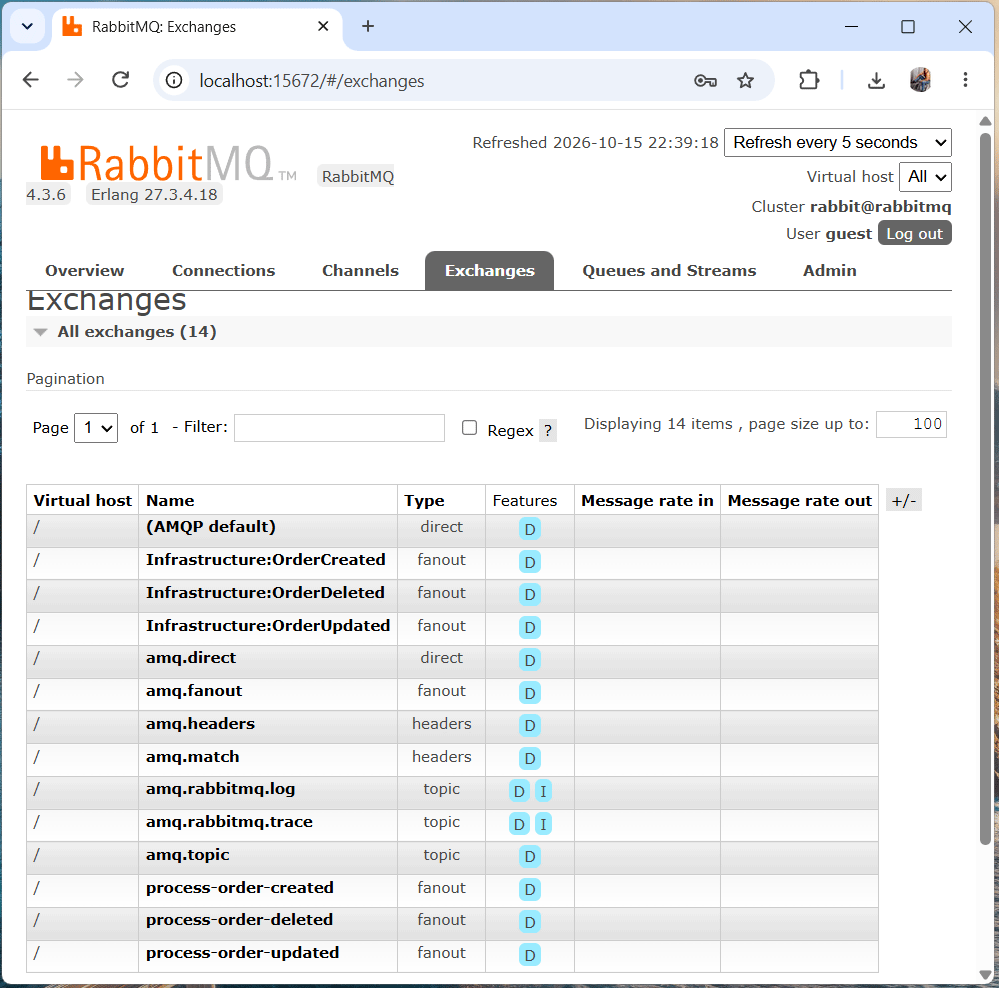
This will take you inside the portal where you can see exchanges, queues for the messages. There, open the Exchanges tab and you will notice RabbitMQ has created new Exchanges.
- Infrastructure:OrderCreated
- Infrastructure:OrderDeleted
- Infrastructure:OrderUpdated
- process-order-created
- process-order-deleted
- process-order-updated
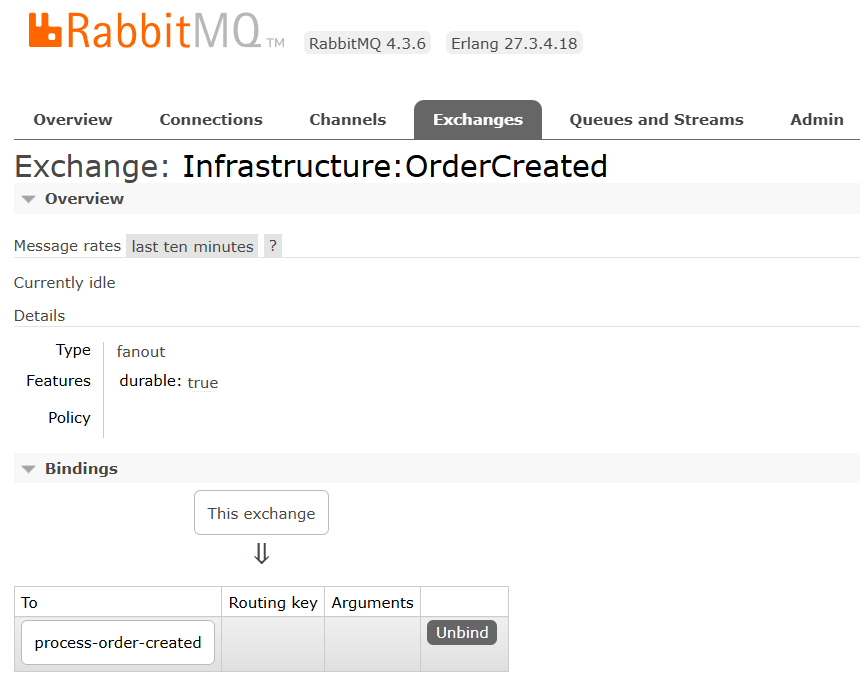
Click on any Exchange to see it’s bindings. For example, I click on Infrastructure:OrderCreated to see it’s binding process-order-created.
Testing the Microservices
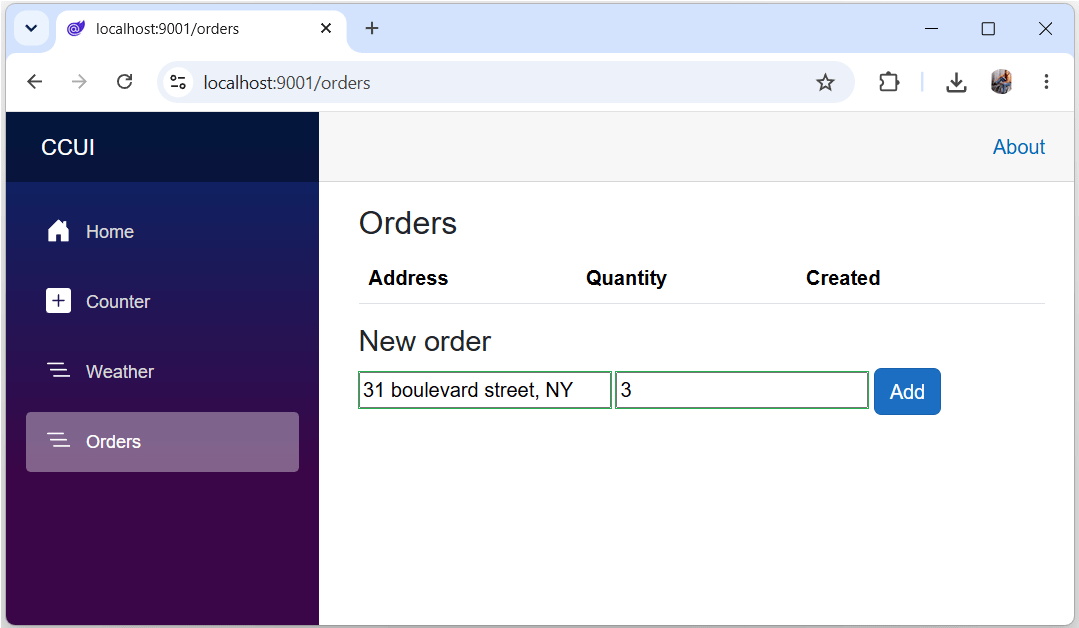
Now, lets open the CCUI app on the browser. It’s url being – https://localhost:9001/. Here I create a new pizza order, for address enter 31 boulevard street, NY and for quantity enter 3. Then click the Add button. This will insert the order to the MongoDB database. See below image:
Next, on the RabbitMQ portal go to the Queues tab to see 3 Queues are created:
- process-order-created
- process-order-deleted
- process-order-updated
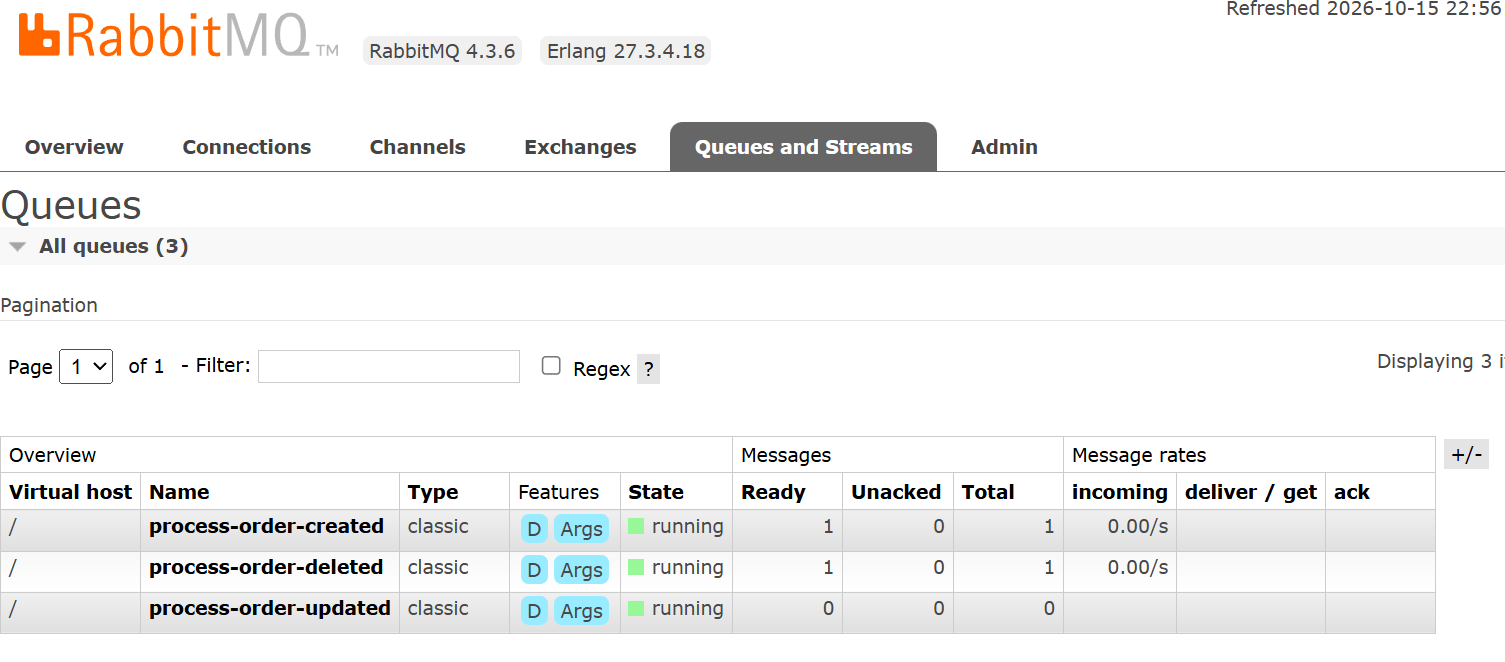
Click on the process-order-created queue to see that 1 message is delivered.
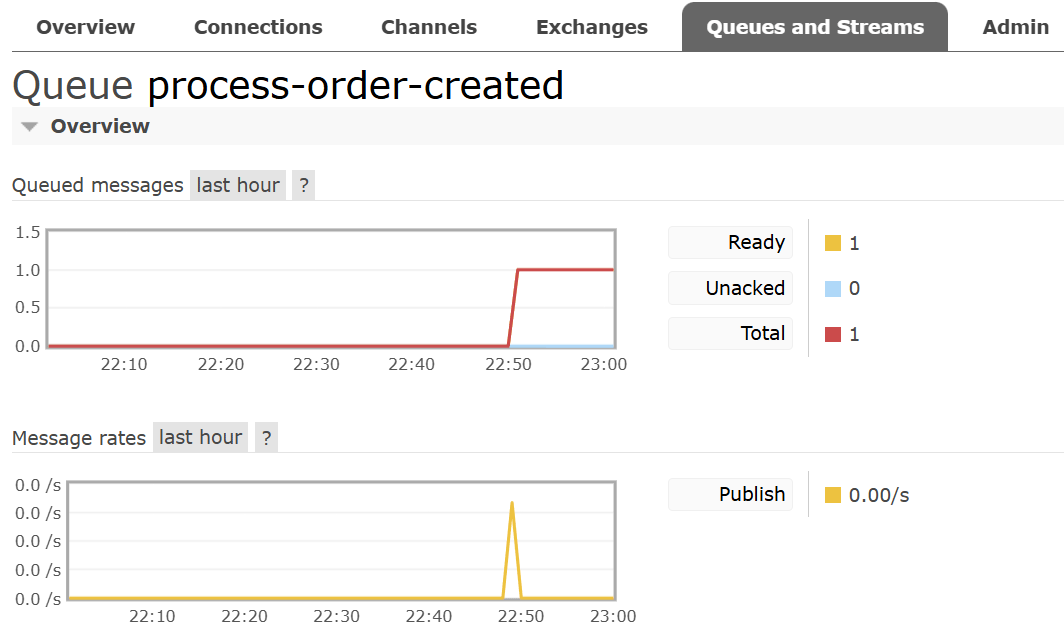
If the consumer microservice is offline, RabbitMQ keeps the messages stored in the queue. When the microservice comes back online, even after an hour, RabbitMQ delivers the waiting messages to the consumer and then removes them from the queue.
Let us test the working of these Microservices one last time. I will do this from the very beginning. First drop both the “Order” and “Process” MongoDB databases. Use MongoDB Compass to do so.
Now, in the Docker Desktop, stop containers of both the Microservices, both MongoDB containers and the container of RabbitMQ. Then delete all these containers.
Finally delete the docker volumes associated with the MongoDB and RabbitMQ.
Now, start both the docker-compose services. The command you already know is docker-compose up -d. I need the CommandCenter and ProcessCenter to run for the first time initially so that the necessary RabbitMQ queues are created.
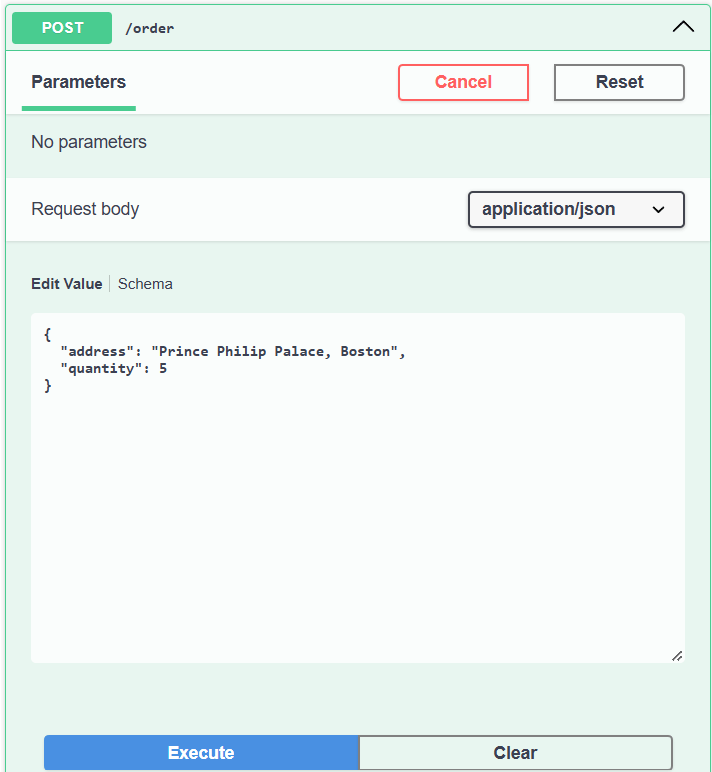
Now the main thing starts. Stop the ProcessCenter Microservice by running the command docker-compose stop. This means only the CommandCenter microservice is running. Now, go to the CommandCenter swagger whose URI is https://localhost:8001/swagger and create an pizza order with Swagger. The order json is given below.
{
  "address": "Prince Philip Palace, Boston",
  "quantity": 5
}
Just click the POST button on swagger and put this json on the Request body json. Then click the Execute button to create this order.
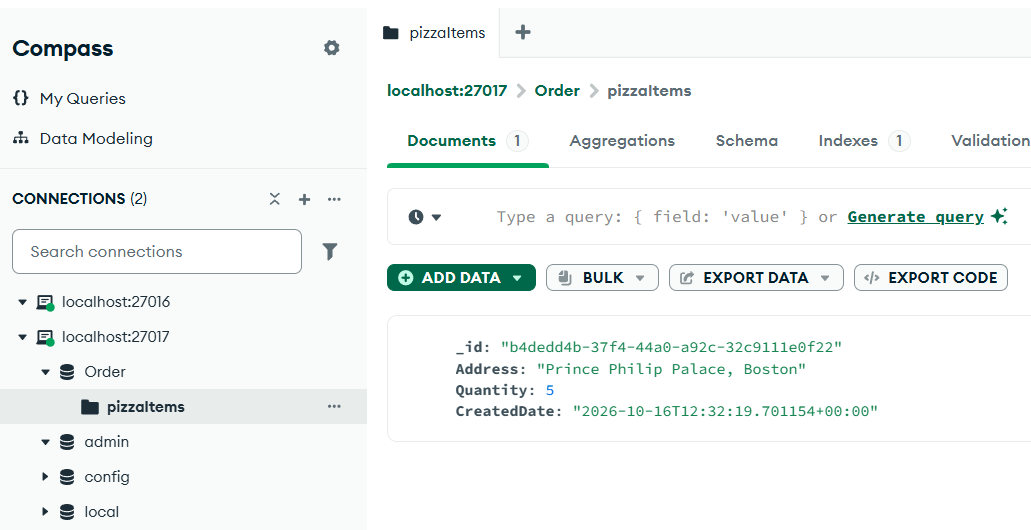
Now open MongoDB Compass and note down the Order Id of the created record, we are going to use it next.
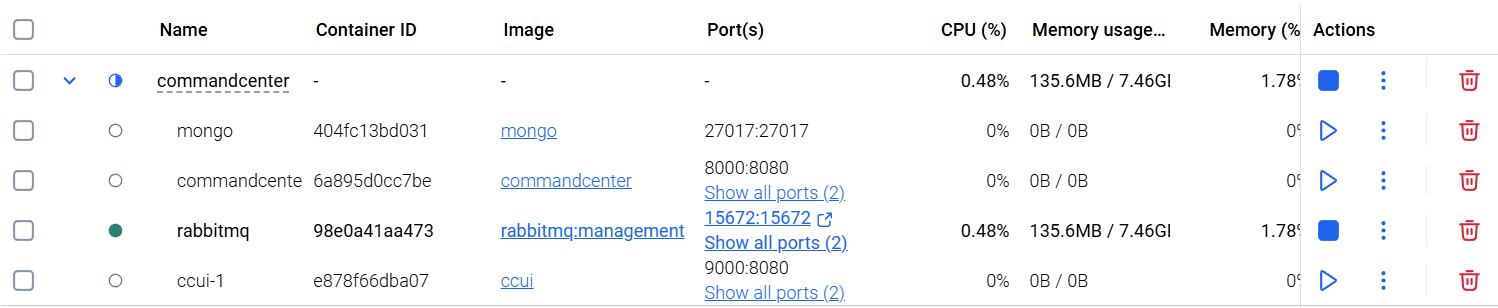
Now, stop the CommandCenter microservice, but keep RabbitMQ running. In Docker Desktop, stop only the CommandCenter container from the interface, as shown in the image below.
Now run the ProcessCenter microservice with the command docker-compose up -d. Then switch to MongoDB Compass and refresh localhost:27016, which is the database of the ProcessCenter microservice. You will see that the pizzaItems collection has been created automatically. Why? When ProcessCenter starts, it receives the pending RabbitMQ message, and the collection is created with the same record we added earlier through the CommandCenter’s Swagger page. See below.
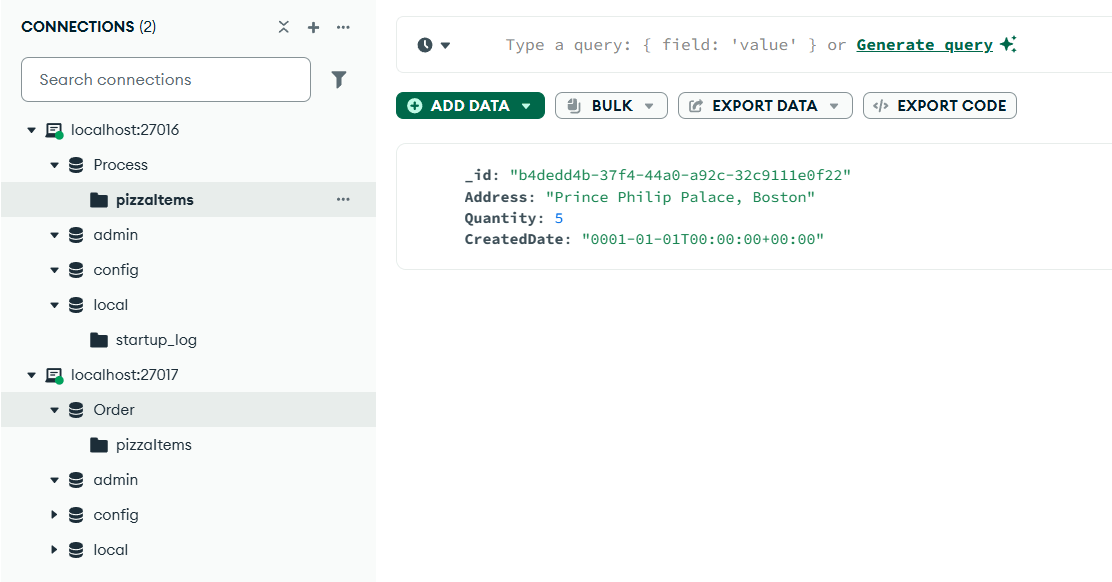
This does mean the data is duplicated across services. However, the duplication is intentional: it allows each microservice to own its data and keep working independently, even when other microservices are down or unavailable.
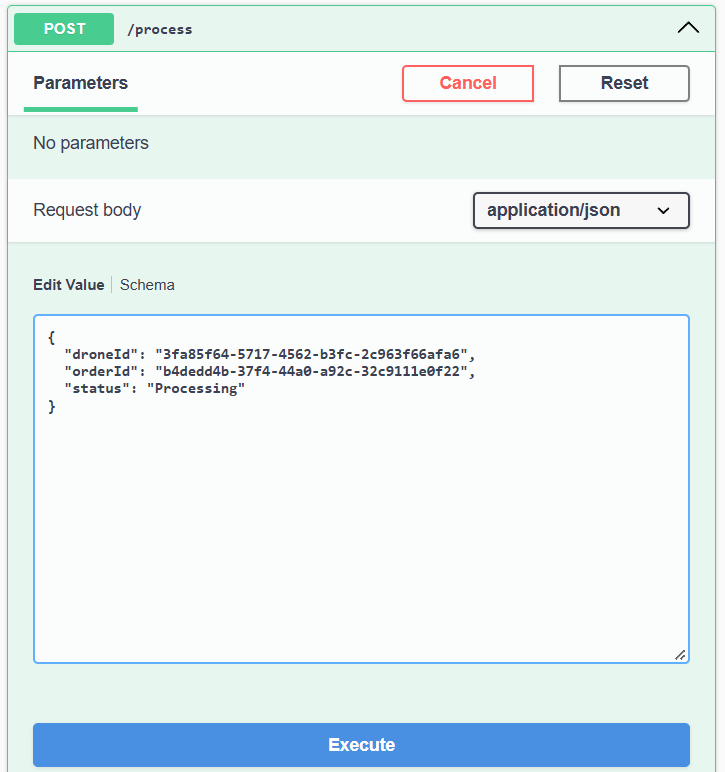
Now I move to the swagger page of ProcessCenter microservice – https://localhost:6001/swagger, click the POST button to add a Process record. You change the order id on this json with your order id and change status to Processing.
{
  "droneId": "3fa85f64-5717-4562-b3fc-2c963f66afa6",
  "orderId": "b4dedd4b-37f4-44a0-a92c-32c9111e0f22",
  "status": "Processing"
}
Click the Execute and this will create a process record.
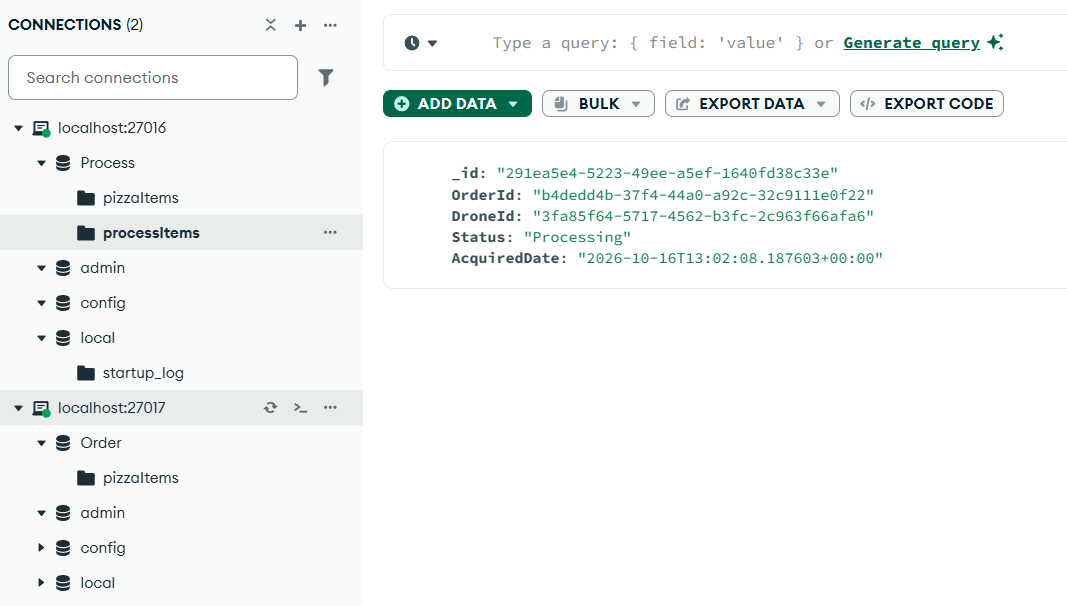
Refresh the database in Compass and you will find “processItems” collection is created inside the Process database.
Now, on the swagger page of ProcessCenter microservice, click the GET button and enter the drone id (3fa85f64-5717-4562-b3fc-2c963f66afa6) for the record we created before. Click the Execute button.
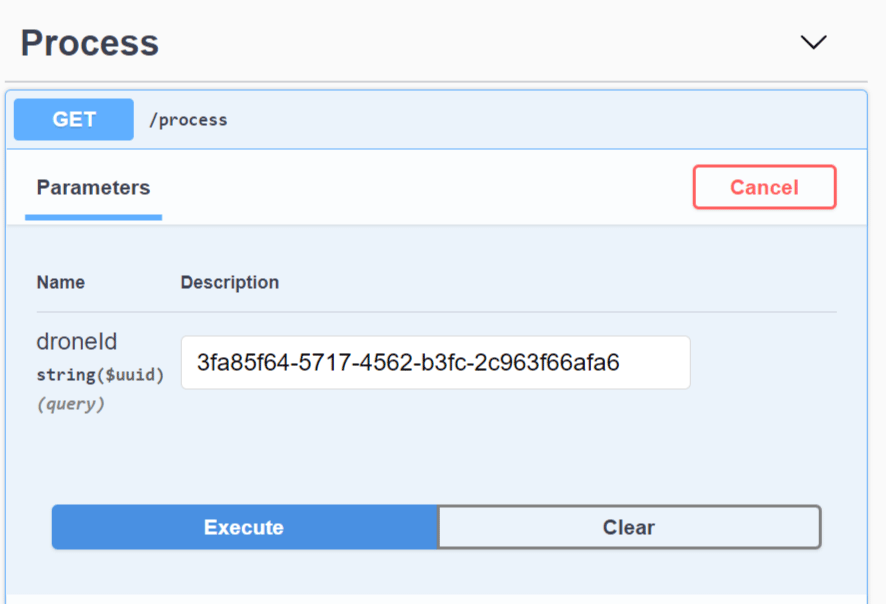
You will see the full order details.
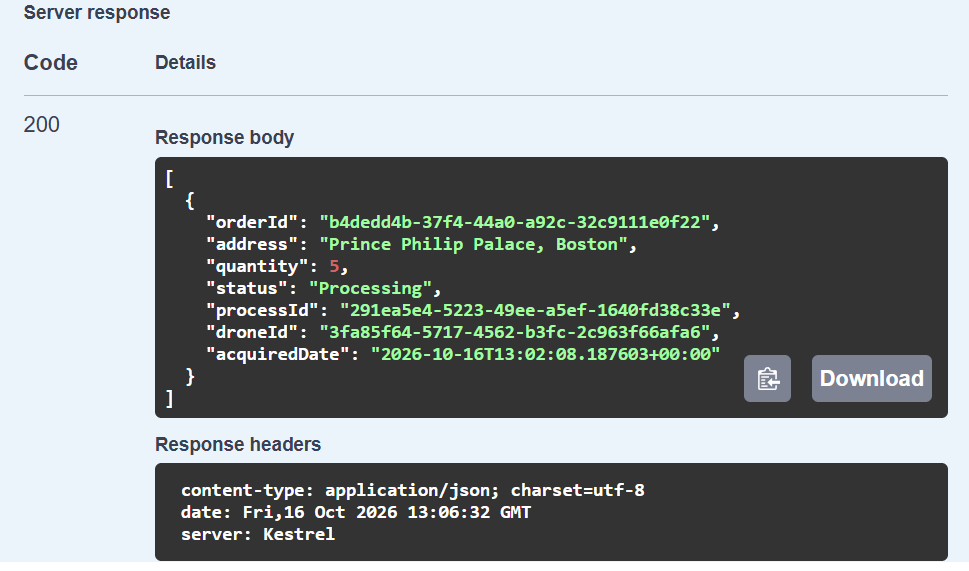
This means if the CommandCenter microservice is down then also the ProcessCenter Microservice will have all the orders. This was not the case earlier when we created synchronous communication between microserivices using HTTPClient Class.
Check the rabbitmq portal to find more exchanges and queues created for different message types send by the producer.
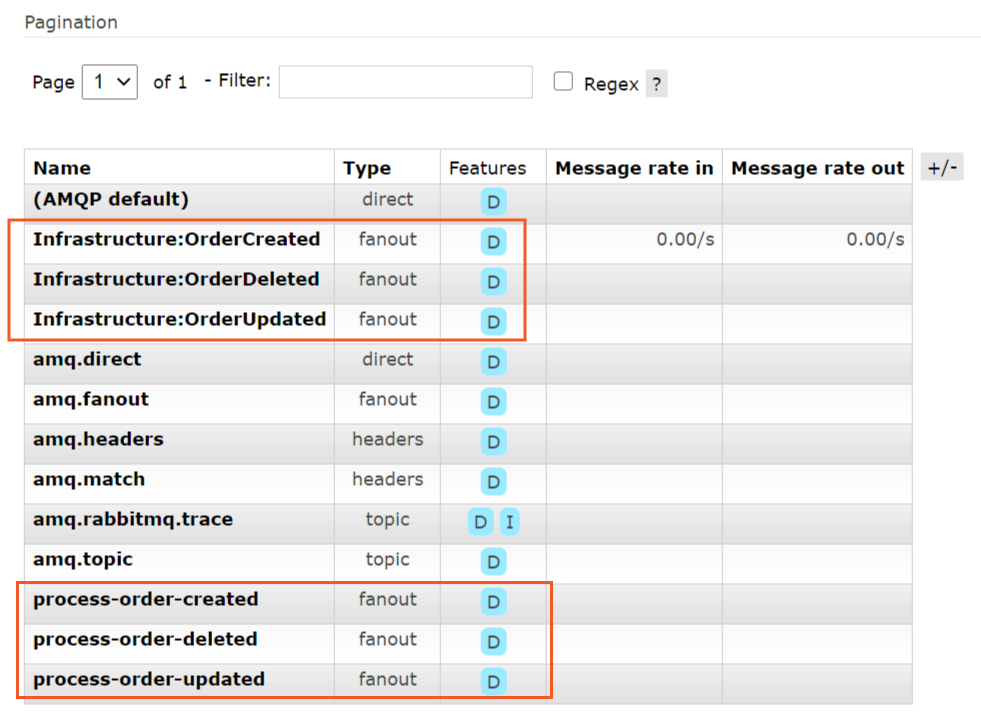

RabbitMQ is successfully transferring messages from “CommandCenter” microservice to “ProcessCenter” microservice.
In this tutorial we covered how to do Asynchronous communications between Microservices using RabbitMQ and MassTransit. We also updated our drone pizza delivery microservices to have producers and consumers of messages. I hope you enjoyed learning it. If you have any comments then use the comments section below.
SHARE THIS ARTICLE


Related Tutorials:


ABOUT THE AUTHOR
I hope you enjoyed reading this tutorial. If it helped you then consider buying a cup of coffee for me. This will help me in writing more such good tutorials for the readers. Thank you.

HELLO EVERYONE
 Welcome to YogiHosting - A Programming Tutorial Website. It is used by millions of people around the world to learn and explore about ASP.NET Core, Blazor, jQuery, JavaScript, Docker, Kubernetes and other topics.
SUBSCRIBE TO NEWSLETTER
Enter your email address to subscribe to this blog and receive notifications of new posts by email.
Join 90K other subscribers